Vacuum booster malfunctions lead to the driver being unable to apply the necessary force for normal operation of the vehicle’s braking system. Thus, there are only three malfunctions of the vacuum brake booster (abbreviated as VUT). This is depressurization of the pipeline (its connection points), breakdown of the VUT check valve, depressurization of its working chambers.
The third reason is quite rare, but the first ones are the main ones. Checking the amplifier is usually not difficult, and even a novice car enthusiast can do it. As for repairs, restoring the tightness makes sense only at joints (clamps); in other cases, as a rule, the entire VUT or its connecting tubes are replaced.
What is VUT and why is it needed?
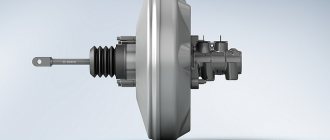
To determine the malfunction of the VUT, it makes sense to describe its purpose, operating principle, as well as the effect of the vacuum booster on engine operation. So, the main task of the “vacuum man” is to increase the physical force (usually 3...5 times) applied by the driver to the car’s brake pedal. This is vital because even a very strong person is not able to create enough force in the hydraulic brake system so that all the brake pads are compressed to the required value at the critical moment. This force is created due to rarefaction of air, and the area in the engine intake manifold is used as its source or is pumped by an additional pump.
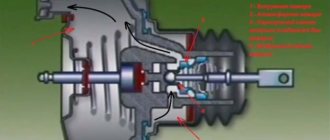
Structurally, the VUT consists of two chambers - atmospheric (on the driver’s side) and vacuum (on the engine side). The vacuum chamber is connected to the intake manifold using an appropriate pipeline. When you press the brake pedal, the vacuum chamber is connected to the atmospheric chamber using a pusher, which has a so-called tracking valve. Next, the diaphragm is connected to the rod and brake fluid is pumped to the brake cylinders. If there is no force on the brake pedal, then under the influence of the return spring the diaphragm returns to its place, the pressure on the brake fluid weakens, which is why the brake pads move apart and braking stops.
VUT device
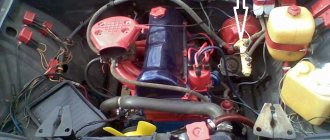
In the simplest case, the vacuum brake booster takes vacuum from the intake manifold. To do this, it is connected to it by an appropriate pipeline. However, in many modern cars there are separate vacuum pumps for the vacuum pump. They come in two types. The first is mechanical, it is driven by the engine camshaft. The second is electric and is driven by a separate electric motor. The use of additional pumps not only increases the comfort of using the braking system, but also increases its reliability (for example, in the event of damage and/or depressurization). But still, the pump is only an auxiliary element, and the main vacuum is taken from the intake manifold.
Signs of VUT malfunction
Partial output of the vacuum brake booster will certainly manifest itself, and from the worst side and quite clearly. So, symptoms of a malfunctioning amplifier include:
- Significant effort when pressing the brake pedal . To feel this for yourself, you can press the pedal four or five times with a known good vacuum seal and the engine turned off. At the last squeeze, the force on the pedal will increase significantly. Sometimes the opposite situation occurs - the pedal is too soft. This indicates “airing” of the brake system.
- The influence of the vacuum booster on engine operation . Since the VUT takes vacuum from the intake manifold, the engine can change its operating mode during braking (although this should not happen in normal mode). This happens because excess air is sucked into the manifold, affecting the composition of the air-fuel mixture.
- The vacuum brake booster hisses . In particular, hissing occurs when the pedal is depressed. A hissing sound clearly indicates the presence of depressurization either in the vacuum amplifier itself (for example, when the diaphragm ruptures), or in its pipeline or in the check valve (for example, when its rubber seals are significantly worn).
- Vacuum pumps knocking . If a mechanical vacuum pump fails, the usual sign of this is a hum emitted by its drive rod (error p1479 may also appear). If an electric vacuum pump is installed on a car, then motorists often experience overheating of its drive motor.
- Knocking noise when braking hard . Moreover, the sound is inertial in nature, since it is caused by the membrane fastening becoming loose.
Accordingly, the occurrence of one or more signs directly indicates to the car owner that it is necessary to check the vacuum brake booster and its components.
- Checking, location, replacement of the vacuum brake booster of the VAZ 2110
Error p1479
In modern cars equipped with an electronic control unit (ECU), an error code p1479 is often generated in the device’s memory - “Brake booster vacuum system mechanical malfunction.” Owners of a wide variety of cars encounter it - Audi, Volkswagen (Touareg, Passat), Ford and others. The cause of an error in the control unit can be very different. For example, when air is sucked in the hose between the intake manifold and the vacuum brake booster itself.
Another common option is the result of measuring the vacuum value with a vacuum sensor. In particular, it occurs if moisture appears inside the vacuum booster and/or its tubes. The solution is to clean and dry the tubes, and in rare cases, replace the sensor itself.
It also makes sense to check the integrity of the fuse going from the control to the sensor. Each machine will have its own electrical circuit, so it is impossible to provide specific information within the framework of this material.
Another option is the performance of the electric vacuum pump. In particular, its electric motor, impeller, bearings, fastenings, connection blocks, as well as relays and fuses.
Malfunctions and diagnostic methods
Brake booster malfunctions have several fatal negative consequences:
Significant reduction in vehicle control during braking cycles. In the absence of the amplifier, the load on the gas pedal increases proportionally - the pedal goes hard, and the braking effect is significantly reduced. For an unprepared driver, such behavior of the car can come as a shock and lead to a traffic accident due to the increased braking distance; If the brakes malfunction, a car loses significant braking potential and becomes practically uncontrollable;
In the video the vacuum booster hisses:
The main signs of a faulty vacuum booster on this model include:
The gas pedal is slow. When moving, the pedal is very difficult to press. This is a clear sign of a malfunction of the amplifier housing diaphragm chamber.
In this case, the car must be operated with great care, since it has lost a certain effectiveness of the braking system;
A sign indicating a faulty brake system lights up on the dashboard at short intervals. This symptom may also relate to other malfunctions in the brakes, but in combination with a tight brake pedal it clearly indicates a faulty booster
The electronic unit of the car constantly monitors all systems for operability (and although on the VAZ 2114 model this unit has not been considered modern for a long time with its functions, it copes with its functions at a good functional level and with high efficiency despite the small number of sensors);
On video how to check the vacuum brake booster of a VAZ 2114:
Deterioration in the braking performance of the system, along with other signs, indicates a direct involvement of a faulty brake booster in the risk of an accident.
This symptom is the main one among all the others; however, operating a car with a very weak brake system is very dangerous - the circuits in this case do not receive additional force and cannot effectively brake.
Troubleshooting most often involves replacing the faulty element with a new unit - this will save repair time, since resuscitation of an old product will require no less time and a slightly lower cost of parts. That is why car enthusiasts most often resort to complete replacement of a failed part.
The cost for the VAZ 2114 model is about 1,500 rubles.
You might also be interested in:
- Vacuum malfunctions...
- Vacuum brake booster…
- Vacuum brake booster…
- The operating principle of a vacuum...
- Replacing the vacuum booster...
- Vacuum booster device
Replacing the vacuum brake booster VAZ 2109 ">
Vacuum brake booster VAZ 2109 ">
Signs of a malfunction of the VAZ 2110 throttle sensor ">
How to clean the throttle valve on a VAZ 2114 ">
Tuning headlights for Niva 21214 ">
Causes of vacuum booster malfunction
The vacuum brake booster and its accompanying elements are fairly simple devices, so experts identify the following main and possible malfunctions of the VUT:
- Depressurization of the vacuum pipeline . It creates a vacuum necessary for normal operation of the braking system. Accordingly, if air is sucked into it from the outside, the VUT will not work. Depressurization (air leakage) due to old rubber can occur in a variety of places - in rubber hoses, joints, clamps.
- Check valve malfunction . Its task is to remove air from the brake system and prevent it from entering both the system itself and the master brake cylinder. The valve itself may be faulty, for example, due to natural wear, or due to significant wear of its rubber seals.
- Depressurization of the working chambers of the vacuum amplifier . This is a fairly rare cause, which most often occurs due to mechanical damage to the VUT. For example, during repairs or an accident.
- Diaphragm rupture . This is a critical failure, since it occurs inside the amplifier itself, and it is usually irreparable and, accordingly, must be replaced. In this case, the amplifier will poison the air and emit a hissing sound.
- Formation of an additional gap in the VUT . The fact is that as a result of the operation of the car and, in particular, the mounting mechanism of the vacuum booster, its membrane moves slightly forward, which actually makes it easier for the driver to press the brake pedal. However, as a result of this, an extra gap appears in the mount, which can sometimes cause a knocking noise during heavy braking. To solve this problem, simply adjust the rod by moving it forward a little. Such repairs are possible both in a garage and in a car service center.
If the car is equipped with an additional vacuum pump, then a fourth fault is usually identified - partial or complete failure of this unit. In this case, the brake system itself will work, but not in optimal mode. In particular, during sharp braking, the force that the driver will need to physically exert on the pedal will increase significantly.
How to check VUT VAZ 2115 for faults?
Inspecting the unit does not require absolutely any tools; it is enough to pay attention to the behavior of the brake pedal when it is pressed. If one day the driver discovers that to stop he needs to press harder on the pedal, then this indicates the need to check the VUT
The procedure is performed as follows:
- Turn off the engine.
- Press the brake pedal several times and lock it in the middle of its stroke.
- Without removing your feet from the pedal, start the car.
If the “vacuum seal” is working properly, the pedal will fall a little, but if this is not the case, then there are some problems with the brake system. As an additional measure when identifying a breakdown, a visual inspection is used, consisting of the following points:
- Check the tightness of the connection between the check valve and the pipe.
- Check the flange for damage.
- Inspect all bends in the pipes and replace them if cracks are found.
- Remove the carpet in the cab on the driver's side and check the protective cap of the shank seal under the steering column; if it sticks, the car may brake spontaneously.
- Remove the protective cap and start the engine, then pump the valve shank several times - the presence of a characteristic hissing indicates a breakdown of the part.
Internal breakdowns of the unit are also possible. Quite often there is a malfunction of the valve, the material of which hardens. Wear of the rubber of the diaphragm can lead to its rupture, then replacing the vacuum brake booster will be the only way out of the situation.
The functionality of the check valve is checked in the following way:
- disconnect the hose from the valve;
- remove the pipe from the VUT rubber seal;
- place the nose of a rubber bulb into the hole in the fitting;
- squeeze the bulb and release it after 4-5 seconds; if the bulb remains compressed, then the valve is working.
How to check the vacuum brake booster
A logical question arises: how to determine whether the vacuum brake booster is faulty. In fact, this is quite simple to do, and without the use of additional equipment, the test can be performed in a garage or even on the street.
The simplest check is performed using the following algorithm:
- With the engine off, it is necessary to pump up the vacuum booster (brake system). This is done by pressing the brake pedal about 4...5 times.
- At the end of the last press, the pedal must be locked in the pressed position.
- Start the engine at idle speed.
- If the “vacuum reservoir” is working properly, then when the engine starts, a vacuum will immediately enter it, as a result of which the brake pedal will move down a little, which will be clearly felt when your foot is placed on it.
- Accordingly, if the pedal does not move and does not respond to starting the engine, then there is a depressurization in the system.
It makes sense to perform another check if the brake system seems to be working properly, but when you press the brake pedal, a change in the operating mode of the internal combustion engine is observed. So, the check is performed according to the following algorithm:
- VAZ 2109: replacing the vacuum brake booster on your own
Disconnect the pipe from the intake manifold.
- Its fitting must be hermetically sealed. To do this, you can use a clamp or a tightened rubber tube with a clamp.
- Start the engine and let it warm up a little.
- Press the brake pedal several times.
- If, at the moment of pressing the corresponding pedal, no changes occurred in the engine operating mode (its speed did not increase or decrease), it means that there is depressurization in the vacuum brake booster system.
- Accordingly, if the engine begins to “choke” when you press the pedal, it means that the “vacuum reservoir” and its system are working normally.
Please note that the described check must be carried out with the car stationary, since in this mode the vacuum brake booster will not work with all the ensuing consequences.
If the check reveals the presence of depressurization, then the next step is to localize the location of the damage. This is not always easy to do, since the crack or leak can be very small and sometimes located in the most unexpected places. However, as a check and preventative measure, it is necessary to check the following elements of the vacuum booster system:
- tightening and general condition of VUT pipeline clamps;
- VUT sealing tube at the clamping points and along the entire length (if possible), often the cause of depressurization is the appearance of a crack in the said tube;
- condition of the vacuum booster check valve seal, this is also a common cause, especially on older cars (for example, VAZ classic).
If the check does not produce results, then it makes sense to simply replace all the vacuum booster tubes with clamps.
Check valve
You can check the VUT check valve using one of two methods. The first of them involves dismantling the specified element, and the second involves holding the brake pedal with the engine running.
How to check a removed brake booster
After the valve is removed, you just need to blow into the fitting that was connected to the amplifier with your mouth or using an air compressor. If the valve is working properly, then air should flow freely. The next step in this case is to draw air from that fitting. Best by mouth. Accordingly, the valve should not let air back in. Otherwise, the check valve is partially or completely damaged and must be replaced. Instead of a mouth, you can use a thick rubber bulb, for example, from a hydrometer.
However, removing the check valve is not the best solution, since the process of removing it can damage the seal of the vacuum brake booster system. It is better to check the brake booster check valve on a car in the simplest way. In accordance with the second verification method, it is recommended to proceed as follows:
- start the engine and let it run for about one to two minutes;
- press the brake pedal all the way and turn off the engine;
- if the check valve is working properly, it will close, since there is no vacuum on the side of the manifold, and a vacuum will remain in the chamber, accordingly, the pedal will not press up (there will be no need to exert additional force to hold it);
- otherwise (if the pedal is pulled up sharply), the VUT check valve is damaged.
As in the case of a pipeline, it is easier and faster to replace the check valve with a new one, since this unit is usually non-removable and cannot be repaired, and its price is relatively low.
Hisses when braking (with video example)
In the following video you can hear this characteristic sound:
By the way, according to the instructions, the standard “vacuum unit” of the VAZ-2110 cannot be repaired, only replaced, but we “do it ourselves.” And judging by the number of different instructions for self-repairing cars posted on the Internet, it can be argued that any domestic car enthusiast with more than five years of experience can safely be awarded the title of design engineer in absentia. Therefore, we will consider the repair procedure, especially since the difference in cost between the repair kit and the vacuum booster itself is disproportionately high.
In any case, first we will have to dismantle the VUT; for this we will need a minimum of available tools.
Tools
- Open-end and socket wrenches in sizes “10”, “13”, “17”;
- Powerful flat screwdriver;
- Repair kit or VUT assembled;
- Sealant and a little desire to do it yourself.
At this stage, we have a choice: either do everything as the manufacturer’s instructions say (disconnect the main brake cylinder from the VUT, unscrewing all the brake pipes from it, and then bleed it) or a little simpler and with little cost (simply moving it away to the side).
In any case, the choice is yours, but I will take the easy way:
- Disconnect the push rod from the brake pedal: Remove the latch and pull out the pin.
- Disconnect the block with wires from the brake fluid level sensor: Disconnect the block.
- In the engine compartment, unscrew the two nuts securing the master brake cylinder to the “vacuum chamber”:
Two nuts at “17”. - Holding the check valve, remove the vacuum pipe from it: Removing the vacuum pipe.
- It is at this point that all “manuals” require disconnecting the brake pipes from the brake pipe, but I suggest unscrewing just one nut securing the brake lines to the passenger compartment and simply moving the brake pipe to the side:
Nut at “10”. - In the cabin, under the instrument panel, unscrew the four nuts securing the brake pedal bracket:
Nuts at “13”. - We dismantle the vacuum booster together with the bracket: Dismantling the VUT.
- Having unscrewed the two nuts securing the pedal bracket and prying it up with a screwdriver, we disconnect it from the “vacuum unit”: Nuts for “17” Repair.
- We purchase a repair kit for VAZ - 2108/2109 in the store:
Contents of the repair kit. - Using a powerful screwdriver and a hammer, carefully flare the vacuum amplifier housing: Flaring.
- Since there is a return spring inside, to prevent the free half from “shooting out”, we tighten the previously unscrewed nuts onto the studs. This is the picture that opened up to us: Aperture defect.
- It will not be possible to disassemble the diaphragm further, since the pins securing it to the body are riveted. We simply remove its cuff from the body with a relatively light movement of the hand: Dismantling.
- You can see for yourself that the catalog number of the “native” and the purchased cuff matches! Catalog number.
- We install the cuff into the diaphragm body, while carefully using a screwdriver to help its edge get into the internal groove: Internal groove of the diaphragm.
- Next, lubricate the seat of the washer on the stud with the corrugation with sealant... Lubrication with sealant.
- ...and the junction of the pedal bracket with the vacuum booster housing: Sealing.
- At this point, the repair of the vacuum amplifier can be considered complete; all that remains is to carefully roll the attachment points of the previously flared halves. Installation of the “vacuum seal” occurs strictly in the reverse order.
This problem occurs when air leaks in the vacuum pipe of the brake booster. It is necessary to check for the presence of leaks both the pipe itself and its connections with the intake manifold and VUT. Since this malfunction causes depressurization of the engine intake system, the air mixture in the third and fourth cylinders becomes depleted and the engine begins to “sputter.” You can learn more about diagnosing this malfunction in this video instruction.
How to troubleshoot
It makes sense to repair the vacuum brake booster system only in the event of partial failure of the booster pipeline, its check valve, or the valve seal. If replacing the listed elements does not produce results, then it is necessary to replace the entire VUT, since its design is non-separable and cannot be repaired.
- Replacing the vacuum booster on a VAZ 2114 with your own hands - step-by-step instructions with photos and videos
Replacing a pipeline with mounting clamps makes sense for several reasons:
- low price of materials;
- difficulty in localizing the location of depressurization;
- Difficulty in repairing cracks or other damage in the pipeline.
Replacing the pipeline itself is not difficult, and even a novice car enthusiast can easily handle it. The main thing is to buy a new set of pipes, clamps and appropriate gaskets from the auto store. Next, using plumbing tools, simply change one tube for another.
Repair of auxiliary pumps
As mentioned above, when a mechanical vacuum pump partially fails, some car enthusiasts simply remove their rod, thereby turning them off and eliminating the knocking noise that occurs when the pump operates. In this case, the brake booster will work, but not as effectively, which will result in a harder pedal. Some car enthusiasts get out of the situation by turning the rod 180 degrees. Sometimes this helps because it is only present on one part of them.
As for electric vacuum pumps, these units are usually irreparable; accordingly, they are simply replaced with new ones.
Vacuum brake booster VAZ 2115
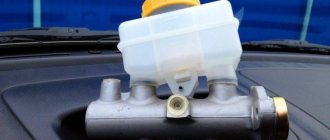
The VAZ 2115 vacuum brake booster is one of the main operating mechanisms of the vehicle’s braking system. The effectiveness of braking, and therefore your safety, largely depends on its serviceability. Therefore, the vacuum brake booster must be checked regularly to detect malfunctions or malfunctions in a timely manner.
Table of contents
Replacement Malfunctions
Replacement
Along with replacing the brake discs, I also changed the vacuum brake booster; although the old one worked, it made hissing sounds when I pressed the brake pedal.
I bought a vacuum called the original, costing 1320, the choice was not the original, it was 150 rubles cheaper, you can’t save on this, and even 150 rubles. the weather will not improve.
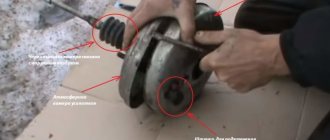
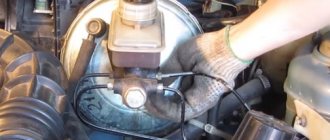
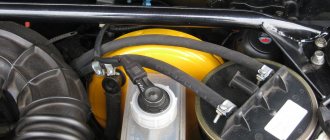
We climb under the hood and begin to release the vacuum seal. For convenience, I removed the air filter housing and moved the absorber to the side. We unscrew the brake pipes suitable for the master cylinder and the two bolts securing the brake cylinder to the vacuum booster (arrows in the photo)
We remove the brake master cylinder and put it aside, you can throw it away if you have a new one.
Then, unscrew the 4 bolts securing the vacuum cleaner bracket to the body
We go to the salon, climb under the pedals, remove the corkscrew bracket securing the vacuum rod to the pedal, disconnect the rod
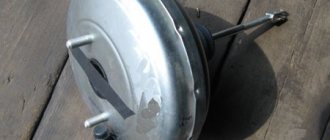
We take out the vacuum booster from under the hood. Now you can work on the ground.
Unscrew the last two bolts securing the vacuum unit to the bracket.
We put the new and old vacuum next to each other, look at them, admire them, rejoice at the new spare part
Then we put everything back together in reverse order, don’t forget to bleed the brakes.
After replacing the vacuum and brakes, as I wrote earlier, I was not completely happy with the result. The reason for this was a faulty master cylinder.
Instructions: bleeding the brake system. How to tighten the steering rack, the material is available at the link. Gearbox diagram https://vz15-up.ru/trn/korobka-peredach-vaz-2115.html#t2.
Malfunctions
Methods and signs of detecting faults in the vacuum brake booster
For example. Start the engine, and after a few minutes, turn it off. Then press the brake pedal a few times with normal force. If the amplifier is working properly, at the moment of the first press, the pedal will be pressed, as expected, all the way. The system will operate, and the created vacuum will attract the diaphragm, which helps push the piston of the master cylinder through the rod.
Next, the valve will equalize the pressure in the chamber with atmospheric pressure. During the second and subsequent pedal presses, there will be nowhere for the vacuum to come from, causing the pedal stroke to become less and less. If no difference is felt between the initial and subsequent pedal presses, then it is clear: this device does not provide additional force in the master brake cylinder.
Following this experiment, it would be useful to perform another one. The engine is turned off. The brake pedal has been pressed any number of times in a row. Her move testified to something. Either the results of the experiment seemed inconclusive, or there was a desire to carry out a control test. The following actions are performed. The brake pedal is depressed, and when the pedal is pressed, the engine starts.
When the vacuum booster is working properly, a vacuum forms in its vacuum chamber, due to which the membrane presses on the rod, the rod pulls the pusher connected to the pedal, and the latter drops slightly.
In the case when the pedal remains in place, the conclusion is drawn: the expected chain of events did not take place due to a malfunction of the vacuum brake booster. Such checks reveal significant damage to the part.
The next test makes it possible to determine the presence of small air leaks. With the car engine running, press the brake pedal and then, without releasing it, turn off the engine. Hold the pedal in the same position for half a minute.
Due to the leakage of the amplifier, the pressure in the vacuum chamber will increase. The diaphragm, under the influence of the return spring, having lost the support of the force balancing its position, will put pressure on the pusher and raise the brake pedal.
The VAZ 2115 vacuum brake booster is one of the main operating mechanisms of the vehicle’s braking system. The effectiveness of braking, and therefore your safety, largely depends on its serviceability. Therefore, the vacuum brake booster must be checked regularly to detect malfunctions or malfunctions in a timely manner.
Checking the vacuum brake booster of VAZ 2115
In order to check the vacuum brake booster, you don’t need any tools, just pay attention to the brake pedal. If you once find that in order to brake you need to press harder on the brake pedal or that the brakes have become less effective, this is a clear sign of a faulty VUT.
1. To check the vacuum booster, stop the car and turn off the engine.
2. Press the brake pedal firmly a couple of times, then stop it mid-stroke.
3. Next, without taking your foot off the brake pedal, start the car.
If the vacuum brake booster is working properly, the brake pedal will fall down a little, but if this does not happen, there is something wrong with the booster or the brake system.
Visual inspection of the VAZ 2115 vacuum booster
1. Check the tightness of the connection between the pipe and the check valve;
2. Check that the flange is not damaged;
3. Next, inspect all bends of the pipes; if you find cracks or wet marks, replace them immediately;
4. If the shank seal, which is located under the steering column, is damaged, the car may begin to brake spontaneously. To check this, take out the mat and carefully inspect the protective cap; if it sticks, it can be assumed that it is faulty.
5. Next you need to remove the cap and start the engine. Rock the valve stem a couple of times; hissing is a sure sign of failure.
6. If you find the slightest hint of a malfunction, replace the vacuum brake booster of the VAZ 2115, given its low cost and simplicity of the replacement procedure, this will be better than hoping for serviceability and risking your own health.
Replacing the VAZ 2115 vacuum booster with your own hands
We will need:
— A set of keys, open-end and socket for “10, 13, 17″;
— Buy a new VUT;
— A couple of hours of free time.
Actions:
1. Disconnect the rod protruding from the vacuum booster from the brake pedal.
2. After this, in the engine compartment it is necessary to unscrew the brake cylinder (TC) from the VUT.
3. Next, many “manuals” recommend disconnecting all the tubes, which supposedly complicate the process of removing the vacuum brake booster. However, I don’t like pumping the brakes, it’s a waste of time, which is already not that much, so I decided that I would do without this item and did it my way.
4. Three of the four tubes coming from the TC are attached to the body; they do not allow the cylinder to be removed from the vacuum. If you unscrew only one nut to “10”, you can easily remove the cylinder from the vacuum.
5. After you have eliminated the obstacle - the brake cylinder, disconnect the hose that goes from the intake manifold to the VAZ 2115 vacuum brake booster valve.
6. Next, you need to unscrew the mounting bracket from the body; for this it is better to have a special cardan, see photo. The vacuum seal itself is attached to the body with four turnkey nuts “13”.
7. When the removal is completed, move the mounting bracket to the new VUT; to do this, you need to unscrew the two nuts to “17”.
Assembly is performed in reverse order. Let us remind you that in the previous article we looked at how to install speakers in the rear doors of a Granta with your own hands. High-quality music is the key to a good mood for the whole day.
–> VAZ Masters / Brakes / Maintenance
VU brakes on VAZ 2115
Functionality check
This instruction will be relevant when checking the vacuum booster on VAZ models from 2113 to 2115. So the technique is clearly universal.
How to check the vacuum brake booster.
- Press the brake pedal all the way to the floor about 4-5 times. In this case, the engine should not be started. Due to these presses, you will create equal pressure in two sections of your vacuum booster. The valve will report problems as soon as you start pressing the pedal. If you hear squeaks while pressing, this indicates a serious malfunction.
- Once the pressure is even, start the engine while keeping the brake pedal to the floor. If the brake booster system is working properly, then the pedal will rise by itself after the engine is started. If this does not happen, then you will definitely have to face repair work.
- If the check shows problems with the amplifier, do not forget to additionally check the quality of the hose fastening and the condition of the flange. When the mount is abnormal, this may result in the brake pedal not lifting.
How to check a vacuum booster
Sometimes poorly fixed fasteners cause quite expensive and actually unnecessary repairs or replacement of the vacuum booster. Conduct a preliminary check so as not to complicate your life.
When to change the amplifier
Brakes are a whole system that consists of many elements. Each of them must function correctly and efficiently.
In addition to checking the vacuum booster itself, you should inspect the condition of the brake fluid pipes, make sure there are no brake fluid leaks, and look at the current condition of the brake pedal.
If no faults were found in the braking system, you can think in more detail about the issue of replacing the vacuum booster.
There is no point in repairing the element. It's easier to start replacing right away. The functionality of the car and the power that your engine is capable of producing depend on the quality and timeliness of the work performed. Lack of power negatively affects the speed and comfort of movement around the city and beyond.
To replace a vacuum booster you will need a certain set of tools and materials. It includes:
- Screwdriver Set;
- Pliers;
- Socket wrench for 13 and 17 millimeters;
- Special wrench for brake pipes;
- New plugs;
- New fittings.
Replacement procedure
Let's get straight to work.
- Removing the vacuum booster can be difficult due to the brake cylinder. Therefore, we advise you to remove it first. Another option is to disconnect the pipes from the brake cylinder and move them to the side for a while. Here you decide for yourself what is more convenient for you.
- The cylinder is not the main problem. It is difficult to cope with the mounting of the vacuum booster. It's just not very convenient to do this. This is the design of the VAZ 2114.
- Start with the valve - remove the hose fasteners from it, remove the support bush, after which you can pull out the brake pin.
- Next, using a 13 mm wrench, all four fasteners of the vacuum booster are dismantled.
- After all the inconveniences of the work done, you can remove the element and get ready to install a new amplifier in its place.
- To do this, you will have to install a special mounting frame. The frame is tightened with a 17 mm wrench, after which the new component is installed inside the car.
- If you want to make your work as easy as possible, do not forget to first connect the brake pedal to the booster with your finger when reassembling it. After this, it is much easier to cope with putting the vacuum seal back into place.
How to disassemble a vacuum brake booster.
Do it yourself! When replacing the vacuum booster, be sure to change the old vacuum hose at the same time. This element is far from eternal, therefore, as it wears out, it will negatively affect the quality and efficiency of the new vacuum seal.
Vacuum amplifier
VAZ 2115 vacuum booster replacement
As you know, the brake system of a current car is a rather complex structure that combines several components and mechanisms. Indeed, there are a lot of details and components here.
Note. It is clear that the braking system or vehicle of these years is qualitatively different, for example, from the vehicle of previous years. And the most important difference, of course, is the vacuum amplifier, which is the most effective mechanism that increases the stability of operation, reliability and durability of the entire system.
The vacuum amplifier or VU fails and there are underlying factors for this. On the other hand, thanks to the ingenious invention of engineers, this unit is made in such a way that it is quite easy to repair, even in your own garage.
Simple in design
Features of a vacuum vehicle
Replacing the vacuum booster VAZ 2115
Let's look at the most important features of this type of vehicle:
- As a rule, the booster is installed on a car near the main brake cylinder.
- The amplifier housing is divided into two components: vacuum, which is located on the side of the main cylinder and atmospheric, located near the brake pedal.
VU design
- A specially designed air intake manifold is needed to ensure that the vacuum chamber has a source for vacuum. It is connected to the camera through a special element.
Intake manifold VU
Note. The VAZ 2115 does not have a diesel unit, but if some cars have one instead of a gasoline unit, an electric pump is also required for normal operation of the vacuum booster.
- When the engine stops, the manifold and valve are automatically separated from each other. Thus, the amplifier can only function when the car engine is running. And in other cases, in fact, it is not needed.
- When any breakdown is observed, the vacuum booster is also disconnected.
Note. This amplifier may stop working even while the car is moving if it detects any damage. But this does not mean that the car will lose brakes. They will still function, although not at their full strength.
- A special monitoring valve is responsible for connecting the atmospheric chamber with the vacuum chamber. After the driver applies the pedal, this valve will begin to monitor the connection with the atmosphere.
- The pushrod, which is installed nearby, is connected directly to the pedal. Its main task is, in turn, to move the follower valve.
VU scheme
- There is another part in the vacuum brake system. This is the diaphragm of the connection body, which is located on the side of the vacuum chamber and is connected to the cylinder rod. Thus, there is a non-stop effect on the brake fluid (brake fluid), carried out using a piston directly on the working cylinders.
- The mechanism also has a return spring, the task of which is to return the diaphragm to its initial position.
Detailed operation diagram of the VU
Note. The advantage of VU brakes is its simplicity. This mechanism works due to the pressure difference formed in the atmospheric and vacuum chambers. At the right moment, this same difference affects the pusher, and it continues it, transmitting it to the piston rod of the master cylinder.
Self-replacement of the vacuum booster on a VAZ 2114
First you need to figure out what this vacuum amplifier actually is.
- This is a casing within which the valve is located. The element is structurally divided into two parts, which are separated by a layer of rubber - the diaphragm;
- One part of the amplifier is atmospheric, and the second is vacuum - it is connected to the inlet pipe from the power unit;
- The amplifier valve is a plastic casing containing the main elements that are subject to wear. It is because of them that the operation of the gearbox is disrupted. To be more precise, the gearbox begins to rattle;
- The composition of the valve is as follows: there is a rod on the bushing, adjacent to the buffer and piston. There is also the valve itself on the pusher and return springs with a filter.
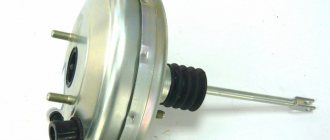
Appearance of the device
Causes of failure
So:
Note. It is important to remember that when this mechanism exits normal operation, the brakes continue to do their job. This is one of the advantages of such a system. In such a situation, the driver of the VAZ 2115 will simply have to apply a little more force to the brake pedal. On the other hand, there may be some difficulties with the controls, but they are minor.
- One of the reasons for element failure may be a rupture of the hose or even a crack in it. As you know, this same hose plays a very important role, connecting the power unit manifold and the amplifier. If a hose ruptures or other problems associated with it, the entire system depressurizes.
Checking the VU hose
Advice. To be able to determine that this is depressurization is not difficult. The characteristic hissing sound is evidence of this. The vacuum amplifier tends to hiss in this case.
- Depressurization is eliminated in the following way: the hose is inspected, breaks and cracks are wrapped, clamps are carefully checked, which can also be relaxed.
- Another reason for the failure of this mechanism is the rupture of the diaphragm located directly inside the mechanism. If air begins to escape from the valve, then this is a symptom.
Checking the operation of the amplifier
To check the functionality of this element, it is recommended to do the following:
- Press the brake pedal several times (5-6) when the car is not yet started. Thus, by pressing the brakes, we create the same pressure in both cavities, close to atmospheric.
- Hold the pedal with your foot and start the engine. If the vacuum booster is working properly, the pedal should move forward randomly.
- If the pedal does not go forward automatically, then you need to check the fastening of the hose tip, as well as other points that negatively affect the efficiency of the amplifier.
- If nothing helps, then the vacuum booster is damaged and needs to be replaced.
Replacing mechanisms
To start replacing the vacuum booster, you first need to arm yourself with the necessary tools and materials:
- Screwdriver and pliers.
- Keys 13 and 17.
- Brake fluid.
- Rubber caps and special plugs.
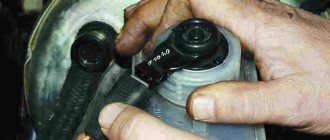
Removing the brake master cylinder
In some cases, dismantling the vacuum booster is not necessary. It will be enough just to replace the master cylinder.
Note. We can say this: if the brake pedal on a car with a vacuum booster becomes softer, and pumping out air pockets from the entire system does not lead to anything, the master cylinder will need to be replaced.
So:
- The block with wires is disconnected from the brake fluid level regulator.
- We take the key 10 and begin to unscrew the fittings from the master cylinder one by one.
- We put plugs on the brake pipes and cylinder.
We put plugs
Note. Plugs make it possible to avoid air penetration into the brake system, so as not to pump out the plugs later, which is not so easy.
- We take a 17mm wrench and unscrew the two nuts that secure the cylinder to the vacuum booster.
- Remove the cylinder.
- We install a new one.
Amplifier replacement
So:
- We again disconnect the block with wires from the regulator.
- We remove the fittings.
Replacing the vacuum booster on a VAZ 2115
Note. The brake master cylinder may not be removed. It will be enough just to disconnect the fittings on the left. Then you will need to move the cylinder to the side.
- Disconnect the hose from the valve.
- We remove the bracket from the interior side that locks the brake pedal pin.
- We remove the finger.
- We take a 13mm spanner and unscrew the 4 nuts that secure the vacuum booster to the car body. We dismantle the old amplifier.
Removed brake booster
Note. In the process of this work you will have to suffer a lot, since this is not the most convenient work.
- We screw the mounting frame onto the new VU using a 17 key.
- We carry out the assembly, remembering that it is recommended to first connect the brake pedal and the VU using a special pin, and only then screw it in completely.
Replacing the vacuum booster in a VAZ 2115
Advice. It is better to immediately change the vacuum hose, since with prolonged use it loses its elasticity and flexibility. As a result, cracks and even fractures occur.
Add a commentAdd a comment We recommend readingVAZ 2110: replacing a car's vacuum boosterVAZ 2109: replacing brake fluid and some nuancesReplacing the rear brake pipe of a VAZ 2109 and all about itVAZ 2109: how to bleed the brakes with a partner
How to change it yourself
Let's look at how to change the VUT using the example of the VAZ 2110, 2111, 2112. The design of the system is quite monotonous, therefore, after watching the video, you can replace the vacuum brake booster of the VAZ 2114 and many other cars.
- Remove the low brake fluid level sensor connector.
- Unscrew the 2 bolts 17 securing the brake cylinder to the VUT body. There is no need to unscrew the lines, just move the cylinder with the tank a little to the side.
- Disconnect the vacuum hose from the check valve. Check the condition of the valve and install it on the new brake booster.
- Unscrew the 4 bolts securing the VUT to the engine shield. The working space in the area of the pedal assembly on the interior side is limited, so an extended socket, extension and ratchet are best suited for unscrewing.
- Disconnect the brake sensor connector.
- Pull out the VUT along with the mounting bracket and the brake pedal.
- Using pliers, remove the locking plate of the brake pedal lever rotation axis.
- Pull out the “finger” that secures the VUT pusher in the lever.
- Unscrew the 2 nuts securing the vacuum body to the bracket.
All you have to do is replace it by installing a new amplifier and assembling all the elements in the reverse order of dismantling.
Be sure to correctly install the sealing gasket between the brake cylinder and the housing, if one is present in the design of the vacuum brake booster of your car.
Design options
On some cars, to replace the vacuum seal, you must first disconnect the booster pusher from the lever in the car's interior. As we see in the GAZelle example, this can be done in two ways:
- unscrew the bolt of the fastening element connecting the pusher and the pedal lever;
- loosen the adjusting nut, and then unscrew the pusher from the fastening element. The peculiarity of this method is that after replacement the pusher must be screwed in the same number of turns. To do this, you need to either measure the distance from the edge of the pushrod to the adjusting nut, or count the number of turns. Otherwise, you will not be able to accurately install the adjusting nut on the pusher of the new amplifier.
Why do you hear a hissing sound when you press the brake pedal?
Most drivers react sensitively to various sounds that accompany the operation of car mechanisms.
An exception is the case when a hissing sound is heard when you press the brake pedal. But it is not always worth panicking - especially in cases where the hissing of the brake pedal when pressed does not in any way affect the efficiency of the braking system. In order to understand the nature of this sound, let's take a closer look at the operation of the vacuum brake booster.
Vacuum booster circuit
Diagram of a vacuum amplifier for a car
The figure shows only a simplified diagram of the amplifier - the details of the device, as they say, are “omitted” - to make it easier to understand.
What happens when you press the brake pedal while the engine is running?
The brake pedal pusher simultaneously affects the booster rod and the so-called follower (in the diagram - “air” valve).
At the moment when the pedal travels, when you press the brake, you can often hear a hissing noise emitted by the air entering the amplifier housing. When the driver takes his foot off the brake pedal, the master cylinder piston and diaphragm rod return to their original position under the influence of the return springs (the vacuum booster return spring is not shown in the diagram). At the same time, since the follower valve opens only to release air (due to the fact that the driver stops pressing the pedal), it is squeezed out of the cavity by the same return spring - it also presses on the diaphragm.
While the driver does not press the pedal and the engine is running, a vacuum is maintained at all times on the side of the master brake cylinder in the amplifier cavity. The monitoring valve is closed, so the diaphragm is in a state of “equilibrium”, i.e. does not have any effect on the master cylinder rod.
Of course, this is only a general diagram of the operation of a vacuum brake booster, typical for all cars. On modern machines, it can be equipped with solenoids that increase the force on the master cylinder piston, and electric pumps can be used to extract vacuum. However, the operating principle of the amplifier remains the same.
Let's now consider how you can check whether everything is in order if, when you press the brake pedal, you hear a hissing sound from its side.
Assembly and processing of the product
Before processing and assembly, it is necessary to thoroughly clean all parts of the VUT, and if necessary, replace them. The working parts can also be washed in regular gasoline; this is done with all elements of the amplifier except the common sealing ring, and after that the parts can be dried with a stream of air. Next, the amplifier is adjusted and assembled; first, a ring and cuff are inserted into the base, and then their location is fixed. The housing is secured to the device, and then it is advisable to lubricate the diaphragm with talc and install it on the housing flange. Now the support ring is inserted into the diaphragm, and the product itself is inserted into the shell of the support disk. This operation will be common for both Moskvich and VAZ 2109, since the design of the amplifier is the same everywhere.
It is advisable to coat the central valve with molybdenum disulfide, and after that it is necessary to remove excess of this powder from the part. Now you can put the support washer on the valve, and then install the valve on the washer to fix it. Next, you should insert a diaphragm into the assembled assembly, install a spring and a plate, and then insert the rod itself through the holes. A technological special screw connects the rod and the body, and the overall surface of the body must be treated with lubricant. The cover with the valve is assembled, the spring is installed and the ring is put on, and then the cover and body are assembled.
Operating principle of a vacuum booster
The cover is connected to the housing base, the amplifier is removed and installed on a stand for adjustment. The thread of the general adjusting screw is lubricated to protect the product from self-unscrewing, and the screw must fit into the rod until the piston moves inside the amplifier. The adjusting bolt is lubricated to protect against self-unscrewing, and then screwed into the rod. The pusher is inserted into the body of the common piston and the sleeve is screwed in until it stops. Now the filter and cover are installed, the locknut and fork are screwed onto the thread of the pusher. Next, the amplifier still undergoes a series of tests on a special stand required to control operation.
Vacuum booster diagnostics
If the brake booster does not work, it becomes noticeable - the brake pedal becomes hard.
But an indirect sign of a malfunction can also be a change in idle speed when the pedal is pressed. This is due to a lean fuel mixture caused by “excess” air entering the engine cylinders, which may even stall if the “suction” is too strong.
If the brake booster does not work, this becomes noticeable as the force required to press the pedal when braking increases.
Most often this is due to damage to the brake booster diaphragm. And it’s not necessarily due to old age - sometimes the sealing rings of the main brake cylinder leak brake fluid, and it gets into the booster housing.
Some car owners manage to rebuild the brake booster themselves - they even sell repair kits for domestic cars. But, in general, this is a thankless task - the body of the “vacuum generator” is non-separable, and not everyone can carefully and tightly connect its parts. In addition, the operation of the brake system is also affected by adjusting the protrusion of the “vacuum rod” from the housing - incorrect adjustment can reduce the efficiency of the booster or cause incomplete “release of the brakes” of the working brake cylinders.
Didn't find the information you are looking for? on our forum.
If you find an error, please select a piece of text and press Ctrl+Enter.
We recommend reading:
Where is the mass on the VAZ 2114 Dimensions on the VAZ 2114 are missing Starter torque on the VAZ 2110 How to replace the deflectors on the VAZ 2114 VAZ 2115 cons and pros The cooling fan of the VAZ 2114 injector does not turn off, causes of the malfunction How to tighten the belt on the VAZ 2114, manual with photo Coolant temperature sensor on the VAZ 2112 – 16 valves where it is located, how to diagnose...