The power plant of a car is a rather complex device, consisting of many mechanisms and systems that interact with each other. The basis of any engine is the cylinder block and its upper part - the cylinder head.
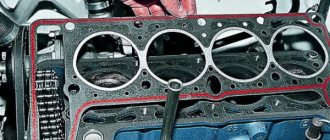
Structurally, it was not possible to connect these two parts without placing a gasket between them to ensure tightness between the specified elements of the power plant, as well as to ensure the connection of the channels of the lubrication and cooling systems so that the working fluids do not mix and do not penetrate the cylinders. At the same time, the gasket must perform its functions under very difficult conditions - high pressure, significant temperature, exposure to oil and coolant.
Any cylinder head (cylinder head) gasket consists of many layers, including sheet steel, cardboard, fiber, and cork. All these layers are well compressed and covered with a layer of sealing substance.
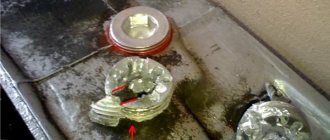
Despite the material the gasket is made of, there is always the possibility of its breakdown. And if you do not pay attention to such a malfunction in a timely manner, it can lead to significant damage to the power plant and major repairs with the replacement of the cylinder-piston group or cylinder block.
Signs of gasket failure
Signs of a cylinder head gasket failure
The main signs of gasket failure are:
- the appearance of a white emulsion on the dipstick when checking the oil level. This deposit on the dipstick means that the gasket has ruptured between the holes through which oil and coolant pass;
- thick white smoke. Indicates that there is a breakthrough in the gasket between the hole through which the coolant flows and one of the cylinders. In this case, the white color of the exhaust gases is given by the evaporating liquid that has entered the cylinder. Additionally, placing your hand near the exhaust pipe while the engine is running will help you verify that the gasket is broken. The coating remaining on the hand should be tasted on the tongue - if it is sweet, then the liquid is getting into the cylinder;
- the presence of oil stains on the surface of the coolant in the expansion tank. Multi-colored oil spots will indicate that, as a result of a breakdown, oil began to enter the channel with the passing coolant;
- bubbles in the expansion tank when the engine is running. This sign will indicate that, as a result of a gust, exhaust gases penetrate into the coolant channel;
- a sharp whistle when the engine is running, accompanied by oil leaks on the cylinder block. This is the clearest sign that there has been a breakdown of the gasket with an outlet. It occurs rarely, often after the engine has been modified with preliminary removal of the head;
- the most hidden type is a breakdown between the cylinders. There are no particularly obvious signs, except for a drop in power and an increase in fuel consumption, which may be the result of a malfunction of other mechanisms. Only a compression test will help verify the presence of such a breakdown, and even then not always. The same misalignment of the valves can give such symptoms;
If such symptoms appear, the only option for eliminating this malfunction is to replace the cylinder head gasket of the VAZ 2114.
It is noteworthy that this gasket is disposable and is replaced every time, so any modification to the engine associated with removing the head must be accompanied by a replacement.
Tightening torque of the cylinder head VAZ 2114 8 valves: correct operation with a torque wrench
A tool such as a torque wrench, which allows you to tighten bolts with equal force, requires great care in operation and certain skills.
Torque wrench
An approximate sequence for tightening bolts with this wrench is as follows:
- set the holder to the “zero” position;
- begin smooth rotation of the instrument, while simultaneously monitoring its readings;
- if the tool rotates (especially at the initial stage of tightening) without changing the torque on the indicator, this may indicate a slight internal stretch of the fasteners. This phenomenon is absolutely normal and the rotation of the tool should be continued;
- When the tightening torque corresponding to the required one is reached, the movement of the tool should be stopped.
Bolt tightening
Instead of using a torque wrench, you should not use any other tool (including a mechanized one, with the ability to regulate the tightening force). After all, only with a wrench can you achieve absolutely precise and smooth tightening of the bolts, thanks to which the gasket will be evenly pressed over the entire surface of the block. This will help maximize its service life, avoid burnouts, oil leaks and coolant leakage.
Necessary tool
Engine repairs involving gasket replacement, although labor-intensive, can be done independently if you have the necessary equipment at hand.
Everything you need to perform the operation is listed below:
- sets of open-end and socket wrenches (you will especially need keys for “10”, “13”, “17” and “19”);
- a set of heads of the same dimensions, as well as a special “Torh” head;
- torque wrench;
- screwdrivers;
- pliers;
- containers for draining technical fluids;
- rags;
- sealant;
Sequence of repair work
Installing the cylinder head
Also need a new head gasket and valve cover gasket. Having all this, you can begin the renovation. The sequence of actions for repairs is as follows:
- The car is placed in the garage, the gearbox is set to neutral, and chocks are placed under the rear wheels. The first thing that is done after setting up the car is to de-energize the on-board network by disconnecting the “-” terminal from the battery.
- The pressure in the fuel system is relieved. For this purpose, there is a control valve on the fuel rail in the form of a regular tire valve. You need to place a container under this valve and clamp the spool. When the pressure is released, gasoline will leak out. You will also need to drain the coolant using drain plugs.
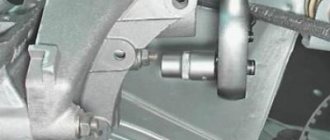
- On the engine, you need to set the piston of the 1st cylinder to the TDC position. To do this, remove the protective cover of the timing belt and rotate the crankshaft until the marks on the pulley, camshaft and flywheel match.
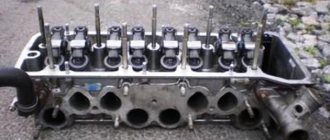
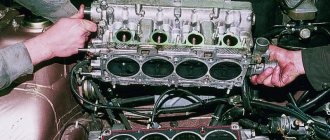
- The next step is to remove the valve covers. To do this, all pipes, the throttle drive rod, the accelerator drive bracket and the valve cover mounting nuts are disconnected from the cover fittings.
- The exhaust pipe of the exhaust gas removal system is disconnected from the exhaust manifold. These works are carried out under the car.
- The wiring is disconnected from the mass flow sensor, the air supply pipe to the throttle assembly is removed, after which it is completely dismantled along with the air filter housing.
- Then you need to disconnect from the head all the elements suitable for the head - pipes of the cooling system of the throttle assembly, vacuum booster, throttle drive linkage, ground wires, bracket for the exhaust manifold supply pipe.
- The intake manifold strut mounts are also loosened, and the struts themselves are removed. Next, the wiring is disconnected from - oil pressure sensors, coolant temperature and throttle position sensors, XX regulator, injectors, high-voltage wires from spark plugs.
- Then the timing belt is removed. Before this, you need to once again check the alignment of the marks on the crankshaft pulley and the timing gear. After this, the belt tension is loosened and it is removed from the timing gear.
- To remove the camshaft gear, you will need to fix it through the technological holes and unscrew the fastening bolt. You need to remove it from the shaft carefully so as not to lose the key. After this, you will need to remove the rear cover, located behind the removed gear, from the head and block.
- The cooling system pipes are removed from the head along with the thermostat from the head, as well as the rest of the wiring. The fuel supply and drain pipes are also disconnected.
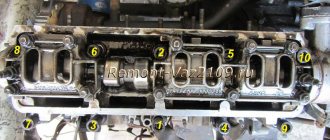
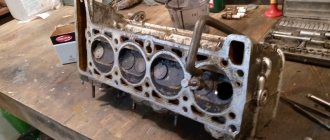
- All that remains is to unscrew the head bolts. But to do this, they must first be weakened, and in a strictly defined order. And only after relaxation do they completely unscrew. If disassembly is done correctly, after removing the bolts, you can remove the head and remove the damaged gasket. At this point, the first part of the repair is considered complete.
Assembly Features
Before assembly, you should check the bolts securing the head to the hood; their length should not be more than 13.5 cm; if they are longer, they can no longer be used.
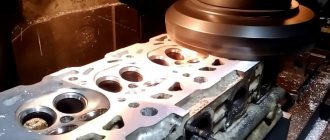
You should also check the flatness of the head. If it was overheated, it is possible that it was warped and will require repair in the form of trimming the plane.
During assembly, the head bolts are tightened in a certain sequence and with a strictly defined tightening torque. Next, everything is assembled in the reverse order of disassembly.
Disassembly is also carried out in the same sequence if the power plant is being modified.
We have problems again... About a week ago the car started complaining about the low coolant level, I thought it was leaking again from under the expansion tank. I opened the hood and everything was dry. I was a little surprised, topped up the coolant and drove on. A couple of days ago, sitting in the car in the evening, I began to freeze, turned on the heater, and it blew cold air while the car was idling. o_O I start accelerating to about 2000, warm air begins to flow. Yesterday I was driving home along the highway, outside the city, and the on-board engine shows me 96-97 degrees of coolant, and this at a speed of 100 km/h! o_O I drove up to the house, stopped, turned off the car and heard the cap of the expansion tank whistling, releasing pressure, while the tank itself was quite swollen. I thought it was just because of the heat, somehow hoping for the best, believing that it was just an air lock. Yesterday evening I wanted to warm myself up in the evening again, and again the stove blew cold...