08.07.2019
| (Votes: 1, Rating: 5) |
Issues discussed in the material:
- What is the working principle of a vacuum brake booster?
- How to check the operation of the vacuum brake booster
- How to adjust and repair VUT
One of the most important parts in a car's brake system is the vacuum booster. Its operation allows reducing the effort exerted by the driver when pressing the brake pedal. The efficiency of the braking system remains unchanged. Like any other machine part, the vacuum brake booster (VBR) is subject to wear and tear, which means it can fail during long-term use. Therefore, it is necessary to periodically check the VUT. We will tell you how to check the vacuum brake booster below.
Operating principle of a vacuum brake booster
Previously, passenger cars were not equipped with vacuum cleaners. The driver was required to press the brake pedal, exerting significant physical effort (about 80 kg) in order to slow down the car during emergency braking. Today, vacuum brake boosters are installed on all cars, and the driver only needs to press the pedal lightly to stop the vehicle.
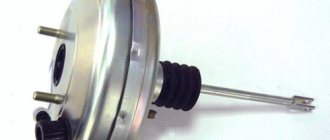
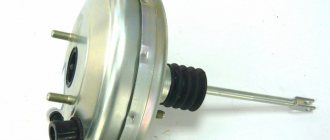
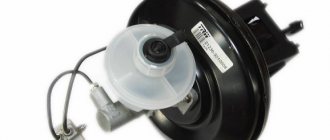
To correctly and timely check the VUT, it is necessary to understand its design and understand the principle of operation. The vacuum amplifier is a cylindrical metal housing consisting of the following elements:
- the diaphragm, which is pushed by the return spring;
- an air valve with two channels - vacuum and atmospheric;
- rod located in the center of the VUT body. At one end it is connected to the brake pedal, at the other - to the master cylinder (GTC);
- pipe that is connected to the check valve. It supplies vacuum from the engine intake manifold.
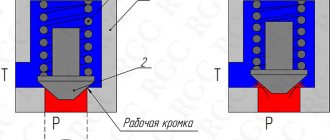
The cylindrical body consists of two chambers: vacuum and atmospheric. They are separated from each other by a membrane. Both chambers are connected by air valve channels, which alternately open when the brake pedal is pressed and released.
Let's consider the operating algorithm of a classic vacuum brake booster:
- If the brake system is not activated by the driver, then the pressure in the chambers is the same, therefore, both the pusher and the rod remain stationary.
- When the driver presses the brake pedal, the rod moves forward. At this moment, the connection between the two chambers through the vacuum channel is disrupted. The passage that connects the atmospheric chamber and the outside air is opened using a valve.
- The pressure difference causes the diaphragm to bend towards the vacuum, helping to press the pusher and the piston of the main hydraulic cylinder.
- The moment the driver stops pressing the brake pedal, the valve closes the atmospheric channel and opens the vacuum channel. As a result, the pressure in the chambers is equalized, and the spring pushes the membrane back to its original position.
Reference. Some car models use a separate brake system vacuum pump to create vacuum. This scheme is effective at low atmospheric pressure (for example, in high mountains).
We recommend
“Which brake fluid to choose: a review of domestic and foreign manufacturers” Read more
My engine misfires when I press the brake pedal
An internal brake booster leak can manifest itself as an engine misfire.
If the internal valve or diaphragm fails, it can cause poor air/fuel ratio and misfire when the brake pedal is pressed, usually at idle.
If you know the vacuum hose, check valve and intake manifold fitting are in good condition, use this simple test to check if your brake booster is misfiring:
- Start the engine and let it idle.
- Apply the parking brake.
- Cover part of the hose with a rag.
- Have an assistant press the brake pedal.
- Disconnect the hose with pliers, using a rag as a protector to prevent damage to the hose.
If the engine idle smoothes out and the misfire stops, the brake booster is causing the misfire and needs to be replaced.
You can use a vacuum gauge to check the vacuum level in the brake booster motor.
Reasons for checking the performance of the vacuum brake booster
The car's braking system will not completely fail, even if the booster breaks down, but the driver will have to make much more effort to slow down the car. A clear sign of VUT failure is that the pedal becomes “hard” and braking efficiency drops sharply. This leads to a dangerous situation on the road.
In addition, other signs appear:
- free play increases to half;
- the operation of the power unit becomes unstable, this is especially noticeable at idle;
- the brakes “stick”, that is, the car continues to slow down even when the brake pedal has already been released.
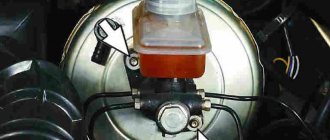
Important. The VUT check must be carried out only when the car engine is running, since the amplifier can operate correctly only when vacuum is supplied from the engine.
Consider the reasons why the above damage to the vacuum booster may occur:
- the connection of the vacuum hose is loose, or air is leaking through damage in the hose;
- loss of tightness due to wear of the diaphragm;
- air valve failure;
- depressurization of the housing;
- decrease in spring elasticity.
You can seal the connection and replace the pipe yourself, just don’t forget to check the “vacuum seal” for functionality. However, if the check shows that the amplifier is broken, then the entire mechanism will probably have to be replaced.
We recommend
“Checking the hand brake: signs of malfunction and their elimination” Read more
What are the signs to identify a faulty VUT?
During the operation of a vehicle in which a vacuum brake booster is installed, one should not ignore the tightness of the structure of the booster itself and the hoses leading to it. Here are some signs of a malfunction that will help the driver always keep the situation under control:
- the driver has a need to apply more effort when braking in order to achieve the same efficiency;
- reducing the brake pedal travel;
- the car continues to brake even after the brake pedal is returned to its original position;
- there is a “suction” in the vacuum hose, and therefore there is unevenness in the speed of the power unit;
- when braking, extraneous sounds like hissing are heard;
- VUT completely “refuses” to work;
- fuel consumption increases when operating the vehicle in normal mode;
- the car suddenly begins to “tweak”;
- Candles don't work.
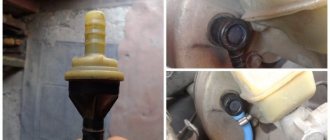
Checking the brake booster valve
The vacuum brake booster may not work well due to a faulty check valve. To check its functionality, remove the hose, remove the valve from the brake booster housing and place a rubber bulb on it. It must be connected from the outside (from the side to which the hose is connected). Next, the pear should be squeezed and released. A compressed bulb indicates the serviceability of the check valve.
Otherwise you will have to replace it. You can also use this method to check the tightness of the inlet hose if you do not have a compressor at hand.
We recommend
“Why the parking brake is on: we’ll figure out the reasons” Read more
Checking engine vacuum using a vacuum gauge
However, you may have noticed during testing or daily driving that there is something wrong with it. And you may be right.
We recommend reading: Car tire care
If your amp barely passed the previous tests (or failed), make sure it's getting the right amount of vacuum. For this test you will need a vacuum gauge.
- Disconnect the vacuum hose from the brake booster and connect it with a tee so that you can also connect the vacuum gauge.
- Start the engine.
- Your gauge should read between 16 and 21HG (inches of mercury). If you get less than 16HG, check for vacuum leaks at the hose, intake manifold (gasket leak or crack in the manifold itself), your engine (valve(s), head gasket); or possible vacuum restriction in the vacuum hose, intake manifold or exhaust system (catalytic converter).
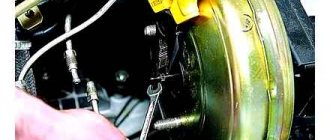
Let's get started
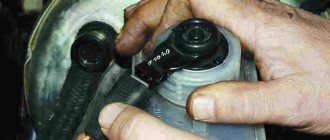
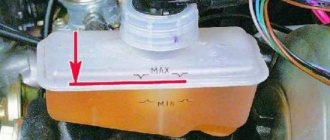
Work should be carried out during daylight hours or in a garage with good lighting. So, put the car in gear and raise the hood. The amplifier is located on the left, driver's side and is screwed to the engine bulkhead. At the first stage, we need to disconnect the clamp of the rubber tube that is connected to the body. This can be done with a flat or Phillips screwdriver. At the next stage, remove the brake fluid level sensor chip. then move the driver's seat as far back as possible. This is necessary in order to conveniently perform work under the steering column. So, lowered into the pedal assembly. It can be dark here, so a portable lamp will not be superfluous. Next, using pliers, remove the stopper from the bushing that connects the pedal to the vacuum rod. The rod connector itself is easy to identify. It is a U-shaped plate with several holes.
Next, remove the rod and lower it to the floor. We return under the hood to the amplifier. To remove it, you will first need to remove the brake master cylinder. It is dismantled along with the iron tubes. Do not unscrew them separately under any circumstances. Otherwise, air will get into the system, some of the fluid will spill out and you will have to fill it in, followed by pumping all four brake mechanisms.
Then we clean the threaded connection on the master cylinder bushings with a metal brush. If necessary, you can use a liquid key lubricant. Please note: the nuts must be unscrewed carefully without damaging the threads. If the nut does not “go”, tighten it one turn, and then unscrew it back. This should help. Also, together with the nuts, remove the washers that are in a compressed state. If they are stuck and difficult to remove, use a flat-head screwdriver. By walking slightly along the cylinder body, you can get these washers out.
VUT installation
- Install the bracket onto the new VUT and secure with two nuts.
Before installation, turn the rod straight so that it immediately fits onto the pedal.
Place the vacuum cleaner into the seat and insert the locking pin from inside.
Cost and how to spot a fake
If we talk about the VAZ-2109, a vacuum brake booster costs from 1.2 to 1.5 thousand rubles. You can buy it in any store or online. A VAZ-2110 vacuum brake booster will cost exactly the same. The exception is the yellow “Sport” amplifier. It is sold for 2.3 thousand rubles. We also note that the amplifiers are interchangeable on VAZs. For example, the vacuum seal from the “eight” is ideally installed on the “nine”, 13, 14 and 99 models. The amplifier for the “ten” is also suitable for “Lada” 11th and 12th models. If we talk about manufacturers, Pekar and DAAZ have proven themselves well. The so-called sports amplifier works in the same way as regular factory ones. Therefore, there is no point in overpaying money for it.
When purchasing, it is important to pay attention to the packaging. It should be made of corrugated cardboard. There is always a label on the box that says:
- Item release date.
- Manufacturer's name.
- Batch number.
- Factory article number.
Removal of VUT
- To access the VUT fasteners, you need to dismantle the engine filter housing. To dismantle, unscrew the two bolts securing the housing at the front, also loosen the clamp securing the pipe and remove the connector from the mass air flow sensor. Turn the front bolts by hand and loosen the clamp with a Phillips screwdriver.
Release the clamp securing the adsorber and move it to the side without disconnecting the hoses. It is convenient to loosen the clamp with an open-end wrench by ten.
Unscrew the 2 nuts securing the brake cylinder and, together with the expansion tank, move it to the side. It is convenient to unscrew the nuts with a thirteen wrench.
- Remove the pipe from the check valve fitting.
- Unscrew the four nuts securing the amplifier from the body.
It is convenient to unscrew the nuts using a wrench with an extension and a cardan. Thirteen head nuts. Remove the spring pin retainer that secures the brake booster rod to the pedal. - Remove the pin and disconnect the rod from the brake pedal.
- Remove the VUT by pulling it towards you from its seat.
Unscrew the two nuts of the bracket that secures the amplifier to the body.
What's next?
At the next stage, you can proceed to dismantling the master brake cylinder. It is important not to damage its tubes. The element is removed forward, without distortions to the side. Now you can unscrew the vacuum booster. As we have already said, it is located on the partition and mounted on brackets. The latter is secured on two studs. They often rust. Therefore, it is recommended to first apply lubricant or soda solution here. After this, unscrew the nuts and remove the amplifier along with the bracket. Next, unscrew the two “blind” bolts from the vacuum seal. We screw the new amplifier to the bracket and install it in the reverse order.
Is it necessary to carry out additional work on the brake system? If the tubes were not damaged and the fluid level did not drop, there is no need to bleed or do anything else.
What if it is not replaced in time?
Very often, when an amplifier breaks down, air begins to enter the system. Typically this happens due to a faulty control valve. As a result, the pressure in the circuit drops. The pedal becomes too soft. Often drivers think that the system is simply airy and bleed the brakes. But after the first trip, the pedal becomes soft again. The response time of the system also increases. This can lead to accidents on the road.
In the worst case scenario, the valve fails completely. Because of this, the system is not able to work at all. In this case, driving out onto the road is extremely dangerous. Therefore, if there are any signs, you should carefully inspect the system and replace the faulty element.
About malfunctions
The main factor in the malfunction of the “vacuum unit” is the inability to create a vacuum in the chamber. It may not be fully produced or may be completely absent from the system. Often the source of the problem is the loss of tightness of the hose that connects the engine to the amplifier.
But breakdowns are also possible due to loss of elasticity of the valve or damage to the working surface of the diaphragm. In any case, before replacing the vacuum brake booster, it needs to be checked. You can do this yourself.