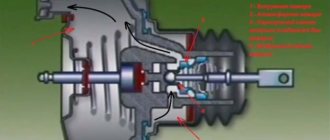
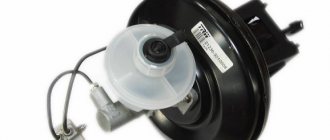
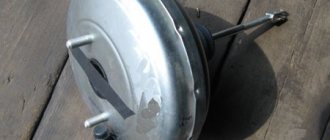
A vacuum booster is a device consisting of a casing in which a valve is located. The part is divided into two parts using a rubber layer called a diaphragm. One part is atmospheric, and the second is a vacuum space and is connected to the intake pipe from the internal combustion engine.
The booster valve is a plastic casing that houses essential parts that wear out over time. Subsequently, the driver can observe the rattling of the gearbox. The part consists of the following elements:
- A rod located on the support bushing.
- There is a piston nearby.
- Buffer.
- Valve with pusher and return springs, as well as filter.
VUT works as follows:
- The driver presses the brake pedal to the floor
- At this time, the piston and valve tappet move.
- The space between the two parts of the amplifier opens up.
- The air exerts pressure on the damper between the two parts of the VUT and, as a result, a different level of pressure is created in each part.
- Due to this difference, the valve and rod move.
- As soon as the pedal is released, all elements return to their places and the system stops working.
During the operation of a car, natural wear and tear of parts is quite possible and the vacuum booster is no exception.
Before you go to the service center or repair the VUT yourself, you need to identify the signs of a part malfunction.
Article: 2108-3510010-01, additional articles: 21080351001001
Order code: 003503
This model of vacuum cleaner has proven itself in the automotive market.
Applicable in the following cars:
Samara / VAZ 2108, 21081, 21083, 2109, 21093, 21099. Also used: Samara / VAZ 2113,2114,2115 Niva / 21213.
When purchasing a VUT (vacuum brake booster), you need to consider the following:
1. VUT must be equipped with a valve.
2. Look at the year of manufacture on the pusher fork, there is also the DAAZ marking.
3. When the pusher stops and the VUT is pressed. the latter should not poison the air.
4. No visible mechanical damage to the body.
During installation, do not forget to apply sealant between the brake master cylinder and the VUT.
Here is a video on how to replace the VUT:
The vacuum booster, using vacuum, creates additional force on the brake pedal. A malfunction of the VUT not only worsens the braking dynamics of the car, but can also cause interruptions in engine operation. Replacing the vacuum brake booster, as well as checking for faults, can be done by yourself.
Symptoms of a problem
- Stiff brake pedal when the engine is running.
- When you press the pedal, the engine starts to rev, and when you slow down sharply, it stalls completely. The described symptom of malfunction is typical for cars in which the vacuum for VUT operation is taken from the intake manifold. If the membrane or vacuum tubes are not sealed, when you press the brakes, unaccounted air will be sucked in, so the engine stalls and begins to stall. The described symptom of VUT malfunction does not apply to cars in which the vacuum is created by a vacuum pump.
How to check?
A torn diaphragm is the main cause of vacuum brake booster failure. The operating principle of the amplifier is based on the difference in pressure in the vacuum and atmospheric chambers, which provides additional retracting force on the pedals. If the vacuum chamber, for example, due to a rupture of the membrane, is connected to a medium with atmospheric pressure, the vacuum created will not be enough for the normal operation of the amplifier.
How to check VUT:
- Start the engine and press the brake pedal all the way. The appearance of hissing indicates that the VUT is not sealed, so air is leaking through it;
- Press the brake pedal vigorously 3-4 times. Keep it pressed and start the engine. If the vacuum seal is working properly, after starting the engine, the force on the pedal will change and it will go down a little.
Repair or replacement?
During production, parts of the amplifier housing are connected by rolling. At home, it is impossible to replicate the factory quality of rolling. Gaps in the contact areas of the housing parts will lead to leaks in the system. Therefore, in the event of a malfunction, a complete replacement is recommended.
Before changing the vacuum seal, carefully inspect the vacuum hose for mechanical damage. It is likely that the cause of the amplifier malfunction is a leak in the vacuum line.
System design
You can learn the operating principle and design of the VUT from the article “How a vacuum brake booster works.” But for proper replacement with your own hands, it is much more important to understand the general structure of the brake system with a vacuum booster. The VUT is attached to the engine shield and is connected only to the main brake cylinder and the pedal lever.
Replacing the vacuum booster does not require disassembling the brake cylinder, so there is no need to bleed the brake system after completing the work.
VUT and GTZ Priora for VAZ 2114
I began to notice periodic buckling in the interior of the car, and sometimes the brakes behaved inappropriately. It immediately became clear that VUT would soon order a long life. And then, starting from one fine day, the hissing became constant + to this all the familiar accompanying factors, like a tight brake pedal, and the most disgusting thing, floating speed xx, accompanied by twitching and shaking of the internal combustion engine. Who knows, he will understand... As I remember, it’s already infuriating...))) I’m thinking about purchasing a new VUT. Just which one? — The staff member didn’t want to install it on principle. — Torgmash is the same standard one, only slightly modified. Baby talk. Extra overpayment. Plus, we sell yellow VUT Torgovmash, but Torgovmash has always produced unpainted. Whose is it? Doubts... - Lucas - good, but expensive. After reading the forums I decided to go collective farming after all. I decided to install the VUT and, accordingly, then the GTZ from Niva 21214M, it fits one to one, only it has a VUT diameter of 9″ and the volume of the GTZ is larger, which is accordingly good, although the rod is a little shorter, although this is not critical and can be treated by adjusting the brake light limit switch. But it was not there! It turns out that in our regional center it’s not so easy to find anything sensible. Pichal won. As an option, you can purchase it to order from servicemen in the official Lada showroom. You only have to wait up to three weeks. And the car runs around every day, driving has become unbearable and unsafe. It turned out that this was not an option either. Well, I decided to install VUT and GTZ Priors (Kalina, Chevy Niva, as it turned out, they are identical, the only difference is in the barrels). There are a lot of articles about this on the drive, so I won’t go into too much detail. I will describe only the main nuances. We actually purchased a VUT (DAAZ) viburnum + GTZ (MANDO), two brake tees from the classics, a liter of brake fluid. It was decided to implement a jamb with different fittings using Priora brake pipes. BUT it was not possible to find them. PICHAL again. The turner did not have the opportunity to sharpen. By driving around retail outlets and blowing the minds of salespeople, tubes with the necessary fittings were found. But they needed improvement. Since the necessary fittings were at the ends of separate tubes. And the following scheme was needed: 12x1-10x1.25
I also bought a short brake caliper tube from the classics. To assemble them yourself and re-flare them to the required length. I got to work on the weekend and, as luck would have it, I had to do it outside in the snow. But there is nothing to choose from. Therefore, I can’t boast of a large number of photos, but nevertheless... Dismantling did not cause any difficulties. The rod at the aperture was extended with the old one, by arc welding. There is no need to boil it too much, and strong heating is not allowed there.
It came down to adapters. I made two tubes of the required configuration by flaring. True, it was necessary to flare the house, but there was no possibility. But everything worked out as planned, and when it was pulled into place, no leaks were found.
Source
How to change it yourself
Let's look at how to change the VUT using the example of the VAZ 2110, 2111, 2112. The design of the system is quite monotonous, therefore, after watching the video, you can replace the vacuum brake booster of the VAZ 2114 and many other cars.
- Remove the low brake fluid level sensor connector.
- Unscrew the 2 bolts 17 securing the brake cylinder to the VUT body. There is no need to unscrew the lines, just move the cylinder with the tank a little to the side.
- Disconnect the vacuum hose from the check valve. Check the condition of the valve and install it on the new brake booster.
- Unscrew the 4 bolts securing the VUT to the engine shield. The working space in the area of the pedal assembly on the interior side is limited, so an extended socket, extension and ratchet are best suited for unscrewing.
- Disconnect the brake sensor connector.
- Pull out the VUT along with the mounting bracket and the brake pedal.
- Using pliers, remove the locking plate of the brake pedal lever rotation axis.
- Pull out the “finger” that secures the VUT pusher in the lever.
- Unscrew the 2 nuts securing the vacuum body to the bracket.
All you have to do is replace it by installing a new amplifier and assembling all the elements in the reverse order of dismantling.
Be sure to correctly install the sealing gasket between the brake cylinder and the housing, if one is present in the design of the vacuum brake booster of your car.
Design options
On some cars, to replace the vacuum seal, you must first disconnect the booster pusher from the lever in the car's interior. As we see in the GAZelle example, this can be done in two ways:
- unscrew the bolt of the fastening element connecting the pusher and the pedal lever;
- loosen the adjusting nut, and then unscrew the pusher from the fastening element. The peculiarity of this method is that after replacement the pusher must be screwed in the same number of turns. To do this, you need to either measure the distance from the edge of the pushrod to the adjusting nut, or count the number of turns. Otherwise, you will not be able to accurately install the adjusting nut on the pusher of the new amplifier.
If during the replacement process the position of the pusher does shift, adjust the free play of the brake pedal.
Stem adjustment
The stem offset determines the distance from the adjusting bolt to the stem buffer. This parameter is extremely important for the normal operation of the braking system. If the overhang is too large, certain contours will jam. A small overhang will increase the free play of the rod (the distance from the rest position to the contact of the buffer).
Auto repair school - Do-it-yourself car repair
Jun 21, 2022 VAZ 2108, VAZ 2109, VAZ 2110, VAZ 1117 Kalina, VAZ 2170 Priora by admin
What signs of a faulty vacuum brake booster (abbreviated VUT ) can you name? I asked myself, I will answer myself))). Hissing when pressing the brake pedal. This time. Unstable engine operation at idle speed. That's two. During braking, engine speed begins to rise or fall (to the point that the engine may stall). That's three. The brake pedal has become harder and less effective. That's four. It seems like he named all the signs. I will continue in the same spirit. I will list possible solutions to problems with a faulty vacuum brake booster. The first, most common, quick, but not cheap way is to replace the entire brake booster . Everything is clear here, we remove the broken VUT and put a new one in its place. If you are interested in the first method, then I am happy to inform you that the site contains material describing the replacement of the vacuum brake booster on VAZ 2108, VAZ 2109, VAZ 21099, VAZ 2113, VAZ 2114, VAZ 2115 cars . Go ahead. The second method, labor-intensive, is not as popular and fast as the first - repairing a vacuum brake booster . The main disadvantage of this method is its complexity. Since repairing an amplifier is a job that includes: removing the VUT from the car, disassembling it, replacing all rubber parts (which are present in the repair kit), assembling and installing the amplifier at the workplace. Not everyone likes this kind of fuss! But this method has one big advantage - it allows you to save a lot of money. After all, the cost of a repair kit is, as a rule, four times lower than the cost of the vacuum brake booster itself. And this is not little. Do you agree? Therefore, everyone who likes to save money and prefers to repair their car themselves , I invite you to read the photo report on the repair of the vacuum brake booster of VAZ-2108, -2109, -21099, VAZ-2110, -2111, -2112, VAZ-2113, -2114 , -2115, Lada Samara . I hope you will enjoy…
Spare parts. The right choice is to purchase a repair kit for a vacuum brake booster manufactured by BRT (Balakovo) . The quality of products (not just repair kits) from this manufacturer is always at its best. But, in my case, a kit from AWEL (Ukraine) was purchased and installed. I will say right away that the quality of tires from this company is pleasantly surprising. Time, of course, will show/check how good everything is, but so far there are no complaints. The contents of the repair kits are the same (see photos 1 and 2).
Tool. In order to repair the VUT (vacuum brake booster), you will first have to remove it from the car. You can find out how to do this and what tools you will need by reading the article on replacing the vacuum booster. To disassemble and reassemble the amplifier itself, you will need the following tools: a large flat-head screwdriver, pliers, a hammer, and a couple of clean rags. Well, and, of course, do not forget about attention and accuracy))). There is nothing complicated in this work, but if you do it hastily, you may forget some part during assembly or damage the new diaphragm.
Photo report on the repair of the vacuum brake booster (VUT) of VAZ 2108-21099, VAZ 2110-2112, VAZ 2113-2115, Lada Samara:
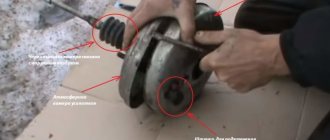
The vacuum booster housing consists of two halves. And in order to disconnect them, you need to deal with the factory rolling. To do this, use a large screwdriver to press out all the bends on the body (photo 3). You can also use pliers for this purpose (photo 4). But, no matter what tool you use for disassembly, the main thing to remember is that you should act slowly and carefully. You should not bend the metal in the opposite direction or break the edges of the housing, because such rough handling will make subsequent assembly of the vacuum amplifier much more difficult.
Also, what I would like to say or remind you about is that there is a rather powerful spring inside the vacuum amplifier. And, if you forget about its existence, then, after pressing the last fixing sides, the amplifier can effectively fly apart/split into two halves. The surprise is not fatal, but not desirable. In order to avoid such an unpleasant incident, you should secure the halves of the amplifier with standard GTZ nuts. We place several washers or nuts of a suitable diameter under them and tighten the nuts (photo 5).
If you don’t want to tinker with the nuts, you can hold the amplifier halves with your hand during disassembly. This, of course, is not so convenient, but it is quite possible.
Oops! After removing all obstacles, the amplifier falls into pieces (photos 6 and 7).
Now all that remains is to systematically replace all the old rubber parts with new ones. You can, of course, replace just the diaphragm . In most cases, it is to blame for the malfunction of the vacuum booster. For example, in my case, the amplifier is practically new and replacing one diaphragm would be enough. But it’s still correct to replace all the rubber parts. Plus, if traces of dirt, sand, or brake fluid are found inside the amplifier housing, then the housing should be washed and cleaned.
Further, short and to the point. Remove the spring and washers with rubber rings. There are no rings in the repair kit, so we try not to tear or lose them . And, most importantly, do not forget about them during assembly, since without these rings the amplifier will not work! Photo No. 8.
We take out the plastic piston from the body. We remove the stud covers and the diaphragm from it (photo 9, 10, 11, 12). You can immediately install new parts in their place.
Remove the protective cover of the valve body. In its place we put a new one, photo 13 (after having lubricated it with lithium, cyatim, etc.).
Lubricate the studs. And carefully install the piston into the housing (photos 14 and 15).
We put washers with rubber rings on the studs (photo 16).
On the second half of the body, we change the sealing ring of the check valve and the GTZ rod (photo 17, 18, 19, 20).
We check that the diaphragm in the body lies flat, without folds and is not twisted (photo 21).
We connect the parts of the vacuum amplifier. We tighten them with nuts (photo 22).
Then, using a screwdriver and a hammer, bend the edges (photos 23 and 24).
Ready! Repair of the vacuum brake booster (VUT) of the VAZ 2108-21099, VAZ 2110-2112, VAZ 2113-2115 has been completed . As you can see, there is nothing complicated in this work. The main thing is the presence of desire and time.
When using an article or photographs, an active direct hyperlink to the website www.avtorem.info is required!
Did you like the article? Share it on your page!
Vacuum booster VAZ 2114: do-it-yourself replacement
The VAZ 2114 vacuum booster is exactly the same in design as the one used on early model cars - 2108, 2109. It is necessary to improve comfort when driving a car. You can remember the first kopecks, which did not have an amplifier - you had to press the pedal with great force to squeeze the cylinder rod. It is with the help of a vacuum that it is possible to increase the force applied to the rod several times. It is also worth mentioning that the effectiveness of emergency braking using VUT increases by approximately 200%. If without VUT you need to apply a force of 13 kg, then with it it is much less - only 7 kg.
Vacuum booster cost
In a situation with instability of the dollar exchange rate, it is best to find out all prices in specialized stores. To make it easier for you to navigate, we note that the minimum cost of VUT starts from 2,000 rubles and above. Accordingly, the higher quality the part, the more expensive it will cost.
If you install the amplifier at a service station, then get ready to shell out an additional thousand rubles.
The frequency of replacing a part usually depends on the quality of the roads, driving style and general wear and tear of parts in the car. To prevent unexpected breakdowns, diagnose your vehicle in a timely manner and, if necessary, carry out repair work.
To summarize the article, we note that you now know how to replace the vacuum booster on your VAZ-2114, as well as how to diagnose a system malfunction. How to carry out the replacement, yourself or at a service station - this is your choice.
Symptoms of a problem
There are a lot of vacuum amplifiers on the market, and they all differ not only in manufacturer, but also in quality. In recent years, the market has been conquered by Chinese analogues, which are of relatively lousy quality, but due to their prices beat their competitors. But skimping on brake system components means exposing yourself to danger. An amplifier of normal quality will cost you about 1000 rubles. Vacuum amplifiers produced by Politekh-AVTO have good reviews. The warranty on them is only a year, but in reality they last at least five.
Your safety depends on the condition of the braking system. This must be taken into account primarily when carrying out repairs and diagnostics. Therefore, a careless attitude is unacceptable. Signs of malfunction characterizing the failure of the VUT:
- It is necessary to apply more force to the pedal when braking.
- Braking efficiency deteriorates (it feels like you are pressing the pedal with the same force, but the rod moves worse).
But these symptoms can also appear if pipes and lines are contaminated. Therefore, it is possible to judge the failure of the VUT only on the condition that the serviceability of the remaining components is not in doubt. To check the VUT, you need to stop the engine and press the pedal hard several times. Then press down so that it is under pressure and start the engine. If the vacuum brake booster of the VAZ 2114 is working properly, you will feel the pedal sink significantly. Well, if it fails, it will be in its original position.
The next step is to identify a specific breakdown:
- Check whether the connection between the pipe and the check valve is tight.
- Are the fixing flanges intact?
- Pay attention to the condition of the pipes themselves - they sometimes crack in bends. A characteristic feature of this malfunction is the presence of wet marks.
- Very often the shank is destroyed. It is necessary to check the cap that is located on the seal. Remove it and start the engine. If even after all these procedures a hissing sound is heard, then the fault is in the shank.
SIGNS OF MALFUNCTION AND CHECKING THE VACUUM BRAKE BOOSER
As soon as you have any doubts about whether the vacuum pump is working properly, you need to immediately check the vacuum brake booster of the VAZ 2114. It is worth noting that brakes are one of the key systems of any car, on which the life and safety of you and yours directly depends passengers, therefore, no negligence or irresponsibility is acceptable here.
Signs of a faulty vacuum brake booster, which indicate that the vacuum brake on a VAZ is broken, are as follows:
- The need to apply more force than before to press the brake pedal;
- Deterioration in the braking efficiency of a vehicle at the same pedal pressure.
As soon as any of these factors appear, immediately begin checking the spare part. To do this, you need to turn off the engine and press the brake pedal several times with sufficient force, then stop it in the middle of the range of motion (your foot fixes the pedal), and restart the engine.
If the vacuum brake booster of the VAZ 2114 is working properly, then the pedal itself will fall a little to the bottom, but if the vacuum booster fails, the pedal will remain in the same position.
After identifying the problem, you need to find out what exactly is wrong with the vacuum seal. This requires a visual inspection. In general, the inspection is carried out on the following points:
- The vacuum chamber is checked for tightness of the connection between the check valve and the pipe;
- The integrity of the fixing flanges is checked;
- A situation is possible when, due to wear in places of bends, the pipes have cracked, this is evidenced by characteristic wet marks on their surface;
- Often the main reason for failure of the vacuum seal is damage to the shank - check the protective cap on the seal; it should not stick. Remove the cap and start the engine; if you hear a hissing sound after bleeding the shank, that’s the problem.
Replacement of VUT VAZ 2114
After diagnostics, you can proceed with replacement. You will need the following set of tools:
- Pliers.
- Keys for “10”, “13”, “17” (open-end, socket heads, sockets).
- Screwdrivers, flat and Phillips.
Pay attention to the condition of the fittings, clamps, and pipes. Replace them if necessary. All do-it-yourself repairs can be carried out at home without any particular difficulties; there is no need to turn to the services of a service station.
Repair stages:
- Remove the rod connecting the VUT and the brake pedal. It is necessary to pry the plate with a knife or flat screwdriver, and then unscrew the bolt.
- Having opened the hood, disconnect the GTZ (brake master cylinder) and the vacuum pump of the VAZ 2114. Usually simple nuts are used for the connection. Further dismantling is carried out either by disconnecting all pipes from the GTZ, or “live”. In the first case, of course, it will be much more convenient, but after repairs it is imperative to bleed the entire system.
- Remove the hose connecting the amplifier to the manifold.
- Using a socket on “13”, unscrew the nuts from the interior that secure the amplifier to the body.
- Remove the amplifier.
That's all, at this point the dismantling process can be considered complete, assembly is carried out in the reverse order. Usually this device is not repaired, but is immediately thrown away. Its price is not very high, and its service life is significant. Therefore, it turns out to be easier (and safer) to install a new VUT.
Brakes! Vacuum brake booster "TorgMash" VAZ 2108 - 21099, 2113 - 2115
Good day to all!
I bought a new VUT a long time ago, even before N.G. I took it to improve the effect of the brakes
High-performance vacuum brake booster VAZ (Lada) 2113 - 2115 Torg-Mash is a modified element that allows you to reduce the load on the gas pedal when braking a VAZ (Lada) 2113 - 2115 car. Technical information: Reducing the force on the brake pedal: up to 2 once; Increased resource compared to standard; Standard installation.
Conditions for the need to install a vacuum brake booster Torg-Mash VAZ (Lada) 2113 - 2115: Use of sports overhead camshafts; Using a larger volume receiver (from 3 liters and above); Using a throttle intake.
When using sports components of the VAZ (Lada) 2113 - 2115 engine, the pressure in the vacuum booster tube drops significantly, which leads to a “heavier” pedal, i.e. the effort required to slow down a VAZ (Lada) 2114 at a comparable rate becomes noticeably higher, which leads to fatigue and a decrease in comfort. For these purposes, this Torg-Mash vacuum booster with increased performance on the VAZ (Lada) 2113 2115 is used, which serves to improve comfort when operating cars with major engine upgrades.
Installing a “Sport” vacuum brake booster improves the ergonomic characteristics of the brake drive: reducing up to 50% (from 13 to 7 kg at a deceleration of 6 m/s2) the force on the brake pedal during service and emergency braking on roads. At the same time, the car’s reaction time to the driver’s action during braking is also reduced. The applied force on the brake pedal is less than usual. Braking the car becomes more comfortable and soft. The time between the moment you press the brake pedal and the moment you start braking is reduced, which makes the braking system more sensitive. Increasing the level of vehicle safety. Recommended for installation on both vehicles with standard and modified brake systems.
but I didn’t have time to install it, today I got off work and earlier I made an agreement about the box and installed it on my car
To replace the vacuum booster you will need a standard set of tools. The procedure for carrying out repair work is as follows:
Inside the car, under the steering shaft, disconnect the power steering rod from the brake pedal. To do this, remove the fixing bracket from the locking pin and remove the pin itself.
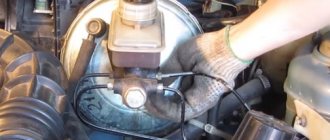
Next we move to the engine compartment. Remove the air filter
and remove the brake master cylinder along with the fluid reservoir. The cylinder is secured with two nuts that must be unscrewed. Using a 17mm wrench, disconnect the vacuum hose from the check valve. Now we unscrew the nuts with a 13mm wrench securing the amplifier bracket to the body partition and remove it from the car.
After the amplifier is removed, unscrew the nuts securing it directly to the mounting bracket. FOR comparison with the one on the left is the Stokowski VUT and on the right is the Torg Mash. In appearance they are no different
HOW TO IDENTIFY A FAKE!
HERE YOU CAN FIND OUT sportcar.nm.ru/vut-kontr2.htm
I checked the new VUT, the brakes are what they were before and now heaven and earth, the brakes have become much BETTER! I'm as happy with the brakes as an elephant! Just what the doctor ordered =)))))
Don’t blame me for the photo, I took it from my phone. Thank you all for your attention! Good luck on the roads! Peace for everyone!
Source
Replacing the vacuum brake booster on a VAZ 2114
The vacuum brake booster of the fourteenth is a casing with a valve inside. It is divided into two parts by a rubber layer - a diaphragm - one part is atmospheric, and the second represents the vacuum space, which is connected to the intake pipe from the engine.
The amplifier valve is a plastic casing that contains the main parts that are subject to wear and cause trouble for the driver in the form of gearbox rattling. The composition is as follows: on the support bushing there is a rod, which is adjacent to the piston and its own buffer. Actually, the valve itself is on its pusher and return springs along with the filter.
The vacuum booster functions as follows: you press the brake to the floor, at this time the piston and valve pusher move in such a way that this opens the space between the two compartments of the unit. Then, a vacuum compartment moves into this space and takes in air. Air presses on the damper between the two parts of the amplifier, creating different levels of pressure in one and the other part. Due to this difference, the valve itself and the rod move, respectively. By lowering the pedal, all parts return to their places, the system ceases to function.
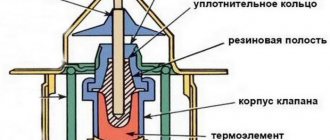
Removing the check valve of the vacuum brake booster Lada Priora (VAZ-2170)
We carry out work to assess the performance of the valve or when replacing it.
We replace the check valve of the vacuum amplifier or its sealing sleeve without dismantling the amplifier. Remove the right side of the front panel upholstery (see “Removing the front panel upholstery”).
...we remove the check valve from the sealing sleeve of the brake booster housing along with the hose. Disconnecting the hose from the valve...
...remove the check valve. The serviceability of the valve can be assessed by blowing it (for example, with your mouth) in both directions. Air should flow in the direction from the amplifier to the intake manifold, but not in the opposite direction. We replace the faulty valve.
If the check valve of the amplifier is working, install it in the reverse order.
Before installing the valve, check the condition...
...a rubber sealing sleeve located in the hole in the housing of the vacuum brake booster. If there is damage on the bushing in the form of tears and cracks or loss of elasticity of the rubber, the bushing must be replaced.
To facilitate installation of the check valve into the bushing, a penetrating liquid such as WD-40 can be applied to their surfaces.
Video on the topic “Lada Priora. Removing the brake booster check valve"
Replacing the VUT Mercedes Benz check valve with a VAZ one.
The brakes hiss. Replacing the brake vacuum seal on VAZ 2110, 11, 12 VUT Replacing the vacuum on VAZ 2110, 2111 and 2112 Source
Checking the amplifier assembly
The answer to the question of how to check the vacuum brake booster is suitable not only for the fourteenth VAZ model, but can also be applied to the thirteenth and fifteenth.
- Press the brake to the floor 4-5 times with the engine not running. This will create uniform pressure in the two parts of the amplifier. When you press the brake, the valve will immediately show itself: if it squeaks, then you need to seriously think about it.
- After the pressure has become uniform, start the fourteenth. But at the same time you need to keep the brake to the floor. If everything is in order with the brake booster system, the pedal will rise after the engine starts. If this does not happen, then repair is definitely required.
- In the event that you realize that there is a problem with the amplifier, you need to look to be sure how the hose is secured and what condition the flange is in. If the fastenings at any point do not correspond to the norm, this may affect the fact that the pedal does not lift, and in fact the fault will be on a separate incorrect fastening, and not on the entire system as a whole.
Reasons for replacing the brake booster
Brakes are a whole system. Therefore, as soon as you have checked the amplifier, do not be lazy and check whether the brake fluid is leaking and whether the pedal itself is in order. Maybe it's worth looking at the brake master cylinder and generally running diagnostics. And if, nevertheless, you have not found any problems in the brake system, then you can think about how to change the vacuum on a VAZ 2114.
It is important to understand that replacing the vacuum on a VAZ 2114 or any other VAZ model is a mandatory process. If the unit is malfunctioning, then the engine is also malfunctioning. The power that the engine will produce depends on the correct functionality of the amplifier. What Russian doesn't like driving fast? As they say, if you love to ride, you also love to change the vacuum.
NECESSARY TOOLS FOR THE JOB
Upon completion of the diagnosis, when the need to replace the part is obvious, before starting work it is necessary to prepare the tools and spare parts required for replacement.
First of all, purchase a new vacuum brake booster for your VAZ 2114; we also recommend replacing the connecting hose at the same time if it shows any signs of wear.
Replacing the vacuum on a VAZ 2114 requires the following tools:
- Pliers;
- Open-end and socket wrenches with a diameter of 10, 13 and 17 mm;
- Screwdriver.
Look at the condition of the plugs and fittings; you may need to replace them too, so when purchasing the necessary materials, do not forget to purchase them.
How to replace?
For this process you will need the following tools:
- Simple screwdriver
- Pliers
- Spanners 13, 17
- Specific wrench for unscrewing brake pipes
- It’s worth buying new fittings and plugs
The question of how to change the vacuum booster on a VAZ 2114 is a very common one. If the perception of the text is not accurate enough for you, you can always rely on our article.
- The brake cylinder will interfere with removing the booster. Therefore, you can first remove it, or simply disconnect the tube fittings from it and move it to the side. It's whatever your heart desires.
- But the cylinder is not the main obstacle. Unscrewing the amplifier fasteners is, in principle, not an easy task, or rather inconvenient. We start with the valve: remove the hose mount, pull out the support sleeve and pull out the brake pin.
- Then we take the key to 13 and begin to unscrew the 4 fastenings of the amplifier.
- Having endured troubles and inconveniences, we are preparing to install a new one in its original place. But first, you need to install a special mounting frame on the purchased amp. We wake it up with a key set to 17 and only then put it inside the car.
- The assembly sequence is simple, but an important point from the point of view of convenience is the primary action of connecting the brake (pedal) and the amplifier (all this with just a finger). And then attach the entire unit to the fourteenth.
As a recommendation, you can take the following information: when replacing the brake booster, you need to change the vacuum hose. It also does not last forever, and its wear and tear can have a bad effect on the quality of the new amplifier.
How to install electric power steering on a VAZ 2114
To get started, buy a kit, it includes:
- electric booster with brackets assembly,
- consisting of a steering shaft,
- electronic control unit,
- steering column mechanism with lever and gearboxes.
The installation kit also includes:
- intermediate shaft
- wiring with an individual fuse, for connecting the amplifier with a standard steering column connector of a production car and a battery.
- diagnostic block.
- LED indicating proper operation.
- clamps.
- fasteners.
We are starting to install the EUR on the VAZ 2114
- We place the car in the workplace, brake with the parking brake, and turn off the ignition.
- Disconnect from the battery.
- A cardan-type intermediate shaft is connected to the electric booster on the workbench. This must be done carefully without applying much force, so as not to damage the joints. Tighten the entire connection thoroughly with a grommet.
Removing the steering column with intermediate shaft
Let's begin dismantling the steering column with the intermediate shaft:
- take out the steering wheel plugs.
- Unscrew the steering wheel fastening nut.
- remove the steering wheel from the steering wheel.
- unscrew the screws securing the casings.
- remove the covers.
- Disconnect the instrument panel harness connectors from the two lever switch.
- remove the switch.
- disconnect the harness connector from the ignition switch.
- Unscrew and remove the coupling bolt securing the lower end of the intermediate steering shaft.
- Unscrew the two bolts and two nuts securing the steering column, using the steering bracket, and remove the steering column with the intermediate shaft assembly.
Here you need to keep in mind that on one pair of fasteners, the caps are cut off during factory assembly. Therefore, we will need a chisel and a hammer to cut down these fasteners or devices for turning out bolts with a tear-off head.
- we free the steering shaft from the steering rack instead of their splined connection, to facilitate this process; again, using a chisel, you can open the seam of the intermediate shaft.
- We attach the steering wheel with the steering wheel mounting nut and with sharp but careful movements we pull out the steering column.
The entire steering column has been removed. Now there is nothing stopping us from installing electric power steering.
Installation of EUR on VAZ 2114
Before we begin installing the electric power steering, we cut off the ignition switch from the standard steering shaft, the first thing we need to do is:
- Place the intermediate shaft of the driveline type of the electric power steering onto the splined part of the steering rack worm shaft, there is a groove on the worm, it must be mated to this groove.
- tighten the coupling bolt.
- We attach the EUR body to the upper mounting studs.
- We drill two holes in the steering column mounting bracket at the place where the electromechanical amplifier is mounted, since its lower mounting devices do not coincide with the standard ones.
- After drilling from the inside, place the nut and washer through the screw, tighten each of the two bolts in turn.
Be sure to use a grower for a more reliable fastening; the steering is not something to joke about.
Replacing the vacuum booster VAZ 2114
Among the large number of components and mechanisms of the vehicle, special attention should be paid to the braking system. At the same time, the performance of the vacuum brake booster can significantly affect safety. Therefore, regular checks are necessary and if malfunctions are detected, the VAZ 2114 vacuum booster must be repaired or replaced.
No tools are required to check the vacuum seal. You just need to pay attention to the brake pedal. If to brake you need to press the pedal more than usual or the efficiency with standard pressing has decreased, this means that there is a malfunction in the vacuum brake booster (VBR).
To confirm, you need to stop the vehicle and turn off the engine. Press the brake pedal several times with force and lock it approximately in the middle of the stroke. In this position, start the car. If everything is in order with the VUT, then the pedal will fall a little. Otherwise, there is a malfunction.
Externally, problems can also be identified.
But for this you need to do the following:
- Checking the tightness of the connection between the pipe and the check valve;
- Is there any damage to the flange?
- Check all pipe bends for cracks and leaks;
- Inspection of the shank seal located under the steering column (possible spontaneous slight braking);
- Checking the protective cap. Just a few strokes of the valve shank are enough to find out whether there is hissing.
If even a minor malfunction is detected, it is best to replace this element of the brake system. Considering its low cost, you shouldn’t skimp on your own safety.
Characteristics of the VAZ 2114 model
The Samara is a pretty nice five-door hatchback that began production back in the nineties, but was released to the public only in the early 2000s. Unlike previous projects, Samara had enhanced technical features, developed a significantly higher speed, remaining well controlled at a speed of 160-170 km/h (this is a very good indicator for domestic cars).
The car had such characteristics as reliability, practicality, resistance to adverse external factors, endurance and good dynamics. What else is needed on our extreme roads, especially if we talk about the provinces? In general, the car became in demand and for many years received the title of sales leader; after all, not everyone can afford foreign cars, but here the appearance is satisfactory and the quality is tolerable.
But, of course, like all AvtoVAZ cars, Samara had not only advantages. A number of shortcomings have gathered clouds of formidable criticism over the car, which continues to this day. In particular, professionals note the fragility of many elements, the insufficient working condition of the engine and transmission, and the brake system, which too often fail.
The steering system of the first generation Samara was a C grade, so the engineers were faced with the difficult task of seriously correcting flaws and technical defects. In 2009, a restyled version, Samara-2, or VAZ 2114, went on sale, which turned out to be much better, more efficient, more practical and in some ways even more aesthetically pleasing than its predecessor.
In addition to many improved characteristics, which include an engine formatted to meet the needs of drivers, more powerful and robust, the appearance of new equipment, a more modern steering system was observed. The steering wheel of AvtoVAZ cars has always been unstable and needed additional strengthening. Now such an opportunity has appeared; if you wish, you can install power steering on a VAZ, and who likes it better: electric power steering or power steering.
In 2010, another minor stage of restyling took place, which slightly updated a number of engines; a 1.6-liter engine appeared that meets European quality standards. In 2014, an updated version of the VAZ was released again. This time, engineers worked a lot on the new dashboard to make it not only stylish, but also multifunctional. Of course, no matter how hard talented engineers try, Samara is still significantly inferior even to the budget projects of Western or Eastern concerns.
Operating principle
Golden rule: before you begin to restore or replace any unit or component, you should study its structure and operating principle.
The vacuum amplifier has the following operating principle:
- when the driver presses the pedal all the way, at that moment the piston and the pusher move, opening up free space between the two sections of the device;
- the vacuum section moves into the formed space, taking all the air;
- the air presses on the damper located between the elements of the amplifier, which provokes a pressure difference in the two parts;
- rod and valve - shift due to the resulting pressure difference;
- all elements return to their original positions when the pedal is lowered.
Any decision regarding plans to repair or replace an amplifier must be fully justified.
To do this, it is necessary to inspect the mechanism, which most car owners can do on their own.
Checking functionality
These instructions for checking the functionality of the vacuum booster will be relevant only for certain models of VAZ cars, ranging from VAZ 2113 to model 2115. Therefore, this technique, without exaggeration, is universal.
Check procedure:
- First, you need to press the brake pedal all the way, doing 4-5 repetitions. It is important that the internal combustion engine is not turned on. Through these presses, equal pressure is generated in two sections of the vacuum booster, so if there is any kind of malfunction, the valve will “tell” about them as soon as the driver presses the pedal. Creaks are the first symptom that confirms the presence of a problem.
- After creating uniform pressure, you need to start the engine, first holding the brake pedal (all the way!). If the brake pedal does not return to its original position after turning on the engine, this indicates a faulty amplifier. And vice versa - if the pedal rises after the internal combustion engine is started, then the amplification system is in perfect order.
- If the problem still occurs, you should check the condition of the flange and the quality of the hose fixation. If the hose fastening is slightly different from the norm, this may be the reason for the pedal not lifting.
The last (third) point is of no small importance, since often expensive and complex repairs to the amplifier may turn out to be pointless if the culprit of the problem is a poorly secured hose fastening.
In what cases is the amplifier replaced?
The brake system has a rather complex structure, since it includes a large number of elements. Each of which closely interacts with each other, creating a balanced mechanism.
In addition, you should examine in detail the condition of the brake pedal, check and eliminate possible leakage of brake fluid, and also check the current condition of the pipes.
If no problems with the listed elements were identified, then you should consider further actions that relate to replacing the faulty system. Since replacing the VAZ 2114 vacuum amplifier is the only reasonable solution, because there is no point in repairing it, as from a financial point of view and the quality of repair and restoration work.
It’s worth emphasizing right away that the characteristics of the car will depend on the quality of the work performed.
Service replacement cost
You may not be able to change the part yourself because you don’t have enough tools, knowledge, or a place where you can do it. In this case, you can contact a car service; the repair price will be around 1000 rubles, taking into account the average prices in Russia. In this case, the total repair budget will be around 3,000 rubles , unless replacement of additional elements is required. There is one important advantage when contacting a service center. When people who know their stuff work there, they will be able to identify other shortcomings of the system during the analysis and show them to you clearly so that you know exactly what you are paying for. Remember that repairs should be made immediately when the problem is diagnosed, since driving with a broken vacuum booster is very dangerous. For this repair you do not need special knowledge, so you can easily replace the vacuum booster yourself, saving a third of your budget.
Replacement process
Before you begin the replacement process, you need to prepare a set of tools and materials, which first of all includes:
- pliers;
- new fittings and plugs;
- a wrench designed for brake pipes;
- Screwdriver Set;
- socket wrench for 13 and 17 mm.
The replacement process consists of many stages, the implementation of which must be approached with all responsibility and professionalism:
- Looking ahead, it should be mentioned that the dismantling process can be seriously complicated due to the brake cylinder. To avoid this, this element must be removed in advance. You can go another way: disconnect the pipes from the brake cylinder, and then move them to the side for a while.
- Attaching the vacuum booster is another difficulty that will be encountered during the dismantling process. This is all due to the design costs of the VAZ 2114.
- We remove the hose fasteners from the amplifier, then take out the support sleeve, and then pull out the brake pin.
- We remove the 4 vacuum booster fasteners using a 13 mm wrench.
- We remove it and prepare to install a new amplifier.
- We install the mounting frame, tightening it with a 17 mm wrench, and only then install the amplifier.
- To make the work easier during reassembly, you should connect the brake pedal to the booster using your own finger.
Important! It is also necessary to replace the vacuum hose with a new one, since it tends to wear out.
The cost of the vacuum amplifier replacement service is not fixed and therefore depends on the specific region.
Functionality check
This instruction will be relevant when checking the vacuum booster on VAZ models from 2113 to 2115. So the technique is clearly universal.
- Press the brake pedal all the way to the floor about 4-5 times. In this case, the engine should not be started. Due to these presses, you will create equal pressure in two sections of your vacuum booster. The valve will report problems as soon as you start pressing the pedal. If you hear squeaks while pressing, this indicates a serious malfunction.
- Once the pressure is even, start the engine while keeping the brake pedal to the floor. If the brake booster system is working properly, then the pedal will rise by itself after the engine is started. If this does not happen, then you will definitely have to face repair work.
- If the check shows problems with the amplifier, do not forget to additionally check the quality of the hose fastening and the condition of the flange. When the mount is abnormal, this may result in the brake pedal not lifting.
We recommend: How to properly bleed the brakes of a car with ABS?
Sometimes poorly fixed fasteners cause quite expensive and actually unnecessary repairs or replacement of the vacuum booster. Conduct a preliminary check so as not to complicate your life.
When to change the amplifier
Brakes are a whole system that consists of many elements. Each of them must function correctly and efficiently.
In addition to checking the vacuum booster itself, you should inspect the condition of the brake fluid pipes, make sure there are no brake fluid leaks, and look at the current condition of the brake pedal.
If no faults were found in the braking system, you can think in more detail about the issue of replacing the vacuum booster.
There is no point in repairing the element. It's easier to start replacing right away. The functionality of the car and the power that your engine is capable of producing depend on the quality and timeliness of the work performed. Lack of power negatively affects the speed and comfort of movement around the city and beyond.
Replacement
To replace a vacuum booster you will need a certain set of tools and materials. It includes:
- Screwdriver Set;
- Pliers;
- Socket wrench for 13 and 17 millimeters;
- Special wrench for brake pipes;
- New plugs;
- New fittings.
Replacement procedure
Let's get straight to work.
- Removing the vacuum booster can be difficult due to the brake cylinder. Therefore, we advise you to remove it first. Another option is to disconnect the pipes from the brake cylinder and move them to the side for a while. Here you decide for yourself what is more convenient for you.
- The cylinder is not the main problem. It is difficult to cope with the mounting of the vacuum booster. It's just not very convenient to do this. This is the design of the VAZ 2114.
- Start with the valve - remove the hose fasteners from it, remove the support bush, after which you can pull out the brake pin.
- Next, using a 13 mm wrench, all four fasteners of the vacuum booster are dismantled.
- After all the inconveniences of the work done, you can remove the element and get ready to install a new amplifier in its place.
- To do this, you will have to install a special mounting frame. The frame is tightened with a 17 mm wrench, after which the new component is installed inside the car.
- If you want to make your work as easy as possible, do not forget to first connect the brake pedal to the booster with your finger when reassembling it. After this, it is much easier to cope with putting the vacuum seal back into place.
When replacing the vacuum booster, be sure to change the old vacuum hose at the same time. This element is far from eternal, therefore, as it wears out, it will negatively affect the quality and efficiency of the new vacuum seal.