Design and principle of operation
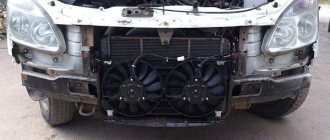
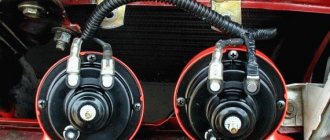
The designers of the Chevrolet Niva used a dual fan unit in the cooling system. This slightly complicated the connection diagram, but sharply increased the efficiency of radiator airflow. The fans are driven by 12-volt DC synchronous motors with a permanent magnet inductor. Electric motors have a closed, non-demountable design and do not require maintenance.
The power of each electric motor is 110 W. The fan assembly draws 18 amps.
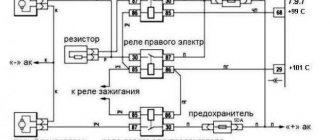
The fans are turned on one by one using an electromagnetic relay controlled by the on-board computer. When the coolant heats up above 99 degrees, the electric fan located closer to the engine air intake starts. The switch-on temperature of the second impeller is 101 degrees. The fan connection diagram is shown below.
Electrical circuit of Niva Chevrolet fans
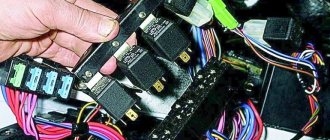
The fan power system includes three relays and a resistor, which, if necessary, provides a reduced rotation speed of the first motor. Power is supplied from the battery through fuses that save the wiring and battery in the event of a short circuit. Control signals come from pins 29 and 68 of the motor controller.
The fans automatically turn off when the antifreeze cools to 95 degrees.
Consecutive switching on and off of engines reduces the load on the on-board electrical network. In most cases, it is possible to normalize the temperature only with the help of the first fan. This is especially useful when driving at night, when headlights and side lights put a lot of stress on the generator.
The ability to force fans on can be useful when driving off-road or in city traffic jams. However, the designers of the Chevrolet Niva did not provide the car with this function. It can be implemented independently or at a service station. It is necessary to connect backup relays parallel to the switching contacts and power them from a button installed in the car interior.
Useful video about installing and connecting the forced fan button on the Shnivy:
Important: forced activation increases the reliability of the cooling system. In case of malfunctions of sensors, relays or on-board computer, the driver can manually turn on the radiator airflow.
It is useful to equip the Chevrolet Niva with a switch that forcibly turns off the fan motors. This will protect their blades when fording water obstacles.
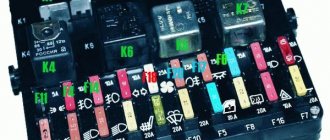
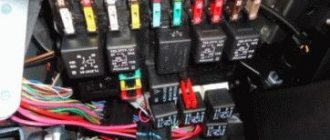
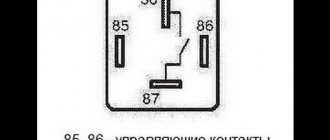
Fan relay
The additional block contains not only fuses. There are also three electromagnetic relays that control the operation of the electric motors of the cooling system. Their control circuits are powered from the ignition switch and on-board controller outputs, and the power current comes from the battery through fuses.
The relay operates as follows:
- Voltage is applied to the control terminals.
- Current passes through the inductor, resulting in an electromagnetic field.
- The steel contacts attract and close.
- The current passing through the relay drives the electric motor.
As soon as the control voltage disappears, the contacts open under the influence of the spring and the fan stops.
You can check the functionality of the relay in three ways:
- Replace the relay with a known working one and test the operation of the system.
- With the engine off and the ignition on, disconnect the temperature sensor connector. You should hear the relay click.
- Dismantle and test the output contacts with a multimeter, applying voltage to the terminals of the induction coil.
Tips for motorists
In the cold season, such a malfunction can be noticed when moving at low speed and stopping frequently. In summer it will appear much faster. For the engines of this car, the use of two fans in the cooling system is provided, since the car was originally designed for driving in difficult road conditions. The reason the fan fails to turn on may be a small “problem” that will only take a couple of minutes to fix.
Where to start the search
Since the fan is driven by an electric motor, a car tester is needed to troubleshoot; in extreme cases, a test light will do. It is small in size, so you can carry it in your car all the time. The electric motors are switched on through the contacts of electromagnetic relays, of which there are three in the cooling system on this car. Pulses to turn on the fans come from two temperature sensors. There are two of them in the system, and they are installed on the engine.
They operate when different temperatures are reached. One of them turns on when the temperature reaches 99 degrees and turns on the first fan, and the second turns on when the temperature reaches 101 degrees. Auto electricians recommend starting the check with the electric motors of these fans. It can be done this way. You should disconnect the connectors from the electric motors and apply power to them directly from the battery. If they work, the temperature sensors are checked.
What else should you pay attention to?
Next, you should check the supply voltage to the electric motor connectors. Pulses to turn on the relay are received from the engine control unit, and it, in turn, from temperature sensors. If, with the ignition on, remove the connector from them and short-circuit the wires, the fan should turn on. If this happens, then the reason is in the sensor itself. If not, check the power supply to this connector.
To check the relays and fuses, you need to find the block with them under the instrument panel. It has fan relays, fuel pumps and fuses installed on it. The relays used are domestic ones with 5 legs. In some models they may have additional fastening with self-tapping screws to the body. To check, they are simply replaced with others. If the additional resistor fails, the fan will not operate at low speed.
Power sensor
The control unit receives information about the antifreeze temperature from a temperature sensor. It is a resistor whose resistance changes with heating and cooling: from 1.3-1.8 kOhm at 30℃ to 155-196 Ohm at 90℃. You can check its performance using an ohmmeter and a thermometer. To do this, you need to remove the part, immerse it in water and measure the resistance at different temperatures.
The sensor is located on the engine head in the area of the exhaust pipe of the cooling system. You can unscrew it with a socket or socket wrench.
We recommend watching a video that shows where the sensor is located and how to check:
Repair of cooling fan on Niva Chevrolet
- First you need to check the fuses for integrity. If they burn out, it is necessary to replace them and try to find out the reasons for their burnout, since they will continue to burn out.
There can be four reasons for their burnout:
- fan wedge: fuses simply cannot withstand the load;
- fuses with a lower current strength than necessary are installed (check that the current strength of the installed fuses should be 30 A);
- the reason is the plugs: they are clogged with dirt, water, rusted or melted;
- it is necessary to check the wiring for abrasions, melting, etc.;
- The reason is the fan wedge: first of all, twist the blades with a stick, but in no case with your hands. Check the bearings for wear; there may be a problem with them and will require replacement.
- It is necessary to check the fan start sensor. Disconnect both plugs and connect them together. If the fan does not work, you will have to replace the sensor.
- The problem may lie in the relay. It is very simple to check its serviceability: we change the relay with the one located next to it and connect the wires of the radiator sensor to each other. If the fan starts up, then the problem is in the relay.
- If the electric motor fails, its rotor will stop rotating, and so will the fan blades. The performance of the engine is checked by direct connection to the battery. To do this, you need to connect two wires to two engine terminals and to two battery terminals. If the fan blades do not rotate, the motor will need to be replaced.
- The reason is the temperature sensor that records the temperature of the antifreeze. The malfunction can be determined by the following method: disconnect two wires from the sensor and connect them together. If the fan blades start to rotate, then the sensor needs to be replaced with a new one.
- If there is a break in the wires, then there will be no voltage in the circuit. In this case, it is necessary to “ring” the wires.
Possible malfunctions and their causes
1.Both fans do not work. The electric motors may fail, the temperature sensor may malfunction, or the power wires coming from the battery or ignition switch may be broken.
2. The second fan does not work. Causes: sensor malfunction, fuse or electromagnetic relay failure. It is also possible that the power cable may be broken.
3. The left fan does not turn on. Causes: faulty power resistor or temperature sensor, blown fuse or relay. It is also possible that the power cable may be broken.
4. Only two fans turn on at a time. This happens when an additional resistor in the circuit of the first electric motor breaks.
5. The fan does not turn off. Typically, the fan runs constantly when the relay is broken or the coolant temperature sensor is faulty.
Reasons why Chevrolet Niva cooling fans do not work
The cooling fan does not work on a Chevrolet Niva - let's look at some reasons why this could happen.
The performance of cooling fans could be affected by various factors:
- fuse burned out;
- problem with the fan switch sensor;
- the motor winding has broken;
- the fan is jammed;
- the connections were oxidized, which led to a lack of voltage supply to the fans;
- the relay is in a technically faulty condition;
- problem with the antifreeze temperature sensor.
Replacing fans
If the fan motors do not start when the wires from the battery are connected directly to the power terminals, the devices must be replaced.
To do this, you will need a set of wrenches ranging in size from 10 to 17 mm and a Phillips screwdriver.
Before starting work, you need to drive the car onto an inspection ditch or a lift and turn off the power to the on-board network by removing the negative terminal of the battery.
Fans are dismantled as follows:
- Remove the crankcase protection and mud guard.
- Unscrew the screws and remove the thick spider-shaped plate and a couple of tin covers that are located in front under the bottom of the car.
- Unscrew the radiator frame cross member.
- Loosen the tension and remove the power steering belt and pump.
- Remove the 4 bolts holding the power steering pump.
Important: to get to the bolt covered by the oil filter, you need to move the amplifier away from the bracket.
- Push the pump back, hanging it on the hoses.
- Remove the air conditioner drive belt.
- Remove the bolt holding the timing belt pulley.
- Remove the pulley and belt.
- Unscrew the four nuts at the corners of the electric fan housing and the two bolts securing it in the middle.
- Remove the fan unit from the studs and pull it down.
Tip: The crankshaft position sensor makes it difficult to remove the fans. Therefore, they need to be pulled out gradually. The left side is lowered first, then the block is moved to the left, raising the right edge so that the casing becomes vertical.
This method is probably suitable for restyled Niva Chevrolet models. On older cars, you will have to remove the radiator grille and bumper, unscrew the fasteners and move the air conditioning and cooling radiators forward. After this, access to the electric fans will be open.
During dismantling, you should carefully remember the procedure. Assembly is carried out in reverse order.
Important: the service life of the fan motors is approximately the same. Therefore, even if one of them fails, both must be replaced. Otherwise, you will soon have to repair the car again.
Checking and removing fans
To understand whether they work or not, you need to disconnect the connector from their motors, and connect a lamp to the wires through which voltage is supplied; we do the same with the sensor; if both lamps light up, then the problem is in the fans.
To remove them you need to do the following:
- Disconnect all wires
- Removing the upper pipe
- Removing the bumper
- If there is an air conditioner, bend the tubes (this must be done carefully, as they may burst) or drain the freon (filling it back will not be cheap), then remove the air conditioner radiator.
- You need to loosen the nuts on the radiator casing
- Tilt the radiator so that you can remove the fan unit
- Unscrew the bolts that secure the block and remove it
After removal, it is recommended to immediately replace both with new ones, since there is a possibility that a little time will pass and the second element will fail and all replacement work will need to be done again. You can do this procedure from below, but you will need special equipment, and you will need to move the engine ten centimeters back, which is very labor-intensive.