What is it, why, how does it work
VUT for VAZs is a device that is responsible for braking the car. Due to the vacuum, it helps create additional force on the brake pedal. Thus, it simplifies the operation of the braking system - the car wears out less, stops faster, and the driver needs to put in less effort behind the wheel.
But it's not that simple. On VAZ 2110 cars, brake boosters affect engine performance,
Therefore, you need to listen to their serviceability and look much more closely than to the “jamming” of other parts. At idle, the injection on this car is equal to 3-4.5 milliseconds from 7 to 12 kg of air. At the slightest violation of the mixture ratio (air, fuel and evaporation), the engine will stop working evenly and begin to stall. There will be leaks in the cylinders, due to which the spark plugs may fail, the wear rate will increase, which, in turn, will increase fuel consumption and the cash costs of maintaining the machine. And all these problems are caused by air leaks from a faulty vacuum brake booster of the VAZ 2110.
On cars of the VAZ 2110 series, a braking system is used based on diagonal separation of circuits. It works according to the following scheme:
- The first hydraulic drive circuit ensures efficient operation of the left front and right rear wheels;
- The second brake circuit is responsible for the operation of the right front and left rear wheels.
Thus, if one of the circuits fails (even while driving along the highway), the second will cope with a safe stop - the car will not spin, which significantly reduces the risk of damage to both the vehicle itself and the passengers in it.
Signs of VUT malfunction
Partial output of the vacuum brake booster will certainly manifest itself, and from the worst side and quite clearly. So, symptoms of a malfunctioning amplifier include:
- Significant effort when pressing the brake pedal . To feel this for yourself, you can press the pedal four or five times with a known good vacuum seal and the engine turned off. At the last squeeze, the force on the pedal will increase significantly. Sometimes the opposite situation occurs - the pedal is too soft. This indicates “airing” of the brake system.
- The influence of the vacuum booster on engine operation . Since the VUT takes vacuum from the intake manifold, the engine can change its operating mode during braking (although this should not happen in normal mode). This happens because excess air is sucked into the manifold, affecting the composition of the air-fuel mixture.
- The vacuum brake booster hisses . In particular, hissing occurs when the pedal is depressed. A hissing sound clearly indicates the presence of depressurization either in the vacuum amplifier itself (for example, when the diaphragm ruptures), or in its pipeline or in the check valve (for example, when its rubber seals are significantly worn).
- Vacuum pumps knocking . If a mechanical vacuum pump fails, the usual sign of this is a hum emitted by its drive rod (error p1479 may also appear). If an electric vacuum pump is installed on a car, then motorists often experience overheating of its drive motor.
- Knocking noise when braking hard . Moreover, the sound is inertial in nature, since it is caused by the membrane fastening becoming loose.
Accordingly, the occurrence of one or more signs directly indicates to the car owner that it is necessary to check the vacuum brake booster and its components.
Error p1479
In modern cars equipped with an electronic control unit (ECU), an error code p1479 is often generated in the device’s memory - “Brake booster vacuum system mechanical malfunction.” Owners of a wide variety of cars encounter it - Audi, Volkswagen (Touareg, Passat), Ford and others. The cause of an error in the control unit can be very different. For example, when air is sucked in the hose between the intake manifold and the vacuum brake booster itself.
How to check the vacuum brake booster for a VAZ 2110 for performance
To protect yourself from possible incidents on the road, you need to regularly check your brake boosters for malfunctions. This is done very simply:
- Turn off the engine.
- Press the brake pedal several times (this is necessary to check for equal pressure in the cavities). If everything is in order, the valve body itself should not stick.
- Still keeping your foot on the pedal, turn on the engine. If the vacuum brake boosters are working properly on our VAZ 2110, then the pedal will move forward along with the foot.
If this does not happen, make sure that this is the reason (the problem may also be with the fastening of the hose tips, the unsatisfactory condition of the tip flange, which, by the way, can also come off). Also, the pedal may have difficulty responding due to a poor connection between the intake pipe fitting on the engine and the hose and tip. All these indicators negatively affect the operation of amplifiers and their efficiency.
checking and adjusting brakes on VAZ 2110 cars | VAZ 2111 | VAZ 2112
Checking pipelines and connections
To prevent sudden failure of the brake system of the VAZ 2110, VAZ 2111, VAZ 2112, carefully check the condition of all pipelines and connections, paying attention to the following: metal pipelines should not have nicks, scratches, burrs, active foci of corrosion and should be located away from sharp edges, which can damage them; brake hoses must not have any cracks on the outer shell or signs of chafing visible to the naked eye; they should not be exposed to mineral oils and lubricants that dissolve rubber; by pressing the brake pedal firmly, check to see if any swelling appears on the hoses, indicating their destruction; all pipeline fastening brackets must be intact and well secured; loosening or destruction of brackets leads to vibration of pipelines, causing their breakdowns; Do not allow fluid to leak from the connections of the master cylinder with the tank and pipelines; if necessary, replace the tank bushings and tighten the nuts without subjecting the pipelines to deformation. When tightening the pipeline nuts, use wrench 67.7812.9525. Eliminate any detected faults by replacing damaged parts with new ones. Flexible hoses, regardless of their condition, should be replaced with new ones after 125 thousand kilometers or after five years of operation of a VAZ 2110, VAZ 2111, VAZ 2112 to prevent sudden ruptures due to aging.
Checking the functionality of the vacuum booster VAZ 2110, VAZ 2111, VAZ 2112
Press the brake pedal 5-6 times with the engine off to create equal pressure close to atmospheric in cavities A and B (see Fig. 6-2).
At the same time, by the force applied to the pedal, make sure that the valve body is not jammed. Keep the brake pedal depressed and start the engine. If the vacuum booster of the VAZ 2110, VAZ 2111, VAZ 2112 is in good working order, the brake pedal should “move forward” after starting the engine. If the brake pedal does not “go forward”, check the fastening of the hose tip, the condition and fastening of the tip flange in the booster, the hose to the tip and the fitting of the engine intake pipe, since loosening the fastening or their damage sharply reduces the vacuum in cavity A and the efficiency of the booster. rice. 6-2. Vacuum booster: 1 - vacuum booster housing; 2 — amplifier housing cup; 3 - rod; 4 — adjusting bolt; 5 — rod seal; 6 — sealing ring of the main cylinder flange 7 — diaphragm return spring; 8 — amplifier pin; 9 — tip mounting flange; 10 - valve; 11 — hose tip; 12 - diaphragm; 13 — amplifier housing cover; 14 — sealing cover; 15 - piston; 16 — protective cover of the valve body; 17 — air filter; 18 — pusher; 19 — pusher return spring; 20 — valve spring; 21 - valve; 22 — valve body bushing; 23 — rod buffer; 24 — valve body; A - vacuum chamber; B - atmospheric chamber; C, D - channels Adjusting the brake drive of VAZ 2110, VAZ 2111, VAZ 2112
The free play of the brake pedal when the engine is not running should be 3-5 mm.
The adjustment is carried out by moving the brake light switch 7 (Fig. 6-11) with nut 6 released. Install the switch so that its buffer rests against the pedal stop, and the free play of the pedal is 3-5 mm. In this switch position, tighten nut 6. fig. 6-11. Brake drive: 1 — master cylinder; 2 - tank; 3 - vacuum booster; 4 — brake pedal bracket; 5 — brake light switch buffer; 6 — brake light mounting nut; 7 — brake light switch; 8 - brake pedal WARNING Adjust the free play of the brake pedal when the engine of the VAZ 2110, VAZ 2111, VAZ 2112 is not running. If the brake light switch is too close to the pedal, it does not return to its original position. In this case, valve 21 (see Fig. 6-2), pressing against body 24, separates cavities A and B, which opens air access to chamber B, and the wheels are incompletely released when the pedal is released.
How to adjust the brake system on a VAZ 2110
In theory, the parking system should be able to hold the VAZ 2110 when the surface is tilted up to 25%. If it can’t cope, don’t rush to a car repair shop, where you’ll have to shell out a hefty sum - you can provide first aid to your car yourself:
- The tensioner locknut must be loosened.
- Then we tighten the cable.
- We check the full stroke of the lever (it should be 2-4 teeth per sector).
- Tighten the locknut more tightly.
- To be on the safe side, we perform several brakes, checking at the same time whether the stroke of the lever has changed.
In this simple way you can check how well the vacuum brake booster works on a VAZ 2110.
The wheels should rotate without effort, with the lever fully lowered.
Source
How to make a replacement?
Replacement is carried out using a set of keys and screwdrivers. The vacuum brake booster is located under the hood, so work can be done in the garage or outside. The replacement takes place as follows:
- First you need to disassemble the wall of the VAZ 2110 engine compartment, then remove the frill. This element is attached using a seal and upholstery;
Important! The most unpleasant moment in dismantling the vacuum brake booster is unscrewing the four nuts in the interior. To get to them you will have to remove several elements of the dashboard.
Principle of operation
VUT, or as drivers say - vacuum cleaner, creates a vacuum, due to which additional force is created when the brake pedal is pressed. Thus, the vacuum booster ensures that when you press the pedal without applying much force, the brakes are applied quickly and effectively.
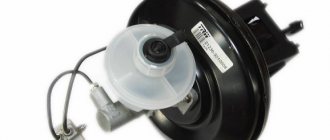
Vacuum brake booster
Such a system on the VAZ 2110 not only simplifies and speeds up wheel locking, but also contributes to less wear and tear on the vehicle and makes driving more comfortable. The “diagonal layout” of the vacuum brake, when the wheels are blocked due to two circuits (front right - rear left and front left - rear right) is designed so that even if one of the circuits fails, it is possible to brake quite effectively, and the car at the same time didn't skid.
Recommendations
If the VUT fails on a VAZ 2110, the replacement can be done with your own hands in a regular garage. However, after replacement it is important to check the amplifier. The fact is that sometimes even a new amplifier can be faulty, and errors are often made during reassembly.
We also recommend reading the article about why the brake pedal fails after replacing brake pads. From this article you will learn about the main reasons for changes in the hardness of the brake pedal after replacing the pads, as well as what the driver should do in such a situation.
For this reason, it is recommended to additionally check the VUT for air leaks. To diagnose, you need to start the car engine and press the brake pedal all the way, then turn off the engine.
If after 30 seconds the pedal does not deviate from the fully depressed position, this will indicate that the amplifier is OK. If, after releasing the pedal, it begins to return back under the influence of the return spring, then this indicates an increase in pressure inside the working amplifier. In turn, this is a malfunction of the vacuum booster.
Examination
Typically, a vacuum booster is checked for serviceability as follows:
- Without starting the engine, you need to press the brake several times (as when pumping);
- After the 5th – 6th press, lock the pedal in the pressed position, start the engine;
- As soon as the engine starts, the pedal moves forward slightly on its own. This is if the vacuum booster is working properly.
If a vacuum is not created, then the first thing you need to do is check the connections and the hose itself for leaks, as well as the check valve of the VAZ 2110 vacuum tank. Often the reason is a malfunction (ruptures, cracks) of rubber parts that require replacement.
In this case, repairs will help, namely replacing faulty parts with serviceable ones.
An internal part, such as the diaphragm, may require repair; over time, a hole may appear in it.
The diaphragm is sold as part of a repair kit. The price of the VUT VAZ 2110 repair kit fluctuates around 250-400 rubles.
Checking the amplifier status
Even an inexperienced motorist can understand that the VUT is out of order, since pressing the pedal will require much more effort. Replacing the VUT VAZ 2110 is required if a hissing sound is heard when you press the pedal, and the pedal becomes too tight. The device should be checked with the engine turned off: the driver should press the pedal several times and then hold it in the depressed position. Next, you need to start the engine, and if the brake pedal goes down to the bottom of the car without strong resistance, then the unit is working properly.
If the pedal is pressed with difficulty, then there is a defect in the unit. To avoid having to disassemble the system once again, it is recommended to check the booster check valve and vacuum hose - these elements must be sealed and not damaged. The most common defects are:
- Spring damage.
- Hose break.
- Diaphragm rupture or crack.
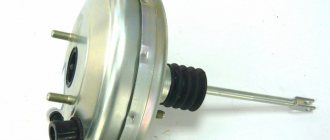
Dismantling
To replace the vacuum booster, the following actions are necessary:
- Remove the engine compartment trim;
- Remove the trim from the windshield;
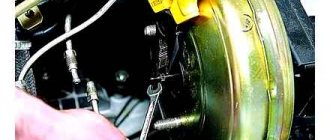
- Unscrew the nuts securing the vacuum booster to the main cylinder with a 17mm wrench;
- Then carefully remove the master cylinder from the studs without damaging the tubes;
- Disconnect the hose from the vacuum tank;
- Disconnect the wiring from the brake light switch from the passenger compartment;
- Unscrew the brake pedal from the body (you will need a 13 key);
- Remove the vacuum brake booster;
- Disconnect the brake light button;
- Using a screwdriver, pry up the locking bracket and remove the pusher pin;
- Unscrew the two nuts securing the vacuum chamber to the bracket and disconnect it. Now it is possible to replace this device with a new one.
The vacuum seal is replaced in the reverse order. Then the brake light button is installed and the free play of the pedal is adjusted, which should be 3 - 5 mm.
Source
Checking the operation and replacing the check valve of the vacuum booster:
1. Disconnect the wire with the “–” terminal from the car battery.
2. Remove completely the left and right noise-insulating upholstery of the engine compartment.
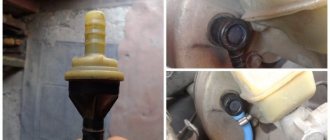
3. Inspect the vacuum hose for tightness of the connection with the fitting on the inlet pipe. If everything is fine here, then we move on.4. Check the connection of this hose at the other end - at the vacuum brake booster.
5. Here you need to loosen the clamp on the hose with the valve and remove it, after which the check valve can be removed from the vacuum booster.
6. You need to put a rubber bulb on the valve from the side of the large diameter fitting (the end that was inserted into the brake booster) and squeeze it. If everything is in order, then the air will calmly come out from the other side - through the valve.
7. If, when opening the pear, it remains in a clamped position, then the check valve of the vacuum brake booster is corrected. If air does not come out from the back side or the pear takes in air after opening it by hand, then the valve must be replaced with a new one. Replacement and assembly occurs in the reverse order.
This procedure can be done without a pear - blow through your mouth. Air should be freely blown out from the back of the valve and it should not be possible to blow into itself.VAZ
Source
Vacuum brake booster VAZ 2110. Diagnostics and repair
Don't believe those who say that the brakes were invented by cowards. They were invented by very smart and long-lived people, and the vacuum brake booster was also invented by very lazy people. In order to check the need for VUT on your car, try stopping it by pressing the brake pedal with the engine off at low speed. Most likely, to come to a complete stop, you will have to press the brake pedal so hard that you will even need to sit up a little in your seat. Can you imagine if such a surprise awaits you during heavy traffic in a stream of cars, and even on a descent? Therefore, this issue simply needs to be taken seriously and with full responsibility for your own and others’ safety. So, let’s figure out how to repair a VUT and replace its components.
Vacuum booster malfunctions
Malfunctions of the vacuum booster result in the driver being unable to apply the necessary force for normal operation of the vehicle's braking system. Thus, there are only three malfunctions of the vacuum brake booster (abbreviated as VUT). This is depressurization of the pipeline (its connection points), breakdown of the VUT check valve, depressurization of its working chambers.
The third reason is quite rare, but the first ones are the main ones. Checking the amplifier is usually not difficult, and even a novice car enthusiast can do it. As for repairs, restoring the tightness makes sense only at joints (clamps); in other cases, as a rule, the entire VUT or its connecting tubes are replaced.
General structure of the brake system of the VAZ 2110
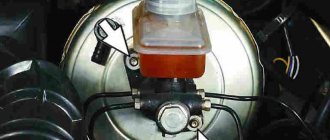
The vacuum brake booster of the VAZ-2110 is located in the engine compartment of the car between the main brake cylinder and the brake pedal.
We will briefly consider the operating principle of the vacuum brake booster in the following figure:
In the initial state, both cavities are connected to the atmosphere through a follow-up valve (not shown in the figure). When you press the brake pedal, the rod moves the diaphragm to the left, the follower valve separates the cavities and a vacuum is created in cavity “A”. And since cavity “B” is still under atmospheric pressure, both of these conditions (vacuum + atmospheric pressure) together give additional force to the braking.
You can take a detailed look at the operation of the entire braking system of a car in its entirety in the following video tutorial.
How it works (video)
Modification of VUT VAZ 2110
The difference between the brake pedals of a foreign car and a VAZ 2110 is immediately noticeable. On foreign cars the brake pedal is softer than on Russian cars. What will be the benefit of modifying the vacuum brake booster ?
What positive and negative aspects will it bring? Tuning the VAZ 2110 brakes is a hot topic that touches on the topic of installing rear disc brakes, but in this article we’ll see what modifications to the VUT (vacuum brake booster) will bring.
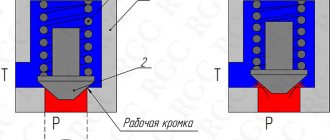
The entire modernization of the VUT tens consists of installing a washer. How the washer affects the braking process can be traced to the operating principle of the VUT: When you press the brake pedal, the rod 18 rests against the rod 3 through the washer 23. Due to the design features, the bypass valves begin to work a little later than the rod begins to press on the GTZ. In this regard, resistance appears on the pedal, and after installing the washer, this process changes in the opposite direction. That is, initially (or simultaneously with the movement of the rod) after the movement of the rod 18, the valves open/close, which is why the VUT begins to work, while the force is significantly reduced at rated loads.
That is, installing the washer in the VUT gives:
- When braking smoothly (when the pads are just being applied), the pedal will be lighter.
- During heavy braking, the pedal response remains the same as before installing the washer.
Installing a washer in VUT VAZ 2110
We remove the frill and sound insulation of the engine shield.
We unscrew the GTZ and move it to the side, the tubes remain screwed on.
We take out the rod with the oil seal from the VUT and reduce its length by screwing in the tip by the thickness of the ring (1mm). It will be more convenient to clamp head 4 in a vice and turn rod 3 with a small pipe wrench.
Using tweezers, pull out rubber washer 23 (to do this, an assistant should press the brake pedal). We place the prepared ring under it, and on top washer 23 and a shortened rod with an oil seal. In other words, we install the ring between positions 22 and 23, increasing the stroke of the rod 18 by 1 mm.
Washer dimensions D1=25xD2=15xh=1. The thickness should be no more than 1mm, because the information content of the brake pedal will be completely lost. The thinner the washer, the less effect it has. The washer can be either metal or rubber. There is no point in increasing the washer, since the efficiency of the vacuum unit does not change, but its characteristics change. Also, with an increase in the thickness of the washer, it may happen that at maximum pressure, the rod 18 will not reach the rod 3, and accordingly, the force will be transmitted through the washer (membrane 24), which can damage it.
We assemble everything in reverse order.
What happened after finalizing the VUT? Roughly speaking, the washer selects “free” pedal travel. But it cannot be called a free stroke either, because this is the stroke of the minimum pressure in the system. Now, with a small pedal force, the car will brake harder than before.
Some reviews after the modification of the VUT say that when braking lightly at low speed, you can feel that the brakes are starting to disappear, so the article is informative in nature, and not a proposal for improvement.
DIY vacuum booster diagnostics
First of all, it must be said that malfunctions and failure of the vacuum amplifier are not fatal. There is only a characteristic difficulty when braking the car and, in some cases, a disruption in the stable operation of the engine. In any case, before the trip, you can independently conduct a fairly effective and not requiring special skills check of the operation of the vacuum brake booster, for this:
- When the engine is not running, press the brake pedal several times at full speed;
- Keep it pressed;
- We start the engine.
If at the same time the pedal “goes” a little to the floor, it means that everything is in order with your vacuum amplifier, but if not, then we continue further diagnostics of the system.
Main symptoms of VUT malfunctions (table)
| Signs | Diagnostics | Conclusion | Elimination method |
| Hissing when braking | The engine is running, press the brake pedal and at the same time detect a hissing sound in the pedal area | The integrity of the diaphragm is compromised | Diaphragm replacement, total VUT |
| Hissing when the engine is running | The engine is running and a hissing sound is heard in the engine compartment. The engine runs unstably; when you press the brake pedal, the speed increases slightly briefly | The integrity of the pipe connecting the VUT and the intake manifold is damaged | Search for air leaks, elimination, replacement of pipe |
| Soft “cotton” brake pedal | When you press the pedal, it steadily, non-stop “goes” to the floor. When braking there is no feeling of stable resistance to pressing force | Depressurization of the hydraulic system, air ingress | Searching for leaks, checking fluid levels, bleeding brakes. |
| The car does not “slow down” | When you press the pedal, the braking is delayed, the pedal travel is not enough to lock the wheels | Large free stroke of the rod | Adjust idle speed |
Lada 2110 1999, 77 l. With. - with your own hands
Cars for sale
Lada 2110, 2001
Lada 2110, 2011
Lada 2110, 2006
Lada 2110, 2005
Comments 43
The VUT is working properly (does not hiss, the pedal falls when starting the engine, the speed does not jump when braking), but the brakes are weak and the pedal is a bit harsh, the first press seems to be normal, the second is harder, the third seems to be without VUT at all (this is if you brake at speed), if Take a break of 5 seconds between presses, then all presses are the same as the first, but no matter how hard you try, the wheels do not lock. Could it be due to a faulty GTZ that the brakes are weak and the pedal is hard?
Apparently I have the same thing, the same symptoms. When you press the pedal several times, the speed increases. And not stable idle.
how did you halve it?
After the repair everything works fine, but they told me that this repair kit is not practical
Did you not treat the rubber parts from the repair kit with anything additional before installation?
So, they say, silicone grease (not to be confused with sealant) moisturizes and gives elasticity to the rubber bands.
How to repair or replace parts
Hisses when braking (with video example)
In the following video you can hear this characteristic sound:
By the way, according to the instructions, the standard “vacuum unit” of the VAZ-2110 cannot be repaired, only replaced, but we “do it ourselves.” And judging by the number of different instructions for self-repairing cars posted on the Internet, it can be argued that any domestic car enthusiast with more than five years of experience can safely be awarded the title of design engineer in absentia. Therefore, we will consider the repair procedure, especially since the difference in cost between the repair kit and the vacuum booster itself is disproportionately high.
In any case, first we will have to dismantle the VUT; for this we will need a minimum of available tools.
Tools
- Open-end and socket wrenches in sizes “10”, “13”, “17”;
- Powerful flat screwdriver;
- Repair kit or VUT assembled;
- Sealant and a little desire to do it yourself.
Dismantling
At this stage, we have a choice: either do everything as the manufacturer’s instructions say (disconnect the main brake cylinder from the VUT, unscrewing all the brake pipes from it, and then bleed it) or a little simpler and with little cost (simply moving it away to the side).
In any case, the choice is yours, but I will take the easy way:
- Disconnect the push rod from the brake pedal:
Source
The device of the brake system on the VAZ 2110
On a VAZ 2110 car, the brake system has a hydraulic dual-circuit drive. It’s no secret that you can’t go far in a car without brakes and safety in this case is close to zero.
Today we will talk to you about how the brake system works on the domestic VAZ 2110 car, or, more simply, the “ten”, we will analyze its main malfunctions, as well as ways to eliminate potential and existing problems.
Diagram of the hydraulic brake drive: 1 – front wheel brake mechanism; 2 – left front–right rear brake circuit pipeline; 3 – main cylinder for hydraulic brakes; 4 – pipeline of the right front–left rear brake circuit; 5 – master cylinder reservoir; 6 – vacuum booster; 7 – rear wheel brake mechanism; 8 – elastic lever of the pressure regulator drive; 9 – pressure regulator; 10 – pressure regulator drive lever; 11 – brake pedal; A – flexible hose of the front brake; B – flexible rear brake hose
Checking the VUT check valve
The cause of poor performance of the vacuum brake booster may be a malfunction of the check valve to which the hose from the intake manifold is connected. To diagnose the latter, you need to remove the hose, remove the valve from the VUT body and put a rubber bulb from a syringe or hydrometer on it from the outside (to which the hose is connected) and squeeze it. If, after releasing the bulb, it remains compressed, the check valve is working properly.
Otherwise, it must be replaced. In a similar way, you can check the inlet hose for leaks in the absence of a compressor.
Diagnostics of the vacuum brake booster can be easily carried out in just a few minutes through simple manipulations without the use of any measuring instruments or tools. For a more objective check, try the various methods suggested in the article. Before doing this, do not forget to check the condition of the hose leading to the VUT from the intake manifold.
The main signs of failure of the vacuum brake booster control valve are a stiff or, on the contrary, soft brake pedal, as well as complete inoperability of the pedal.
Principle of operation
Hydraulic dual-circuit brakes with diagonal distribution are predominantly efficient and reliable. This is due to the fact that if one circuit fails, the second will allow your car to brake.
The circuit system is arranged as follows - one of them is responsible for the left rear and right front wheel, and the second circuit is responsible for the left front and right rear wheel.
This way, you will be able to brake without damaging the brakes or causing other problems with the system.
Braking system design
The most important component of the VAZ 2110 brake system circuit is a vacuum booster and a dual-circuit regulator. The latter is responsible for creating pressure in the rear brake devices.
The brake drive is equipped with a piping system, which is divided into two circuits, brake devices and hoses. They allow the front and rear wheels to brake.
To activate the braking system, a special pedal is located inside the passenger compartment at the driver’s feet. In the VAZ 2110 car it is located in the middle. The main elements of the hydraulic drive are:
- Vacuum booster . Its design helps create pressure directed towards the master cylinder piston.
- Pressure regulator drive . Through it, the brake fluid is directed to the rear devices of the braking system.
- Direct brake pressure regulator VAZ 2110 . Its function is to be responsible for the force of pressure. The unit reduces or increases this indicator, depending on the load on the rear axle of the car.
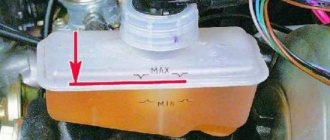
- Master cylinder with reservoir and pistons . On the filler neck of this tank there is a sensor that monitors the emergency level of brake fluid.
- Front wheel brake . Its design includes cylinders, pads and a disc, plus a special alarm that warns of wear or malfunction of the lining.
- Rear wheel brake . Here the system is not disk, but drum. At least, this is the design the factory envisages. Some VAZ 2110 owners believe that drum mechanisms are not reliable and efficient enough, and therefore install disk devices in their place.
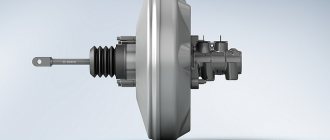
Brake booster
Almost all modern cars are equipped with vacuum brake boosters. They have a fairly simple design, but are very effective and quite reliable.
Purpose
The VUT serves to transmit and increase force from the pedal to the brake master cylinder (MBC). In other words, it simplifies the driver’s actions when braking. Without it, the driver would have to press the pedal with incredible force to force all the working cylinders of the system to function simultaneously.
VUT serves to increase the driver's effort when pressing the brake pedal
Device
The VUT design consists of:
- housing, which is a sealed metal container;
- check valve;
- plastic diaphragm with rubber cuff and return spring;
- pusher;
- follower valve with rod and piston.
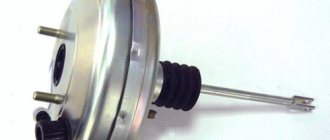
A diaphragm with a cuff is placed in the device body and divides it into two compartments: atmospheric and vacuum. The latter is connected through a one-way (non-return) valve to a source of air vacuum using a rubber hose. In the VAZ 2106, such a source is the intake manifold pipe. It is there that, during operation of the power plant, a vacuum is created, which is transmitted through a hose to the VUT.
The atmospheric compartment, depending on the position of the follow-up valve, can be connected both to the vacuum compartment and to the environment. The valve is moved by a pusher, which is connected to the brake pedal.
The operation of the amplifier is based on the pressure difference in the vacuum and atmospheric chambers
The diaphragm is connected to a rod, which is provided to push the master cylinder piston. When it moves forward, the rod presses on the GTZ piston, causing the fluid to be compressed and pumped to the working brake cylinders.
The spring is designed to return the diaphragm to its initial position upon completion of braking.
How it works
The functioning of the “vacuum tank” is ensured by the pressure difference in its chambers. When the car engine is turned off, it is equal to atmospheric pressure. When the power plant is running, the pressure in the chambers is also the same, but there is already a vacuum created there by the movement of the engine pistons.
When the driver presses the pedal, his force is transmitted to the follower valve through the pusher. Having shifted, it closes the channel that connects the compartments of the device. The subsequent stroke of the valve equalizes the pressure in the atmospheric compartment, due to the fact that the atmospheric channel opens. The pressure difference between the compartments causes the diaphragm to bend, compressing the return spring. In this case, the rod of the device presses on the GTZ piston.
Thanks to VUT, the force applied to the pedal increases by 3–5 times
The force created by the “vacuum driver” can exceed the driver’s force by 3–5 times. Moreover, it is always directly proportional to the applied.
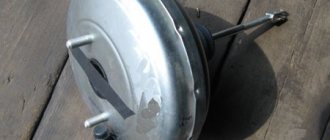
Location
VUT VAZ 2106 is installed in the engine compartment of the car on the left side of the engine shield. It is secured with four studs on the plate of the brake and clutch pedal bracket. The GTZ is fixed on the body of the “vacuum generator”.
The vacuum booster is located in the engine compartment on the left side
Why do you need a pressure regulator?
Not every owner of a domestic “ten” will understand why the brake pressure regulator on a VAZ 2110 needs to be replaced. Simply, this name is not familiar to everyone. A popular designation for a regulator is a sorcerer.
This very sorcerer is located on the rear suspension of your car. It has a lever with a movable position. Depending on the moment of load on the spring, its position changes.
The voltage generated during actuation is directed and distributed to the brake piston. Pressing the piston pedal reduces the load on the rear pads. If the brake system is working properly, the loads are distributed evenly.
In order for the unit to function efficiently and without errors, it is necessary to adjust the brake pressure regulator on your VAZ 2110. This way you can prevent untimely wheel locking.
The brakes stopped working
In the worst case scenario, the brake booster control valve fails completely, resulting in complete inoperability of the brake system. Fortunately, such an outcome is unlikely. But if suddenly it does occur, carefully stop the car, tow it home and contact a qualified specialist in the diagnosis and repair of brake systems. Depending on the severity of the case, the matter may be limited to only replacing the valve, but serious repairs of the entire brake system may be required.
The brake booster control valve is an important element of the braking system, ensuring driving safety. That is why the presence of the described symptoms should not be ignored or postponed “for later”. Contact a qualified mechanic who can professionally diagnose and repair your vehicle's brake system.
The vacuum booster is one of the integral elements of the car's braking system. Its main purpose is to increase the force transmitted from the pedal to the master cylinder. Due to this, driving becomes easier and more comfortable, and braking is more effective. In the article we will analyze how an amplifier works, find out what elements it consists of, and also find out whether it is possible to do without it.
Improvement of the braking system
Many VAZ 2110 owners agree that the factory brake system is far from perfect. Therefore, they decide to modernize and improve the unit using technical tuning.
A popular solution to the issue of brake efficiency is to replace drum mechanisms with disc ones. Of course, in the case of the “ten” we are talking about the rear wheels. When replacing brakes, be sure to take into account the fact that the rear wheels must brake more softly and somewhat later than the front wheels. This way the car won't skid and you won't fly off the road.
Another option is to remove the factory brake master cylinder and vacuum booster. Instead, units from Priora are excellent. Such tuning will eliminate vibrations and also allow you to use the brake pedal effectively and without excessive effort.
Regardless of the changes made to the brake system, after each modification it is mandatory to pump the brakes.