Vacuum brake booster (VUT) is a device that creates additional force in the brake system due to vacuum (vacuum) in the intake manifold. Thanks to the presence of VUT, when pressing the brake pedal, the driver does not need to exert much physical effort for effective braking.
In turn, the “vacuum reservoir” in the brake system:
- increases the sensitivity of the brake pedal;
- it is possible to dose the braking force on the pedal more easily and accurately;
- overall braking performance improves.
Although the device is quite reliable, the amplifier may fail during operation. In this case, you need to know the symptoms and also replace the vacuum brake booster in a timely manner. Read more in our article.
Design and principle of operation of VUT
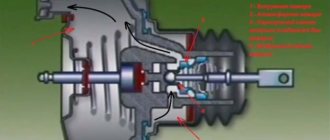
The VAZ 2110 brake booster increases the degree of pressure on the brake cylinder plunger. The unit consists of several parts:
- Frame. Made from two parts. It has brackets for attaching to the vehicle body and mounting the brake master cylinder. When connecting the body parts, a sealed seam is formed.
- Elastic membrane. Necessary for applying vacuum to the working rod.
- Spring. Serves to return the part to its original position.
- Valve. Used to connect the working chamber to the atmosphere.
- Rod and pusher.
When the VAZ 2110 internal combustion engine is running, a vacuum is formed in the intake manifold. This is due to the movement of the pistons towards bottom dead center when the intake valves are open.
The design of the VAZ 2110 vacuum brake booster provides for the presence of two cavities separated by an elastic membrane. One of them is connected to the engine intake manifold with a flexible hose.
When the power plant is operating, the pressure in both cavities is the same. A spring prevents the membrane from moving. When the brake system control lever (pedal) is acted upon, a valve opens, connecting the second cavity to the atmosphere.
Under the influence of rarefaction, the membrane moves. Dragging the rod along with it, the diaphragm presses on the piston of the master cylinder. The response speed and intensity of the impact depend on the degree of pressure on the pedal.
After the driver releases the pedal, the pressure in both cavities becomes equal. The spring returns the elastic membrane in the opposite direction. The pressing of the pads in the brake mechanisms stops.
If the VAZ 2110 vacuum booster is faulty: signs
Failure of a unit leads to deterioration in the performance of the braking system and requires replacement of components. There are several brake booster malfunctions:
- Violation of the integrity of the fitting required to connect the unit to the engine intake manifold. Breakage occurs as a result of mechanical impact on the part. A sign of a malfunction is a hissing sound from the engine compartment. The power plant is unstable. This is due to the fact that the tightness of the intake manifold is broken.
- Membrane rupture. The malfunction occurs when a part wears out naturally or brake fluid gets on it. The driver can determine the breakdown by incorrect operation of the brake system. The pedal is pressed with great force. The braking distance of the VAZ 2110 increases.
- Valve malfunction. If the cavity communicates with the atmosphere at the wrong time, the unit will not work correctly. This malfunction is characterized by an incorrect response of the system to the influence of the control lever.
- Hose break. A crack in the pipeline leads to insufficient vacuum in the cavity. The driver will need to apply more force when pressing the pedal.
To check the functionality of the VAZ 2110 vacuum brake booster, turn off the engine and pump the control lever several times. Press the pedal and start the internal combustion engine. If the unit malfunctions, the pedal will remain motionless, and if the mechanism is working properly, the control lever will move down. This is due to the occurrence of vacuum in the cavity.
Articles
- 21100-3510010-00 — native VUT
A common replacement is AUTO TECHNOLOGIES AT 1001-010VB.
AUTO TECHNOLOGIES AT 1001-010VB
- TRIALLI VA 550
- DAAZ 21100-3510010-00
- DAAZ 2110.3510010
- FENOX VB10003C3
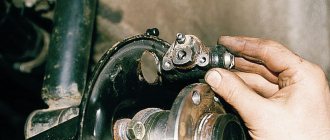
How to remove a VAZ 2110 vacuum booster: replacing VUT
Replacement does not require the use of an inspection hole or overpass. The car is placed in gear to prevent spontaneous rolling. Before starting work, prepare the necessary tools. Replacement will require wrenches, screwdrivers and a new clamp to install on the hose.
The VAZ 2110 vacuum brake booster must be dismantled in the following sequence:
- Disconnect the battery from the power supply. Replacing the vacuum brake booster involves disconnecting the electrical wires. To avoid a short circuit, it is necessary to de-energize the system.
- Unscrew the fastening elements of the soundproofing panel located on the partition separating the passenger compartment and the engine compartment.
- Remove the soundproofing panel.
- Disconnect the plug from the brake light switch. Dismantling the amplifier involves removing the bracket along with the control pedal into the engine compartment.
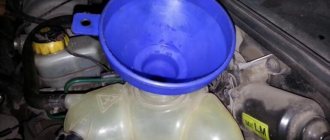
- Remove the expander. There is no need to disconnect the connection pipes. It is enough to disconnect the fasteners of the container and put it aside.
- Disconnect the electrical plug connected to the sensor.
- Unscrew the threaded elements securing the brake master cylinder.
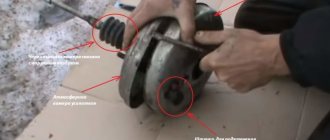
- Remove the part from the seat. After disconnecting the brake cylinder, inspect its boot for damage and the presence of brake fluid leaks. If a leak is detected, the sealing collars will need to be replaced.
- Remove the clamp and disconnect the hose connecting the fitting to the engine intake manifold.
- Unscrew the fasteners securing the pedal assembly bracket to the body of the VAZ 2110 car.
- Remove the vacuum brake booster along with the bracket into the engine compartment.
- Disconnect the pushrod from the pedal. To do this you will need to remove the pin.
- Unscrew the vacuum brake booster from the bracket.
After removal, the assembly is inspected, damaged parts are replaced with new ones. If there is severe wear, the amplifier may need to be completely replaced. Assembly and installation on the vehicle is carried out in the reverse order.
We recommend reading our articles:
- Instructions for replacing the fuel pump on a VAZ 2110;
- Where is it located and how to change the cabin filter on a VAZ 2110.
Functionality check
This instruction will be relevant when checking the vacuum booster on VAZ models from 2113 to 2115. So the technique is clearly universal.
- Press the brake pedal all the way to the floor about 4-5 times. In this case, the engine should not be started. Due to these presses, you will create equal pressure in two sections of your vacuum booster. The valve will report problems as soon as you start pressing the pedal. If you hear squeaks while pressing, this indicates a serious malfunction.
- Once the pressure is even, start the engine while keeping the brake pedal to the floor. If the brake booster system is working properly, then the pedal will rise by itself after the engine is started. If this does not happen, then you will definitely have to face repair work.
- If the check shows problems with the amplifier, do not forget to additionally check the quality of the hose fastening and the condition of the flange. When the mount is abnormal, this may result in the brake pedal not lifting.
Sometimes poorly fixed fasteners cause quite expensive and actually unnecessary repairs or replacement of the vacuum booster. Conduct a preliminary check so as not to complicate your life.
When to change the amplifier
Brakes are a whole system that consists of many elements. Each of them must function correctly and efficiently.
In addition to checking the vacuum booster itself, you should inspect the condition of the brake fluid pipes, make sure there are no brake fluid leaks, and look at the current condition of the brake pedal.
If no faults were found in the braking system, you can think in more detail about the issue of replacing the vacuum booster.
There is no point in repairing the element. It's easier to start replacing right away. The functionality of the car and the power that your engine is capable of producing depend on the quality and timeliness of the work performed. Lack of power negatively affects the speed and comfort of movement around the city and beyond.
Replacement
To replace a vacuum booster you will need a certain set of tools and materials. It includes:
- Screwdriver Set;
- Pliers;
- Socket wrench for 13 and 17 millimeters;
- Special wrench for brake pipes;
- New plugs;
- New fittings.
Replacement procedure
Let's get straight to work.
- Removing the vacuum booster can be difficult due to the brake cylinder. Therefore, we advise you to remove it first. Another option is to disconnect the pipes from the brake cylinder and move them to the side for a while. Here you decide for yourself what is more convenient for you.
- The cylinder is not the main problem. It is difficult to cope with the mounting of the vacuum booster. It's just not very convenient to do this. This is the design of the VAZ 2114.
- Start with the valve - remove the hose fasteners from it, remove the support bush, after which you can pull out the brake pin.
- Next, using a 13 mm wrench, all four fasteners of the vacuum booster are dismantled.
- After all the inconveniences of the work done, you can remove the element and get ready to install a new amplifier in its place.
- To do this, you will have to install a special mounting frame. The frame is tightened with a 17 mm wrench, after which the new component is installed inside the car.
- If you want to make your work as easy as possible, do not forget to first connect the brake pedal to the booster with your finger when reassembling it. After this, it is much easier to cope with putting the vacuum seal back into place.
When replacing the vacuum booster, be sure to change the old vacuum hose at the same time. This element is far from eternal, therefore, as it wears out, it will negatively affect the quality and efficiency of the new vacuum seal.
Recommendations
When replacing and operating, adhere to several recommendations. This makes it possible to increase the service life of the part. Recommendations:
- During operation, regularly inspect the housing for leaks. If brake fluid gets on the elastic membrane, it will be destroyed.
- When removing the cylinder, bend the tubes carefully. Severe bending will cause a fracture or change in the internal diameter of the pipeline.
- After replacement, check the functionality of the system. To do this, select a flat area without obstacles. The brake system should not be tested on public roads.
- When assembling, check the degree of tightening of threaded elements.
Replacing the vacuum brake booster of a VAZ 2110 may be necessary if the unit fails. The part can be installed without specialized equipment. To do this, you must follow a sequence of actions.
Have you replaced the vacuum brake booster on a VAZ 2110? What type of malfunction was in your case? Leave comments and share the article on social networks. Save it to your bookmarks so you can quickly return to it when replacing the VUT on your car.
Watch the video. Replacing the vacuum brake booster of a VAZ 2110.
Which vacuum cleaner to buy
Brakes are the most important system in a car. Repairs should be approached responsibly. The vacuum booster is an expensive unit. Therefore, the owner may have the idea of buying a used spare part. In this case, you can really save money. But, the old vacuum seal can fail at any minute, which means the money was wasted. In addition, disassembling the VAZ 2110 and then replacing the vacuum seal may be in vain.
Consumer choice
| Lucas | 9.4% |
| Iruna | 2% |
| TorgMash | 53.3% |
| Technomaster | 0.8% |
| ProSport | 2% |
| Sport | 2% |
| AT, Czech Republic | 0.8% |
| Factory VUT | 23.1% |
| Another VUT | 5.5% |
| Axiom | 1.2% |
| The leader of this competition was TorgMash, with 53.3% of the votes cast for it. | |