How to remove and install the instrument panel of a VAZ 2106-2103
Let's talk about what the dashboard of this car is.
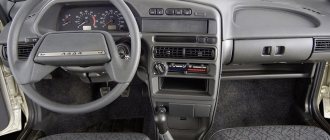
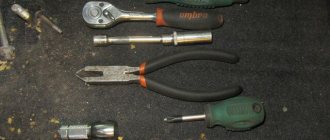
In essence, it is a solid and non-separable metal structure, filled with polymer foam and covered with the same film. This panel includes a variety of vehicle controls, control mechanisms and instruments. The kit we need to remove and install the instrument panel includes a 10mm wrench and two screwdrivers.
When do you need to remove and install the instrument panel? First of all, when you want to replace the old panel with a new one. Also, the panel must be removed if body work of various types is carried out, which may result in damage to the dashboard.
Removal and installation of the instrument panel occurs as a result of the following steps:
- We remove the storage shelf; to do this, unscrew the four screws that secure it;
- We dismantle the radio panel. We find two fastening screws on the left and right at the very bottom, then unscrew the upper fastening screw, which is on the left;
- Remove the bar with additional controls by prying it off with a screwdriver. Under the bar we will find two more screws securing the radio panel. We unscrew them. Remove the radio panel, holding the mounting plate;
- Having unscrewed the fastening screws, remove the two decorative trims of the windshield pillar. The overlays are located on the right and left;
- We remove the decorative lining of the steering column. To do this, we also unscrew the fastening screws;
- We dismantle the instrument cluster panel. We pry this panel off with a screwdriver. in those places where the clamps are located and pull it out a little. Disconnect the cable and speedometer. Next, which is very important, mark the wires so as not to get confused when re-installing. Disconnect the marked wires. Finally, remove the instrument cluster panel;
- Let's start disassembling the panel itself. We pry the watch with a screwdriver and take it out. Again, mark and then disconnect the wires. We take out the backlight lamp from the clock and disconnect the wires;
- Then, carefully separate the interior heater fan switch. Again, we mark the wires and directly remove the switch. Unclench it with a screwdriver and remove the heater damper;
- We separate the glove box illumination lamp from the wire. We dismantle the side of the glove compartment by unscrewing its two fastening screws.
- We find four screws on the instrument panel that secure this very panel from below to the car body;
- Back to the glove compartment again. We find in it two screw nuts that secure the dashboard on top. Two more nuts are located under the instrument cluster. We also unscrew them;
- Hold the panel in your hands and gently pull it towards you. After that, it will separate from the car and remain in your hands;
The panel has been removed. Installing the panel back on the car is done by repeating the same algorithm of actions, but in reverse order.
Source
Electrical wiring of VAZ 2104: differences between modifications
The automakers coped with the task of producing a successor to the famous VAZ “two” without any problems - the “four” inherited almost all the elements and components from the donor VAZ 2105. Such unification made it possible to quickly launch a new model into series, so even the electrical wiring of the VAZ 2104 did not have significant differences. But with the advent of modifications, differences still appeared.
The dream of any summer resident of the 80s - the VAZ 2104 with a powerful engine and large capacity is capable of much.
Total information
The appearance of the VAZ 2104 station wagon on the domestic market was justified by several reasons:
- Firstly, its predecessor, the VAZ 2102, was based on a penny chassis, while the automaker was already mass-producing more modern models (see, for example, VAZ 21213: nuances of operation).
- And secondly, the country needed transport that would allow ordinary citizens to provide themselves with a universal vehicle that could be used to transport simple belongings over long distances.
The video presented in the article clearly demonstrates its capabilities as a multifunctional vehicle capable of not only transporting passengers within the city, but also as a means of active tourism:
- travel to mountainous areas;
- trips to nature;
- long-distance routes to sea coasts, etc.
- The model turned out to be popular in the countries of the socialist camp.
- It was supplied there from 1984 to 2009 inclusive, and was offered under the trade names:
- Lada Estate,
- Lada Combi or Lada Nova Combi,
- Lada Riva Break.
Export versions have always been distinguished by high-quality painting
Note! The electrical wiring diagram of the VAZ 2104 in the export version was distinguished by the presence of a heated rear window and a windshield wiper on the rear door. Also, similar equipment was found in the VAZ 21043, which borrowed the interior and electrical equipment from the VAZ-2107, and since 1994 it has become standard equipment for all “fours”. You can read about other differences between AvtoVAZ export models in the article - how much better is the Samara Baltic version than its domestic counterparts .
You can read about other differences between AvtoVAZ export models in the article - how much better is the Samara Baltic version than its domestic counterparts.
Export models
The photo below shows the wiring of the VAZ 2104 and modifications of the VAZ 21043, which differed only in certain components of the rear of the car.
The photo shows the wiring diagram of the VAZ 21043 model
In particular, the diagram shows elements that are present only on export models:
- Key switch for heated rear window (63) with a power indicator lamp located on the instrument panel;
- Rear door window washer pump electric motor (66);
- Rear window wiper motor (68).
Tip: You can learn about the role of wiring in a car from the publications in the “General Information” section.
Models for the domestic market
Before the appearance of the VAZ-21047 modification, the car was produced in a standard configuration, which allowed car owners to service it with their own hands. And many systems were quite familiar to car owners from other models of the domestic automobile industry.
Classic power supply system VAZ 2104
The Tolyatti Automobile Plant made no secret of the fact that the model was almost completely unified with the VAZ 2105, because even the factory instructions were issued the same for the two models.
There are no secrets: the “four” is an extended “five”
- But with the advent of injection technologies in the VAZ production program, the VAZ 2104 wiring diagram for the injector was modified.
- In particular, the Quartet received:
- five-speed gearbox;
- electrical equipment and interior of the VAZ-2107;
- power unit and new electronic units that controlled its operation.
VAZ 21047 borrowed equipment and components from the seventh model
For reference: According to the factory classification, models with an injection engine were called VAZ-21041i or VAZ-21041 VF, but in the automotive environment they were often called “four-seven”, “forty-seven” or more officially VAZ 21047.
Summary
Overall, the car turned out to be of good quality, which allowed it to remain on the factory assembly line until 2012. Among the features of this attractiveness are low price, the possibility of increasing the interior, ease of maintenance and availability of spare parts.
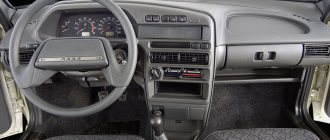
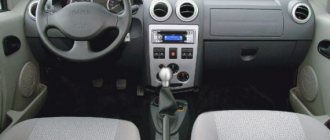
Instrument panel - removal and installation
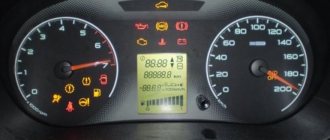
Location of lamps and instruments on the dashboard:
1 — speedometer; 2 — speedometer backlight lamp (AMH12-4 (W4W); 3 — tachometer; 4 — tachometer backlight lamp (AMH12-4 (W4W); 5 — oil pressure indicator; 6 — fluid temperature indicator in the cooling system; 7 — fuel level indicator ; 8 — fuel reserve warning lamp (AMH12-3 (W3W); 9 — fuel level indicator illumination lamp (AMH12-4 (W4W); 10 — shield mounting bracket; 11 — liquid temperature indicator illumination lamp in the cooling system (AMH12-4 (W4W); 12 — warning lamp for insufficient oil pressure (AMH12-3 (W3W); 13 — backlight lamp for the oil pressure indicator (AMH12-4 (W4W); 14 — warning lamp for turning on the parking brake (AMH12-3 (W3W); 15 — battery charge indicator lamp (AMH12-3 (W3W); 16 — indicator lamp for closing the carburetor air damper (AMH12-3 (W3W); 17 — indicator lamp for turning on the external lighting (AMH12-3 (W3W); 18 — indicator lamp for switching on direction indicators (AMH12-3 (W3W); 19 — high beam indicator lamp (AMH12-3 (W3W)
1. Prepare the car for work (see “Preparing the car for maintenance and repair”).
2. Disconnect the wire from the negative terminal of the battery (see “Battery - removal and installation”).
3. Remove the steering column casings (see “Steering shaft casings - removal and installation”).
4. At the bottom of the instrument panel, disconnect the wire from the air damper close warning lamp switch.
5. Using a screwdriver, pry off the top of the shield and remove it from engagement with the panel.
If the top of the shield cannot be pressed out, we pierce two holes with an awl at the bottom of the instrument panel in special places (shown by arrows). Using a thin screwdriver or a metal rod, press out the spring clips and remove the bottom of the shield.
6. Remove the shield from the instrument panel.
7. Having pulled out the shield as much as possible, unscrew the knurled nut securing the speedometer cable by hand and disconnect the cable.
8. Disconnect the two connectors of the dashboard wiring harness from the instrument panel wiring harness.
9. Having previously marked or remembered the location, disconnect the wire blocks from the three key switches.
Installation of the instrument panel is performed in reverse order.
Source
Wiring harness in the cabin
Thanks to electrical wires, all sensors, components and the instrument panel function as a single mechanism, providing a single task: the uninterrupted transmission of electrical signals between interconnected elements.
A complex system of wires in the cabin ensures connection of the instrument panel with other components and sensors
The interior contains most of the elements of the vehicle that provide control of processes, monitoring their implementation and diagnosing the technical condition of sensors.
Automotive system controls located inside the cabin include:
- instrument panel and its backlight;
- external lighting elements of the roadway;
- turn signal, stop and sound warning signals;
- interior lighting;
- other electronic assistants such as windshield wipers, heater, radio and navigation system.
The wiring harness in the cabin ensures the connection of all elements of the car through the fuse box, which, regardless of the number of devices, is the main element of electrical wiring in the cabin. The fuse box, located to the left of the driver under the dashboard, often caused serious complaints from VAZ 2106 owners.
Fuses protect important elements of the electrical circuit from short circuits
When any wire loses physical contact, the fuses overheat, burning the fuse link. This fact was the presence of a problem in the electrical circuit of the car.
Fuses are the main elements of the electrical system
Table: designation and power of fuses in the VAZ 2106 block
| Name | Purpose of fuses |
| F1(16A) | Horn, lamp socket, cigarette lighter, brake lamps, clock and interior lights (plafonds) |
| F2(8A) | Windshield wiper relay, heater and wiper motors, windshield washer motors |
| F3(8A) | Main beam of the left headlight and high beam warning lamp |
| F4(8A) | High beam right headlight |
| F5(8A) | Left headlight low beam fuse |
| F6(8A) | Low beam right headlight and rear fog lamp |
| F7(8A) | This fuse in the VAZ 2106 block is responsible for the side light (left sidelight, right rear light), trunk light, license plate light, right light bulb, instrument lighting lamps and cigarette lighter illumination |
| F8(8A) | Side light (right side light, left rear light), license plate light left light, engine compartment light and side light warning light |
| F9(8A) | Oil pressure gauge with warning lamp, coolant temperature and fuel level indicator, battery charge warning lamp, turn indicators, carburetor choke indicator, heated rear window |
| F10(8A) | Voltage regulator and generator excitation winding |
| F11(8A) | Reserve |
| F12(8 ) | Reserve |
| F13(8A) | Reserve |
| F14(16A) | heated rear window |
| F15(16A) | Cooling fan motor |
| F16(8A) | Direction indicators in hazard warning mode |
The wiring harness is laid under the carpet, passing through technological openings in the metal body of the vehicle from the dashboard to the luggage compartment.
How to replace the instrument panel on a VAZ 2103, VAZ 2106?
Note! Replacing the panel in most cases is not replaced, but only removed in order to replace devices and switches, so if you want to replace only devices or switches, then use the special article on replacement, entitled: “Replacing panel devices”!
Removal: 1) First, taking a screwdriver in your hands, use it to unscrew the five screws that secure the upper and lower parts of the steering column housing.
Note! The letter “A” in the photo indicates the screw that secures the casing to the steering wheel switch; it also needs to be unscrewed, but only carefully!
2) After removing all the screws, remove the lower and then the upper part of the casing from the steering column.
Note! When removing the casing, do not lose the ignition switch ring, which is indicated by the letter “A” in the photo above!
Helpful advice! You can remove the instrument panel without removing the casing; to do this, use a wrench to unscrew the two nuts that secure the steering column compensator.
When both nuts are unscrewed, the steering column will drop sharply down to prevent this from happening, hold it with your hand when unscrewing the nuts. When your instrument panel is installed, then before you start tightening the compensator mounting nuts back, first check the ease of rotation of the steering wheel, and only then tighten the nuts!
Note! The second nut that secures the compensator is located in exactly the same way but only on the right side!
3) Next, using two flat-head screwdrivers at once, pry up the lower part of the panel in the places where it is attached with brackets to the dashboard. After prying, pull the panel towards you and, as a result, remove it from the car.
Note! In general, to remove the panel, it is best to press the panel fastening brackets through the special holes. If these holes are covered with a facing film, then these holes can be easily found at the place where the film will sag, and after finding it, carefully using an awl, you can remove the film so that it does not cover these holes.
And if you don’t have any holes, then, as described at the beginning of this paragraph, remove the panel, that is, pry it off with screwdrivers at the bottom and pull it towards you and remove it!
4) When the panel is removed, take pliers in your hands and, using them, from the back of the instruments that are installed on the panel (first from the speedometer), unscrew the cable end nut and then disconnect the cable end from the speedometer.
5) Now, for convenience, move the panel towards you, and then use a marker to make a mark on each connector. When the marks are made, disconnect all the connectors from each other and, as a result, completely remove the instrument panel from the car.
Installation: 1) Installation of a new instrument panel occurs in the reverse order of removal.
Note! When you get to the final installation of your new panel, always remember! First install the top part of the panel, and only then click on the bottom part to snap it into place.
For more information on how to install the instrument panel, see the video below!
Additional video: Don’t understand how to install the instrument panel in its place? Then watch this video, which will show everything in detail:
Source
Why is the dashboard backlight off?
I will give an example from my life. In the summer, I went fishing with a friend in a VAZ 2115. On the way to the place of arrival, the dashboard lights turned off. The malfunction may seem insignificant during the day, but in the evening and at night the driver in this situation cannot concentrate on the instrument readings, which means it was necessary to eliminate the malfunction.
What to do in this situation, where should you look for the cause of the malfunction? Spare bulbs were available, but no fuses. Or maybe the reason is not in the fuses, but in the gap or lack of contact? You won’t immediately understand where to start. That is, we asked ourselves one opinion: how then to determine guilt in this case?
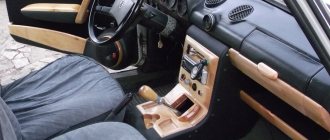
Tuning the interior of the VAZ 2106
All car owners know that tuning the interior means giving it a new look, improving functionality and safety. With its help you can create an individual and unique style.
Interior tuning consists of several stages:
- torpedo tuning;
- instrument panel tuning;
- beard tuning;
- replacement or reupholstery of seats;
- installation of a radio;
- steering wheel tuning;
- tuning the gear knob.
Let's look at each of these points in more detail.
Torpedo tuning
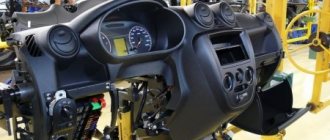
The top front panel of a car is called a torpedo. It is a solid metal structure covered with polymer foam and film. It contains an instrument panel, glove compartment, interior heater, air duct deflectors, and a clock.
The front panel is an important element of the interior, which can be tuned in different ways: replace the dashboard completely with a new one, paint it with liquid rubber, cover the smooth surface of the dashboard with leather, film or flock. Before starting tuning work, you need to remove the panel.
Torpedo dismantling
Removing the console occurs as follows:
- After unscrewing the four fastening screws, we remove the storage shelf.
Tuning options for the VAZ 2106 torpedo
There are several options for tuning a torpedo:
- You can replace the standard torpedo with a new one from domestic or imported cars. It is installed entirely with devices. Since the parts in the “classic” are interchangeable, panels from the VAZ 2105, VAZ 2107 are suitable for the “six” ;
- cover the torpedo with liquid rubber. This option is labor-intensive, and such a coating is short-lived and will begin to crack over time. It will need to be updated periodically. The big advantage of this method is its low cost;
- reupholstering the dashboard with vinyl film, flock, automotive leather or leatherette. This method of improvement is the most effective, but scrupulous and time-consuming. To carry out the work, it is necessary to dismantle the torpedo and take measurements from it. It is best to make a pattern from non-woven fabric. Using the pattern, cut out the component parts. Sew all the pattern pieces together with strong threads. It is advisable to work carefully so that folds do not form on the material, which will spoil the appearance. Then treat the surface of the console with hot glue and pull on the cover. And, using a hair dryer, glue the cover.
Installing the trim on the dashboard
Installation involves removing the dashboard from the car. This will simplify the installation of the lining, perform the work faster and with better quality. Degrease the surfaces of parts with special care: wipe them with anti-silicone, which is used when painting cars.
The applied glue should firmly adhere to the surface of the VAZ dashboard; to do this, you need to walk around the entire perimeter of the spare part with fine-caliber sandpaper. As a result of such actions, active adhesion of the glue to the surfaces will occur. The manipulations performed will help to properly apply the primer to the plastic. The soil must be evenly distributed over the entire plane. The primed surface should be allowed to dry; it should not be subjected to further processing for some time.
The plastic cover can make squeaks when the car is running; to avoid this, you need to secure it with self-tapping screws and carry out additional gluing. The durability of the VAZ torpedo lining is guaranteed both by the color scheme and the shine. But high temperature conditions can be fatal: the lining above the instrument scale will deform.
Instrument panel tuning
Modernization of the VAZ 2106 dashboard consists of replacing the backlight and decorative parts of the scales.
Replacing instrument panel scales and arrows
This process is quite simple and you can do it yourself:
- At the start of work, we dismantle the instrument panel panel of the “six”
- We gain access to the sensors and remove all indicator arrows, starting with the tachometer.
- After this we remove the scales.
- To remove the speedometer needle, unscrew the bolts and turn the scale to the left. After this, the instrument needle will drop slightly and begin to oscillate. As soon as it finally freezes, this position must be marked with a marker. All this is necessary so that the speedometer then indicates the correct speed.
Installation of the removed parts is carried out in reverse order. After which the panel is mounted in its original place.
Instrument panel lighting
Many car enthusiasts know that the “six” has weak instrument lighting. When upgrading the panel, you can add LED lighting. Before starting electrical work, be sure to disconnect the negative terminal from the battery.
- Having dismantled the panel, we remove the devices one by one.
- We take each of them apart.
- We glue the links of the LED strip into the body. For small devices, one link of three diodes is enough. For larger ones you will need 2 or 3 links, depending on what lighting intensity you like.
Be sure to wipe the inside of the glass of the devices so that there are no fingerprints left.
LED illumination of the “six” instruments
As a tuning option, diode lighting of devices is also installed, during the installation of which LED strip and lamps with diodes are also used. Some car enthusiasts are interested in how to make illumination for VAZ 2106 devices of this type and what is required for this.
So, to install LED backlighting for devices, you need 10 -15 cm of tape with diodes of the selected color, several diode lamps of the selected color and a soldering iron.
The order of work is as follows:
- We disconnect the negative contact of the battery and dismantle the instrument panel, disconnect from the connections the board with the instruments where the speed indicators, engine speed indicators, etc. are located.
- We take out the factory backlight bulbs for the instruments of the VAZ 2106 contour arrangement (4 pieces) and for convenience we dismantle the speed and speed indicators;
- We carry out preventive preparation of wiring and diode-type tapes, tested and suitable for use, measure the wires in sections of 3-5 cm, cut and clean the edges for connection, prepare for soldering and solder pieces of wiring with tapes and lamps;
- We prepare places for fastening LED strips and diode lamps, then we stretch the wiring on which the lamps are attached, and glue the tape and prepare the board for soldering;
- After checking the functionality, we assemble the backlight. We recommend the direction of the lamps in the following order: I – vehicle mileage indicator, II – limit (red) line of the power plant speed indicator.
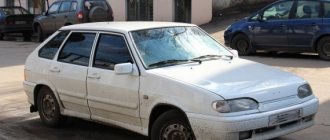
The year 1975 plays an important role in the history of the VAZ automobile company. It was then, 40 years ago, that the first “six” rolled off the assembly line of the plant. Since then, the car has been extremely popular, VAZ 2106 owners have created numerous clubs, and many drivers claim that they would not trade their “swallow” for anything. Let's look at methods for tuning the dashboard of a legendary car with your own hands.
Beard tuning
The center of the car interior is the console, which is called the beard. It acts as a continuation of the torpedo and attracts the attention of all passengers.
When tuning, you can place in your beard:
- watch;
- radio;
- pocket for small items;
- armrest;
- USB sockets;
- switches;
- backlight
Typically, the beard for “classics” is made from plywood, fiberglass, or from spare parts from foreign cars.
Beard drawings can be found on the Internet or taken measurements from an old console. For the pattern, thick cardboard is used, which holds its shape well. The template is transferred to plywood and, after carefully checking the dimensions, cut out along the contour. Next, the parts are connected with self-tapping screws. The finished frame is covered with leatherette or other material in the color of the upholstery. The material is secured with a furniture stapler and glue.
Video instruction:
Tools for connecting the measuring device:
1. A soldering iron, preferably designed for soldering electronic circuits, and not old basins. 4. A benchmark tester you trust. To check the accuracy of measurements using our device, voltage and current. And further calibration of the DSN-VC288 voltammeter. 5. Any load for control measurement (you can use an LED lamp of the appropriate voltage). 7. A utility knife for stripping insulation and preparing wires for soldering.
Consumables for connection:
1. Solder. 2. Soldering acid or rosin. 3. Set of wires for installation. 4. Insulating materials, electrical tape or heat shrinkage. 5. A little electricity to test the device.
Seats
Tuning VAZ 2106 seats can be done in two ways:
- change the upholstery;
- replace the seats by taking them from another car.
Seat reupholstery
To reupholster the upholstery yourself, follow the instructions:
- Remove the seats from the interior. To do this, move the chair back all the way and unscrew the bolts in the runners. Then slide it forward and also remove the bolts. Remove the seats from the interior.
Installing seats from another car
Updated seat upholstery will decorate the interior, but will not make them ergonomic or comfortable. To do this, seats from another car are placed in the “six”. Seats with a distance between the runners of approximately 490 mm are suitable here. Many car owners say that seats from Ford Scorpio, Hyundai Solaris, VAZ 2105, VAZ 2107 fit well into the cabin . But to get a good result, you cannot do without replacing the fasteners.
Replacing seat fastenings
The slides on which the seats in the “six” are located are not located at the same level, so the old fastening requires replacement. To do this you need:
- Move the seat back all the way and unscrew the front bolts. Then move it forward to the dashboard and remove two more screws from the runners.
Car modifications
VAZ-2104. The basic version of the station wagon, with a carburetor engine from the VAZ-2105, 1.3 liters and 64 horsepower. Equipped with a 4-speed gearbox.
VAZ-21041. A prototype of a station wagon, it was equipped with a carburetor engine from a VAZ-2101, with a volume of 1.2 liters and a power of 62 hp. Just like the base model, it was equipped with a 4-speed manual transmission.
VAZ-21042. Export version, the steering wheel was located on the right. The car also received a carburetor engine from the VAZ-2103, with a volume of 1.5 liters and a power of 72 hp.
VAZ-21043. The car was equipped with electrics and interior from a VAZ-2107, some copies had a VAZ-2106 interior. The carburetor engine was borrowed from the VAZ-2103. The gearbox was either 4 or 5 speed.
VAZ-21044. An export model, equipped with a 1.7-liter VAZ-2107 engine with mono-injection, as well as a 5-speed gearbox.
VAZ-21045. The export version with a 1.8-liter engine did not enter mass production.
VAZ-21045D. It was produced in small series since 1999, equipped with a VAZ-341 diesel engine with a volume of 1.52 liters and a power of 50 horsepower. The gearbox is 5-speed.
VAZ-21047. A prototype with an engine starting from a penny. An improved version of the Four, it was equipped with a VAZ-2107 interior and a VAZ-2103 carburetor engine with a volume of 1.5 liters and a power of 72 hp. The gearbox was 5-speed. On export versions, the radiator grille was installed from the VAZ-2107.
VAZ-21048. Diesel station wagon, with a 1.77-liter VAZ-343 engine. The gearbox is 5-speed.
VAZ-21041i. A car equipped with a VAZ-21067 injection engine. volume 1.6 liters. The gearbox is 5-speed. The electrical equipment and interior are from a VAZ-2107 car, and the front seats are from the Izhevsk hatchback IZH-2126.
VAZ-21041 VF. The interior, electrics and front seats are the same as the previous modification; the radiator grille is also borrowed from the VAZ-2107. It was equipped with a 1.5 liter injection engine from the VAZ-2103 and a 5-speed manual transmission.
Radio tape recorder
No upgrade of the “six” is complete without installing a speaker system or at least a simple radio. A standard place for a radio receiver in the beard of a small-sized “six”. It should be trimmed to standard 1DIN. This can be done with a metal file. Then sand the edges with sandpaper.
Installing a radio
The radio tape recorder is attached to the beard using a metal case. Radio installation steps:
- Having bent all the tabs, use special spatulas to remove the radio from the case.
- The metal base is inserted into the prepared hole.
- We fix it using special tongues.
Cables are included to connect the player. The most commonly used are:
- black - “earth”;
- red and yellow (often wound together) - ignition “+”;
- blue - power for the active antenna;
- white - front left (FL) speaker;
- gray - front right (FR) speaker;
- green - rear left (RL) speaker;
- purple - right rear (RR) speaker.
You can connect the radio to the ignition switch to the free INT terminal. Then it will only work when the engine is running and the ignition is on. This connection scheme will protect forgetful car owners from completely draining the battery.
If you twist the red and yellow wires together, the radio will no longer depend on the ignition. You can listen to music with the ignition off too.
Typically, a connection manual comes with the audio system. Following the instructions and color scheme, installing audio equipment in the “classic” will not be difficult.
Speaker installation
A good place to place the speakers would be the front door panels. If you choose the right size speakers, they will fit here very well. To install, perform the following steps:
- Remove the trim from the doors.
- On the casing we cut a hole for the speaker. A hole of the required size can be made using a template. To do this, trace the speaker on paper. You need to work carefully so as not to miss the size.
- We attach the column and screw it to the casing using the fastening that comes with the kit.
- We carefully lay the wires in the cavity of the doors so that they do not sag or fall out.
- We install the casing in place.
Don't forget to buy new fasteners for the door trim. Often, when removing the casing, the fasteners break.
Additional speakers are placed on the dashboard or on the side pillars of the windshield.
If the car owner changes the entire beard, creating it himself to his own size, then he can place a 2DIN radio in it. A player with a large screen will add charm to the appearance of the car.
Some craftsmen insert speakers instead of air ducts. But from personal experience I know that the standard “six” torpedo does not have side window blowing. In humid and cold weather, windows fog up and freeze. If you remove the air ducts for the windshield, the airflow will worsen even more. Therefore, I do not recommend this installation of speakers.
Video: installing speakers and Shumka
Antenna installation
The “six” did not have a standard antenna installed, but a place for it was provided on models before 1996. Adherents of original spare parts can find their original antenna on the car market. It is attached to the front fender of the car.
To do this, you will need to make a hole in the wing, install the antenna, tighten the bolts and connect the wires to the radio and ground. This installation method is quite complicated and not every car owner will decide to make holes in the body.
The ease of installation is distinguished by the interior active antenna, which is attached to the windshield. It is not exposed to precipitation, does not require additional care, and does not interfere with aerodynamics when the car is moving. When purchasing an interior antenna, please note that the kit should include instructions, fasteners and stencils to simplify installation. There are two ways to install a radio antenna inside the cabin:
- The housing is attached to the glass behind the rear view mirror, and the whiskers are glued in opposite directions at the top of the glass.
- The antenna body is secured to the top of the windshield on the passenger side, and the poles are glued along the edges of the glass at right angles to each other.
Installation specifics
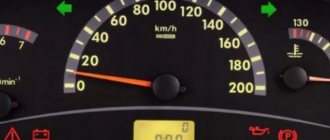
Table of characteristics of a digital voltmeter.
If there are no problems during installation with digital voltmeters that are powered from the cigarette lighter, then models installed directly into the dashboard often force drivers to think about the order in which they are connected.
Most voltmeters on the market have two or three wires for connecting to the network, although there are models with four contacts. The wires have standard color markings:
- the red wire corresponds to “plus”;
- the black wire is connected to the negative;
- The white wire is responsible for controlling the backlight intensity and turning the device on and off.
In some cases, an unexpected problem arises when connecting the voltmeter in this way: it lights up dimly or refuses to work at all. The reason may be the alternative marking of the wires, in which the white wire is responsible for the “minus”, and the black wire for controlling the device.
The voltage sensor is installed in the standard place of the clock, but in some cases, when it is impossible to find free space for the voltmeter, you have to make a hole for it directly in the dashboard.
An excellent place to connect the device is the dashboard plug on the left side of the steering wheel. It is small in size and easy to remove and secure for processing.
Figure 1. Connection diagram for a voltmeter with a pulse stabilizer.
The voltmeter body has a raised surface: the frame around the display will protrude above the surface of the car panel. Thanks to this, the device will not fall inside the mounting socket, and will also hide uneven edges of the hole.
Inexpensive models of voltmeters may not have a separate wire for power; such a device is connected via three contacts on the sensor body (Fig. 1). In this case, the voltmeter is connected using a 4-wire wire from the computer drive (Fig. 2). The wide IDE format connector is cut off, and the remaining wiring is attached by soldering to the contacts of the car wiring. The 4-pin contact ensures a good connection and makes it possible, if necessary, to quickly and effortlessly replace the voltmeter if it breaks down.
Regardless of the structural features of the voltmeter, before installing it, the car’s wiring diagram is studied in detail, according to which the location of the device’s connection is determined. It would also be a good idea to carefully read the instructions for the device, since the methods for connecting it may differ.
Steering wheel tuning
A comfortable and beautiful steering wheel contributes to comfortable driving. To achieve this, in the “six” you need to update the steering wheel in the following ways:
- install a steering wheel from another VAZ model;
- replace with sports one;
- retighten the steering wheel.
Installing a steering wheel from another VAZ model
The simplicity of the Zhiguli allows you to replace the steering wheel with a steering wheel from other VAZ models. Many car owners believe that it is not worth the work and effort that needs to be put in.
The steering shaft of the chisel is thinner than the classic one, and not by much, that is, it is not very easy to make an adapter for the hub. Plus the steering wheel is higher, normally it won’t engage the turn signal bump stop. In a word, you need to suffer a lot to install it properly. As for me, it’s not worth it, if you really want a normal steering wheel, then you need to go and buy it, the choice is very rich right now, but you need to look at them carefully, there are so many leftists that it’s just terrible.
https://autolada.ru/viewtopic.php?t=26289
Replacing with a sports steering wheel
A sports steering wheel will give the car a beautiful and aggressive look. You just need to know that the “six” is not intended for sudden maneuvers. The sports steering wheel has a smaller diameter and is more difficult to make turns with, so you need to get used to it.
Steering wheel reupholstery
In an auto store you can find braiding on the steering wheel for re-upholstering with your own hands. Such kits include the braid itself made of genuine leather, strong threads for sewing and a special needle.
Video: dismantling the steering wheel
Block lights
Here are the turn signal bulbs, dimensions, low and high beams. To get to the side lights and low and high beam lamps, you need to:
Remove the protective cap. We turn it counterclockwise, the indicators are marked on it. It has no thread, but can be removed by turning it 180 degrees. In its inner part there are “antennae” with which it is fixed in the body of the headlight unit.
Remove the wire retainer. It secures the low beam lamps in the reflector housing. This clamp is made of elastic metal, so you need to remove it carefully. We take its upper ends out of the grooves and lower them down, freeing the socket of the high and low beam bulbs.
We take the lamp out of the reflector, holding it by the base, and remove the plug.
Important! If it is working properly, but you want to install a halogen or LED one, it is not recommended to touch it with your hands. Otherwise it may burn out
Changing the headlight bulb
We take it out of the reflector housing along with the socket. If you haven't done this for a long time, then getting it out will be problematic. To do this, remove the low and high beam unit. We insert a finger into the reflector hole, feel for the size bulb and push it out with a little force.
To replace, you need to lightly press the light bulb and turn it half a turn. It will come out of the plinth retainers and can be easily removed. We insert the new one in reverse order.
Important! When installing into the headlight housing, do not use great force - the reflector may crack. To ensure easy installation, it is recommended to sand the seat with fine-grained sandpaper.
This will remove oxides, dust, and dirt that interfere with smooth installation.
Video, instructions for replacing light bulbs in the headlights and dimensions of the VAZ “Seven”:
Direction indicators
We turn the turn signal socket counterclockwise half a turn in the headlight unit housing.
Let's take it out. The lamp, similar to its dimensions, is fixed in the socket with two “antennae”. Therefore, they pressed lightly on it, turned it and took it out. The cartridge is made in the form of a single plate with a slot on one side. Therefore, the light bulb must be pulled out of it with little effort, because its contacts will cling to the socket.
Video about modifying the direction indicator in the headlight unit of a VAZ 2105-07, removing and replacing the lamp in it: