Many motorists are trying to modernize the vehicles they have purchased. They do this for the simple reason that almost all budget and classic vehicle models have a rear drum brake system. Replacing the drum brake system with a disc one is quite justified. The advantages of such a technical solution provide the following:
- More uniform application of braking forces and, as a result, increased efficiency of the braking process;
- Reduce the braking distance of the vehicle;
- Reduce the response time of the brake mechanism;
- Improve heat dissipation.
The last parameter can be considered one of the most significant, especially for those drivers who are accustomed to an active driving style at high speeds or when driving on mountain tracks.
The feasibility of installing disc brakes
Why not install rear disc brakes on the VAZ 2110, especially since all the consumables for this are available, and such an operation can easily be done with your own hands if all the components are found. Whether this makes sense is another matter. The Nissan Micra, for example, still brakes with rear drums, and the Volkswagen Polo Sedan, although built in Russia, only received disc brakes on the rear axle in 2015.
Therefore, it is worth figuring out whether there is any point in installing disc brakes on the rear axle of a VAZ 2110. To begin with, installing non-standard brakes is a change in the design of the car. This fact cannot go unnoticed when passing a technical inspection, so there is every chance of being left with the brakes, but not passing the next technical inspection. Not a very tempting prospect.
Stage 2. Installation of the HCD
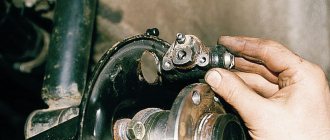
First, the caliper is mounted. It can be placed in relation to the axis in front or behind, but the second option is recommended as the most symmetrical.
Next, you should dock the hub with the faceplate so that the holes completely coincide. If inaccuracies are observed, you can correct this deficiency using a hammer.
A hammer is also used to straighten the corners of the beam, on which the caliper will rest in the future. Please note that there is no need to place the engraver under the upper left bolt, since the caliper bracket will rest against it. But, again, you have a choice - you can refuse the engraver or grind off its head using a grinder.
The brake is mounted on the hub and secured with a faceplate. The necessary gaps are made using washers. Tightening must be done with a force of 3-4 Nm.
Next, the block is installed, the hose is connected to the caliper, and only after that the tube is connected to the hose.
The line needs to be sealed and checked - this is very important. If you are sure that the HCDs are installed efficiently, you can proceed with mounting on the second wheel.
Disadvantages of installing disc brakes
Questions may also arise for the owner of a car with disc brakes, even in the event of a minor accident, from which, unfortunately, no one is insured. By default, the one who has a car in poor technical condition will be at fault. And you can prove to technical experts as much as you like that disc brakes are better than drum brakes, but making changes to the design is a violation.
If we talk about the technical side of this event, then it is worth thinking about how to make a parking brake drive on disc brakes. Of course, there are kits on sale that include everything you need. It is also possible to install even a hydraulic handbrake drive, although its design is somewhat controversial. The pressure regulator in the circuits will also require modification or additional adjustment, since the operating pressure in disc and drum brakes is different.
Disadvantages of TRT
Naturally, where there are advantages, there are always several disadvantages:
- First of all, it is worth noting the price, which is significantly higher than that of drum brakes.
- The need for high-quality adjustment, which may cause a call to the service center.
- Poor-quality installation leads to the fact that the safety of the car is reduced - the car skids.
- In the case of the VAZ-2109, like any other VAZ model, the installation of an anti-aircraft protection device is not a certified event and may result in a fine from the traffic police.
- If you get into an accident, most likely, the expert will find you at fault, since the improvements to your car will be illegal.
- The lack of high-quality tuning can lead to the fact that the rear wheels can brake much better than the front wheels, which is fraught with serious consequences and emergency situations.
In other words, self-installation of the HCD on the VAZ-2109 is recommended only if you are confident in your capabilities. Otherwise, it is recommended to contact a service center. Despite the fact that the safety of your car with such tuning will increase, you may encounter problems with the traffic police, since such improvements are not legal.
Advantages of a disk system
If, nevertheless, the advantages of disc brakes prevail over common sense, then we will try to install a kit for replacing drums with discs. But you should select only certified parts, no amateur activities. Disc brakes will give your car the following:
- The braking distance may be reduced.
- More uniform distribution of braking force, subject to modification of the pressure distributor.
- The mass of disc brakes is less, as a result, the unsprung masses become smaller.
- Disc brakes are easier to maintain.
- Better thermoregulation.
- The pads do not stick or freeze.
Ready kit for installation, or installation in parts
Now let's look at the sets that are offered for sale. Firstly, this is a fairly well-known kit of Darbis rear disc brakes. This set costs about 15 thousand, but it is sold without discs, and the kit includes:
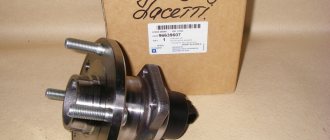
- figure-of-eight bracket and caliper;
- a five-millimeter faceplate as an adapter for the hub;
- set of dirt-proof covers;
- four brake pads from the first generation Ford Focus;
- set of brake hoses from 2110;
- brake hose and handbrake cable bracket.
The kit allows you to install a brake disc of any diameter, the seller issues a copy of the certificate of compliance with technical conditions and a warranty for 30,000 km. 13-inch brake discs will cost another 6-8 thousand per pair, depending on their design and manufacturer. The manufacturer also indicates that the parking brake will now be non-adjustable, that is, adjustment will be made automatically, and manual adjustment will only be required if the cable is replaced. The entire set is installed on standard seats and connected to the brake system without any modifications.
Replacement
Since you can no longer be stopped and you want to equip the rear wheels of your VAZ 2109 with disc brakes, first prepare a set of necessary components that will be useful during the replacement process.
- Calipers. Take simple front calipers from a VAZ 2109;
- Hoses. Use front brake hoses as standard iron hoses will not reach into place;
- Pads. Any high-quality pads of the required size will do;
- Bolts, washers-grower. Requires M10x1.25 bolts 30 millimeters long. A total of 12 pieces and always with growers;
- Distance washers. Take the timing belt tensioner roller washers, which are used for the VAZ 2108. You need 8 of these pieces;
- Faceplate or caliper mounting plate. Need 2 pieces. Moreover, this part is non-standard; it will have to be made as accurately as possible using a coordinate machine;
- Disks. Front discs with a diameter of 240 mm are suitable. First sharpen them so that the hub seats coincide by 60 millimeters. You can machine the hub itself, not the brake disc. The choice is yours.
To achieve a high-quality result when installing disk mechanisms, you first need to ensure proper dismantling of the elements of the braking system.
Dismantling
Let's start the procedure. It is not the easiest, but it is quite possible to do it yourself.
- Remove the wheel.
- Release the tension on the handbrake cable and close the rear pads.
- Using a 12mm wrench, unscrew a pair of guide pins.
- Using a hammer, carefully knock down the brake drum. Before doing this, it is better to clean the seats with a wire brush, and also treat the surfaces with WD40.
- Apply gentle blows with a rubber mallet or use a wooden block. You should knock along the entire circumference of the brake drum. In some cases it comes off quite hard, but be patient.
- Using a screwdriver, pry up the lower tension spring TK and remove it. Using the same spring, you can remove the small springs (guides) that press the pads to the boot. This is the brake cylinder shield.
- Remove the springs, then grab the bottom of the brake pad and lift it up.
- Place the upper part against the brake cylinder and remove the spacer bar.
- Remove the shoe from the brake cylinder and remove the upper tension spring TK.
- Remove the handbrake lever from the handbrake cable and remove the second brake lever.
- Remove the bolts that secure the hub to the beam. Arm yourself with a split wrench or a regular open-end wrench 17 and a wrench to increase the leverage. Treat the bolts with WD40 and remove them.
- Proceed carefully, no sudden movements. Otherwise, you will simply lick off the edges of the fasteners.
- Before knocking down the hub, remove the brake pipe. To do this you need a split wrench. Having torn off the fastening, bend the tube slightly to the side and seal it with a cap, which must first be removed from the cylinder bleeder fitting. This will prevent brake fluid from leaking.
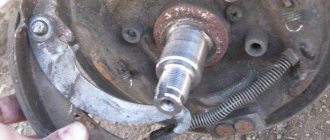
- The hub is held in the seat of the beam, and it is there from the factory. That's why she probably got attached to it. The blows will have to be delivered accurately and powerfully. Hit the support disk from the inside, alternating strikes from above and below.
- If you ruin the platter, no big deal. It's going to landfill anyway.
- When the hub begins to gradually separate from the beam, apply less strong blows. Knock off the hub completely.
Replacement procedure
Faceplate and installation features
Before installing disc brakes on a VAZ 2110, you need to remove the old drum brakes. This operation will not take much time and effort, the only thing is that it is advisable to have a puller for the hub and try not to damage the old brake caliper on which the pads and working cylinder are attached. After the old brakes are removed, you can install a new set, according to the instructions. Nothing new is written there, the only thing worth paying attention to is that the guide bolts are lubricated with a special grease, which is not advisable to remove.
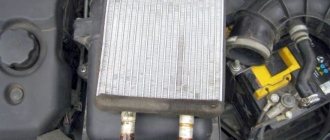
If the question arises about independently selecting spare parts for installing disc brakes instead of drum brakes, then the only difficulty is the manufacture of the faceplate. We have attached a drawing of the faceplate to the article, and this is what the finished rear beam of a VAZ 2110 with disc brakes looks like.
Despite the effective brakes, be careful on the highway and good luck to everyone!
Bleeding the brakes
After all the work has been carried out, it is necessary to perform bleeding - getting rid of air in the system. This is essential to improve operational efficiency. And once you’ve started upgrading, don’t forget to change all the components that have been serving for a long time. Replace hoses, front pads, VAZ-2114 vacuum brake booster, master cylinder. As for the fluid, it should be changed approximately every two years. Briefly, the pumping procedure looks like this:
- Pour liquid into the expansion tank.
- Bleed the right rear caliper.
- Check the fluid level and add if necessary.
- Bleed the left rear caliper.
- Repeat step 3.
- Bleed the right front caliper.
- Follow step 3.
- Bleed the front left caliper last.
Here's how to bleed the VAZ 2114 brakes correctly, the essence of the procedure is to go from the farthest to the nearest caliper (relative to the main brake cylinder).