The instrument panel installed on VAZ cars of the ninth family is made of high-tech energy-absorbing plastic 3 millimeters thick. It is worth noting that at the moment there are several VAZ “torpedoes”. After the mid-90s, the “nine” was produced on the assembly line, on which the high instrument panel of the VAZ-2109 was installed. Up to this point it was low. Oddly enough, the last panel made much less noise than the one that was installed after it. But today is not about that. In this article we will tell you how to tune the instrument panel of a VAZ-2109 and how it is dismantled.
Finalizing the backlight
The best option for tuning this element of the interior would be to refine the instrument information scales, namely, replace the standard backlight with a diode one. Owners of newer VAZs are lucky - in them the light is located from inside the panel. The old “nines” were illuminated from the outside, which created a certain ascetic effect. And she didn’t look very sporty. Changing its location from external to internal is quite possible. To do this, you will need a light-transmitting pad, wires and electrical tape.
How is the backlight of the VAZ-2109 instrument panel modified? To begin with, we will need to remove the socket from the car, after first turning off the power to the car’s on-board network and unscrewing the fasteners of the linings. We will talk about this in detail in the section “How to remove the instrument panel of a VAZ-2109 low and high.” In order for the light from the diodes to fall on the pad from the inside, it is necessary to make several cutouts on its surface. This can be done using a soldering iron or a hot knife.
Sound insulation and cladding
After the dashboard tuning has been carried out, it’s time to start. So:
- We dismantle all interior elements and standard trim.
- We cover all the necessary surfaces with sheets of vibroplast (how to carry out high-quality sound insulation is described in detail in the article “VAZ 2109 interior sound insulation”).
Note. Typically it takes about 14 pieces of insulating material measuring 0.6 x 0.9 meters.
- After soundproofing, we trim the interior.
- First of all, we change the covering on the ceiling (professionals advise gluing it twice, leaving an interval of 5 minutes).
Note. When upholstering the interior, it is imperative to take into account the color scheme and do not forget to glue the doors, dashboard, area next to the gearbox and other parts of the car.
Working with LED Parts
After making the holes, you can move on to the lighting itself. It will be located like on foreign cars, that is, from the inside. In specialized services, such a service costs several thousand rubles, so in order to save money, we will do it ourselves.
As we noted earlier, our lighting will be made on the basis of a regular LED strip. We cut it into several uniform pieces. As a result, we should have several tracks with 3 diodes on each. For uniform illumination, we make a reflector from foil. For the tachometer and speedometer we need 3 pieces of tape. For the remaining elements (scale of fuel level, coolant temperature, etc.) one piece is enough.
Peculiarities
Most of all, “chisels” liked the “low” panel due to one significant difference from the “high” one - the well-designed arrangement of air ducts. In 21083, the air forced by the fan from the heater core is lost somewhere inside it. As a result, the interior does not warm up well.
The second feature is the low quality of plastic and poor fit to body parts. At the slightest vibration or pressure, it begins to creak unpleasantly. And when driving on uneven roads, the noise from it is similar to a baby rattle.
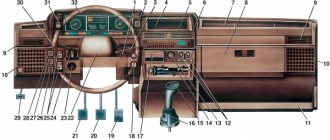
Instrument panels with indexes 2108 and 21083 were installed on the first generation of front-wheel drive models; in addition to the cuts, they differ from each other only in the location of the equipment control buttons and differently combined control devices.
note
We are not in a hurry to throw away the standard suspension, since it will illuminate the arrows of the instrument scales. But it can also be modernized. To do this, you need to glue an LED strip in place of the lamps. Many car enthusiasts note its very bright glow, so we add additional tint film to the diodes. If you don’t have one, you can use a black marker - the result will be the same. In this case, the standard light filter remains in place, and the backlight shade will be soft and uniform with a white-blue color.
Dashboard modification options
The VAZ 2108 dashboard trim will help to radically change the interior decoration. You can choose any modification that suits your requirements and wishes. You can transform the interior by installing leather elements with inserts of bright colors instead of boring ones. Quite popular is a panel overlay that allows you to cover the “native” factory background images.
A car with such an insert will resemble a racing car, and you will need to spend a minimal amount of money. There are quite a few similar options for transforming the interior: from laconic snow-white inserts to bright and colorful ones, allowing the car to radically transform.
Drivers who spend a lot of time behind the wheel of their vehicle decide to change the entire VAZ 2108 dashboard or at least some part of it. A simple change of a light filter from green to another - blue, purple or yellow - adds uniqueness and enlivens the interior.
The VAZ dashboard trim and instrument dials, in which the standard font is modified, add newness to the long-familiar elements of the car. The trim on the VAZ dashboard may differ in appearance, and the instrument scales may have different divisions, for example, not 2-3-4, but 2-2.5-3-3.5-4. It is impossible to significantly change or move the location of the dials due to the design of the car, but modifications for stylization are possible.
The overlay on the instrument scale must be replaced with special care, since the probability of breaking thin arrows or knocking down the zero marks of indicators is very high. And it is very difficult to correct this situation, since arrows are rarely sold separately; they can only be found at disassembly. At the same time, they may differ from the factory ones, which cannot but be striking.
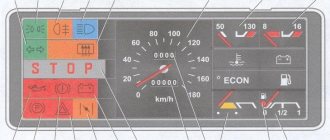
The neon trim on the VAZ dashboard looks stylish. In the evening and at night, it gives the feeling of participating in a race in the famous movie “Fast and Furious”. It seems that you just need to press the gas pedal and the accelerator will turn on, which will take you far forward in a matter of seconds. The design of the low panel of the VAZ 2108 does not provide for:
- minimum brake fluid level indicator unit;
- block thickness control unit;
- presence of lamp health indicator and many other functions.
Despite this, the popularity of cars from early years equipped with such an instrument panel does not decrease. Sometimes it’s even the other way around: the demand for a VAZ 2108 dashboard equipped with the first instrument panels is higher for modern cars that their owners are going to convert. A wide shelf, powerful air exchange, or simply a pursuit of retro elevate these instrument panels to the top of the popularity ratings.
Tuning the low panel of a VAZ is no less popular. In this case, there are no limits to the designer’s imagination. The factory location of the buttons and the niche for the car radio allow you to modify and build in, for example, a TV for a car, or change the location and functionality of the buttons depending on your wishes or needs.
Recently, the installation of a rear camera has been gaining popularity, which significantly increases the maneuverability of the car. Any dashboard allows you to build a screen for such a camera, but sometimes it is necessary to additionally connect some functions to free buttons. Manufacturers thought through the VAZ 2108 dashboard taking into account the wishes of not only the driver, but also the passengers. This explains the convenient location of the buttons, accessible exclusively to the driver in order to avoid emergency situations.
We disassemble the instrument panel of the VAZ-2109 (low panel)
According to the instructions, in order to completely disassemble the socket, we need to do a lot of manipulations. In this case, the work is performed in a certain order. First, 3 heater control knobs are dismantled, then the fan switch device and the fixing screws of the center console trim. Next, the block with wires is disconnected from the rear PTF switch, one cord from the emergency light switch and two from the heated rear window. Afterwards, the block is removed from the external lighting switch and the cigarette lighter illumination.
Next, unscrew the 4 mounting screws of the heater control panel and 2 bolts from the instrument panel visor. Then the spring clips are compressed and the instrument cluster housing is removed from the panel. The speedometer cable is also removed. Next, remove the white block from the instrument cluster and the econometric fitting hose. The mileage reset cable is disconnected from the speedometer. Then the red block with wires is removed.
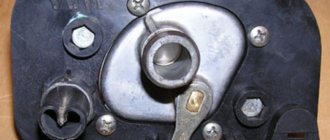
At the next stage, the nut securing the headlight hydraulic corrector, the steering column switches and the steering wheel itself are disassembled. After installing the ignition key in position “1”, the anti-theft device is removed, and then the block with wires from the ignition switch is removed.
How to further remove the instrument panel of the VAZ-2109? After this, the steering column pipe is removed along with the ignition. To remove the handle from the rod, you need to pull the “choke” towards you. Next, remove the bolts securing the damper rods and the elements themselves that hold the shield with dials on the right and left sides. That's it, at this stage the instrument panel of the VAZ-2109 (low) has been successfully removed! Installation of all elements is carried out in the same way as removal, in reverse order.
Visor modification
As noted at the beginning of the article, the standard visor on the VAZ-2109 does not fit the dashboard of the VAZ-2110, and therefore it will have to be improved. In the photo below we present a clear example of how, using epoxy, trimming and special other “individual” means, you can obtain the required window configuration. In the end, just paint the visor black and everything will look as if it were a standard visor.
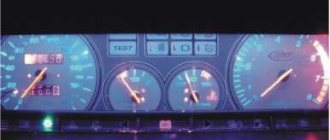
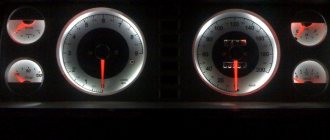
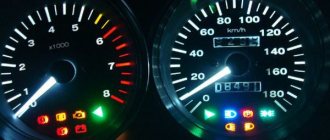
And this is what the finished version looks like:
Agree that such an instrument panel looks much more pleasant. At night, with the backlight on, we get this view:
So, where do the work begin?
Removing the high instrument panel begins with removing the decorative steering wheel trim. Next, you need to unscrew the steering wheel mounting nut so that its front part is flush with the end of the column shaft. But you should not remove the nut right away. The steering wheel on the “nine” sits very tightly on the splines, and with sudden movements it can jump off the mounts and cause serious injury.
With sharp blows of the hand, the part is knocked off its fastenings and finally removed. Next, unscrew the 6 bolts of the lower column casing. The last part, together with the ignition switch trim, is pulled out entirely. We do the same with the top casing. After this, the base is removed from the shaft and the two wire blocks from the sound signal are disconnected. Then the cords from the windshield wiper and washer are removed along the chain, as well as the turning and lighting lever.
After pulling out the “choke”, the handle is removed from the rod and the instrument panel consoles are removed. Next, remove the cigarette lighter socket, the ashtray, as well as the fan switch and heater control knobs (here you can try prying them off with a minus screwdriver). After this, the hydraulic corrector, lighting switches and other elements are removed in the same way.
After it comes to the instrument panel and the speedometer cable has been removed, remove the red and white pads from the instrument cluster and on-board control system. Then we disconnect the ignition switch along with the ground, the control lamp for opening the damper and the guide rods. The shield fastening screws themselves are located on both sides of the cladding. After removing them, the instrument panel (VAZ-2109 Samara) will be in a position free from the car.
Fuel level sensor
Especially for those car owners who want to see accurate data and are looking for a suitable type of sensor, we offer a table for your reference:
The optimal choice would be the sensor number 2108-3827010-01. Its reading is approximately as follows: the middle of the scale indicates a level of 20 liters, and the red zone begins when the tank contains about 5 liters of fuel.
In any case, when you buy a sensor, test it for resistance: the best option for you is a sensor that shows 360 ohms when the tank is empty.
Video review of the dashboard on the VAZ-2109:
Source: auto-cool.com
Experts' opinion
Alexander. It is recommended to abandon GPS navigators with external installation: there is no need to mount them on glass, as the view from the driver’s seat is significantly reduced. If the navigator is really needed, then you can create a special niche for it in the dashboard. The VAZ torpedo is quite simple and has a large amount of free space to accommodate various control units and multimedia systems.
Alexei. I installed a new torpedo from another car - a difficult job that required patience, precision and a lot of free time. I’ll say right away that you need to be well versed in the placement of important elements of your car: wiring, air ducts, and so on. Dismantling must be carried out carefully, since the original torpedo may still be needed.