The following components are also required:
- Silent block remover for removing the upper control arm from the car;
- Steering end remover, without which it is impossible to unpress the outer steering ends
Most likely, if you decide that you can replace silent blocks on a VAZ 2107 yourself, then you have the rest of the tools. These should be elements such as:
- Jack;
- Socket and open-end wrenches 22;
- Socket and socket wrenches 13;
- Thin, well-sharpened chisel;
- Hammer;
- Mount.
All of the above has most likely convinced you that silent blocks are a very important component of the car. Only one conclusion follows from this - you should not skimp on buying high-quality branded silent blocks. You can also use polyurethane components, but the cost may leave you a little shocked.
So, after all the tools and parts for replacement are prepared, you should start with a process such as replacing the front silent blocks.
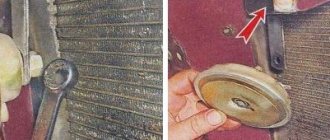
- Loosen the wheel bolts and lift the required wheel using a jack. After this, immediately remove it and loosen the nut on the axis of the upper arm using a 24mm wrench. You can immediately unscrew the steering tip nut and unpress it.
- At the next stage, unscrew the upper ball joint nut using a 24mm wrench. Using a puller, unpress the support pin from the bipod. If there is no puller, simply unscrew the support from the lever using several 13mm wrenches.
- Unscrew the upper arm eye nut and remove it. It is noteworthy that replacing silent blocks involves unscrewing the vertical bolt securing the bumper.
- The next step is to drag the lever to the workbench and clamp it in a vice. Now you should press out the silent blocks with a previously purchased device. Next comes the installation of the front arm silent blocks. Next, install the lever in place, having previously processed the axis of the upper lever. For this you can use nigrol, lithol, motor oil. It is not recommended to tighten the axle nut completely. Tightening is carried out with the vehicle completely lowered.
- Secure the support, put on and secure the wheel, and lower the car from the jack.
Next, prepare a set of silent blocks to carry out such a process as replacing the silent blocks of the rear levers. First of all, you should remove the silent blocks of the rear control arms from the VAZ 2107.
- Remove the wheel from the car;
- Unscrew the lever axle nuts on both sides using a 22mm wrench and remove the thrust washers.
- Screw the complete puller bolt onto the lower arm axle. Tighten the nut while holding the bolt from turning. The puller glass, at the same time, presses on the lower lever, pressing it from the silent block.
- The next step is to remove the silent block from the lower arm.
- On the opposite side of the rear lever axis, the silent block is pressed out in the same way.
Next, the rear silent blocks are directly replaced:
- The new silent block must be centered in the hole of the lower arm;
- To prevent the lower arm of the silent block from moving relative to the axle during pressing, a thrust washer should be placed on the axle on the opposite side and the old self-locking nut should be screwed in.
- Install the puller onto the lower arm axle and tighten the nut. The puller glass should press on the silent block flange. If you didn’t know how to press in a silent block, then this is how it’s done. It is worth noting that when pressing in, a glass of smaller diameter must be installed on the silent block remover than when pressing out.
- Release the puller by unscrewing the screw. Next, install the thrust washer on the axle and tighten the new nut without tightening it.
- In the same way, press in the silent block on the opposite side of the lower arm and screw in a new nut, installing a washer.
- Finally tighten the nuts on the lower control arm after installing the vehicle on the wheels.
In general, this process is not particularly simple, but if you follow the step-by-step instructions, it will be easy to do, just like repairing shock absorbers yourself. The subframe silent blocks are also replaced in a similar manner. Don't forget to reinstall the tie rod ends and then tighten them. The next step is to tighten the lower and upper arm nuts after the machine is completely lowered to the ground.
Replacing the rubber-metal joint of the lower arm without disassembling the suspension
The sequence for replacing the rubber-metal joint of the lower arm:
- Using a twenty-two millimeter wrench, we unscrew the fastening nut of the lower arm.
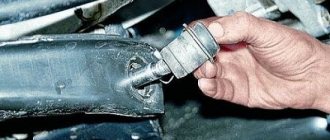
- We use a special puller and press the hinge out of the seat. This is where it came in handy that the steering tip had been removed in advance, since otherwise it would not have been possible to bring the puller to the silent block.
- After removing the damaged silent block, you need to clean and lubricate the axle and threads with oil. The seat is also checked for damage. You need to be prepared for the fact that the silent block will be very difficult to insert back. In this case, it may be necessary to center the lower arm axle and lug using a jack and pry bar.
- Using the prepared device, we press the silent block back into the seat. We fix the movable joints, and we can consider that the work is done.
- We reinstall the previously removed steering tips. At the same time, do not forget to pin them.
- Next, tighten the nuts of both the upper and lower suspension arms of the VAZ 2106. If you follow the technology, then you need to perform this process with four passengers and an additional load of forty kilograms, which is placed in the trunk.
- In the absence of the specified number of assistants, you can get by with one (its weight must be at least eighty kilograms). It will alternately occupy seats in the cabin corresponding to the axles of the VAZ 2106, on which the nuts are tightened.
The rubber-metal hinge of the lower and upper arms is replaced in a completely identical manner on the other wheels of the VAZ 2106. Do not forget that the final fixation of the axle nuts is carried out when all silent blocks have been replaced.
Replacing ball joints
The work scheme (like all others) begins with cleaning the parts from dried dirt. You need to make it a rule to clean all the elements at the bottom of the machine before starting diagnostics and repairs. The most convenient way to do this is to first use a stream of water from the nozzle of a portable car wash, and then dry it with compressed air.
To replace the ball joints, first remove the wheels of the VAZ 2107.
The jack for loading the lower part of the suspension rests on the lower arm, simulating a “load” on the suspension.
- Unscrew the ball pin nut (for example, the top one).
- A special pressing tool is used to separate the steering knuckle and the support pin;
- Unscrew the ball joint and remove it in its protective case.
- A new support is installed and assembly occurs in the reverse order.
The lower support is also replaced. After this, the car is jacked up on the other side and the ball joints on the other side of the suspension are replaced.
After this, it is necessary to adjust the wheel alignment; this must be done at a service station on a special stand.
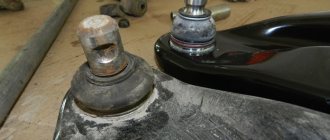
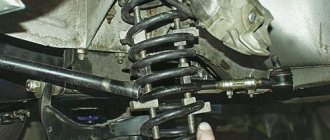
Let us recall that the silent block is a connecting element in the suspension of the VAZ 2107, and any other “classic”, which has an elastic liner made of polyurethane or rubber in order to soften the shocks of the suspension and vibrations. These parts take on large shock loads.
The figure shows the mounting diagram for the silent block of the lower arm.
Because of this, silent blocks are susceptible to wear, as a result of which the alignment is disrupted. It is advisable to change silent blocks every 50-100 thousand km. Mileage.
How to diagnose the upper ball joint?
You can’t handle this on your own; call someone for help. You need to depress the brake pedal. This eliminates the possibility of feeling play in the front wheel bearing. While the assistant holds the brake pedal, you need to sharply rock the front wheel. If there is play in the ball joint, you will feel it. The wheel will move freely when pushed forward and backward. In this case, a crunching or squeaking noise may appear, which can be heard from the installation site of the upper ball joint.
Lada 2106 › Logbook › Replacing the lower arm of a VAZ 2106
After a spring inspection of the front suspension, a crack was discovered in the lower left arm. I was pleased with the decision to change the lever to a stronger one.
At the same time, I decided to change the springs, since they had never been changed since the factory and had already sagged quite a bit. I also decided to replace all the ball joints and the steering linkage set.
At first everything went according to plan, I removed the old lever and pressed out the silent blocks. New silent blocks are still new USSR, in quite excellent condition.
I used a 32 head as a press-in.
I installed the new lever in place, then it was time to install the spring. And this is where the adventures began. The new Soviet spring clamp has given a long life.
As a result, I had to do some magic using a crowbar and a pry bar. Half an hour and the spring was in place.
Phobos decided to take new springs with variable pitch.
They turned out to be 3 cm longer than the original ones (long-term use affected them).
I put it down in frequent turns. The next day I started installing the ball joints and steering linkage. I chose TREK TRS SPORT ball joints, BELMAG steering linkage.
On the second side the spring became much lighter. As a result, almost the majority of the front suspension was replaced in two days. Next, a wheel alignment was done.
ugra.ru
Summary:
Review:
Buy spare part front lower suspension arm, left nk 5012575. Price for left front lower suspension arm; independent suspension arm; front left lever; wishbone; chassis.
Lower front left suspension arm nk 5013941 - Levers and rods from nk. Prices, reviews for NK levers and rods
Levers, sets of arms and suspension beams for Fiat Tipo in the online store 【EXIST.ua】 Buy original and non-original products with prices and photos in Kyiv and Ukraine Pickup the next day if purchased before 15-00 on weekdays. Front lower lever FD Focus II/C-Max 21mm RH re-grade lies at 18mm, pcs. Lever Suspension 5012562 Nk art.
How to replace the silent blocks of the lower arms of a VAZ without a puller.
Comments 27
I agree with everything said above.
I completely share your opinion. This is a good idea. Ready to support you.
I think you are wrong. I'm sure. Let's discuss this. Write to me in PM, let's chat.
As they say... Don't let, don't take, great article!
it was very interesting to read
Thank you so much, how can I thank you?
aaaaaaaaaaaaaaaaaaaaaaaaaaaaaaaaaaaaaaaaaaaaaaaaaaaaaaaaaaaaaaaaaaaaaaaaaaaaaaaaaaaaaaaaaaaaaaaaaaaaaaaaaaaaaaaaaa atticaaaaaaaaaaaaaaaaaaaaaallllllllllllllllllllllllllllllllllllllllllllllllllllllllllllllllllllllllllllllllllllustatory.
Does anyone have a link to good quality?
I'm sorry, but I think you're wrong. I can defend my position. Write to me in PM, let's chat.
I agree with everything said above. We can communicate on this theme. Here or in PM.
Purpose and main elements of suspension
Wheel suspension was created much earlier than the car itself. Initially, it was used on horse-drawn carriages, which were intended for comfortable riding over long distances. They had at least 4 wheels installed, because of this, the designers had to worry about how to ensure the vertical movement of the wheels relative to the body
This was especially important for driving on rough roads
The first pendant designs were created during this period. Later, almost without any changes, they were used in the first machines that had just begun to appear on the market. The speed of these cars could barely reach 30 km/h. But with the development of the industry, it was necessary to reconsider the approach to suspension designs.
Initially, suspension was perceived only as a means of achieving the most comfortable ride, but cars became faster and faster, and the emphasis shifted to handling quality. In the 20s of the last century, a new system of car organization appeared: an independent suspension system was created for the front, and subsequently for the rear wheels.
Today in the passenger car sector it is possible to install independent suspension only for the front wheels. It can be combined with an independent, semi-independent and dependent rear system. Although a large number of schemes already exist, they are all united by common components. There is:
- guide elements that provide a given trajectory of movement of the wheels relative to the body;
- elastic elements responsible for the required force to move the wheels;
- elements whose purpose is to dampen vibrations.
Guide elements: levers, struts, ball joints and rubber-metal joints.
Elastic elements: springs, leaf springs, torsion bars and pneumatic chambers.
Front suspension
The front end of the VAZ “six” has a more complex suspension design, since the front wheels are steerable and it is on this part of the car that heavy loads fall. The front suspension of the car is an independent double wishbone with coil springs, hydraulic shock absorbers and a stabilizer bar.
Front suspension diagram of VAZ 2106: 1 - hub bearings; 2 — hub cap; 3 - nut; 4 — steering knuckle axle; 5 - cuff; 6 — hub; 7 — brake disc; 8 — protective cover of the upper ball pin; 9 — upper ball pin; 10 — bearing (liner) of the upper support; 11 — upper lever; 12 — compression stroke buffer; 13 — spring insulating gasket; 14 — shock absorber; 15 — shock absorber mounting pad; 16 — axis of the upper arm; 17 — rubber bushing of the hinge; 18 — outer bushing of the hinge; 19 — adjusting washers; 20 — suspension cross member; 21 — stabilizer bar cushion; 22 — stabilizer bar; 23 — axis of the lower arm; 24 - lower arm; 25 — clip for attaching the stabilizer bar; 26 - spring; 27 — rubber bushing of the shock absorber spring; 28 — lower spring support cup; 29 — steering knuckle; 30 — lower ball pin race insert; 31 — lower support bearing; 32 - lower ball pin
Cross member
The front beam is the strength element of the volumetric structure. The material used to manufacture the product is steel. The cross member is located in the engine compartment below. The power unit is fixed to it through the cushions, as well as the lower arms of the shock absorption system.
The cross member is the power element to which the engine and lower suspension arms are attached
Levers
The front suspension consists of four levers - two upper and two lower. The lower elements are fixed to the crossbar using an axle. Between the beam and the axle there are washers and shims that change the camber and angle of the front wheel steering axis. The upper arm axle is a bolt that goes through the mudguard post. Rubber-metal products are installed in the holes of the levers - silent blocks, through which the suspension elements in question can move. Using ball joints, the steering knuckle (trunnion) is mounted to the levers. The wheel hub with the brake disc is fixed on it using tapered roller bearings. The hub is tightened on the axle with a nut, and on the right the fastener has a left-hand thread, and on the left it has a right-hand thread.
The front suspension arms connect and hold the elements of the shock-absorbing system
Shock absorbers
Shock absorbers ensure a smooth ride of the car, i.e., eliminating bouncing on uneven surfaces. Damper devices of almost identical design are installed at the front and rear. The difference lies in the size, mounting methods and whether the front shock absorber has a buffer. The front dampers are mounted with their lower part to the lower arm, and mounted on the top on the support cup.
The shock absorber in the suspension design ensures a smooth ride of the car
Table: parameters of the “six” shock absorbers
| vendor code | Rod diameter, mm | Case diameter, mm | Body height (excluding stem), mm | Rod stroke, mm |
| 2101–2905402 2101–2905402–022101–2905402–04 (front) | 12 | 41 | 217 | 108 |
| 2101–2915402–02 2101–2915402–04 (rear) | 12,5 | 41 | 306 | 183 |
Springs
The “six” is equipped with cylindrical springs, the upper part of which rests against the rack through the gasket and support cup, and the lower part rests against the recess of the lower arm. The purpose of the elastic elements is to provide the necessary vehicle clearance and smooth out shocks while driving on uneven roads.
Springs are an elastic element that provides ground clearance and smoothes out shocks when driving over uneven surfaces.Stabilizer
The stabilizer is a part that reduces body roll when cornering. It is made of special steel. In the middle, the product is fixed to the front side members through rubber elements, and at the edges - to the lower arms.
To reduce roll when cornering, the suspension uses a transverse stabilizer
Spherical bearing
The ball joints of the front suspension are a hinge, thanks to which the car is able to maneuver and move smoothly. In addition, these elements make it easy to control the front wheels. The support consists of a housing with a ball pin and a protective element in the form of a rubber boot.
The front suspension contains 4 ball joints that connect the arms and the steering knuckle to each other
How to test the lower ball joint?
It turns out to be much easier to diagnose the condition of the lower ball joint. True, for this purpose you will need to use a caliper. However, if you don’t have one, then any thin metal rod will do. But if you plan to replace the front suspension of the VAZ-2106, stock up on all the necessary tools. If you can’t find any steel wire, then take a match. But you still need a ruler to take measurements. There is a very small plug bolt at the bottom of the ball joint.
Use a wrench or pliers to unscrew it. Now insert the caliper into the hole to check the distance between the top edge and the support pin. The maximum value of this distance should be 11.8 mm. And if you have even a little more, then the lower ball requires replacement. Of course, if repairs are being carried out, then it is better to change all the ball joints. Whatever one may say, this will have a real effect, even the steering play will decrease.
Silent blocks VAZ 2106
Quite high loads are constantly placed on the silent blocks of car suspensions, especially on roads with poor surfaces. Such conditions significantly reduce the life of these parts, as a result of which they fail and need to be replaced. Since the controllability of the car depends on the condition of the silent blocks, you need to know not only how to identify a fault, but also how to replace these suspension components.
What it is
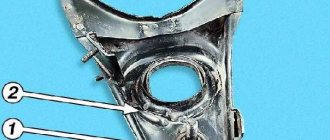
The silent block is a rubber-metal product, structurally made of two iron bushings with a rubber insert between them. Through these parts, the components of the car's suspension are connected, and thanks to the rubber part, vibrations transmitted from one suspension element to another are dampened.
Silent blocks connect suspension elements and dampen vibrations
Where installed
On the VAZ 2106, silent blocks are pressed into the arms of the front suspension, as well as into the reaction rods of the rear axle, connecting it to the body. The condition of these elements must be periodically monitored, and if they are damaged, repairs must be made in a timely manner.
The front suspension of the classic Zhiguli consists of the following parts: 1. Spar. 2. Stabilizer bracket. 3. Rubber cushion. 4. Stabilizer bar. 5. Lower arm axis. 6. Lower suspension arm. 7. Hairpin. 8. Lower arm amplifier. 9. Stabilizer bracket. 10. Stabilizer clamp. 11. Shock absorber. 12. Bracket bolt. 13. Shock absorber bolt. 14. Shock absorber bracket. 15. Suspension spring. 16. Steering knuckle. 17. Ball joint bolt. 18. Elastic liner. 19. Cork. 20. Insert clip. 21. Bearing housing. 22. Ball bearing. 23. Protective cover. 24. Lower ball pin. 25. Self-locking nut. 26. Finger. 27. Spherical washer. 28. Elastic liner. 29. Pressure ring. 30. Insert clip. 31. Bearing housing. 32. Bearing. 33. Upper suspension arm. 34. Upper arm amplifier. 35. Compression progress buffer. 36. Buffer bracket. 37. Support cap. 38. Rubber cushion. 39. Nut. 40. Belleville washer. 41. Rubber gasket. 42. Spring support cup. 43. Upper arm axis. 44. Inner bushing of the hinge. 45. Outer bushing of the hinge. 46. Rubber bushing of the hinge. 47. Thrust washer. 48. Self-locking nut. 49. Adjusting washer 0.5 mm 50. Distance washer 3 mm. 51. Cross member. 52. Inner washer. 53. Inner sleeve. 54. Rubber bushing. 55. Outer thrust washer
What are there
On the VAZ “Six” and other Zhiguli models, silent blocks made of rubber were installed from the factory. However, instead of them, you can use polyurethane products, thereby improving the performance of the suspension and its characteristics. Polyurethane hinges have a longer service life compared to rubber ones. The main disadvantage of polyurethane elements is their high price. If a set of silent blocks made of rubber for a VAZ 2106 costs about 450 rubles, then made of polyurethane it will cost 1,500 rubles. Hinges made of modern material not only improve the behavior of the car, but also better absorb shock and vibration, reducing noise.
Silicone silent blocks, despite their higher cost, improve the characteristics and performance of the suspension
What is the resource
The service life of rubber-metal joints directly depends on the quality of the products and the operation of the vehicle. If the car is used mainly on good quality roads, then the silent blocks can last 100 thousand km. If you frequently drive through potholes, of which there are many on our roads, the service life of the part is noticeably reduced and repairs may be required after 40–50 thousand km.
How to check
Problems with the hinges can be judged by the behavior of the car:
- controllability deteriorates;
- Vibrations appear in the steering wheel and knocks in the front when driving over uneven surfaces.
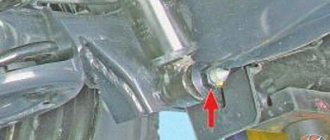
To make sure that the silent blocks have exhausted their service life and require replacement, they should be checked. First, the parts are visually inspected for damage to the rubber. If it cracks and partially comes out, then the part is no longer able to cope with its tasks.
Hinge wear can be determined by visual inspection
In addition to inspection, you can move the upper and lower arms with a pry bar. If knocking and strong vibrations of the silent blocks are observed, then this behavior indicates a lot of wear on the hinges and the need to replace them.
Adjusting the front bearings
This procedure should be carried out as often as possible - approximately every 10 thousand km. mileage On a VAZ-2106 car, the front suspension needs constant monitoring; unfortunately, this is the most vulnerable unit. You hang the wheel, remove the protective cap, after which you will need to loosen the nut on the hub. And only after this you need to use a 27 wrench to unscrew or screw in the nut. It depends on which direction the adjustment is required.
Note: the tightening force should be light. In addition, after tightening, it is necessary to make approximately a sixth to seventh part of a turn in the opposite direction. The fact is that the hub has cone bearings, which are easily destroyed when trying to tighten it with force. But they are able to withstand heavy loads due to the fact that the contact area between the holder and the rollers is rather large.
How to raise or lower the suspension of a VAZ car with your own hands
Sooner or later the time comes to modify the car’s suspension, or, more simply, the motorist is ready to tune the suspension of his VAZ
It doesn’t matter what the reasons are that the motorist decided to raise or lower the car’s suspension: both suspensions are possible, or only the front or rear
You need to understand what responsibility the motorist will have if he decides to lower or raise the car’s suspension. Technologically, lowering or raising a car's suspension is not that difficult, even if the driver has little experience as an auto mechanic. The meaning is different.
How to lower the suspension of a VAZ car
Tuning a car's suspension has some features. Before you lower or raise your car's suspension, you need to think about what the results will be after modifying the suspension. You need to understand that changing the factory standard parameters of the car will lead to a change in the physical properties that were originally included in the design.
Lowering the suspension not only improves the vehicle's handling, but also changes the appearance of the car. There are some peculiarities in lowering the suspension. When lowering, the motorist reduces the ground clearance (clearance). You also need to understand that when the suspension is lowered, the car will not drive on German autobahns and European roads.
There are potholes on our roads, and you will also have to cross tram rails. First, to lower the suspension, you must first diagnose the suspension and calculate the installation gaps between the wheel arch and tires.
It should also be taken into account that the tires will have to be changed to low-profile with high-profile
This is important to consider
Before raising or lowering the suspension, it is worth taking into account popular experience, which shows that all suspension components need to be changed at the same time. If you change suspension elements selectively, this will give the opposite results
How to raise the suspension of a VAZ car
If the car suspension is raised, then you need to make sure that the car does not lose its characteristics. The main suspension components need to be replaced:
Shock absorbers, when replacing there is no need to do anything on your own. In the catalog you need to select those shock absorbers that the manufacturer offers for a specific car model.
But to raise the suspension, stiffer and shorter shock absorbers are chosen.
Anti-roll bar. It is better to change the stabilizers together with the struts.
The springs are chosen to be stiffer and shorter.
The suspension of a VAZ car is raised for several reasons. As a rule, car owners decide to raise the suspension in 2 cases: to increase load capacity and increase ground clearance (cross-country ability). Most often questions arise about how to properly raise the rear suspension. There are lift kits on the market today for different car models. These kits allow you to raise the suspension to a certain height.
We must not forget that an increase in vehicle clearance is accompanied by some changes in the physical properties of the car. For example, the center of gravity increases. This may negatively affect the vehicle's performance when cornering at certain speeds.
The important thing is that before you raise or lower the suspension yourself, you need to take into account a very important value - weight redistribution, which matters when turning the car
Weight redistribution is affected by lowering the center of gravity and increasing the distance between the wheels. Increasing the distance between the wheels is done by switching to wider tires. But this method is limited by the dimensions of the car. Lowering the vehicle's center of gravity can be achieved by installing short struts. This reduces the suspension travel. The racks must be chosen sufficiently rigid.
If the motorist is not ready to calculate all the relationships between parts, physical properties of the car and suspension components, then in order to raise or lower the suspension, you need to choose the second option - purchasing a complete suspension package for a specific car model. On request, as a rule, there are various proposals for modifying the suspension. Specialists will select components for the VAZ based on their preferences and the requirements of the car owner.
But you will need to install them yourself. If you think that raising or lowering a car’s suspension is just a matter of replacing springs and shock absorbers, then this will be a big mistake. Suspension tuning requires making changes to the type of tires and wheels, calculating how the behavior of the car will be affected by changing the suspension. This is provided that the result of the modification is necessarily positive.
xenon-kiev.com.ua
Modernization of VAZ 2106 suspension
Today, many owners of classic Zhiguli cars are improving their cars and making changes not only to the appearance, interior, power unit, but also to the suspension. VAZ 2106 is a car with a wide field of activity for tuning. The only limitation is the financial capabilities of the owner. Let's look at the main points for modifying the suspension.
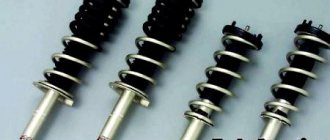
Reinforced springs
They resort to installing reinforced springs on the “six” when it is necessary to make the suspension stiffer, since many are not satisfied with its softness.
Springs from a VAZ 2121 along with a reinforced cushion are often installed on the front of the car. Such elastic elements have a slightly larger coil thickness and rigidity. The rear suspension is mainly equipped with springs from the “four”. In addition to them, dampers from Niva are installed, which will be especially important for those cars that run on gas, since the equipment weighs a lot.
VAZ 2106 owners often replace standard springs with elements from Niva
Air suspension
One of the options for modernizing the suspension is installing air struts. After implementing such a design, it becomes possible to change the ground clearance and generally increase the level of comfort. The car receives driving characteristics similar to the behavior of imported cars. When installing air suspension, both the front and rear shock absorption systems are subject to conversion. To do this, purchase a kit of necessary items, which includes:
- compressor;
- connecting elements;
- pneumatic struts;
- sensors, etc.
The air suspension kit consists of a receiver, compressor, air cylinders, connecting elements
to pneumatic changes in this order:
- Remove the springs from the suspension.
- We cut off the bumper almost completely and make a hole for mounting the air strut in the lower cup and upper cup.
- We install air cylinders.
- The front suspension is also completely disassembled.
- We weld a plate onto the lower arm so that the airbag can be mounted, while removing the stabilizer mount.
- We drill a hole in the plate for the lower mount of the air strut.
- We are finalizing the little things and installing an air spring.
- We repeat similar actions on the other side.
- We install the compressor, receiver and remaining equipment in the trunk.
- We place the suspension control unit in an accessible place.
- We connect the air struts and electrics in accordance with the diagram that comes with the kit.
Video: installing air suspension on classic Zhiguli cars
Electromagnetic suspension
Another option for improving a car’s suspension is electromagnetic suspension. The basis of this design is an electric motor. It can operate in damping and elastic element mode. The operation is controlled by a microprocessor. This type of suspension is installed instead of standard shock absorbers. The uniqueness of the design lies in its virtually trouble-free operation. Plus, it has a high level of security. If for some reason the pendant loses power, the system can switch to mechanical mode thanks to the electromagnets. The most popular manufacturers of such suspensions are Delphi, SKF, Bose.
The electromagnetic suspension is controlled by a microcontroller, ensuring a smoother ride and safer
The suspension of the VAZ “six” does not stand out for its complexity. Therefore, the owners of this car can repair it. You can identify and fix problems by reading the step-by-step instructions. When the first signs of problems appear, you should not delay repairs, since other suspension elements will also be subject to increased wear.
Replacing silent blocks on the upper arm of a VAZ-2107
Now we will describe how the silent blocks on the upper arm are changed, and the described method does not require complete removal of the element from the car.
Everything is done like this:
- To gain access to the lever, jack up the front wheel on the side where the work is being done and remove it. You will also have to unscrew and remove the plastic wheel arch protection (if equipped);
- We unscrew the nut of the upper arm mounting bolt, having previously treated it, as well as the hinges themselves with WD-40;
- We unscrew the bumper mounting bolt, since it will interfere with the removal of the lever fastening element (only on VAZ-2105 and 2107, on other classic models this is not necessary);
- Remove the mounting bolt. After this, the hub will go down, which will make it possible to rotate the lever on the ball joint, so that the side with the hinges is on the outside. This will provide full access to the silent blocks, without the need to completely remove the lever;
- Using a puller, press out the worn element. This is done like this: we put a washer on a long bolt, and then a piece of pipe with a diameter larger than the silent block. We pass the bolt through the hinge, so that the pipe begins to rest against the lever, and the hinge itself is inside it, put on the second washer and screw on the nut. We take two keys - with one we tighten the nut, and with the second we hold the bolt. As it twists, the nut and washer will push the hinge into the inside of the pipe until it comes out completely.
- Before installing a new element, clean the seat and lubricate it with soapy water. To fit, we use a puller with a tube of smaller diameter so that it rests against the side.
- Pressing is done like this: we put a washer and a tube on the bolt, into which we insert a new element. We pass the bolt through the hole in the lever, add the second washer and nut. Before tightening, center the silent block relative to the hole. We tighten the nut until the hinge rests on the washer. Unscrew the puller and install a piece of larger diameter on it. We position the device so that the pipe is on the side where the hinge moves. By tightening the nut, we seat the silent block until the bulges on its outer ring rest against the lever.
- We change the second hinge in the same way. After this, we turn the lever back, lift the hub to align the holes of the lever and the car body, install the mounting bolt, lubricating its body and threads with nigrol, tighten the nut, put the wheel in place and remove the car from the jack.
Lower arm - removal and installation
We remove the lower arm in case of mechanical damage or to replace rubber-metal hinges.
Front suspension lower arm mounting parts:
1 — self-locking nut M14x1.5 (12574811); 2 — thrust washer (2101-2904045); 3 — rubber-metal hinge (2101-2904040); 4 — thrust washer (2101-2904035); 5 — axis of the lower arm (2101-2904032); 6 — spring washer (10517070); 7 — adjusting washer (2101-2904225/28); 8 — nut M12x1.25 (16101511); 9 — lower right lever (2101-2904020-01)
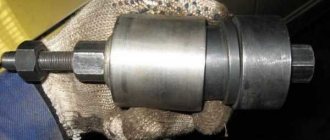
To complete the work, you will need a device for pressing out and pressing in rubber-metal hinges.
Removal
1. We prepare the car for operations (see “Preparing the car for maintenance and repair”).
22 mm socket wrench
Unscrew the two self-locking nuts of the lower arm axle and remove the thrust washers.
19 mm socket wrench
Unscrew the two nuts securing the lever axis to the cross member and remove the thrust washers.
6. Using a mounting spatula, press the lever axis away from the cross member and remove the lever.
Between the axle and the cross member (on the axle mounting bolts) there are washers necessary for adjusting the wheel alignment angles. They should not be removed from the bolts unless necessary. If washers need to be removed, their location should be marked.
7. When replacing the lever, remove the ball joint from it (see “Ball joints - replacement”). When replacing rubber-metal hinges, the support does not need to be removed.
8. Install the lower arm in a vice. To press out the hinge, screw the puller bolt onto the lever axis. The supporting part of the glass should rest against the lever. While holding the bolt from rotating, tighten the puller nut and press the rubber-metal hinge into the glass.
9. Similarly, press out the hinge on the opposite side of the lever and remove the axle.
Installation
1. Having changed the position of the puller parts, we press the rubber-metal hinge into the lever.
2. Through the free hole in the lever, insert the axle with thrust washers.
3. From the side of the pressed rubber-metal hinge, install an outer thrust washer on the axle and screw in a new self-locking nut without tightening it.
4. Having changed the position of the puller parts, we press the second rubber-metal hinge into the lever.
5. Having installed the thrust shaped washer on the axle, tighten the self-locking nut.
6. Install the lower arm and other parts in the reverse order of their removal.
7. Without unloading the suspension, finally tighten the lever axle nuts and install the wheel.
8. After replacing the lever or rubber-metal joints, it is recommended to check and, if necessary, adjust the alignment angles of the front wheels (see “Wheel alignment angles - adjustment”).
How to Replace Silent Blocks on a VAZ 2106
How to replace silent blocks of a VAZ-2106
Quiet blocks Used in the design of cars of all models. They are rubber inserts between parts of the suspension, used to absorb vibrations and, accordingly, to ensure a smooth ride of the chassis. The silent blocks themselves are subjected to very high loads, which leads to their frequent failure.
In this article we will describe in detail how to replace silent blocks on a VAZ-2106; we provide step-by-step annotations and useful tips that will help you perform this complex Do-it-yourself function, without the involvement of car service specialists.
Tools and accessories needed to replace silent blocks
First, you will need to prepare all the necessary tools. Without them, it will be quite difficult to get to the silent blocks in the VAZ-2106 and dismantle defective parts. So, for high-quality and convenient repairs you will need:
- special tools for disassembling ball bearings, front levers, removing and installing a new metal and rubber hinge, as well as for pressing out the remote steering tips;
- open-end wrenches, combination wrenches and 13, 22 and 24 mm wrenches;
- connector;
- fastening kit;
- a thin and sharp chisel that allows you to carefully remove the lower silent blocks without removing the lever;
- hammer.
How to replace silent blocks |
lower control arms for Vas
classic without the help of a puller. VKontakte Groups:.
Replacing silent blocks on VAZ 2101 2107
How to replace silent blocks |
lower arm machine
Vas
Classic model using universal.
Additionally, you will need to prepare the new suspension components for installation on the car. today It is best to purchase polyurethane bushings that are several times different from your normal extended life.
But if your goal. make repairs at minimal cost, then you can make traditional rubber parts.
Repair of the front suspension arm on VAZ 2101 - 2107
Ball malfunction
- 39 0 35k
Which springs are better
- 77 4 92k
Stabilizer's pole
- 128 0 158k
Checking car shock absorbers
- 74 1 88k
How to check car suspension springs
- 36 1 46k
The need to replace the lever on a VAZ 2101-2107 arises if it is bent, small cracks appear, deep potholes appear, or silent blocks rotate in the eyes.
Experienced motorists do not recommend welding the lever. This is a relatively difficult job. To repair the lever you will need the following tools:
- tension puller for springs;
- ball joint removers;
- devices for pressing in and pressing out silent blocks (not needed if the lower arm was purchased immediately assembled. This kit includes the lower axle and silent blocks);
- ring and open-end wrenches for 13, 17, 19, 22;
- hammer;
- chisel;
- mount.
Spring Tension Puller and Ball Joint Puller
Key for fixing the rod of the front shock absorbers
Replacing the front lower suspension arm of a VAZ 2105
A faulty front suspension arm on a VAZ 2105 may cause a knocking sound when the car starts or brakes. You can replace it yourself. More details
It is preferable to buy the lever assembly. If you decide to save money, then you will additionally need to buy more spare parts, namely:
- two silent blocks for the lower arm (if you decide to change both levers, you will have to buy four silent blocks);
- internal washers (in some cases the axle may not be useful).