Replacement of the Niva 21213 Axle Shaft Bearing
All about the Chevrolet Niva bearing axle
In the jeep class there is a car with four-wheel drive. This mechanism determines the presence of a rear axle
, which is designed to transmit torque from the gearbox to the driving rear wheels. The rotation of the wheel is ensured by the presence of gears and axle shafts in the bridge. The shaft is connected to the wheel and drives it. But why do we need a bearing axis in the bridge? Because the topic of the article is called bearing axis
, this will be discussed further. Let's take a closer look at this mechanism in the design of the rear axle, its purpose, design (size, quantity, etc.), malfunctions and the replacement process. To combine the possibilities, a video was placed at the bottom of the material, which made it possible to clearly study the replacement procedure. ABS car replacement kit
Purpose of the bearing axis
bearing
located in the rear axle
Chevrolet Niva, closer to the outer edge.
Like all bearings, it has the function of supporting and smoothing the torque of the rear
.
One part of the axle (inner) engages with the gears (has slots), and the other comes out of the axle and is attached to it by a flange, brake drums and a Niva Chevrolet wheel. To ensure that the axis rotates smoothly and does not become part of the structure, there is a ball bearing
.
bearing It is placed in a special jack of the bridge structure, where it performs its direct function. To prevent it from moving inside the bridge, there is a special hard lock on the axle, which is a locking sleeve. Thus, it has a double fixation. There is also an oil seal on the shaft, which ensures a tight connection to the rear axle
Important! In case of gland damage or wear, negative impact on the bearing
, causing the latter to fail. Therefore the seal must be replaced.
Niva car frequently
Chevrolet should be monitored for the condition of the bearing box and seals, and if damaged, replaced immediately.
design
Like many parts, the bearing axis
has its own design, which is characterized by important indicators:
- number;
- internal and external size;
- height.
These data are necessary not only so that the bearing can be installed in the shaft seat on the shaft and axle, but also so that it performs its intended functions. But it should be noted that if one of these data is known, then the other cannot be calculated. For example, a bearing
The shaft axis has catalog number 2121-2403080. If the product number is known, then this is enough to buy it at a car dealership. Replacement and bearing width 23. Nivag axle oil seal for 2121, 21213. If you need to know the dimensions, the web has data: height and size.
If the part number is unknown, you can take full product measurements by removing the shaft axle. After the measurement, the following data should be obtained:
How to find out if the bearing in the rear axle is faulty
Starting this article, we noted that the rear axle of the car bears the main load in radial and axial form. This ball bearing is a radial bearing. In principle, the axial load should not be present, or be completely negligible. The fact is that such a load on the axle can appear when there is play in the inner race where the seating surface is located. Sometimes you may find play in the middle of the faulty part, in the bearing. This happens when the raceway is worn out, or there are problems with the balls and cage.
There are several reasons for a different type of bearing wear:
— the oil seal is leaking and worn out quite badly;
— various contaminants or, possibly, water have entered;
— the shaft beats quite hard;
— the locking (or also called locking) washer of the strip moves along the neck near the shaft, which is why there is bearing play;
- Shaft imbalance may also be the cause.
Before starting repairs, diagnostics are necessary. To do this, carefully read what needs to be done.
Diagnostic instructions:
- The car needs to be lifted using a jack.
- Spin the wheel very smoothly, without making any noise.
- When you move the wheel towards the rear axle of the car, you may feel some play. In some cases it is even more than two millimeters. This means only one thing: you need to remove the axle shaft to directly check the bearing for its functionality.
Helpful advice:
I’ll tell you how to determine for sure that the axle bearing is faulty and worn out. While the car is moving, you hear a loud noise in the rear wheel area. In some cases, at low speeds you feel vibration.
axle bearing
The topic of the article is Niva axle bearing. To further understand the issue, I will say that the bearings for Niva, Niva-M and Shniva are the same. The only difference is in the locking rings, but I’ll talk about that below. There is only one problem with this node - it is a fake. If a factory bearing is installed and the installation is carried out correctly, the service life of this unit is very long.
Niva axle bearing, Russian manufacturer
For several years now I have been sending this bearing to services and individuals from a Russian manufacturer. The plant is a gas processing plant, located in the city of Vologda. The only recommendation I give is that before installation, very carefully and gently remove the protective cheeks, wash off the factory grease and fill with something more modern. A sharp toothpick works great if you don't have anything special on hand. It’s a mystery to me why our factories, with the tenacity of maniacs, continue to fill bearings with mineral-based lubricants. Maybe they believe from the old days that a bearing can lie in a warehouse for a long time and use a preservation lubricant? I don't have an answer to this question.
Once again about applicability. All cars of the Niva family have the same axle bearings. Other bearings are installed only on fields with a 1.6l engine, since there is a bridge from the classic there. But we won’t consider this option; I don’t remember when I saw her live. The installation kit may differ only in the locking ring. On a regular Niva - with, on a Shniva - a “wide” ring, on cars with an ABS system - a ring with notches for the sensor. I have never used rings of different widths; I always placed and completed orders with “narrow” rings; when they are placed correctly, everything works great. This bearing was still produced by the Minsk Bearing Plant, but then supplies became less and less frequent. Representatives of the plant said that they are now working for Europe and are not interested in supplies to Russia.
Import manufacturer, FAG (Germany)
The bearing of this standard size is made by the German manufacturer FAG. I circled three symbols on the bearing with red circles. The name of the manufacturer (FAG), at which plant the spare part was produced (Turkey) and the designation of the bearing according to the European classification (62208 2RS). Of course, this bearing is made of higher quality than the domestic one. This is confirmed both purely visually and tactilely when you pick it up, and by the rolling of the car after its installation. The advantage of this bearing is its service life and work with wheels of large diameters and discs of non-standard offset. The disadvantage is its price today. As of November 2018 – 1900 rubles per bearing. However, if you sort through a node based on the “sort through and forget” rule, then this is normal. On cars in which FAG bearings were installed in the hub assemblies and axle shafts, a drop in gasoline consumption of about a liter per hundred kilometers was repeatedly recorded. It is not difficult to calculate the further payback of bearings. Delivery of this item is carried out only upon order, with prepayment. Delivery time 2-3 weeks.
Niva axle bearing - installation
This is the stage at which most bearings are destroyed. Sometimes I saw such barbaric installation methods in Papuan services that after that I stopped supplying spare parts. As they once showed me the installation of bearings of this type. Take an old brake drum from a field and place it on a hard surface. Let there be a concrete floor. Lubricate the seat of the bearing and the locking ring with grease (in this case, any grease). We put the bearing on the axle shaft, push it in a little, 100 grams with a hammer so that it doesn’t warp. Next, we will torment the ring: we take a torch or blowtorch in our hands and heat it red-hot. We take it with pliers and put it on the axle shaft. Now, with a previously prepared pipe, we apply one precise blow from above, along the axle axis. The diameter of the pipe should be several millimeters larger than the fitting size, so as not to spoil the “mirror” under the cuff. And no cooling with cold water, only cooling naturally. The process is over. As mentioned above, orders are always completed with a narrow ring. Both because of ease of use and because of pricing.
Basic parameters of factory parts for repair
Main technical indicators of the unit: diameter and length of the axle, number and length of the spline belt, type of bearings and sealing seals. These indicators are determined by the design features of the system and the calculated traction forces under comparable operating conditions at the time of design and production.
Often, under the influence of large loads, deformation of the axle shafts occurs, premature wear and jamming of the support ball bearings occurs, deformation and fatigue wear of the sealing seals, followed by leakage of transmission oil from the axle.
Factories producing spare parts for the domestic automotive industry are constantly striving to improve manufactured vehicle components and assemblies. They regularly offer consumers a newer, more reliable, more modern product.
Let's consider the technical parameters of the drive elements of the rear axle of an SUV.
Half shaft
Main characteristics:
- Catalog number: 21230-2403069-00, 21230240306900, 2123-2403069.
- Length: 760 mm.
- Diameter for oil seal: 35 mm
- Weight: 8.4 kg.
- Manufacturer: AvtoVAZ
- Average market prices: 6900 rubles.
Existing analogues:
- axle shaft, standard size for VAZ 2121 Chevrolet Niva, average price 3,400 rubles;
- Russian, the average price is 3900 rubles.
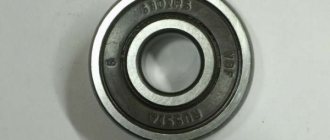
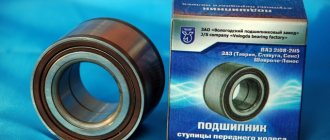
Rolling ball bearings
- Catalog number: 2121-2403080. Designation - GPZ - V76-180508AK2US9.
- Manufacturing index: 180508, 62208-2RS
- Manufacturer: AVTOVAZ
- Average market prices: 400 rubles;
- Inner diameter - 40 mm;
- Outer diameter - 80 mm;
- Width - 23 mm;
- Weight - 440g;
- Rated rotation speed - 5600 rpm.
Foreign bearing manufacturers - NSK, SKF, SNR. Average price from 600 rubles.
Oil seals
- Catalog number: 21100-2301034-00-0 - left and 21100-2301035-00-0 - right.
- Overall dimensions: 35x57x9 mm.
- Manufacturer: AVTOVAZ.
- Average market prices: 45-60 rubles.
Existing alternatives:
- CV joint drive oil seal 2110.08 “RT” universal, manufacturer RUZINOTEHNIKA;
- axle drive seal VAZ-2110-2112, 2123 right/left (35x57x9), manufacturer General Motors.
It is also worth noting the German manufacturer Corteco. This company produces a wide range of oil seals for the VAZ-2123.
Ready-made repair kits
On the spare parts market you can also purchase a ready-made repair kit for servicing the rear axle shafts of the VAZ-2123.
The repair kit for the rear axle shaft of the VAZ 2123 Chevy Niva from ESPRA consists of bearing 2121-2403080, sealing oil seal 2110-2301034 and locking ring 2123-2403084. The average price of such a set is 690 - 890 rubles.
Interesting! Some Niva owners prefer to purchase ready-made kits from one manufacturer, considering this to be a kind of guarantee of the compatibility of the parts being replaced.
Replacing the rear axle oil seal Niva 2121
Reg.: 02/04/2009 Messages: 225 From: planet Norilsk. Age: 38 Car: 21213 95 Reg.: 04/30/2010 Threads / Messages: 3 / 1802 From: Moscow, TiNAO Age: 31 Car: MMC Pajero Sport 05
Reg.: 07/25/2009 Messages: 15 From: Yakutia Age: 35 Car: VAZ 21214 2008, VAZ 21101 2006
Reg.: 06/27/2007 Messages: 1765 From: Moscow Age: 51 Car: 21213, 1999
Name: Alexey Reg.: 03/05/2005 Threads / Messages: 62 / 4065 From: Moscow, Northern Administrative Okrug Age: 39 Car: Shniva 2022 70 tkm
Sever18
Wash the semi-axial bearing as a preventative measure (you need to remove one of the cheeks) and fill it with new grease. At least lithol. Anybody will be better than it was.
There is no need to buy any additional rings, etc.
Reg.: 06/03/2011 Messages: 68 From: Omsk Age: 62 Car: 2131 2001
Reg.: 06/17/2011 Messages: 95 From: Ukraine, Alchevsk Age: 34 Car: VAZ 2121 1982
But I also decided to change the bearings on the axle shafts and the seals. I bought 2121 for the Niva. I brought it to the garage and started putting the oil seal on the axle shaft, but it reached halfway and that’s it. Next comes the thickening of the axle shaft. The store said that the axle shafts on the VAZ 2101 and 2121 are the same. It turns out I have a VAZ 21213 rear axle? I think the bearing will fit. The numbers match 62208r
Added after 8 minutes 26 seconds:
Also in the store the seller said that the seals are installed on the VAZ 21213, I don’t remember anymore, I think it’s from the VAZ 2110
Name: Nikolay Reg.: 11/12/2008 Threads / Messages: 4 / 1073 From: Ruza.Moscow region. Age: 49 Car: VAZ21214. 2001, MP 7.0
Reg.: 02/27/2011 Messages: 1474 From: Biysk Age: 43 Car: VAZ-2131 1.8 carb 2002 (Was: 2121 84 2121 93 21213 01 2123 2007)
Maintenance of the axle shaft 21213. The bearings on the axle shafts 2121.21213, 2123, 21214 are the same. Only the seals are different: On 2121, the oil seals are 2101. On all other axle shafts, the drive seals are 2108-2110. Locking bushings for 2121 are their own. All the others have their own 21213. etc. The only difference is the presence or absence of ABC on the car. If there is ABC, then the bushing is appropriate. Bottom left 2121. Right 2123 under ABC, top - 2123-21213 (without ABC):
Reg.: 11/07/2010 Messages: 30 From: Bratsk Age: 37 Car: VAZ-21213 '96
Reg.: 12/02/2010 Posts: 37 From: Maloyaroslavets Age: 59 Car: VAZ 21213 1999
I'll write down how I removed the axle shaft. Maybe it will be useful to someone. We begin removing the axle shaft as in the manual, and end by screwing the wheel on with the reverse side. It was not possible to “pull” the axle shaft with manual effort. My weight is too low. Next, I proceeded as follows: 1. Attach a chain (about 2.5 m long) to the holes of the disk (symmetrically). It turned out to be a loop that I was going to hit (emphasis on the “U”) with a sledgehammer. 2. I placed a log at the end of the loop, on which I placed a chain, and placed a heavy piece of iron (a counterweight from a washing machine) into the resulting loop so that the loop would not fall off the log. 3. I was about to take a sledgehammer, but the log fell, and when I picked it up and lightly hit the loop with a piece of iron to tighten the chain, a miracle happened: the AXLE MOVED. No problem further.
Added after 1 minute 24 seconds:
In point No. 1, the emphasis is on the first “U”, otherwise not everyone will understand.
How to notice a malfunction in time.
If you fail to pay attention to the failure of this element in time, the rear axle may jam while driving, which can lead to unpredictable consequences at high speed. Therefore, you need to periodically pay attention to the sound of the wheels in order to notice the characteristic hum in time. This usually occurs even at the lowest speed. After this, it is necessary to measure the wheel play, which should not exceed 0.7 mm.
If you fail to pay attention to the failure of this element in time, the rear axle may jam while driving, which can lead to unpredictable consequences at high speed. Therefore, you need to periodically pay attention to the sound of the wheels in order to notice the characteristic hum in time. This usually occurs even at the lowest speed. After this, it is necessary to measure the wheel play, which should not exceed 0.7 mm.
Disassembly
To get to the failed seal, you will need to remove from your Chevrolet Niva all the parts that make up the right or left rear hub assembly. Only then will it be possible to remove the axle shaft.
Disassembly is carried out in this order:
- park the car on a level place;
- secure the front wheels with stoppers;
- turn off the handbrake;
- slightly loosen the nuts securing the wheel;
- lift the car with a jack;
- remove the wheel;
- clean the end of the axle shaft, which protrudes slightly beyond the dimensions of the brake disc, from dirt and rust;
- spray it with WD-40;
- unscrew a couple of bolts holding the drum (you need a 12 mm wrench);
- Move the above brake element with light hammer blows.
Please note that there are two main methods used to remove the drum. In the first case, it is squeezed out of place by screwing the above-mentioned bolts into the free holes
In the second, they use the same hammer, but using a stump of a block as a protective pad. Without this preventative measure, it is easy to damage the edge of the brake disc.
Other section materials
| Transfer case test |
| Methodology for determining the causes of vibration of the transfer case and body floor (in the area of the front seats) |
| Determining gearbox faults by noise |
| Preloading the differential box bearings and adjusting the lateral clearance in the meshing of the final drive gears |
| Checking the contact of the working surface of the gear teeth of the main gear of the reducer |
| Checking technical condition |
| Checking the technical condition of gearbox parts |
| Checking the technical condition of axle shafts |
| Disassembly and assembly |
| Disassembling the gearbox |
| Adjusting the gearbox drive gear bearings |
| Gearbox assembly |
| Axle shaft assembly |
| Removing the gearbox |
| Removing and installing the transfer case |
| Removing and installing axle shafts |
| Installation and adjustment of the gearbox drive gear |
| Installing the differential box |
| Gearbox installation |
| Transfer case device |
| Replacing the gearbox drive gear oil seal |
| Possible malfunctions, their causes and methods of elimination |
| Rear axle gearbox design |
| Measuring the axial free play of the axle shaft on a car |
| Axle bearing lock ring |
Procedure for replacing the front wheel bearing
The owner of a Chevy Niva will need to acquire several types of tools, including:
- Press;
- Suitable type of lubricant;
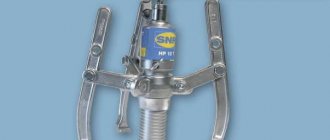
- Puller;
- Retaining ring remover;
- Mandrel for pressing;
- Hammer;
- Torque wrench;
- Hex head size 30;
- Screwdriver with a flat surface “minus”;
- Wrenches with standard sizes 17 and 19.
Front wheel bearing replacement process
- In the first step, the car is placed on a level surface. It is best if it is a lift or a pit.
The wheel rim needs to loosen the nuts and bolts that secure it. Hanging is done first for the front part.
Replacing the wheel bearing of a Niva Chevrolet is very simple. The wheel rim along with the hub nut cover must be removed.
The next step is to install the opposite wheel in its place. The car is lowered using a jack until the second wheel is firmly hooked onto the support.
The main advice is to protect yourself from accidental rotations.
- Using an increased lever, you need to break off the hub nut. Next comes the re-removal of the wheel. Using a jack, we re-position the Niva in a suspended position, suitable for repairs.
- Removing the brake caliper is the next step. Using flat-head screwdrivers, spread the brake system pads, then unscrew the bolts securing the bar. The caliper and suspension element are connected to each other with wire. This will protect the brake hose and will not place increased stress on it. The non-adjustable bearing will also be protected.
- Next, the brake disc is removed. The main effect on it is gentle tapping with a hammer. It's good if the tool is a rubber hammer.
- Then the pin from the steering tip is pressed out of the eye near the steering knuckle. After disconnecting, it is recommended to retract the tip and secure it at a certain distance so that it does not interfere.
It is recommended to make a special mark on the surface of the two mating parts in advance. Then it will be easier to maintain the recommended position.
- Then, when replacing the bearings, they proceed to using a 17-mm wrench. The main thing is to correctly remove from their place the bolts that secure the shock absorber strut and the steering axle to each other. The two bolts that connect the knuckle and the ball joint are unscrewed using another 19mm wrench.
- The drive axle shaft is freed from the hub nut. Then the same is done with the thrust washer.
- The press will become an indispensable assistant when removing the hub from the steering knuckle. If a classic instrument is not nearby, you can use other available options. Then you need to compress the part with a puller. The emphasis is on the holes provided for this.
- Several operations are carried out using a lift: removing two locking rings from the knuckle and dismantling the bearing. The small washer of the puller rests against the outer race, and the larger part rests against the trunnion body.
- Before reassembling, clean the hub and rotary washer. The next step involves installing the retaining ring on the outside. A suitable type of lubricant is used before processing. The bearing is pressed into the fist. Then the inner wheel is installed, to which the hub is attached. Wheel bearings work the same way.
The main thing during screwing is to ensure that there are no excessive loads. Otherwise, the spare part will become deformed and become unusable ahead of time.
Below watch a video on how to replace the front wheel bearing on a Niva.
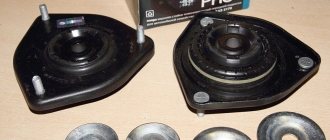
Options for strengthening hubs on Niva
Incorrect adjustment of the hub clearance can cause a serious problem for the car owner. The consequences can be different, from frequent destruction of bearings, which requires constant replacement, to bearing jamming while moving, destruction of the hub assembly and the occurrence of an emergency. Theoretically, every owner knows that to solve the problem it is necessary to abandon tapered bearings in wheel hubs. There are two main options for solving the problem: installing non-adjustable hubs or converting parts for double-row bearings.
Installation of non-adjustable hubs on Niva
The first modernization option involves the purchase of a new reinforced Niva hub unit, which has significant advantages compared to standard products.
Benefits of using a reinforced hub assembly:
- There is no need to adjust the thermal gap;
- The ride quality of the vehicle in complete off-road conditions is improved due to the reinforced hub and the installation of a more reliable and durable bearing;
- It becomes possible to install larger tires and rims with an increased offset;
- The closed design of the bearing and double protection with anthers and seals on both sides prevents water, dust and dirt from entering it, which significantly increases its service life;
- The friction force in the bearings decreases, which has a positive effect on the dynamics of the Niva on the road, and the vehicle roll increases.
The kit consists of two knuckles with pressed bearings, two hubs and two boots
When purchasing, it is important to clarify how many splines your hub has, so that there are no problems with installation. There are kits for Niva that come with 22 and 24 splines
Experts advise installing reinforced units in service centers, however, you can handle the replacement yourself, since installation does not require any additional modifications
It is important when installing new parts to also use new wheel studs and nuts. It is also necessary to lubricate all elements to prevent them from souring and before installing the caliper, clean it, which will have a positive effect on the progress of the vehicle’s pads
The only drawback of this improvement of the machine is the high price of the hub unit. The second reinforcement option involves converting the hub to a double-row bearing and is characterized by minimal financial costs.
Converting a hub to a double-row bearing with your own hands
To remake the part, you will need to purchase two double-row bearings and retaining rings from Moskvich 2141. You can buy standard products or imported analogues of bearings. Imported products are characterized by higher quality.
Strengthening the hub involves turning work, so you will need to find a craftsman who will agree to bore the hub to fit the landing radius of the new bearings of 37 millimeters, grind reinforced internal and external support washers, ten and a half millimeters thick, and grind the steering knuckles according to the drawings. Drawings can be found on the Internet or created yourself, having all the necessary parts available
Particular attention should be paid to refining the steering knuckles, since coordinate grinding of products is required, and not every craftsman will undertake this work
Some experts advise installing bearings from AUDI, then only the steering knuckles will have to be modified. The bearings are made without additional modifications to the hub.
After turning, all that remains is to press the product into the hubs and assemble the non-adjustable hub assemblies in the reverse order. The new bearing comes with special rubber seals, so there is no need to install standard oil seals. When assembling the hub and brake discs, do not forget to install the manufactured support rings.
The redesigned hub assembly is installed on the vehicle and the nut is now clamped as tightly as possible. You won't have to adjust it anymore.
Such a modernization of the hub unit will save the car owner from problems with it; the hum while driving will no longer bother you.
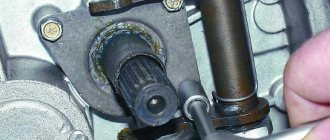
5.7.4 Removing and installing the axle shaft
You screw an M10 nut onto the stud, and put a bushing between the nut and the fixed frame of the rear axle. You insert the protruding end of the stud from the nut side into the hole where the thread of the original bolt used to stick out.
As a result, one end of the stud rested against the body of the original bolt, and the head of the bolt rested against the flange of the axle shaft. There are 4 of them in total; Using a puller, the axle shaft is removed.
If you don’t have a puller at hand, you can use a wheel. To do this, the wheel is put in place, but only 3 nuts are used, which are not fully tightened. There must be space between the wheel and the axle shaft. We press the wheel against the axle and pull it sharply towards us. By repeating the procedure several times, you will be able to remove this bridge part.
If you do not plan to change the oil seal, then you should remove the axle shaft very carefully. So as not to spoil it. The brake mechanism is tied with wire, otherwise it may be damaged; The condition of the sealing ring is checked; To remove the bearing, clamp the axle shaft in a vice; First you need to knock out the retaining ring that holds the bearing in place.
This is done using a chisel. Carefully knock down the ring, trying not to damage the nearby parts; After this, the bearing itself is removed, this is also done with a hammer and chisel. After removing the bearing, you should carefully inspect the axle shaft.
It should not be bent, and there should be no cracks or burrs.
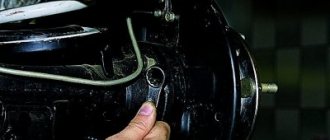
Signs of malfunction and wear of the rear axle bearing of Niva Chevrolet
The main sign of malfunction and wear of the axle bearing is noise when driving from the wheel, and sometimes shearing, knocking, vibration at low speed. What are the axle shaft malfunctions: Getting to know the axle structure before replacing the Niva Chevrolet axle bearing, Before changing the axle bearing on a Chevrolet Niva, be sure to study the axle structure. Below is a detailed view of the bridge with bearing assembly.
Pay attention to the locking ring 9, which will need to be compressed before removing the bearing 8. Below is a detailed breakdown of the axle shaft itself, as well as a list of parts with factory part numbers
For repairs you will need: The differences in the design of the bearing units are only in the locking rings. When replacing, it becomes difficult to remove these washers; in some situations it is simply cut off or knocked down with a hammer. In any case, when installing a new bearing, it is recommended to also change the retaining ring with the seal.
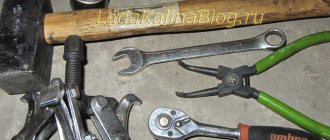
Place the car on a flat surface, place wheel chocks, and lift the wheel with a jack. Standard set of tools and screwdrivers.
Niva Urban rear axle bearing replacement
Muffle furnace or gas burner or gasoline blowtorch. Repair kit for repairing axle shaft bearing, retaining ring, axle shaft seal. New set - oil seal, retaining ring and bearing.
A pipe with a diameter of 40-45 mm and a length slightly longer than the axle shaft. The tool has been selected and the axle shaft can now be removed. This is done in the following sequence: Place the car on a flat surface, install wheel chocks under the front wheels. We tear off the wheel mount, jack up the car, and install a stand under the rear axle.
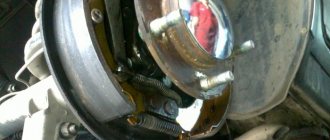
Remove the wheel and unscrew the brake drum mounting screws. We unscrew the bolts securing the brake drum to the axle shaft. We knock down the brake drum, but not directly with a hammer, but through a wooden spacer, otherwise there is a danger of damaging the brake drum. We knock down the brake drum using a wooden block
If you are not going to change the oil seal, be careful not to damage its working edge. If the seal is damaged or requires replacement, replace the seal as described here
Secure the brake mechanism with wire. Inspect the axle shaft; if it is bent or cracked, replace it.
Removing and replacing a Lanos taillight - How to repair a VAZ
Reviews of Mitsubishi Carisma: advantages and disadvantages of the car - AVTO.RU
Installing a New Seal
After removing the axle shaft, the metal shield where the brake pads are attached will remain hanging on the copper pipe with the fluid, so it should be fixed by inserting the 2 upper bolts back into the holes. Then follow the instructions:
- Remove the thick rubber gasket from the rear axle flange.
- Pull out the old oil seal by prying it with a screwdriver or pliers. Clean the seat and wipe with a rag.
- Lightly lubricate the new seal with transmission oil and insert it into the socket of the Niva rear axle as evenly as possible.
- Using a round pipe adapter, press the oil seal into the socket with light blows of a hammer. You can use an old seal as an additional attachment.
At the end of the procedure, you must thoroughly wipe all parts free of oil - the brake cylinder, pads, drum and metal shield. Before reassembling, it would be a good idea to check the axle bearing for wear and grease. Wear is indicated by difficulty turning, binding, or slight noise. If you discover a malfunction, take the axle shaft to the nearest car service center; you will not be able to replace the bearing without special equipment.
To check the grease inside the bearing, you need to pry the plastic covering the rollers with an awl and remove it. Then add thick Litol-type lubricant inside and put the plastic in place, and then begin assembly.
At the end, it is important to check the oil level in the rear axle gearbox of the Chevrolet Niva. The test is carried out on a fully assembled car, standing on a level area. The filler plug is unscrewed from the gearbox housing, after which the oil level is determined visually or using a thin wooden stick. If there is a shortage, you need to insert a hose of a suitable diameter into the filler neck with a watering can at the end, where the lubricant is poured. It is more convenient to top up with an assistant: you control the level, and the assistant gradually adds oil.
Is it possible to replace the front wheel bearing of a Niva Chevrolet with your own hands?
It is recommended to entrust installation to professionals. However, if you have a set of tools and free time, it is quite possible to perform the replacement yourself. Before starting repairs, you need to visit a car wash and wash the front suspension especially thoroughly. The second important step is the correct dismantling of the part. To do this, you need to block the wheel and remove the bolts that secure the wheels. Further:
- first, use a jack to suspend and secure the front part of the car;
- then remove the wheel along with the brake pads;
- unscrew the piston pin of the swing arm;
- we take out the bolts that secure the ball joints;
- screw the hub together with the hinges.
The fact that the wheels on a Chevrolet Niva rotate smoothly is determined by the presence of bearings in the hubs. They can stand on both the front and rear wheels. Bearings are designed to reduce friction.
If such bearings fail, the wheel warps and the rubber begins to wear unevenly and quickly.
If the bearing is damaged while the car is moving, the wheel will simply lock and stop rotating.
For this reason, it is important to pay timely attention to bearings, especially on the Chevrolet Niva, since the car is an SUV and therefore experiences heavy loads on the chassis
How to diagnose a broken hub
Surely every driver has at least once encountered a situation when, while driving, a so-called crackling noise is heard. The sound can appear at speeds of 40 km/h and above. Using a car with such a sign is fraught not only with danger to the life of the driver and passengers, but also with serious consequences for the car itself. Most likely, you will notice a hum in a loaded car when turning.
Finding out which wheel bearing is worn out is quite simple: if there is noise from the wheel when turning to the right, the left bearing should be replaced
Similarly, if a hum occurs when turning left, pay attention to the right bearing
There are several stages of wheel bearing wear:
- hum when turning;
- hum during normal driving with a loaded car;
- hum when driving an empty car;
- constant hum that increases during turns;
- a strong hum, accompanied by crunching, grinding and unregulated movements of the car from side to side.
The period of time between the first and fifth stages with moderate driving can be up to 5 years. It is recommended to replace the part as soon as possible so as not to put the car and the driver’s life at risk.
What could have caused the Niva Chevrolet bearing to fail:
- in 70% of cases, breakdown occurs due to unsuitable lubricant: its quality, excess or shortage may well damage the part;
- it happens that various contaminants and moisture penetrate deep into the bearing;
- this is the cause of failure in 18% of cases;
- There is also a possibility of incorrect assembly of parts, which entails excessive load and overheating.
What are the risks of driving a car with a damaged wheel bearing? There is a considerable possibility of the wheel jamming, which can end in disaster when driving at high speed. It is quite possible to lose control of the car due to the wheel “moving to the side”. Spreading brake pads is also a possible consequence.
Generator bearing: replacement recommendations
The following recommendations are given for replacing the Niva Chevrolet generator bearing:
The first step is to remove the generator itself. First, the generator mounts are loosened, then the adjustment bolt is released. The next steps are to remove the belt and disconnect the ground from the battery. We are talking about the negative terminal. It is also necessary to disconnect the wires from the generator itself. The structure is removed through the lower part. Why does the mount itself unscrew?
- After this, the master begins to disassemble the generator. The first step is to remove the pulley. The owner will need a screwdriver to lock the rotor. The main thing is a careful approach to work. The pulley is unscrewed with the appropriate key. You will need to pull back the latches to remove the cover. The part is pulled towards itself. All connections with bolts are additionally processed. Then it will be easier to unscrew them.
- The next steps are to unscrew the screws and remove the voltage regulator unit. You also need to get rid of brushes for a while. The generator cover is disconnected from the starter, otherwise it will not be possible to gain access to the bearings themselves. The main thing is not to damage the winding during such work.
- After complete disassembly of the generator, access to the bearings becomes available. It remains to check the parts for any defects that have appeared, including cracks and chips. Do the parts rotate easily? Is there any play between them? The seats may suffer from wear, so they also need to be inspected.
- Next, you need to knock the bearing out of its seat. To do this, tap the surface with a small hammer. The blows must be strong, but careful, otherwise the result will not be achieved. A piece of pipe of the appropriate size will make an excellent stand. Removing the rear bearings is impossible unless a special puller is used.
- The properties of old and new parts must remain similar. The same attachment is used when pressing into the body. The anchor is where the rear bearing is installed.
- When reassembling, proceed in reverse order.
Below watch a video on how to disassemble and repair a Niva generator.
Source
When to change the seal
Since our car is often operated in very difficult conditions, the loads on the bearings are very high. In addition to loads, the bearing may be subject to moisture attack when the axle shaft seal fails. At the same time, oil may begin to leak from the rear axle housing. As a result, the bearing is poorly lubricated and the grease is washed out over time.
The most obvious symptom of bearing failure will be increased noise at any speed. In more severe cases, both radial and axial play may be observed.
At the first symptoms of a bearing failure, you need to start replacing it.
The axle shaft has been dismantled, now it’s worth inspecting it carefully. If it requires editing or there are cracks and mechanical damage on its surface, it must be replaced. The splined part of the axle shaft is also carefully inspected. In case of any damage, the axle shaft will have to be replaced. If everything is in order with the axle shaft, change the bearing and retaining ring:
- The bearing and retaining ring are pressed onto the axle shaft with thermal tension, so to remove them you will have to use a grinder and a chisel. We clamp the axle shaft in a vice.
We clamp the axle shaft in a vice and saw off the old bearing with a grinder.
- We use a grinder to trim the bearing and stopper in several places, but so as not to touch the axle shaft.
Press the new bearing onto the axle shaft using the old locking ring.
- We heat the retaining ring in a muffle furnace, with a torch or blowtorch for 7-10 minutes until it turns dark red (200-250 degrees) and use pliers to install the ring in place, slightly guiding it with the pipe.
- Let the axle shaft cool, in the meantime we change the oil seal in the brake flap.
Bearing device.
Like most parts in a car, a bearing has several indicators based on which you can select the necessary part:
- number
- internal and external dimensions
- height
Knowing these parameters, you can select a replacement element that will be suitable for a given car and perform its functions correctly.
The number is the value in the catalog - 21212403080. In most cases, this data is enough to purchase a bearing model for a Chevrolet Niva in a store. If the required element is not available, you can find analogues, knowing the technical characteristics:
- internal diameter 40mm
- outer diameter 80mm
- height (meaning product thickness) 23mm
Self-replacement of a damaged element
Do-it-yourself hub repair will require an inspection hole or a lift. You need to hang the front of the car to provide full access to the components. Further dismantling after removing the wheel occurs exclusively in strict sequence. Repair diagram for dismantling the front hub of Niva 2121:
- Remove the guide block and caliper. Secure it with something under the bottom of the car so as not to completely dismantle the brake.
- Remove the wheel bearing nut and take out the tapered bushing.
- Using a chisel, bend the locking nut of the front knuckle arm.
- Repeat the procedure on the rear fastener.
- Remove both nuts and the stopper plate (you will need a 19 mm wrench).
- Move the lever away from the knuckle and disconnect the brake hoses.
- Remove the fasteners and the entire fist.
- Disconnect the hub base (brake disc) from the knuckle.
- Pull out the oil seal using a screwdriver.
- Remove the lower ring, the inner sector of the outer bearing and the cage
- Repeat the procedure with the second bearing.
- The outer ring of the second element is removed in a similar way.
Replacing the NIVA wheel bearing
We will show you how to replace a wheel bearing in a NIVA car. To work, we will need new wheel bearings, two wheel seals, and a standard set of car enthusiast tools. The entire repair process is shown from start to finish, with detailed comments from the author along the way.
Owners of this car very often encounter the problem of a humming wheel bearing. It is recommended to remake the bearing for 108, after that there is no need for any adjustments or tightening it once a month. If for some reason you do not want to change the wheel bearing, then you must change the hub seals during disassembly.
Checking the hub and wheel bearing
If, while driving, you hear a sound whose frequency gradually decreases or increases depending on the speed. To diagnose the problem, you can use this method. We hang the wheel, place a stump under the lower arm and lower the car onto it. Next, we grab the bottom and top of the wheel with our hands and start pumping. If you feel any play, you can simply tighten the bearing. If this does not help you, there is still play, then most likely the hub has become unusable and needs to be replaced. If there is no play, there is a high probability that the bearings have failed.
The sound of a faulty wheel bearing is dull; it can be clearly heard at an average speed of 60-80 km if the car is rolling in neutral gear.
Case from practice
The owner of Niva came to the car service center with a complaint about bad brakes. When the brake pedal was pressed, it sank to the floor and only when pressed again did it work as it should. Everything indicated that there was air in the brake system, but bleeding did nothing. In the end, it turned out that the fault was with failed wheel bearings and the hub itself. The inner race of the bearing rotated on the hub.
Arrows indicate production and pitting. For comparison, this is what the new hub looks like.
But what happened to the bearing.
Causes and signs of failure of the Chevrolet Niva hub
A broken car hub is usually a serious problem and should not be ignored.
Among other things, a worn hub heats up more when the car is braking, which negatively affects the performance of the car’s brakes. It happens that damage to the hub occurs gradually and, as a rule, this is indicated by an unpleasant sound, accompanied by vibration of the body or weak shocks.
The main reasons for hub failure are:
- careless driving on roads;
- multiple overloading of cars;
- driving on sandy soil or “mud baths”;
- frequent car slipping;
- aggressive driving style with sharp acceleration and braking.
These reasons can have a significant negative impact on the hub housing, outer or inner bearing ring. They are also sources of dirt, moisture and sand getting inside the bearing mechanism, which causes the journal to fail.
Useful video
After assembly, the bearing clearances should be carefully adjusted. Experts recommend replacing it with a two-row modification, if possible. You will have to bore the hub for installation, but the service life of the unit increases significantly. Repairing the front hub of Niva 2121 is quite simple if you follow the diagram.
All about the Niva Chevrolet axle bearing
A car from the jeep class has all-wheel drive on all 4 wheels. This mechanism determines the presence of a rear axle
, which is designed to transmit torque from the gearbox to the driving rear wheels.
The rotation of the wheels is ensured by the presence of gears and axle shafts in the bridge. The axle shaft is connected to the wheel and sets it in motion. But why do you need an axle bearing in the axle? Because the topic of the article is called axle bearing
, it will be discussed specifically about it further.
Let's take a closer look at this mechanism in the design of the rear axle , its purpose, design (size, number, etc.), malfunctions and the replacement process.
To consolidate the abilities, a video is posted at the bottom of the material, in which you can visually study the procedure for substitution. Replacement kit for cars with abs
Design
Like many parts, the axle bearing
has its own design, which is characterized by important indicators:
- number;
- internal and external size;
- height.
This data is necessary not only so that the bearing can be installed in the seat of the axle shaft and axle, but also so that it performs its intended functions. But it is worth noting that if one of these data is known, then the second need not be calculated. So, for example, a bearing
the axle shaft has catalog number 2121-2403080. If the product number is known, then this is enough to purchase it at a car dealership. Replacement of bearing width 23. Auto Nivag axle shaft seals for 2121, 21213,. If you need to know the dimensions, then there is data on the Internet: height and size.
If the catalog number is unknown, then after removing the axle shaft, complete measurements of the product can be taken. After the measurement you should get the following data:
- D internal = 40 mm;
- D outer = 80 mm;
- Height (thickness) = 23 mm.
What signs indicate bearing failure?
The Niva's radial and axial loads are taken by the rear shaft axle bearing. Other parts have their own problems, but the symptoms of a malfunction remain approximately the same in almost all situations:
- Extraneous noises, metallic knocks;
- The appearance of backlashes. It is easy to check when the wheels swing perpendicular to the bearing axis;
- Vibration while driving inside the cabin;
As soon as the driver hears one of the characteristic sounds of bearing wear, it is recommended to immediately go for repairs. Most often, Chevrolet Niva wheel bearings fail. An SUV is more likely to experience axle loads.