What are they needed for
I won’t be unfounded, but I’ll just give simple examples from life. I think they will allow you to understand why it is worth considering the issue of installing spacers to increase ground clearance.
- The car is initially quite low. This applies to imported cars, since our automakers understand that fighting the roads is pointless, as is waiting for their quality to improve. Therefore, they try to adapt to current conditions, offering high ground clearance. But even that is not enough. As a result, driving through the next section, you again and again cling to the bottom, crankcase protection, cannot pass the curb, brake before each hole so as not to get hit. All this interferes with normal movement and driving turns into a test.
- You often have to load the machine. A cabin full of people or a huge amount of luggage noticeably sits down the car, which begins to scrape along the asphalt and rub its wheels against the fender liners. Agree, this is not very pleasant.
Installing spacers is the most optimal solution to the problem, if you look at it from a price-quality perspective. They increase rigidity and increase the distance from the bottom to the ground. Fortunately, my car is quite high, but this problem is very close to me, since my friends do not have such ground clearance. Actually, I would like to install inserts for them too, since I have to constantly take my car if we go somewhere in nature or outside the city. But let's not talk about sad things.
I think it’s very clear to you why these spacers are needed and what function they perform. But before you install and even purchase these elements, which are sold not only in Volgograd, but also in any cities such as Moscow, St. Petersburg, Novosibirsk, Yekaterinburg, Krasnoyarsk, etc., I suggest you find out what these spacers are.
The problem of insufficient clearance
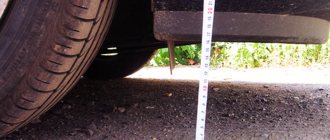
A lot of owners of passenger cars during operation are faced with one problem - the low ground clearance of the car, which is why, when overcoming bumps, the car clings to the bottom until it hangs on its belly. This is especially true in winter.
Moreover, the problem with insufficient ground clearance can arise both with new cars, which are structurally designed with low ground clearance (such cars are popularly called “puzoterki”), and with models with ground clearance that is, in general, quite acceptable, but due to shriveled springs suspension, there was a decrease in it.
And anyway, what driver doesn’t want to bring his car at least a little closer to crossovers and SUVs in cross-country ability.
And the easiest way is to increase the ground clearance.
Spacer design
Spacers are divided into front and rear, differing in design. For a full “lift”, necessary to increase the vehicle’s cross-country ability off asphalt, all four are installed. But sometimes they make do with a pair of rear ones for partial lifting, which is usually required when there are frequent suspension breakdowns and the bottom touches uneven roads from carrying heavy loads in the trunk or three passengers on the back seat.
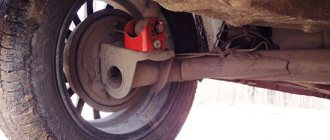
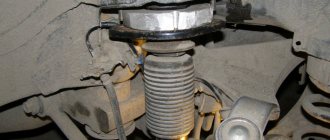
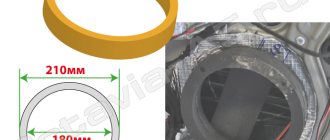
Front spacers (we are talking about MacPherson suspension) are installed between the shock absorber strut support and the body. They are rings made of hard plastic or aluminum. Rear spacers are installed between the body and the spring of the rear axle or beam. They look like “steering wheels” made of dense rubber or polyurethane with a diameter corresponding to the diameter of the spring.
Rubber spacers
Rubber inserts are also used. The element is placed under the rear pillar. The thickness of such a shock-absorbing cushion depends on the distance you want to achieve.
Advantages:
- There is no deformation of the body, rubber does not rust over time, the service life of mechanisms and systems does not decrease.
Minuses:
- Difficult to install, especially on the rear pillar.
Spring buffers
Spacers for increasing ground clearance are made of rubber and aluminum - they are also called “Spring Buffers”. Installation of such an element is simple - just place a gasket of the required thickness under the spring support plate.
Advantages:
- You can achieve a significant increase in ground clearance; when installing such special shock-absorbing cushions, it is also possible to adjust them without removing them.
Flaws:
- Not suitable for sagging springs, cannot be installed on a rusted body.
Spring inserts
Metal spacers of this type are placed directly into the springs. Can be installed on both front and rear wheels. It is worth making a choice in their favor if the car has a significantly reduced ground clearance.
Pros:
- The element also allows you to increase the vehicle's carrying capacity and avoid subsidence after loading.
Minuses:
- Insufficient increase in ground clearance.
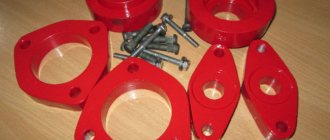
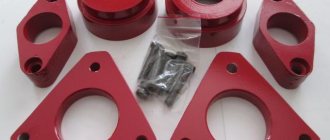
Ready-made kits to increase ground clearance
The types of such kits vary significantly depending on the car model. As a rule, the front struts come with kits with steel or aluminum spacers. The cost of such kits also varies significantly. The price greatly depends on the manufacturer who installs it and on the material used. The services also offer paid services for installing spacers, which is completed in a short time. The kits also vary in how the spacers are installed. The front spacers are a box with mounting holes. Rear spacers are rings with special eyes.
Most often, experienced car owners recommend purchasing sets of aluminum spacers. Such spacers will cope with their task for much longer - increasing ground clearance. However, kits made of plastic are gradually becoming more popular due to the low cost of this material.
The picture shows the contents of one of these kits.
Advantages and disadvantages
If we consider the positive aspects of using spacers to increase ground clearance, then, in general, there are not so many of them:
- Increased vehicle maneuverability;
- Increasing spring stiffness;
- Increasing the vehicle's carrying capacity (the vehicle does not sag as much when loaded);
- The likelihood of damage to the underbody of the car is reduced.
There are much more negative sides to such suspension tuning, so you should think carefully about whether it is worth installing them.
Spacers in a car suspension are:
- Reduced vehicle stability on the road due to a change in the center of gravity;
- Increased wear of chassis components;
- Increased load on drive joints (in front-wheel drive cars);
- Changing the work fails in general (it becomes tougher);
- Deterioration in controllability.
But here it is worth noting that with the right approach to the issue of installing spacers, the negative impacts will be minimal and almost unnoticeable.
Pros of this idea
A modification that has only disadvantages usually disappears quickly. The installation of spacers continues to this day. Therefore, there are significant advantages to this.
The advantages of spacers include:
- Increased cross-country ability . It will become easier to drive the car off-road; various bumps and unevenness will be overcome without difficulty. The likelihood that a car driving over hillocks will “sit on its belly” is reduced. In such unpleasant situations, the help of outsiders is usually required.
- Reducing the likelihood of damage . When actively driving off-road or even sharply braking on a flat road with low ground clearance, the percentage of damage is always high; you can accidentally scratch the bottom, damage components: fuel lines, wiring, small parts, etc. There may not be anything “vitally important” located in the lower part of the car, but serious damage can cost the life of your iron friend.
- Preventing "accidental touches" . The car’s bumper or lower body will no longer touch various bushes, curbs and other objects that can be found on uneven terrain.
- Improving the appearance of the car . One way or another, with high ground clearance, even a Soviet passenger car will look more impressive.
- The ability to maintain normativity . There is a certain standard for ground clearance for each brand of car. When it decreases excessively, the vehicle becomes uncontrollable or difficult to control, which is rarely liked by the owners. When installing spacers, it is possible to maintain the standard.
Homemade spacers
Any spacers are structurally simple, so they are not difficult to make. Moreover, this process is quite creative.
Some make them by simply cutting them out of an old tire, others use ebonite, steel, polyurethane and other materials.
Any tools are good for making. At home, a drill, jigsaw, files, etc. may be useful for this.
Those who have the opportunity to use a lathe simply turn them from blanks.
In general, any suitable material can be used for manufacturing, and it can also be processed with different tools and equipment. The only important condition is compliance with the dimensions.
For cutting, you can try to find drawings, and if they are not there, then focus on the dimensions of the components of the suspension (for example, a spacer for a spring is made based on the diameter of the spring itself and its seat).
In general, if you want to make spacers at home, it is quite possible.
How to install spacers on a car with your own hands + Video
To install the spacers, you will need a lift, overpass or inspection pit. If you don’t have any of this, you can get by with a jack and 2 support posts. You will also need a set of wrenches and a suspension spring remover. The procedure for installing spacers on various types of suspension is described below. Before starting work, carefully read the article on safety precautions for car repair and maintenance, this will help you avoid injuries and injuries.
Installation of spacers on MacPherson suspension
- Unscrew the CV joint nut, then raise the front of the car using a lift or jacks and stands and remove the wheels. If the decorative cap prevents you from getting to the CV joint nut, then remove one wheel without lifting the other side of the front of the car. Ask an assistant to engage first gear (there is no need to start the engine) and press the brake pedal all the way. Then perform the same operation on the other side.
- Pull out the cotter pin and unscrew the nut securing the tie rod pin in the shock absorber strut. If for some reason you cannot reach the nut, turn the steering wheel in the opposite direction. After unscrewing the nut, remove the pin from the strut using a puller, which can be purchased at any auto store. Do not try to knock out the pin with a hammer, as you will damage the threads and have to replace the entire tie rod end. Unscrew the nut that secures the ball joint, push the lower arm down and remove the steering knuckle from it. Place a wheel or other support under the stand; this will allow you to install the spacer without removing the brake caliper.
- Unscrew the nuts that secure the shock absorber strut to the car body. Do not drop the stand as this may damage the brake hose. Carefully lower the strut until the support bearing studs come out of the body. After this, position the stand in such a way as to avoid tension or kinking of the brake hose. Place the spacer on the support bearing and tighten the nuts. For spacers 1 cm thick, there is no need to tighten the nuts.
- Carefully lift the rack until the support bearing studs fit into their holes. Tighten the nuts. Do not use nuts with plastic inside; they will not provide adequate support for the post and spacer. Therefore, use two regular metal nuts. If the studs are not tall enough to tighten two nuts, grind one of the nuts down to half the thickness and use it as a locknut. Place the steering knuckle onto the CV joint shaft. Have an assistant press the brake pedal and tighten the CV joint nut to the torque specified in your vehicle's repair instructions, then be sure to tighten the nut using a hammer and chisel.
- Reinstall the tie rod end, tighten the nut and install the cotter pin. Insert the ball joint into the lower arm and tighten the nut. Install the wheels and tighten the wheel nuts or bolts. Lower the vehicle to the ground and tighten the wheel nuts or bolts. Adjust camber and toe. This can be done either at any car service center or independently.
Which material is better
The choice of material depends on the needs of the car owner and the condition of the car itself. Below is a table from which you can select a material.
Criteria Polyurethane Rubber Composite Aluminum Metal Impact on suspension Service life Difficulty of installation Damage to the vehicle Possibility of deformation
| Long-term use leads to damage | Helps achieve smoothness, absorbs all vibrations | Have no significant impact | Have no significant impact | Have no significant impact |
| Long | Wear out quickly | Brief - you need to change the spacer every year | Average | Long lasting, considered the most durable |
| Very simple | Simple | Average | Average | Average |
| May damage suspension | Does not cause significant harm | Does not cause significant harm | Does not cause significant harm | May lead to the appearance of rust on the car body at the point of contact between the structure |
| Easily deformed | Deformed over time | Deformed over time | Deformed from strong mechanical loads | Virtually no deformation |
Characteristics of spacers made of various materials
Online stores sell spacers of various types, shapes and sizes. In some cases, finding suitable spacers is quite difficult and you have to make them yourself, for which you need to clearly understand how a particular material affects the car. This will help you select the optimal material for the spacer. Aluminum spacers have good strength, but cause corrosion to the body and shock absorber. Spacers made of plastic and fiberglass are not inferior in strength to aluminum ones, but do not cause engine damage. But they are very difficult to remake.
Installing spacers
If you nevertheless decide to install spacers, we will tell you about the technical nuances of this procedure, which will allow you to evaluate your capabilities and decide on the order of its implementation.
To install spacers on the front of a car with MacPherson struts, it is necessary to completely remove the two front struts. There is no need to disassemble the removed stands.
In the standard upper supports, the mounting studs are extended. To do this, you will have to knock out the original studs, and hammer in longer ones from the kit in their place. Another way is to screw threaded extensions onto the original studs, which are often included with spacers. After this, the spacer is “clapped” onto the extended fasteners, and the rack together with it is installed in place.
All of the above is a fairly simple task that a handy car enthusiast with a suitcase of wrenches and a jack can handle without much difficulty. However, what was an ordinary task for fathers and grandfathers, today can cause horror among their descendants, and in this case, it is probably better to entrust the procedure to an unofficial car service... Moreover, after the “lifting” the suspension geometry changes, and a mandatory procedure for adjusting the angles will be required descent and collapse.
Installing the rear spacers, oddly enough, is somewhat more difficult than the front ones. Formally, it seems simpler: you need to completely remove the springs, pre-compressed with special ties, and push them back in with spacers. However, this is only half the battle.
You will still have to lengthen the shock absorbers, because due to the changed suspension geometry, the working stroke of their rods will shift. In a static position, they are extended almost all the way, which when working on rebound (for example, when a wheel falls into a hole) causes a hard impact. Therefore, the shock absorber must be extended by the thickness of the spacer (or better yet, plus another ten millimeters). This is done in three ways.
The first is replacing the shock absorber with a longer one, from a different car model, but with similar upper and lower mounts. You can find out about the existence of such on the thematic forum for your car. It depends on your luck, because extended shock absorbers suitable for what is called “bolt-on” may simply not be available in nature. In this case, the second method is practiced - lengthening the shock absorber rods using extensions, often called “soldiers”. And the third is extending the shock absorber from below by installing eye extensions.
The version with “soldiers” is attractive due to its simplicity and some technical aesthetics. However, the search for a “pair of soldiers” may take a long time: the product is not popular, and the quality of those sold is not always the best. An excellent option is the services of a responsible turner and thermal specialist. The first one will carve your extensions, and the second one will harden them.
It is no worse to lengthen the shock absorbers not from the rod side, but from the eye side. A U-shaped extension is bolted to the original eye, and it, in turn, is attached to the moving elements of the suspension. But eye extensions, like “soldiers”, are not sold everywhere, they are not universal, so finding the part you need for your car can be difficult. In this case, a rough, but quite workable option is often practiced. A new eye, cut off from a faulty similar shock absorber, is welded to the shock absorber eye through a metal extension made of a profile pipe. Sometimes adjustable extensions are also made: the second eye is attached to the original one through two welded coupling nuts and a threaded rod made from a strong bolt from the cylinder head.
In any case, do not forget that the installation of spacers, despite its popularity among the people and relative harmlessness, is still not an event approved by the manufacturer of your car. During the warranty period, you may get into trouble with official servicing, and improper installation of spacers coupled with lengthening the shock absorbers can cause a lot of trouble.
Features of self-installation
During installation, consider the optimal clearance size. These requirements differ for different types of cars. For ordinary passenger cars, the distance between the lowest point and the surface should be in the range from 140 to 200 mm. The so-called “SUVs” are located higher: from 180 to 250 mm. SUVs are even higher: from 200 mm to 350 mm.
Increased ground clearance can also be achieved by installing higher springs and shock absorbers. But this way will deprive you of the opportunity to use repair services under warranty. In general, any independent manipulation of the car’s design increases the risk that you will no longer be provided with warranty service. This is especially likely when installing “non-original” parts. In this case, there is also a rise in the center of gravity of the car and a deterioration in some driving properties.
Adjustment work
Once again, it is worth saying that if you are an inexperienced person, then it is better to find a familiar specialist who would help carry out everything planned, from installing the described part to calibrating all the values, or take the car to a service station.
If you understand the structure of your car, then you need to start by adjusting the position of the pressure regulator. To install it correctly, you need to apply a force of 45-50 kgf to the rear of the machine. After this, you need to unscrew the bolt that holds the pressure regulator and move the drive bracket using a screwdriver until the gap between the spring and the lever is about 2 millimeters. You can check the remaining gap by simply placing a piece of wire with a diameter of 2 millimeters into it or taking a similar drill.
Now you can start setting the desired light level. To do this, you need to place the car on a flat horizontal surface at a distance of 5 meters from any light wall, let it be the wall of a house or garage, it doesn’t matter. It is better to do this “trick” together, at the same time the tire pressure is checked and the companion sits in the driver’s seat. Now a horizontal line is drawn on the wall at a height of 60 cm from the floor and split in half in the center of the car. Now, from the center of the horizontal line, measure the distance of the car headlights and draw perpendicular vertical lines. There should be a beam of light at the intersection of the horizon and vertical lines.
How much will the car lift from the spacers?
Once you have decided to install such parts on your vehicle, you will naturally have a question - how much will the ground clearance of your car increase? It all depends on the following factors:
- thickness of spacers for supports, springs, struts or shock absorbers;
- vehicle weight - the smaller it is, the greater the lift height will be;
- the condition of the springs or struts - the newer they are, the higher the ground clearance will be;
- type of suspension.
As for the last characteristic, the following fact should be noted here: with a bridge suspension design, the ground clearance will increase strictly by the thickness of the spacer, while with a multi-link design, the ride height will increase by a slightly greater value than the thickness of the installed product.
Installing rear spacers for springs - step-by-step instructions
The tool kit for the rear of the car is similar, but the procedure will be slightly different due to differences in design in different parts of the car. You should also consider the type of assembly - in some cars you will have to open the trunk to gain access to the rear wheels on both sides. For the rear of the body, thicker rubber spacers are recommended, as they have several advantages over other options:
- absence of corrosion leading to the need for metal repairs;
- no body deformation;
- there is no negative impact on the driving properties of the car.
A new set will need to be installed after a similar distance (10,000-30,000 km) or when changing wheels to new ones to ensure complete safety and better driving performance. You must act in the following sequence:
- loosening the rear wheel nuts;
- use a jack to secure the car;
- the wheel is removed, the caliper and pads do not need to be removed;
- the spring must be removed using a tie;
Using a spring tie Tip! If there is no tie, you can simply unscrew the rear arm from the hub side and lower it a little - then the spring will simply “come out” from below. - the old spacer is removed;
The spacer on top is held by a spring, so to find it, you need to remove the spring, and also remove the spacer from the removal point - The new spacer is installed in place of the old one, then supported by a spring, and everything is installed in the reverse order.
It should be taken into account that when increasing the ground clearance on the rear axle, you will need to replace the shock absorbers with longer stroke ones, as well as replace the brake hoses. Assembly is carried out in reverse order.
Ways to increase clearance
There are several methods for increasing ground clearance, but when choosing the optimal one, you should take into account what problem is being solved - increasing the ground clearance to improve cross-country ability or eliminating the consequences of flat springs.
We change the wheels.
One of the easiest ways to increase ground clearance is to install larger diameter wheels on your car. This solution can really help add a couple of centimeters between the bottom and the road.
But there are many negative aspects here - installing such wheels will be expensive, the clearance will increase, but the distance between the wheel and the arch will decrease, and the load on the suspension and transmission will increase. In general, this method is not the most optimal.
We strengthen the springs.
You can increase the stiffness of worn-out springs, thereby reducing body vibrations when driving over uneven surfaces, not only by replacing them (which is also not always cheap), but also by installing elastic elements between the coils of the springs.
Their main task is to resist compression. Previously, ordinary tennis balls were used for these purposes (and now for some, such tuning is quite relevant).
Now you can simply buy special rubber spacers that are installed between the turns. This modification of the suspension only increases the stiffness of the springs and has virtually no effect on ground clearance.
We change the suspension.
You can also increase ground clearance by completely reworking the chassis and installing an air suspension instead of the usual one. But this is a very expensive option.
Installing spacers is the easiest way to increase both ground clearance and spring stiffness.
There is no need to modify anything in the car suspension, they are inexpensive, or you can make and install them yourself.
The essence of this method comes down to adding special substrates under the shock absorber struts between the body and the support (increases ground clearance), or between the support and the spring (increases rigidity).
It's simple: the spacer will prevent the shock absorber strut from becoming all the way (resting against the body), as a result the load-bearing part will rise relative to the wheel, thereby increasing the ground clearance.
As for spacers to increase rigidity, after assembling the strut the spring will be in a more compressed state.
Conclusion
In general, the method of installing spacers under shock absorbers, on the one hand, is not such a difficult thing, however, there are nuances in this task that only a fairly experienced person can do. And of course, this part is designed specifically to reduce the costs that you might incur when replacing shock absorbers. At the same time, the car stops sagging due to increased weight and the fender liners no longer touch the wheels. So spacers are a worthy way to eliminate this problem, which has every right to life.
Sources
- https://pricep-vlg.ru/auto-gadget/prostavki-dlya-uvelicheniya-klirensa/
- https://www.kolesa.ru/article/vsyo-vyshe-i-vyshe-i-vyshe-kak-i-zachem-podnimat-kuzov-avtomobilya-prostavkami
- https://zamena-podshipnikov.ru/prostavki-dlya-uvelicheniya-klirensa.html
- https://AutoTopik.ru/sovet/1269-prostavki-dlya-uvelicheniya-klirensa-svoimi-rukami.html
- https://AvtoKart.ru/diagnostika-i-remont/kak-uvelichit-dorozhnyj-prosvet.html
- https://autodont.ru/running-gear/shock-absorber/prostavka