It’s worth saying right away that I got a VAZ 2109 with a low instrument panel, and therefore I will show the entire removal process on it. Of course, many VAZ 2109-2108 already have high panels, but unfortunately, I can’t demonstrate it with such a model yet for obvious reasons. As for this case, to be honest, I didn’t think that this work could be done so easily on the “nines”.
If my memory serves me correctly, then you only need to unscrew about 8 mounting bolts and that’s it. Well, okay, first things first. To do this we need the following tool:
- screwdrivers flat and Phillips
- pliers
- head 22
- knob
Before performing this procedure, you will need to complete the following steps:
The low instrument panel is bolted to the edges only. There are two bolts on each side. The top bolt on the left side of the panel is clearly shown below:
And the second one is located below the glove compartment next to the shelf:
When they are unscrewed, you need to unscrew 4 more bolts that secure the mechanism with the stove control levers:
Now I’ll clearly show the fastenings on the driver’s side. The top one is in almost the same place:
And the lower one is in close proximity to the car hood release handle, as clearly shown in the photo below:
Now you can pull off the instrument panel with small jerks, since it is secured in the center with metal latches. It is enough to simply move it to the side so that you can get to some elements.
It is also worth noting that it will be necessary to remove the steering column cover, the steering wheel itself and the switches so that nothing gets in the way:
Now all that remains is to disconnect the choke cable by removing the bracket and taking out the locking plate, as well as disconnecting the wire from the end switch:
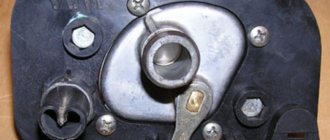
And disconnect the headlight range control. To do this, you first need to pry off the plug from the outside with a thin screwdriver or knife, remove the regulator handle and then unscrew the nut with a 22mm head:
After this, you can remove the instrument panel from the car, the result is shown in the picture below:
And this is what the VAZ 2109-2108 interior looks like without a panel:
Sometimes there is a need to remove only one visor on the high instrument panel of a VAZ 2109 without removing the entire panel. Often this point is not described in the manuals; the emphasis is on dismantling the entire dashboard and disconnecting it from the car body. At the same time, to access the instrument cluster, for example, to install LEDs for dial illumination instead of standard lamps or install another instrument combination, there is no need to dismantle the entire instrument panel; it is enough to remove only one visor.
In this article we will look at how you can do this yourself.
Finalizing the backlight
The best option for tuning this element of the interior would be to refine the instrument information scales, namely, replace the standard backlight with a diode one. Owners of newer VAZs are lucky - in them the light is located from inside the panel. The old “nines” were illuminated from the outside, which created a certain ascetic effect. And she didn’t look very sporty. Changing its location from external to internal is quite possible. To do this, you will need a light-transmitting pad, wires and electrical tape.
How is the backlight of the VAZ- 2109 instrument panel ? To begin with, we will need to remove the socket from the car, after first turning off the power to the car’s on-board network and unscrewing the fasteners of the linings. We will talk about this in detail in the section “How to remove instrument panel 2109 low and high.” In order for the light from the diodes to fall on the pad from the inside, it is necessary to make several cutouts on its surface. This can be done using a soldering iron or a hot knife.
Possible faults
What malfunctions are typical for the dashboards of VAZ cars? Check out the main list after watching a video about connecting the shield from a VAZ 2110 to a “nine” (the author of the video is Garage BFS).
- The speedometer does not work. There may be several reasons for this - a broken cable, its incorrect installation or wear of the socket. You should try disconnecting the cable and reconnecting it.
- The odometer, which records the mileage of the vehicle, does not work. This problem is usually resolved by replacing the device.
- One or another indicator does not light up. Perhaps the sensor itself has failed or the light bulb has burned out.
- The instrument panel backlight does not work. This is usually due to burnt out bulbs or bad contacts. There may also be problems in the electrical circuit, but this happens rarely.
- The coolant or oil level sensor is giving incorrect information. For example, the driver is warned about a lack of engine fluid level or boiling refrigerant in the expansion tank, but in fact, with these parameters everything is normal. The problem is usually solved by replacing the sensors.
Working with LED Parts
After making the holes, you can move on to the lighting itself. It will be located like on foreign cars, that is, from the inside. In specialized services, such a service costs several thousand rubles, so in order to save money, we will do it ourselves.
As we noted earlier, our lighting will be made on the basis of a regular LED strip. We cut it into several uniform pieces. As a result, we should have several tracks with 3 diodes on each. For uniform illumination, we make a reflector from foil. For the tachometer and speedometer we need 3 pieces of tape. For the remaining elements (scale of fuel level, coolant temperature, etc.) one piece is enough.
Dashboard
We will take a look at the dashboard diagram and its components using the image below.
Dashboard
This diagram contains the following elements.
| Number | What is this |
| 1. | Instrument cluster |
| 2. | Ignition switch |
| 3. | Dashboard |
| 4. | Central nozzles of the interior heating and ventilation system |
| 5. | Side nozzles of the interior heating and ventilation system |
| 6. | Glove compartment lid |
| 7. | Shelf |
| 8. | Stub |
| 9. | Heated glass switch on the tailgate |
| 10. | Rear fog light switch |
| 11. | Hazard switch |
| 12. | Central switch for outside light |
| 13. | Control panel for interior heating and ventilation system |
| 14. | Radio socket |
| 15. | Gear shift lever |
| 16. | Hand brake lever |
| 17. | Ashtray |
| 18. | Cigarette lighter |
| 19. | Windshield washer and wiper control lever |
| 20. | Gas pedal |
| 21. | Brake pedal |
| 22. | Clutch |
| 23. | Choke closing handle |
| 24. | Horn switch |
| 25. | Trip counter reset knob |
| 26. | Instrument panel light switch |
| 27. | Control knob for hydraulic headlight adjustment |
| 28. | Hood lock drive lever |
| 29. | Control lever for headlights and turn signals |
note
Read
We are not in a hurry to throw away the standard suspension, since it will illuminate the arrows of the instrument scales. But it can also be modernized. To do this, you need to glue an LED strip in place of the lamps. Many car enthusiasts note its very bright glow, so we add additional tint film to the diodes. If you don’t have one, you can use a black marker - the result will be the same. In this case, the standard light filter remains in place, and the backlight shade will be soft and uniform with a white-blue color.
Installing a torpedo from another car
A significant modification can be called the installation of a torpedo, which is intended for another car. Such work is carried out extremely rarely, as it is difficult to perform. Its features include:
- The panel must be selected according to the width of the cabin, otherwise it will not become simple even after modification. At the same time, attention is also paid to the height. For example, SUVs have a higher dashboard, which will not fit into the car in question. Most often they choose torpedoes from foreign cars that were produced in the last millennium. This is due to the fact that they can be found at an affordable price when disassembled, and modifications may be insignificant.
- All elements of the front part will have to be redistributed. Particular problems arise with the location of the stove and steering column. If these elements do not significantly coincide in location, then significant changes must be made to the design of the torpedo.
- In any case, you will have to create new seats and fasteners on the body, since it is more difficult to change the torpedo. This moment determines the need for precise marking, as well as welding, creating holes, and so on.
- Many problems arise if the panel does not fit the width of the body. It is quite difficult to shorten a torpedo qualitatively, but it is still possible. After this, you will have to use additional decorative elements to close the seams.
We disassemble the instrument panel of the VAZ-2109 (low panel)
According to the instructions, in order to completely disassemble the socket, we need to do a lot of manipulations. In this case, the work is performed in a certain order. First, 3 heater control knobs are dismantled, then the fan switch device and the fixing screws of the center console trim. Next, the block with wires is disconnected from the rear PTF switch, one cord from the emergency light switch and two from the heated rear window. Afterwards, the block is removed from the external lighting switch and the cigarette lighter illumination.
Installation and repair instructions
If you are faced with the problem of a failure of the dashboard of a VAZ 2109 vehicle, then the best option would be to replace the dashboard yourself. To properly replace, you will need instructions for dismantling and installing the shield, which are given below. To perform these steps, you only need screwdrivers - flat-head and Phillips-head. The instructions are given on the example of a low panel, but in general they are identical for other versions of instrument panels. Don't forget to disconnect the battery!
Unscrew the screws of the shield visor. Disconnect the speedometer cable. Disconnect the ecometer hose.
- First of all, you need to de-energize the system; to do this, disconnect the terminals from the battery.
- Using a Phillips screwdriver, unscrew the plastic trim around the steering wheel. You don’t have to remove it, but it is advisable to do so for greater convenience.
- You can also disconnect the steering column switches by simply unplugging the wiring harness.
- Using a Phillips screwdriver, unscrew the two small screws securing the dashboard visor and remove this element.
- After these steps, you can compress the springs and remove the electronic panel from the center console.
- The next step is to disconnect the speedometer cable. It is necessary to be very careful when dismantling so as not to damage the cable, especially if it is old. Otherwise, it will need to be replaced.
- Next, turn off the white outlet and remove the econometer hose.
- Then you should disconnect the cable for resetting the car’s daily mileage data from the speedometer.
- The final step will be to disconnect the red connector and dismantle the shield itself. A new panel is replaced and installed, after which further assembly is carried out in the reverse order.
As you can see, the procedure for replacing the instrument panel is not particularly complicated - just do everything in accordance with the instructions and there will be no problems in the further operation of the device.
So, where do the work begin?
Removing the high instrument panel begins with removing the decorative steering wheel trim. Next, you need to unscrew the steering wheel mounting nut so that its front part is flush with the end of the column shaft. But you should not remove the nut right away. The steering wheel on the “nine” sits very tightly on the splines, and with sudden movements it can jump off the mounts and cause serious injury.
With sharp blows of the hand, the part is knocked off its fastenings and finally removed. Next, unscrew the 6 bolts of the lower column casing. The last part, together with the ignition switch trim, is pulled out entirely. We do the same with the top casing. After this, the base is removed from the shaft and the two wire blocks from the sound signal are disconnected. Then the cords from the windshield wiper and washer are removed along the chain, as well as the turning and lighting lever.
After pulling out the “choke”, the handle is removed from the rod and the instrument panel . Next, remove the cigarette lighter socket, the ashtray, as well as the fan switch and heater control knobs (here you can try prying them off with a minus screwdriver). After this, the hydraulic corrector, lighting switches and other elements are removed in the same way.
After it comes to the instrument panel and the speedometer cable has been removed, remove the red and white pads from the instrument cluster and on-board control system. Then we disconnect the ignition switch along with the ground, the control lamp for opening the damper and the guide rods. The shield fastening screws themselves are located on both sides of the cladding. After removing them, panel (VAZ- 2109 Samara) will be in a position free from the car.
Instrument cluster
As for the instrument cluster of the VAZ 2109 with a low panel, it has the following diagram.
Dashboard
According to the image shown, the components of the instrument cluster are as follows.
| Number | What is this |
| 1. | Speedometer |
| 2. | Coolant temperature gauge |
| 3. | Voltmeter |
| 4. | Fuel level indicator in the tank |
| 5. | Fuel reserve warning lamp |
| 6. | Econometer |
| 7. | Vehicle mileage meter |
| 8. | Vehicle mileage meter |
| 9. | STOP lamp |
| 10. | Battery charge level indicator lamp |
| 11. | Air damper warning lamp |
| 12. | Hazard warning light activation indicator |
| 13. | Low brake fluid level warning lamp |
| 14. | Handbrake activation warning lamp |
| 15. | Warning lamp for low oil pressure |
| 16. | Indicator lamp for turning on the direction indicators |
| 17. | Indicator lamp for turning on side optics |
| 18. | Indicator lamp for turning on the rear fog lights |
| 19. | High beam warning lamp |
| 20. | Rear window heating indicator lamp |
Instrument scale
Photo gallery: tuning the interior of the “nine”
Modifying the seats allows you to change not only their appearance, but also improve the fit
Installing a dashboard from another car allows you to make the interior more modern
Improved interior lighting provides additional comfort not only for the driver, but also for passengers
Sports seats allow the driver to feel as comfortable as possible when tailoring the car for sports.
Upgrading a torpedo with your own hands allows you to build acoustics or multimedia into it
The introduction of additional devices makes vehicle operation more comfortable, giving the driver additional information about the status of important components and systems
Illumination of the passenger and driver's feet adds some zest to the ordinary interior of the Nine.
The introduction of LED lighting into the glove compartment is one of the interior tuning options
Modern floor mats are also an option for upgrading the interior of the VAZ 2109
The tuned panel combined with a sports steering wheel makes the car different from others
Tuning the interior of a VAZ "nine" is a fascinating process. Depending on the wishes and financial capabilities of the owner, the interior can be changed beyond recognition. By replacing the interior finishing materials with modern ones, the car will be pleasant for both the driver and passengers. In addition, the upgrade can be done with your own hands without the use of special tools.
Tidy 21099 injector: icon designations
There are more lights and indicators here than on the carburetor. Additional light bulbs available:
- requirement to check the engine;
- STOP light.
Tidy 21099 carburetor: designations
The decoding described at the beginning of the article can be fully used as an example for this point.
Stop light on the dash 2109
The lamp signals the driver about the presence of unexpected problems in the on-board circuits. When such an inscription is activated on the device, it is recommended to immediately go to a service station and look for the cause.
Important points regarding replacement
- When removing the right side of the console, be careful. Behind it are wires that can easily get caught on the side and be damaged. So before removing this cover, you should remove the negative terminal from the battery. You should also turn off the car radio by removing its connector from the common wiring harness located behind the upper instrument panel;
- Removing the plastic handles from the stove levers can cause serious difficulties. The fact is that there are protrusions on the stove levers (top and bottom), and holes on the handles. When you put the handle on, it snaps onto the lever. The only way to remove it is to pry it off with a flat screwdriver as shown in the picture. But when prying up the handle with a screwdriver, you should not bend it too much: the plastic breaks very easily;
The handles on the levers of the VAZ 2115 stove can be removed using a flat screwdriver
So, a novice car enthusiast is quite capable of removing the dashboard from a VAZ 2115 and other cars in this line. All that is required is patience and attentiveness. If, after unscrewing all the fasteners, the dashboard stubbornly refuses to come off, you should inspect everything again: it is quite possible that some tiny screw was missed.