Step-by-step tuning steps
Before dismantling the VAZ 21099 panel, you will need to remove the terminals from the power supply by hand. Then the decorative steering wheel trim is removed. The nut should be unscrewed so that its end is flush with the similar element of the steering column shaft. You can’t turn it away right away. Then tuning the VAZ 21099 panel involves removing the steering wheel.
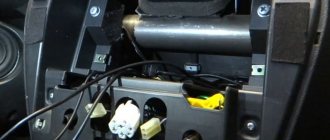
After unscrewing the 6 screws that secure the lower casing, you will need to remove it. The ignition switch trim is removed. The next step involves loosening the bolt that secures the base of the switches. The last element is removed from the shaft, and 2 blocks with the corresponding wires are disconnected.
In this case, you will need to label the washer and wiper switches. The block with wires is disconnected from the corresponding levers and direction indicators. The choke should be pulled out so that a draft occurs. At the same time, the handle of the first unit is pulled towards itself. Then the bolts securing the console trim are removed from the panel and the trim itself is removed.
The cigarette lighter cartridge and ashtray are pulled out of the socket. The VAZ torpedo is equipped with a heater fan that will need to be removed. To do this, it is recommended to use a screwdriver. The block and two wires are disconnected from the fan switch. They illuminate the europanel.
Tuning instrument panel
You also need to disconnect the handles for the hydraulic headlight adjustment and the light switch. After unscrewing the nuts, the corresponding switch is pushed inside the panel. The side nozzles are removed with a screwdriver. The high panel provides for turning away the bolts for fixing the linings. The last elements are located on both sides of the torpedo.
Subsequent tuning is carried out taking into account the removal of the radio socket. Existing audio equipment is pre-dismantled. Then, using a screwdriver, the latches are removed and the cover is raised. The block and wires are disconnected from the cigarette lighter. A similar step is carried out in relation to the backlight and alarm switch.
High instrument panel
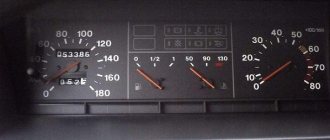
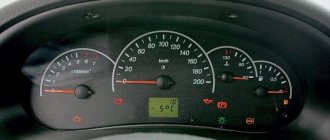
According to the diagram presented below, the VAZ 2109 with a high panel has the following components.
High dashboard
Item number
What is this
Hazard switch
Windshield wiper and washer control lever
Central nozzles of the interior heating and ventilation system
On-board computer (not available on all trim levels)
Glove compartment lid (glove compartment)
Side nozzles of the interior heating and ventilation system
Speaker (loudspeaker) trim
Power window switches (available on certain trim levels)
Control panel for heating and interior ventilation system
Gearbox shift lever
Hand brake lever
Carburetor choke handle
Horn switch (horn)
Instrument panel light switch
Front seat heating switch (available as standard)
Rear fog light switch
Front fog lamp switch (not available on all trim levels)
Rear defogger switch
Hood lock drive lever
Turn signal and light control lever
Outdoor optics switch
The final stage of work
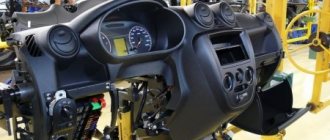
The high panel of the VAZ is dismantled carefully, since there are latches on the left that quickly break. After disconnecting the block from other elements, the entire instrument cluster is dismantled. The final step involves disconnecting the cable from the speedometer. If the Europanel is equipped with additional equipment, then you need to be even more careful. Tuning a torpedo involves disconnecting the block from the following units:
- on-board control system;
- ignition relay;
- remaining panel instruments;
- backlight lamps.
You will need to unscrew the screws for the lower fixation of the torpedo on both sides. Using a screwdriver, pull out the plug and unscrew the screws for the side fixation of the torpedo. The europanel is removed at the final stage. Installation of a new structure of this type is carried out in the reverse order. Upon completion of this procedure, the operation of the switches is checked.
Often, tuning a VAZ torpedo involves dismantling the plastic and removing the panel board. In this case, you will need the following tools and materials:
- soldering iron;
- europanel or insert;
- ultraviolet light bulb;
- wires;
- light bulbs;
- cartridges;
- glue;
- marker.
Initially, you will need to remove the old europanel, remove the glass and the existing edging. The insert and arrows are carefully pulled out. Particular attention should be paid to the new insert. It is recommended to make holes with some margin. This will prevent the arrows from sticking.
Further tuning is based on dismantling the standard backlight. This may break the plastic. Initially, the board is dismantled. Experts advise first drawing on paper the existing connection diagram and connections.
The standard lighting is replaced with neon lamps. Neon is glued to the panel. A plastic protection is fixed on top. In this case, you need to check whether this structure is securely held. The block with which the neon lighting is controlled should be glued to the europanel. To do this, you can use glue or double-sided tape.
Such tuning is easy to do with your own hands. An important point is the installation of the panel and the correct connection of its devices to the network. For this, auto mechanics recommend using books on repair and operation of the VAZ 21099.
Source
How to do easy tuning of the VAZ-2109 dashboard with your own hands
During the salon of the domestic “nine”, tuning its “tidy” becomes a truly irreplaceable element. Beautiful modifications can be done with your own hands. To do this, you will need to make a new dial on a computer using special design programs and printing the picture on a printer.
However, first you need to clearly think through the appearance of the dials for the car's tachometer and speedometer, as well as for all the sensors that remain. Once the dials are printed, they need to be laminated, and then you can start removing the instrument panel.
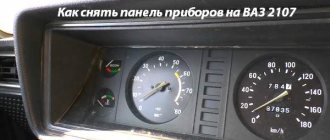
To do it correctly, you must first remove the steering wheel pads and also mark the steering position relative to the shaft. Then carefully unscrew the fastening nut.
Next, you can remove the steering wheel and unscrew the screws that are located in the area of the car lower casing. After this, you will have to disassemble the steering column. When the instrument panel is removed, you should unscrew the arrows from the old speedometer and tachometer. Subsequently, they will be attached to the updated dials.
During this time, you can also repaint the dials and hands in bright colors. Regular spray paint cans are suitable for this. At the same time, it is better to make the dial a rich black color.
You can make it matte using special products. In this case, the arrows need to be painted in bright pink or original red-burgundy tones. After the painted plates of the machine dial have dried, they are completed with an old or pre-prepared scale and removed hands.
In a situation where the owner wants to modernize the instrument panel in a more modern way, he should also use a special (original, as in the video) backlight. You can add an original touch using a fluorescent marker, but more on that below.
Every driver of a domestic car wants to make the instrument panel of his VAZ-2109 as bright and original as possible. Here is one of the options for how beautifully you can modify this element of the machine.
You will also need a fluorescent marker or paint. It will change color if exposed to ultraviolet light. This technique is often used in modern nightclubs. You will also need ordinary light bulbs with sockets, like those in the “tidy”. no need to change, they will remain in place. Everything you need is there, you can get started.
First you need to remove the plastic, then the dashboard. Also, don't forget about the black plastic that surrounds the glass. We disassemble the standard insert, as well as the arrows. Most often, there are no holes in the new insert. Therefore, you will have to do them. For the arrows, the holes will be needed wider than in the standard trim. Otherwise, the arrows will start to stick.
Next you need to dismantle the lighting that is installed. The work should be done carefully so that the plastic is not damaged. We take out the board with the light bulbs. We install a neon light bulb instead of the usual ones, and stick a plastic protection on top. It used to have factory bulbs screwed in. Don't forget about the control unit for the new neon light bulb. Be careful not to reverse the polarity at all times.
If this happens, nothing will shine. Next you need to screw in the instrument lighting bulbs. This should be done in parallel to the neon lamp. We lay the wiring from the inside; first, for this you need to make holes in the partitions.
Let's check if everything is correct. The light bulbs inside should be adjusted. Next we put on the overlay and seal it. After these steps, all we have to do is paint the hands with a purchased fluorescent marker or paint. It is advisable to repeat painting after 10 minutes. After this, the arrows can be installed in their place. This completes the tuning.
Check the work, otherwise you will have to disassemble everything. If there are no problems, you can assemble everything in strictly reverse order. After this, the VAZ 2109 will be equipped with a colorful panel like good foreign cars. If desired, you can use fluorescent paint to paint the dashboard trim in the place where the needle reaches its limit. It looks very nice.
Content
Owners of domestic cars pay quite a lot of attention to interior tuning. This is due to the fact that cars come out of the factory with very unattractive configurations: low-quality plastic, poor assembly, outdated controls and instruments, and so on.
If a few years ago VAZ somewhat revised its view of what a car should be, which was reflected in the design, then older models were still produced using old technologies that had been circulating since the creation of the car plant. They only improved a little.
No one can argue with the fact that VAZ has always lagged several times behind even inexpensive foreign cars in terms of quality and level of equipment. Now it has become possible to slightly transform your car, for which the front dashboard is replaced or modified.
Possible faults
What malfunctions are typical for the dashboards of VAZ cars? Check out the main list after watching a video about connecting the shield from a VAZ 2110 to a “nine” (the author of the video is Garage BFS).
- The speedometer does not work. There may be several reasons for this - a broken cable, its incorrect installation or wear of the socket. You should try disconnecting the cable and reconnecting it.
- The odometer, which records the mileage of the vehicle, does not work. This problem is usually resolved by replacing the device.
- One or another indicator does not light up. Perhaps the sensor itself has failed or the light bulb has burned out.
- The instrument panel backlight does not work. This is usually due to burnt out bulbs or bad contacts. There may also be problems in the electrical circuit, but this happens rarely.
- The coolant or oil level sensor is giving incorrect information. For example, the driver is warned about a lack of engine fluid level or boiling refrigerant in the expansion tank, but in fact, with these parameters everything is normal. The problem is usually solved by replacing the sensors.
Popular methods for changing a torpedo
To begin with, here is a list of the most popular methods for changing the front panel. We include:
1. Complete replacement. Installing a new torpedo, which was taken from another car, can be called a rather difficult job. Note that if instrument panels and other small tuning parts can be found on sale, then suppliers of such parts do not create a torpedo (it can be found on sale extremely rarely). This is due to the fact that such tuning is carried out quite rarely. However, only by completely replacing the panel can you get rid of cheap plastic and put an end to the crickets that can make long-distance travel simply unbearable.
2. Quite often, partial modifications are carried out, which is represented by the creation of additional niches for the multimedia system, a control unit for new functions, and so on. Such work cannot be called difficult, since plastic is used in the manufacture of the torpedo - a material that can be easily processed using available tools. The main thing is to carry out such work carefully, since if mistakes are made, important electrical elements and so on can be damaged.
The first method is implemented quite rarely, but allows you to achieve truly unsurpassed results. The second is easier to implement, but does not allow you to completely get rid of low-quality plastic.
Dismantling
There may be several circumstances for dismantling the low panel of the VAZ 2109:
- Body repair;
- Repair of panel components;
- Car soundproofing;
- The desire to replace an old torpedo with a new one, etc.
We offer you a step-by-step control that will allow you to remove a small type of panel installed on a VAZ 2109 without outside help.
Dismantling process
- Remove the stove control knobs. A total of three difficulties.
- Remove the heater fan switch knob. To do this, you need to pull it towards you.
- Unscrew the 2 fasteners of the dashboard trims from each side of the console. The cover must be pulled towards you.
- Disconnect the wiring block from the rear fog light switch.
- Disconnect a couple of power connectors and one power wire from the heated rear window switch.
- Disconnect the wiring block from the hazard warning light switch.
- Remove the wiring harness from the exterior light switch.
- Disconnect the power supply for the cigarette lighter illumination.
- Disconnect the cigarette lighter wiring harness and remove the panel trim.
- Remove the 4 heater control panel fasteners.
- Unscrew the 2 fasteners of the device shield visor.
- Remove the visor itself of the device composition.
- The spring clamps need to be compressed.
- Remove the instrument cluster
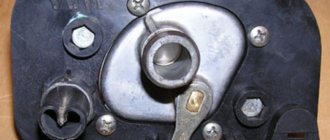
. - Unscrew the speedometer mounting nut, and then disconnect the speedometer cable.
- Disconnect the block with wires (it is white) from the instrument panel.
- Remove the hose from the econometer fitting, and then remove the cotter pin.
- Disconnect the cable from the speedometer that resets the odometer for the day.
- You now need to disconnect the red block from the instrument cluster
- Remove the instrument panel light switch handle and the headlight hydraulic adjustment handle. They need to be pulled towards you.
- Unscrew the mounting nut of the instrument backlight switch.
- Unscrew the fastening nut of the headlight hydraulic corrector socket.
- Remove the steering wheel and its paddle shifters.
- Insert the key into the ignition and turn it to position 1. This will disable the anti-theft device. Only after this can you turn off the power supply to the ignition switch.
- Unscrew the 2 mounting bolts and 2 nuts of the steering column tube.
- Remove this pipe, taking the ignition switch along with it.
- Pull the choke handle towards you (we are talking about carburetor suction). There should be a craving. After this, the handle is removed from the rod.
- Unscrew the 2 choke guide rod fasteners holding it to the instrument panel.
- Remove the mounting screw on the left side of the dashboard.
- Unscrew the fasteners for the lower panel fixation on the left.
- Similarly, remove the fasteners from the side and bottom on the right side of the dashboard.
- Unscrew the panel fastening screw, which is located inside the glove compartment.
- There remains one fastener on both sides of the panel, which must be unscrewed in order to eventually remove the tidy.
Numerous fasteners
The low panel is assembled in the reverse order unless it is planned to replace it with a more modern one or with a modified design. Then the assembly depends specifically on the panel that you have chosen for your VAZ 2109.
Car dashboard cover
Another way to get rid of low-quality plastic in the car interior is to cover the dashboard. As a rule, leather or a high-quality substitute is used for this. It is quite difficult to do the covering yourself; the plastic, which was previously part of the interior design, will serve as the basis.
Sidebar: Important: It is recommended to carry out the covering only after creating all the necessary niches for installing additional equipment. Otherwise, costs increase significantly.
When choosing a material, you need to abandon fabric, since the front panel is constantly exposed to direct sunlight and is often exposed to greater impact than other upholstery elements. When choosing a color, you need to give preference to not bright shades that will not be very noticeable. Quite often you can find examples of tuning that use bright fabric: red, blue and other colors. Note that this option looks quite attractive, but during a long trip the driver and passengers will be very tired.
Installing a torpedo from another car
A significant modification can be called the installation of a torpedo, which is intended for another car. Such work is carried out extremely rarely, as it is difficult to perform. Its features include:
- The panel must be selected according to the width of the cabin, otherwise it will not become simple even after modification. At the same time, attention is also paid to the height. For example, SUVs have a higher dashboard, which will not fit into the car in question. Most often they choose torpedoes from foreign cars that were produced in the last millennium. This is due to the fact that they can be found at an affordable price when disassembled, and modifications may be insignificant.
- All elements of the front part will have to be redistributed. Particular problems arise with the location of the stove and steering column. If these elements do not significantly coincide in location, then significant changes must be made to the design of the torpedo.
- In any case, you will have to create new seats and fasteners on the body, since it is more difficult to change the torpedo. This moment determines the need for precise marking, as well as welding, creating holes, and so on.
- Many problems arise if the panel does not fit the width of the body. It is quite difficult to shorten a torpedo qualitatively, but it is still possible. After this, you will have to use additional decorative elements to close the seams.
The work can take several days or even weeks, and the cost of rework varies widely.
Such services are provided only by companies that specialize in tuning.
Why doesn't it light up?
- First, remove the cover of the mounting block and make sure that the fuse is intact. The fuse markings are located on the inner surface of the cover. You should look for fuse F16 or F5, depending on the year of manufacture of your VAZ 2109.
- If the fuse is intact, be sure to check whether the contacts of the fuse you are looking for have not oxidized. It is not uncommon for shields to fail due to broken contact.
- Check if there is power to the dashboard. To do this, you will need a warning light and the ignition on. Disconnect connector X4 in the mounting block and check for voltage at pin 3. The disadvantage of the VAZ 2109 design is that when it rains, the mounting block immediately becomes wet. This causes oxidation of the contacts in the pads, which causes the electrics to stop working. Sometimes not only the contact is oxidized, but also the board of the Nine mounting block.
Installation of a multimedia system and other elements
With the spread of touch screens, they have become quite often used in the production of multimedia systems that are installed in cars. Of course, you can purchase a GPS navigator that will be mounted on top of the panel. But still, this design option is impractical, as it takes up a lot of free space and impairs visibility.
If desired, you can implement a multimedia system into the torpedo. For this:
1. Select a multimedia system. 2. Find out its exact dimensions. 3. We mark the area on the dashboard. 4. We cut out the plastic. 5. Install the multimedia system. 6. Connect the system. 7. We carry out decoration.
Side light bulbs on the VAZ 2114: causes of breakdowns and replacement
- in the rotating optics on the VAZ, cut a hole where the cartridge will be inserted. It is acceptable to use the w5w cartridge type. It will fit into a standard 5W incandescent light bulb or LED strip;
- secure the cartridge in the optic for rotation to avoid moisture, dirt and for durable fastening;
- To transfer lighting from headlights to a VAZ 2107 or 2109, switch the wires to the newly installed socket. When connecting additional lights without transfer, it is necessary to close the contact in the block that goes to the headlight in a parallel manner.
Experts' opinion
Alexander. It is recommended to abandon GPS navigators with external installation: there is no need to mount them on glass, as the view from the driver’s seat is significantly reduced. If the navigator is really needed, then you can create a special niche for it in the dashboard. The VAZ torpedo is quite simple and has a large amount of free space to accommodate various control units and multimedia systems.
Alexei. I installed a new torpedo from another car - a difficult job that required patience, precision and a lot of free time. I’ll say right away that you need to be well versed in the placement of important elements of your car: wiring, air ducts, and so on. Dismantling must be carried out carefully, since the original torpedo may still be needed.