Every second car enthusiast, who is the proud owner of a Nine and other cars, has always wanted to do something with the dashboard. Of course, there is more than enough desire there, green lights, square shapes and sad arrows, even driving is boring. I'll tell you how to easily fix this!
In addition to the VAZ 2109 dashboard itself, prepare for tuning:
insert into the dashboard (it should be transparent, that is, the numbers and the entire scale from the inside);
wires (not power);
light bulbs with sockets - 8 pcs. (same as in the dashboard itself, not LEDs);
Step 1
. We disassemble the panel, remove the glass and the black plastic around it. Carefully remove the arrows and the standard insert. If there are no holes in the new insert, make them. I advise you to make the holes for the arrows a little larger than those of the standard escutcheon in order to avoid the arrows “sticking”. It will be practically invisible, but you will save yourself from unnecessary work.
Step 2
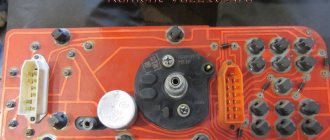
. We remove the standard backlight, pick it out, but do not break the plastic too much, and take out the board with the light bulbs from there. Remember the place where it was connected, we will connect the neon to the same place.
Step 3
. We take a neon light bulb, carefully glue it to the panel on top instead of the standard backlight, and glue the plastic protection on top that previously had light bulbs on it. We check that this entire structure does not fall off, and next to the top we attach the neon control unit, using glue or double-sided tape.
Step 4
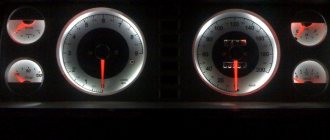
. Next, we connect it to where the standard backlight was before. It is very important to observe polarity; it should be written on the board where is plus and where is minus. If there are no marks, then we do everything empirically. We connect all the connectors in the car to the panel, turn on the dimensions and try. If nothing happens, then the polarity is reversed. When the polarity is correctly determined and connected, the arrows will be highlighted.
Step 5
. Next, we take two light bulbs per device, that is, we put light bulbs on both sides of the speedometer and connect them all with wires. The wires can be pulled inside by picking out small holes in the partitions. Having installed the light bulbs, we connect them to the same place where we already have a neon light, polarity is not important here.
Step 6
. We check if all the light bulbs are working. You can attach the overlay and admire it, and adjust the position of the light bulbs inside. Yes, I forgot! The light bulbs can be mounted inside, also with glue; they won’t go anywhere, the main thing is that the wires do not interfere with the movement of different parts of the sensors. The wires can also be carefully glued into plastic.
Step 7
. Almost done. We put the overlay on top and glue it a little bit at a time in the corners so that it doesn’t bubble. The overlay is in place, take the arrows, install them and very carefully paint them with a marker, it’s better to let them dry a couple of times for about five minutes.
Step 8
. Well, that's all, all that remains is to assemble the dashboard completely and put it in place. You definitely need to check its operation, if everything is fine, we assemble the torpedo to the end and admire the new panel, which is in no way inferior to foreign ones.
Beautiful tuning of the VAZ 2109 interior with your own hands
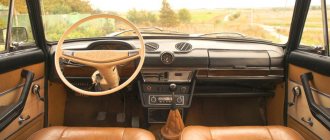
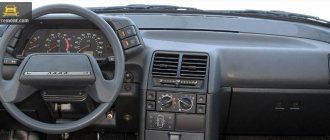
Not every vehicle owner has the right to be called a car enthusiast, but only those who care about their beloved car. Beautiful tuning of the VAZ 2109 interior is one of the ways of careful care and care, because in this way your car is given individual features and its own unique design. It is no secret that the interior of the VAZ 2109, which was tuned by hand, will look original and according to the tastes of the owner.
Algorithm for tuning the VAZ 2109 interior
VAZ 2109 tuning in the cabin
You can, of course, entrust the tuning of a car's interior to professionals, but still, work done with your own hands looks truly magnificent and your soul is always happy.
What you need to buy
If the modification work will be carried out on your own, then you must purchase the following materials:
- Vibroplast M2;
- New instrument scales (color selected depending on the owner’s preferences);
- Automotive LEDs designed for all devices;
- Self-adhesive film;
- Fluorescent paint;
- Cartridges and sockets;
- New wires;
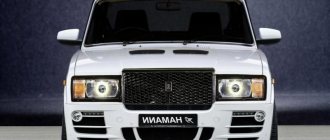
- A new steering wheel, preferably from a famous and expensive manufacturer;
- Regular foil;
- Necessary tools and so on.
note
We are not in a hurry to throw away the standard suspension, since it will illuminate the arrows of the instrument scales. But it can also be modernized. To do this, you need to glue an LED strip in place of the lamps. Many car enthusiasts note its very bright glow, so we add additional tint film to the diodes. If you don’t have one, you can use a black marker - the result will be the same. In this case, the standard light filter remains in place, and the backlight shade will be soft and uniform with a white-blue color.
Sound insulation and cladding
VAZ 21093 salon tuning
After the dashboard has been tuned, it’s time to start soundproofing the interior. So:
- We dismantle all interior elements and standard trim.
- We cover all the necessary surfaces with sheets of vibroplast (how to carry out high-quality sound insulation is described in detail in the article “VAZ 2109 interior sound insulation”).
Note. Typically it takes about 14 pieces of insulating material measuring 0.6 x 0.9 meters.
- After soundproofing, we trim the interior.
- First of all, we change the covering on the ceiling (professionals advise gluing it twice, leaving an interval of 5 minutes).
Note. When upholstering the interior, it is imperative to take into account the color scheme and do not forget to glue the doors, dashboard, area next to the gearbox and other parts of the car.
Trunk
Tuning the trunk of a VAZ 2109 is not the most creative activity, and given the fact that no one will see it anyway, it’s worth thinking only about the practical side of the issue. Firstly, as already mentioned above, a subwoofer and an amplifier will coexist perfectly in the trunk. Secondly, you can reupholster it on leather, faux leather, material with an interesting color, or simply on something more resistant to external influences. And finally, you can organize LED lighting, which will be extremely useful at night.
Steering wheel and its tuning
All experts and professionals believe that the safest is the stock steering wheel of the vehicle. It is this wheel that was developed by the manufacturer and it is this wheel that has passed the necessary tests in accordance with the design of the car. As a last resort, it is recommended to replace the steering wheel with a wheel from the same manufacturer, a newer model. In particular, comfortable and “grippy” steering wheels from the VAZ 2115, etc. are perfect for the VAZ 2109. On the other hand, if the owner wants more, then you can always purchase any “steering wheel” on the market, both from a renowned manufacturer and a steering wheel handicraft wheel.
VAZ 21093 interior tuning
Still, as mentioned above, the best option is to install a standard steering wheel with braiding, which we will analyze carefully. Needless to say, this steering wheel looks great and feels very comfortable in your hands, thanks to the increased thickness of the rim.
Braid
A leather steering wheel always looks amazing. It is always pleasant to the touch, looks presentable and expensive. In addition, the leather “breathes,” so to speak, which affects comfort while holding the steering wheel on long trips. Let's start wrapping the steering wheel with leather ourselves (this procedure is very expensive for craftsmen):
- First, we cover the steering wheel with cling film to make a stencil.
Cool tuning of the VAZ 21093 interior
- We wrap paper or better masking tape over the film.
- Draw the seams with a marker on the tape.
- We cut the tape along the markings, doing it very carefully.
- We remove the stencils, of which there are three.
- Cut out patterns from paper.
- In the leather blank, in places where seams are provided, add 5 mm (along the perimeter of the steering wheel rim, on the contrary, remove 2 mm).
- We sew the leather together, leaving a minimum amount of thread behind the seam, and cut off the rest.
- We sew a seam around the perimeter of the resulting workpiece.
Note. It is best to sew with synthetic threads, which provide strength and proper quality.
- We apply the leather blank to the steering wheel.
Note. To reduce the effect of protruding seams on the front side, grooves can be cut into the steering wheel underneath them.
- We thread the thread, like a lace in a shoe, using a needle.
- We pass the thread through the eyelets of the seams on different sides of the braid.
Note. It is not at all necessary to use glue, since the tightened braid is already securely fixed.
- We fix the thread at the end of the procedure.
- We put all the removed parts and elements back in place.
The futile struggle against external noise
The fight against external sounds is often stated as the main concern of car services. At service stations for the VAZ 2109, noise insulation is offered in greater or lesser volume. To make the car quieter, its roof is even covered with a thick layer of soundproofing material. In fact, such a wrap can only protect you from the sound of a helicopter flying over the roof of your car. The vast majority of other sounds - police sirens, special signals from ambulances and fire brigades, conversations of pedestrians, music from the open windows of other cars, the crackling of engines of passing motorcycles and much more - spreads almost parallel to your roof and does not excite its vibrations. All these sounds enter the interior of your car primarily through the windows, even if they are closed.
Is it worth mentioning that windows cannot be soundproofed simply because it is difficult to see through bitumen mastic. In addition, complete silence in the cabin is not only unnecessary, but even dangerous. If only because the driver must hear the signals of police and other special vehicles. Factory sound insulation provides sufficient audibility.
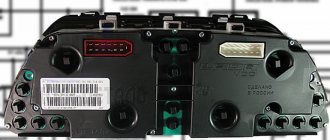
Dashboard diagram
The VAZ 2109 panel is made of a special energy-absorbing material. It consists of an overlay and, in fact, the panel itself.
It is made of plastic. Its thickness is 3 mm. The overlay is essentially reinforced with a special metal frame. It has a reliable energy-absorbing layer made of polyurethane foam. On the outside it is lined with a special decorative film. The car can be equipped with low and high VAZ 2109 panels, as well as a “European panel”.
The high panel of the VAZ 2109, like the low one, has certain features that should be taken into account when installing them. The installation method and the high panel are almost identical, since the mounting points, as well as the connections of the air ducts of the automobile ventilation and heating system, are the same. The differences concern only the wiring harness connections. (The diagram of the VAZ 2109 instrument panel is shown in the photo below; follow the link to read even more about it).
Tools
We've sorted out the materials. Now about what actual tools are needed to carry out the procedure:
- A technical hair dryer, or a construction hair dryer, as it is also called, will be required. They will need to warm up the surfaces and adhesive composition of the materials before application;
- The cutter is also technical, construction, special. This makes it very easy to cut materials - the tool is always sharp, because it has replaceable blades;
- A special automotive glass scraper that needs to be wrapped in some thick cloth. We will use this homemade spatula to level the material after gluing.
How to do easy tuning of the VAZ-2109 dashboard with your own hands
During the modernization of the interior of the domestic “nine”, tuning its “tidy” becomes a truly indispensable element. Beautiful modifications can be done with your own hands. To do this, you will need to make a new dial on a computer using special design programs and printing the picture on a printer.
However, first you need to clearly think through the appearance of the dials for the car's tachometer and speedometer, as well as for all the sensors that remain. Once the dials are printed, they need to be laminated, and then you can start removing the instrument panel.
To dismantle it correctly, you must first remove the steering wheel pads and also mark the steering position relative to the shaft. Then carefully unscrew the fastening nut.
Next, you can remove the steering wheel and unscrew the screws that are located in the area of the car lower casing. After this, you will have to disassemble the steering column. When the instrument panel is removed, you should unscrew the arrows from the old speedometer and tachometer. Subsequently, they will be attached to the updated dials.
When tuning a VAZ 2109 with your own hands, you can also repaint the dials and hands in bright colors. Regular spray paint cans are suitable for this. At the same time, it is better to make the dial a rich black color.
You can make it matte using special products. In this case, the arrows need to be painted in bright pink or original red-burgundy tones. After the painted plates of the machine dial have dried, they are completed with an old or pre-prepared scale and removed hands.
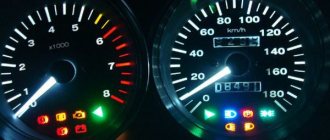
In a situation where the owner wants to modernize the instrument panel in a more modern way, he should also use a special (original, as in the video) backlight. You can add an original touch using a fluorescent marker, but more on that below.
Replacing sensors on the dashboard
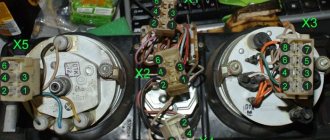
The sensors on the dashboard of a VAZ-2109 car are one of the few parts that drivers rarely turn to for repairs or modifications. However, over time it is necessary to replace the antifreeze temperature sensors or oil pressure level sensors. It is not difficult to purchase new necessary parts - they are sold in all auto stores.
When working on replacing sensors, there is a high probability of touching electrical wiring, so everything must be done extremely carefully. To avoid additional problems, you need to connect the wires so that the four connectors are connected together. To correctly perform this task, use the special table that is present in the vehicle registration certificate.
When working on tuning your torpedo, pay special attention to the direction indicators. Due to the fact that a particular car model is equipped with only one of the indicators, it is necessary to activate the informing signal from the switch. You can find it under the steering wheel. First of all, you need to disconnect the wires from the engine ECU, following the instructions in your data sheet, and then make the connection to the switch.
So, when you have done all the work to upgrade your car, you will be faced with an incredible result. We did a complete update of your car's dashboard with our own hands. Now the panel looks completely different, attracts attention, and much more accurately indicates violations in the system.
Tools
We've sorted out the materials. Now about what actual tools are needed to carry out the procedure:
- A technical hair dryer, or a construction hair dryer, as it is also called, will be required. They will need to warm up the surfaces and adhesive composition of the materials before application;
- The cutter is also technical, construction, special. This makes it very easy to cut materials - the tool is always sharp, because it has replaceable blades;
- A special automotive glass scraper that needs to be wrapped in some thick cloth. We will use this homemade spatula to level the material after gluing.