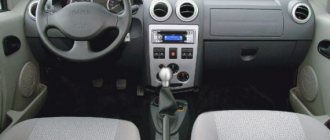
In 1984, the first “eight”, the VAZ 2108, rolled off the assembly line of the AvtoVAZ concern, followed by the five-door “nine”, the VAZ 2109, in 1987. The difference was not only in the presence of a rear door for this line of cars. The designers changed the instrument panel of the VAZ 2109.
The shield turned out to be quite simple, so it is easy to understand. The devices are conveniently located, do not overlap each other, and the readings are easy to read. Initially, the dashboard had a standard rectangular shape with slightly rounded corners. Smoothed corners and familiar visors appeared much later. Three types of instrument panels were installed on the VAZ 2109 - “low”, “high” and Europanel.
The meaning of the indication on the instrument panel of the VAZ 2109
On VAZ 2108 2109 21099 cars there are three options for the instrument panel: 1) Low instrument panel. 2) High instrument panel. 3) Euro instrument panel. The instrument panel is the organ of interaction between the car and the driver. With its help, the driver knows information about the state of all components of the car. That is, the driver receives all the information by looking at the icons and instruments on the instrument panel. Especially novice drivers need to know and understand the instrument panel display. So, the very first, and probably the most popular option for the instrument panel is a low instrument panel.
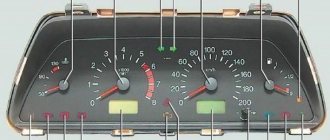
Low instrument panel
1a - speedometer, to indicate the speed of the vehicle. 2a - coolant temperature indicator. Designed to display engine temperature. The driver must control the engine temperature to prevent overheating. 3a - voltmeter - indication of on-board network voltage. The problem with the low panel is that the voltmeter needle very often twitches along with the direction indicators. This happens due to a voltage drop in the wires from the battery to the mounting block. 4a - fuel level indicator, for monitoring the fuel level in the tank by the driver of the car. 5a - the indicator lamp for the reserve fuel balance begins to blink first and then light up when there are three liters of fuel left in the tank. 6a - econometer - shows the vacuum in the engine input manifold. If you drive when the needle is not in the yellow zone, you will save gas. 7a - daily mileage counter. The driver can reset this counter at his own discretion. 8a - total mileage counter. Total mileage of the vehicle. 9a - “STOP” control panel. It lights up when the car is parked with the handbrake, and also when the fuel level in the brake fluid reservoir is low. 10a - battery charge indicator lamp. If it lights up with the engine running, it means the battery is not charging. 11a - control lamp for covering the carburetor air damper. If it lights up, it means the air intake is not closed. 12a - warning lamp for turning on the hazard warning lights. 13a - warning lamp for low brake fluid level. 14a - indicator lamp for turning on the parking brake. 15a - warning lamp for emergency drop in oil pressure. One of the most important light bulbs on the VAZ instrument panel. If the light remains on while the engine is running, the engine may seize due to lack of oil. 16a - indicator lamp for turning on the direction indicators, blinks when the direction switches are on. 17a - control lamp for turning on the side lights, lights up both when the side lights are on and when the headlights are on low beam. 18a - indicator lamp for turning on the rear fog lights. Rear fog lights only work in conjunction with low beam headlights. 19a - control lamp for turning on the high beam headlights. 20a - control lamp for turning on the heated glass of the tailgate.
The high instrument panel differs from the low one in the arrangement of the light bulbs. Contains some light bulbs that are not on the low panel, as well as a tachometer.
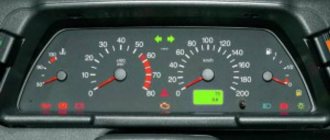
High instrument panel
1b - speedometer, to indicate vehicle speed and mileage. 2b — handle for resetting the daily mileage counter; 3b - daily mileage counter. The driver can reset this counter at his own discretion. 4b - total mileage counter. 5b - fuel level indicator, for monitoring the fuel level in the tank by the driver of the car. 6b - light panel of the on-board control system. 7b - “TEST” display, system test when starting the car. 8b — “STOP” sign. 9b - warning lamp for failure of brake light lamps and side lights. 10b - warning lamp for low brake fluid level. If it lights up or blinks on bumps, then you need to check the brake fluid level in the reservoir. 11b - warning lamp for low coolant level; if it lights up, it means you need to add coolant to the expansion tank. 12b - indicator lamp for front brake pad wear. This lamp lights up when the sensor installed on the front brakes is working. If the light comes on, it means either the brake pads are worn out or the sensor is working falsely. In rainy weather, many people complain that this sensor responds falsely. 13b - warning lamp for level drop in the washer reservoir. If the light comes on, add washer fluid to the reservoir. 14b - warning lamp for low oil level in the engine crankcase. It is very important to understand the difference between oil level and oil pressure. This light comes on when the oil level in the engine crankcase is low. Not to be confused with the oil pressure sensor. 15b - coolant temperature indicator. Designed to display engine temperature. The driver must control the engine temperature to prevent overheating. 16b - tachometer, shows engine speed. 17b - indicator lamp for turning on the parking brake. 18b - “CHECK ENGINE” control lamp for the injection system. That is, this light bulb is intended for models with an injector. It is issued by the electronic control unit if it sees some kind of error in the electronic injection system. 19b - control lamp for covering the carburetor air damper. Indicates that the carburetor air damper is not fully open, that is, the choke is turned on. 20b - the indicator lamp for the reserve fuel balance begins to blink first and then light up when there are three liters of fuel left in the tank. 21b - warning lamp for drop in oil pressure in the engine lubrication system. Indicates that there is no oil pressure when the engine is running, which means the engine may seize. 22b - control lamp for turning on the right turn indicators, blinks when the right turn is turned on. 23b - battery charge indicator lamp; if it lights up with the engine running, it means the battery charging is not working. 24b - control lamp for turning on the left turn indicators, blinks when a left turn is turned on. 25b - warning lamp for unfastened seat belts. The seat belt buckles have sensors that turn off the light when the seat belts are fastened. 26b - warning lamp for open doors. Indication that a door is not closed operates from limit switches that operate on the door. 27b - indicator lamp for turning on the side lights, lights up both with side lights and low beam headlights. 28b - control lamp for turning on the high beam headlights; 29b - “CHECK ENGINE” warning lamp (“Check engine”) of the toxicity reduction system.
Instrument cluster on the VAZ euro panel:
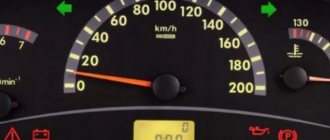
Euro dashboard
1c - coolant temperature indicator. Designed to display engine temperature. The driver must control the engine temperature to prevent overheating. 2c - tachometer, shows engine speed. 3c - the left turn signal indicator lamp blinks when a left turn is turned on. 4c - the right turn signal indicator lamp blinks when the right turn is turned on. 5c - speedometer, to indicate the speed of the vehicle. 6c - fuel level indicator, for monitoring the fuel level in the tank by the driver of the car. 7v - fuel reserve warning lamp. 8v - fuel reserve warning lamp. 9v - warning lamp for emergency condition of the brake system. 10v - control lamp for turning on the high beam headlights. 11c — reset button for the daily mileage indicator. 12v - mileage indicator. 13v - warning lamp for turning on the hazard warning lights. 14v — control lamp “CHECK ENGINE” (“Check engine”); 15v — indicator of time and temperature outside; 16v - battery charge indicator lamp; if it lights up with the engine running, it means the battery is not charging. The generator needs to be checked. 17v - indicator lamp for turning on the parking brake. 18v - indicator lamp for insufficient oil pressure, shows that when the engine is running there is no oil pressure, that is, the engine may seize. 19v - carburetor air damper control lamp (reserve for a car with a fuel injection system). That is, if the car has an injection system, then this light will not work, since it is for carburetor models.
Travel speed
The speedometer is one of the most important indicators. In addition to the speed of movement, it also shows the distance traveled. On models produced before 1995, this is mainly only the total mileage value. Later models have a daily trip counter and a button that allows you to reset it.
If malfunctions occur in the speedometer, you should check the fastenings and condition of the flexible shaft. Pay attention to bends, the radius of which should be more than 10 mm. Replace the drive cable; if this does not help, then installing a new speedometer is required. The price of services in the salon for this repair is small, so it is better to immediately contact specialists.
Instrument cluster
Today, VAZ 2109 cars that can be found on domestic roads, no matter whether they have carburetors or injectors, are equipped with three types of electronic devices. It can be a low panel, a high panel or a Europanel. Let's consider the description of each type separately.
"Low" panel
Low version of the control panel
Let's start with the low version. A detailed explanation of the scheme is given in the table.
| Icon | Purpose |
| 32 | Indicates which turn signal is on. The indicator stops working after the steering wheel is turned. |
| 33 | A light lamp that turns on when the low beam is activated. |
| 34 | Lights up when the PTF - fog lights are turned on. |
| 35 | Lamp for turning on high beam headlights. |
| 36 | Notifies the driver that the rear window heating system is operating. |
| 37 | A signal alerting the motorist to the need to stop and repair a fault. |
| 38 | Speedometer. |
| 39 | A counter that records the daily mileage of a vehicle. |
| 40 | A sensor that notifies the driver about the temperature of the antifreeze in the cooling system. |
| 41 | A sensor that records the voltage level in the vehicle's on-board network. |
| 42 | An icon that lights up when the engine fluid pressure in the system is too low. |
| 43 | hazard warning lamp. |
| 44 | The diode lights up if the brake system is in emergency condition. |
| 45 | Icon for turning on the carburetor choke or choke. |
| 46 | Engaging the handbrake. |
| 47 | This element appears when the car battery is low charged. |
| 48 | Vehicle mileage counter. |
| 49 | An ecometer whose needle rises when you press the gas pedal. |
| 50 | A line that is not recommended to be crossed - the light starts to light when the gasoline level is critically low. |
| 51 | Sensor for measuring fuel level in the tank. |
"High" panel
Instrument cluster on a high panel
Below is a high-type VAZ 2109 instrument panel with electronic backlight. Relevant for both injectors and carburetors. You will find a decoding of the circuit and combinations according to the instructions below.
| Icon | Designation |
| 42 | Speedometer, which displays the speed of the car. |
| 43 | An odometer that records the mileage of a vehicle. |
| 44 | Sensor for measuring fuel level in the tank. |
| 45 | A signal alerting the motorist to the need to stop and repair a fault. |
| 46 | Test lamp. |
| 47 | A signal alerting the motorist to the need to stop and repair a fault. |
| 48 | Lamp warning the driver about a malfunction in the operation of the signal lights. |
| 49 | A sensor that notifies the driver of a lack of antifreeze in the cooling system. |
| 50 | An indicator indicating wear of the brake pads on the front wheels. |
| 51 | The light comes on to warn the motorist about the lack of fluid in the windshield and rear window washer reservoir. |
| 52 | Indicator of lack of engine fluid pressure in the crankcase. |
| 53 | The regulator measures the antifreeze temperature level in the cooling system and displays this data on an electronic panel with backlight. |
| 54 | This icon on the high combination of the dashboard is a tachometer, demonstrating the level of engine speed of the car. |
| 55 | Additional socket. |
| 56 | A button designed to reset the daily mileage. |
| 57 | A lamp that lights up when the car's headlights are turned on. |
| 58 | Daily mileage recording sensor. |
| 59 | A diode lamp that turns on when the side lights are activated. |
| 60 | A sensor that warns the driver about an open door. |
| 61 | A lamp warning the driver that he is driving without fastened seat belts. |
| 62 | A diode indicating that the left turn signal is on. |
| 63 | This element of the combination of an electronic panel with backlight indicates the charge level in the system. |
| 64 | A diode indicating that the right turn signal is on. |
| 65 | The lamp turns on when the engine fluid pressure in the system is insufficient. |
| 66 | The diode turns on if the fuel level in the tank is critical. |
| 67 | The choke switch lamp is found only in carburetor cars. |
| 68 | This element is activated when it is necessary to diagnose the car’s engine. |
| 69 | Handbrake light. |
"Europanel"
Variant of the control panel on the VAZ Europanel
Now let's move on to considering the combination of an electronic instrument panel of the Europanel type with backlight. It should be immediately noted that the description of the components below is almost identical to the low-type electronic panel.
| Icon | Purpose |
| 42 | Indicates which turn signal is on. The indicator stops working after the steering wheel is turned in the required direction. |
| 43 | The Europanel light lamp activates when the side lights are turned on. |
| 44 | Lights up when the rear PTF - fog lights are turned on. |
| 45 | Lamp for activating high beam lights. |
| 46 | This circuit element notifies the motorist about the operation of the rear window heating system. |
| 47 | A signal alerting the motorist to the need to stop and repair a fault. |
| 48 | Speedometer, which displays the speed of the vehicle while driving. |
| 49 | A counter that records the daily mileage of a vehicle. |
| 50 | This circuit component is designed to notify the car owner about the level of antifreeze temperature in the cooling system. |
| 51 | A circuit sensor that records the voltage level in the vehicle’s on-board network. |
| 52 | An icon that lights up when the engine fluid pressure in the system is too low. |
| 53 | Hazard warning light. |
| 54 | The diode lights up if the brake system is in an emergency condition and attention needs to be paid to its diagnostics. |
| 55 | Icon for turning on the choke of a carburetor engine. |
| 56 | Engaging the handbrake. |
| 57 | This element in the diagram lights up when the car’s battery charge is too low. To avoid problems starting the engine, it is better to recharge the battery. |
| 58 | Meter of the vehicle's total mileage in kilometers. |
| 59 | An ecometer whose needle rises when you press the gas pedal. The ecometer allows you to slightly save fuel on the vehicle. |
| 60 | A line on the diagram that is not recommended to be crossed. The diode lamp is activated when the level of gasoline in the tank is critically low. To avoid stopping on the road, you should add fuel. |
| 61 | Sensor for measuring fuel level in the tank. |
Possible faults
What malfunctions are typical for the dashboards of VAZ cars? Check out the main list after watching a video about connecting the shield from a VAZ 2110 to a “nine” (the author of the video is Garage BFS).
- The speedometer does not work. There may be several reasons for this - a broken cable, its incorrect installation or wear of the socket. You should try disconnecting the cable and reconnecting it.
- The odometer, which records the mileage of the vehicle, does not work. This problem is usually resolved by replacing the device.
- One or another indicator does not light up. Perhaps the sensor itself has failed or the light bulb has burned out.
- The instrument panel backlight does not work. This is usually due to burnt out bulbs or bad contacts. There may also be problems in the electrical circuit, but this happens rarely.
- The coolant or oil level sensor is giving incorrect information. For example, the driver is warned about a lack of engine fluid level or boiling refrigerant in the expansion tank, but in fact, with these parameters everything is normal. The problem is usually solved by replacing the sensors.
Installation and repair instructions
If you are faced with the problem of a failure of the dashboard of a VAZ 2109 vehicle, then the best option would be to replace the dashboard yourself. To properly replace, you will need instructions for dismantling and installing the shield, which are given below. To perform these steps, you only need screwdrivers - flat-head and Phillips-head. The instructions are given on the example of a low panel, but in general they are identical for other versions of instrument panels. Don't forget to disconnect the battery!
Unscrew the screws of the shield visor. Disconnect the speedometer cable. Disconnect the ecometer hose.
- First of all, you need to de-energize the system; to do this, disconnect the terminals from the battery.
- Using a Phillips screwdriver, unscrew the plastic trim around the steering wheel. You don’t have to remove it, but it is advisable to do so for greater convenience.
- You can also disconnect the steering column switches by simply unplugging the wiring harness.
- Using a Phillips screwdriver, unscrew the two small screws securing the dashboard visor and remove this element.
- After these steps, you can compress the springs and remove the electronic panel from the center console.
- The next step is to disconnect the speedometer cable. It is necessary to be very careful when dismantling so as not to damage the cable, especially if it is old. Otherwise, it will need to be replaced.
- Next, turn off the white outlet and remove the econometer hose.
- Then you should disconnect the cable for resetting the car’s daily mileage data from the speedometer.
- The final step will be to disconnect the red connector and dismantle the shield itself. A new panel is replaced and installed, after which further assembly is carried out in the reverse order.
As you can see, the procedure for replacing the instrument panel is not particularly complicated - just do everything in accordance with the instructions and there will be no problems in the further operation of the device.
Removal
Having familiarized themselves with the diagram of the high instrument panel of the VAZ 2109, many will probably think about the issue of removing it.
There are more than enough reasons to dismantle the panel:
- Repair, modernization of the heating system;
- Body repair;
- Replacing the old panel with a new one;
- Car painting;
- Body sound insulation, etc.
Dismantling process
This is not to say that removing the panel is a difficult process. The main problem is the time that needs to be spent on the work. The task requires concentration and increased attention in order to dismantle all elements, devices, and linings.
The process looks like this.
- Remove the steering wheel itself, otherwise it will seriously interfere with you when dismantling the panel.
- Pull the carburetor choke towards you. Injection engines do not have such an element. Then remove the plastic handle from the drive rod.
- Next, the decorative trim of the console is removed. To do this, simply unscrew the two mounting screws on the sides.
- Dismantle the ashtray and remove the cigarette lighter from its seat.
- Remove the handle that controls the speed of the fan motor.
- Using a screwdriver, pry the levers of the interior heater drive, which will allow you to remove these decorative elements.
- Disconnect the block with wires from the heater fan mode switch.
- Remove the two power wires for the backlight of the stove control panel from the contacts.
- Now you will need to get rid of several decorative control knobs - headlight hydraulic adjustment, instrument lighting control.
- The next step is to dismantle the hydraulic corrector itself and the lighting regulator. You will need a socket wrench that matches the diameter of the mounting nuts you are using. After unscrewing, push them inside. A little later you will be able to take them out.
- The air deflectors for heating the side windows are removed on the left and right.
- Here, using a Phillips screwdriver, you need to unscrew one mounting screw on each side that holds the upper panel covers.
- Remove the exterior light switch from the dashboard. To do this, you need to carefully pry the switch with a flat screwdriver and pull it out. Do not pull too hard as the switch is limited by the length of the wires used. Disconnect the power supply with the wires from the switch and set it aside. The block can still be pushed inside the panel.
- If you have an audio system, remove the radio. Now remove the standard socket from the radio. Of course, if you still have it.
- Unscrew the central fastener from the panel trim.
- Let's start by removing the dashboard trim. Before doing this, be sure to unlatch the latches located under the dashboard. This is done with a pair of flathead screwdrivers. Insert the tools along the edges and press down. By performing upward movements, the panel rises and then is completely removed.
- The cover has been removed, but that's only half the battle. Next, you can easily disconnect the power supply from the cigarette lighter and the cigarette lighter lamp.
- Also, without much difficulty, the wires from the alarm signal and the hazard warning lights are disconnected.
- Be sure to remember to remove the decorative trim from the front speaker and the heated glass switch, plus the rear fog light switch trim. If you also have a speaker, you will need to remove it.
- Reach through the hole under the speaker to disconnect the wiring harness from the fog light and rear window defroster switch.
- The instrument cluster is held on the panel by two mounting screws, which must be unscrewed. Pull it towards you, unscrew the nut and remove the flexible drive cable from the speedometer.
- That's it, the block with wiring from the instrument cluster can be disconnected and put aside for now.
- Do the same with the ignition switch - disconnect the block with wires, remove the ignition relay ground wire from the connector.
- Here, in close proximity, you will see a wire from the air damper warning lamp. But only for the carburetor VAZ 2109. Injection versions are not equipped with this wire.
- On each side of the panel, unscrew one bottom mounting screw.
- Disconnect the power supply wiring for the glove compartment lighting.
- Unscrew the heater panel fasteners and move it down. This way the panel will not disturb you.
- Remove the fasteners for the interior heater guide rod.
- Unscrew all the remaining side top and center fasteners, after which the panel can finally be completely removed.
High instrument panel
According to the diagram presented below, the VAZ 2109 with a high panel has the following components.
| Item number | What is this |
| 1. | Ignition switch |
| 2. | Hazard switch |
| 3. | Windshield wiper and washer control lever |
| 4. | Radio socket |
| 5. | Central nozzles of the interior heating and ventilation system |
| 6. | On-board computer (not available on all trim levels) |
| 7. | Dashboard |
| 8. | Glove compartment lid (glove compartment) |
| 9. | Side nozzles of the interior heating and ventilation system |
| 10. | Speaker (loudspeaker) trim |
| 11. | Shelf |
| 12. | Power window switches (available on certain trim levels) |
| 13. | Cigarette lighter |
| 14. | Control panel for heating and interior ventilation system |
| 15. | Gearbox shift lever |
| 16. | Hand brake lever |
| 17. | Ashtray |
| 18. | Carburetor choke handle |
| 19. | Gas pedal |
| 20. | Brake pedal |
| 21. | Clutch |
| 22. | Horn switch (horn) |
| 23. | Instrument panel light switch |
| 24. | Headlight hydrocorrector |
| 25. | Front seat heating switch (available as standard) |
| 26. | Rear fog light switch |
| 27. | Front fog lamp switch (not available on all trim levels) |
| 28. | Rear defogger switch |
| 29. | Hood lock drive lever |
| 30. | Turn signal and light control lever |
| 31. | Outdoor optics switch |
| 32. | Instrument cluster |
In order to eliminate certain malfunctions, monitor the operating parameters of the engine and vehicle systems, it is necessary to learn how the instrument cluster with a high panel is designed when you first get acquainted with the VAZ 2109.
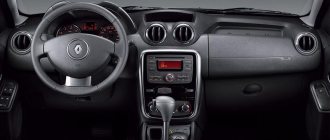
Features of the Europanel
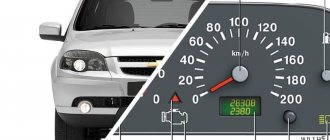
Since 1996, Europanels began to be installed on the VAZ 2109. They have a trapezoid shape with strongly rounded corners, are ergonomic and, as a result, attractive. As in the “high” panel, most of the dashboard is occupied by the tachometer and speedometer, all other instruments - warning lights, indicators - are located around them. Trip counters have been replaced with electronic indicators.
Europanel VAZ 2109
Instrument cluster
Below we present a diagram and also introduce you to the components of this unit.
| Item number | What is this |
| 1. | Speedometer |
| 2. | Daily mileage reset knob |
| 3. | Daily odometer |
| 4. | Vehicle mileage meter |
| 5. | Fuel level indicator in the tank |
| 6. | On-board control system light panel |
| 7. | TEST |
| 8. | STOP |
| 9. | Indicator lamp for breakage of brake light and dimensions |
| 10. | Indicator lamp for low brake fluid level |
| 11. | Indicator lamp for low coolant level |
| 12. | Front brake pad wear warning lamp |
| 13. | Indicator lamp for low liquid level in the washer tank |
| 14. | Indicator lamp for low oil level in the crankcase |
| 15. | Coolant temperature gauge |
| 16. | Tachometer |
| 17. | Parking brake activation warning lamp |
| 18. | Indicator lamp Check engine (Check Engine) fuel injection system |
| 19. | Indicator lamp for closing the engine air damper (carburetor) |
| 20. | Fuel reserve indicator lamp |
| 21. | Oil pressure warning lamp |
| 22. | Right turn signal lamp |
| 23. | Battery discharge warning lamp |
| 24. | Left turn signal indicator |
| 25. | Warning lamp when seat belts are not fastened |
| 26. | Indicator lamp when doors are not closed |
| 27. | Indicator lamp for activation of side optics |
| 28. | Indicator lamp when turning on the high beam |
| 29. | Warning light Check engine emissions system |