And so, I considered the standard speakers to be a drawback, so I decided to replace them. I decided to replace it with speakers of the same size 13 cm, since to install larger speakers it is necessary to cut the door, and I don’t want to do this, and since even in the long term there is no installation of an amplifier, so installing 16 cm is not logical, because of this I decided to install 13 cm speakers and just get better sound. I purchased the well-known Pioneer TS-1339R speakers for the front doors for 2,000 rubles. The kit comes with long wires, which is useful for those who do not have audio training.
Type - coaxial speaker; Number of speakers included - 2 pcs; The shape of the speakers is round; Number of stripes - 3; Rated power - 40 W; Maximum power - 200 W; Minimum frequency - 40 Hz; Maximum frequency - 30000 Hz; Sensitivity - 91 dB; Impedance - 4 Ohms; Diameter - 13 cm; Planting depth - 55.3 mm.
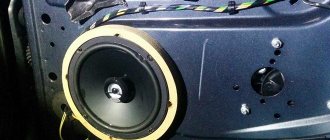
To install in the front doors, remove the trim; to do this, unscrew the bolts in the indicated places and unscrew the door lock release button, remove the trim that is held on by clips.
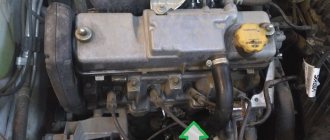
The standard audio equipment of a Lada Granta liftback car includes: a 2-DIMM radio, two speakers in the front door measuring 13 cm, blocks with wires in the rear door.
Obviously, such an audio system is not complete and of low quality. The stock speakers are too small, weak when using mid and high frequencies. It's enough to listen to the radio. Is it worth changing the standard speakers? The answer is yes.
A short checklist for installing speakers in the front doors of Lada Granta
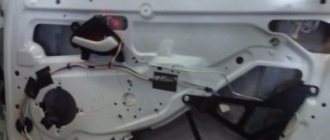
- Removing the door card.
- Removing standard noise and vibration insulation.
- Removing the stock speaker.
- Installation of speakers (13 cm) Granta liftback. When installing speakers at 16.0 cm, use a metal jigsaw to make a cut in the door contour.
- We connect the blocks with wires.
- We collect the card and replace it in a similar way to the second door.
The sequence of actions is presented very briefly; during installation, many “pitfalls” arise, which are discussed below.
Sealing is a guarantee of high-quality sound
In order to achieve a tight fit of all components when installing speakers in a domestic Lada Granta car, it is necessary to carry out intermediate sealing measures. Once the ring is attached, gaps may be found between it and the door panel caused by the installation of spacers. To eliminate this negative point, you will need to glue the outer side of the ring with a special product - “Vizomat 10”. Now the outer side is free of cracks, and the space between the ring and the door can be filled with polyurethane foam. Without allowing the foam to completely harden, we remove all protrusions that could cause interference when installing the speaker.
The subtleties of installing speakers on a Granta liftback that everyone should know
- To avoid additional manipulations with cutouts and extensions of standard holes in the doorway, install audio speakers with a diameter of 13.0 cm.
- If you want to improve the sound quality, increase the volume, frequency, install speakers in the front doors at 16.0 cm. Be prepared to widen the hole in the door structure. You can do this at a service center or yourself, armed with a metal jigsaw. From a ring with a radius of 6.5 cm, make 8.0 cm.
- When installing speakers of larger diameter, there is a high probability of glass coming into contact with the back of the speaker. As a result, vibrations are possible when lowering the glass to its lowest position.
Features of the preparatory process before installing speakers
Gearbox Lada Granta
Before installing speakers in your car in the front doors, you should ask yourself about ensuring a sufficient dispersion effect of sound waves. This suggests the need to stick an additional layer of Bitoplast 10 over the existing Vizomat MP-2. This action is not mandatory, but will significantly reduce the degree of reflection of sound waves from the door surface.
Why Bitoplast 10 and not traditional foam rubber? Let us note the peculiarity of the properties of these materials, which consists in the ability to absorb moisture to varying degrees. Foam rubber is capable of absorbing water like a sponge, which will subsequently lead to the appearance of pockets of corrosion inside the LADA Granta door card, which cannot be said about the recommended material.
Spacers can serve as additional means. You can purchase them at any specialized retail outlet. Is it possible to independently manufacture the indicated spacers (rings)? Such an event is quite possible and requires the presence of an electric jigsaw, the ability to use it and a sheet of high-quality plywood or wood. The thickness of the material affects the placement of the device inside the door panel.
If you neglect to install the ring and use only plastic spacers, this will not allow the side door window of the LADA Granta to fully lower in the future. To ensure correct placement of the speaker inside the door panel and full functioning of the window regulator, you will also need to install plastic spacers under the previously designated ring. It is necessary to place smaller elements under the upper points of the accessory, and, on the contrary, larger ones under the lower points (i.e., remove the gap).
We fix the ring made in this way in the standard hole of the door card. At the same time, we place the indicated spacers.
Review of prices of audio products manufacturers
| Name / characteristics / article number | Price, rub.) |
| Comprehensive budget solution | |
| Radio tape recorder PIONEER MVH-150UBG | from 1500 – 1700 |
| Speakers Pioneer TS-1339 (13cm) | from 2000 |
| Speaker trim | from 450 – 500 |
| Additional noise/vibration insulation of doors | from 1200 |
| Consumables, bolts, screws for vinyl (wood) spacers | from 100 – 150 |
| Car radios | |
| Pioneer SPX-HUD01 | from 10000 |
| Pioneer DVH-345UB | from 12000 |
| Sony XAV-65 | From 15000 |
| Pioneer SPH-DA230DAB | —/— |
| Pioneer SPH-DA120 | from 12000 |
| Pioneer MVH-X585BT | —/— |
| Pioneer MVH-X580BT | —/— |
| Pioneer MVH-S300BT | —/— |
| Auto acoustics coaxial | |
| Two-way coaxial acoustics URAL AK-M | from 7000 |
| URAL AK-74 | —/— |
| Coaxial acoustics URAL AS-C6947 | from 5200 |
| URAL AS-C1647 | —/— |
| URAL AS-C1347 | —/— |
| Four-way acoustics German Maestro AC6511 | from 7500 |
| Focal Performance PC 130 | —/— |
| Dragster DCB 5 | —/—7 |
| Dragster DCA 943 | from 6800 |
| Dragster DC 572.2 | —/— |
| Dragster DC 502.2 | —/— |
| Auto acoustics component | |
| 2-component acoustics Dragster DSB 5 | from 4000 |
| URAL AS-C1627K | —/— |
| URAL AS-C1327k | —/— |
| URAL AK-74.C | —/— |
| URAL AK-47.C | —/— |
| Avatar CBR-6.21L | from 5000 |
| German Maestro MB 4.2 FR | —/— |
| German Maestro 2S 6512 | —/— |
| Dragster DSC 592.2 | —/— |
| Dragster DSA 582 | —/— |
| Dragster DS 532.3 | —/— |
| Alphard Machete MC-6.2A | —/— |
| Amplifiers single / multi-channel | |
| Machete MFC-650.1D | from 10000 |
| Taramps DSP 3000 | —/— |
| Taramps TS2000x4 | —/— |
| Taramps TL500 | —/— |
| Taramps TL1800 | —/— |
| Taramps TL1500 | —/— |
| Taramps DS800x4 | —/— |
| Taramps DS800x2 | —/— |
| Taramps DS440x4 | —/— |
The main differences between coaxial and component acoustics
- Coaxial: a single design of speakers, where low-frequency and high-frequency are mounted on the same axis. Depending on the type of preinstalled crossover, one, two, or three-way crossovers are distinguished.
- Component: consists of a number of individual different-frequency speakers that are installed throughout the vehicle interior.
It is better to install coaxial ones on the back row of seats, component ones - in the front. The cost of coaxial speakers is a third cheaper than component ones.
Sequence of actions when installing rear speakers in a Lada Granta liftback
The speakers will be installed in the factory door openings. The situation with dimensions for openings is atypical. The shape is oval, while the columns are round. It is not known why AvtoVAZ made this decision.
To correctly install speakers in the rear door, do the following:
- remove the door card, handle, control unit;
- select the size of speakers for installation. Size 13 will require less cost and plumbing work compared to size 16.
- Selecting a speaker at “13”: using a utility knife, cut off the edge at the top of the hole for the speaker. The metal body is left unchanged.
- If you select a speaker with “16” or more, use a metal jigsaw to cut off the edge on the metal and plastic casing.
It is important to know. Many car owners are wary when they see that the hole in the speakers is not located in the center of the oval structure (preparation). The problem is familiar, but the defect has not yet been fixed.
- We cut out a stand from wood for the base of the speaker, no more than 0.6 cm thick. For these purposes, it is better to choose plywood.
- We insert the speaker into the door, place a wooden spacer, connect the block with wires - the so-called audio preparation.
To the left rear door: blue/white - brown/blue wire. To the rear right: green / black - yellow / green. We complete the assembly by installing the door card. By analogy, we carry out the installation on the left door.
Preparatory work
First, it is determined what diameter of the speakers will be installed on the Lada Granta liftback or other type of hatchback. Then a set of equipment and fasteners is prepared. Installation will require the following tools:
- screwdrivers;
- jigsaw;
- sharp knife;
- rags;
- metal files;
- wooden spacer;
- chalk to mark the diameter of the stand.
Speaker size 13 is the norm. The internal design of the door allows you to install such a column without additional manipulations. In this case, installation and cutting of the metal base is not required.
Installing speakers in the rear shelf of Lada Granta liftback
The installation process is somewhat complicated by the need to pre-prepare the shelf, cut holes, and install podiums.
- Open the back door of the Lada Granta Liftback, remove the shelf;
- We apply the speakers one by one, projecting their oval silhouette onto the shelf from the back side;
- We cut out holes with a jigsaw and clean them around the perimeter with sandpaper;
- We buy in advance and cut out the podiums for the speakers ourselves. We apply and assemble the structure.
The most crucial moment comes - laying the cable. Some masters practice feeding from side doors, which is fundamentally wrong. As the load on the circuit increases, the speakers will begin to sag. It is best to connect to the ISO connector on the back of the tape recorder.
- We dismantle the plastic linings - thresholds between the front and rear rows of seats.
- We lay the wires from the rear speakers and bring them out to the inside of the dashboard.
- We route the ISO connector and connect it to the free sockets.
- We reassemble the pads.
Provided you follow the recommendations and follow the algorithm, the performance of the speakers is guaranteed. During the warranty period, the buyer has the right to present to the seller any demands provided for by law.
Tips when installing an audio system
As we can see, the installation of acoustic components in the LADA Vesta interior is not capable of generating difficulties and dead ends. The main thing for the owner is to adhere to simple but useful rules, namely:
- We carry out the entire list of manipulations extremely carefully, without breaking the fasteners or scratching the panels.
- Since audio preparation is initially present, we just need to connect the speakers and head unit.
- We do not cut off the standard connectors, but stock up on the previously specified adapters.
- Before directly installing the dynamic heads, we soundproof the door panels.
- Installation of the speakers is carried out on previously prepared gaskets.
Reviews
| № | Positive |
| 1. | Kirill , 33 years old: the standard front speakers are quite enough for me. To add volume to the sound, I installed a couple on the rear shelf. |
| 2. | Vasily , 44 years old: The standard radio on the Lada Granta Liftback is not bad, the sound is good. There are not enough speakers in the back row. I didn’t bother, I set the speakers to “13”. |
| 3. | Vitaly , 33 years old: after purchasing the Lada Granta Liftback, I supplemented the standard audio system with only two rear speakers, that’s enough for me. |
| 4. | Gennady , 41 years old: to increase the volume of sound, he added two speakers to the rear side doors and the rear parcel shelf. The standard radio works, no problems. |
| 5. | Mikhail , 35 years old: I heard a lot of complaints about the standard system, my feedback is positive. Yes, it is not super powerful, but it is enough for the average driver. |
| 6. | Gennady , 29 years old: the standard 2-DIMM radio on the Lada Granta Liftback is quite enough for good sound. Anyone who wants a concert hall should buy it separately. |
| 7. | Vyacheslav , 38 years old: I heard that they install rear speakers on the Grant at “16”, but did not bother. I bought it on “13”, I’m happy, there are no complaints about the sound, it’s not ideal, but it’s enough for me. |
| Negative | |
| 1. | Vasily , 28 years old: I didn’t believe the negative reviews until I bought the Lada Granta Liftback. Weak and terrible. Change the speakers and radio. |
| 2. | Kirill , 33 years old: I took the car with me, it had a standard radio, I replaced it with a new one from Pioneer. It's a completely different matter. |
| 3. | Georgy , 41 years old: when buying Grants, I knew in advance about problems with acoustics. I bought coaxial speakers and a good radio. |
Level one. Noise insulation
Yes, yes, this is the very first point for any upgrade of a standard audio system. If you want to listen to music, first of all get rid of unnecessary sounds. By the way, we are talking not so much about outside noise as about body noise. Look at the home speaker. Durable body, devoid of overtones. Sound emits only what should emit sound, and what should not be held monolithically. Now take a look at where and how any car speaker is installed and what the housing is for it. Most often it is mounted on some kind of metal panel, and in the worst case, even on plastic upholstery. And the body of such a “column” is a door or some kind of body niche. Tough, and that's all. By the way, in the literal sense of the word.
The easiest way to improve the acoustic operating conditions of speakers and get rid of unnecessary resonances and other metallic sounds is to use vibration-damping materials. They are usually made from bitumen or rubber, often with some additives. Their main feature is high internal viscosity. Basically, these are just sheet materials that are cut right on site and carefully rolled onto the metal. But sometimes such materials come in the form of mastics.
Treatment with vibration-damping materials eliminates metallic sounds and improves the operating conditions of installed speakers
Vibration-damping materials are heavier and more rigid, more effective, but they are also harder to work with, so not all craftsmen like them. Thinner and lighter ones are easier to work with, but their effect is not so high. The optimum is usually somewhere in the middle.
Various kinds of lightweight foam and fibrous materials can be considered only optionally; they work somewhat differently and do not have much effect on the absorption of metal vibrations.
Video - Installing 16 cm Speakers in Lada Granta through spacers
Acoustics in Lada Granta
It's no secret that acoustics in a car are very necessary and perform various functions. Installing it is a bit of a concern for novice motorists: they find it difficult to choose the right speakers, they do not have enough money for high-quality installation, etc. This article was written solely to help everyone in this matter and we will find out how to install acoustics in a Lada Granta with our own hands. The Lada Granta and the acoustics, installed correctly in its interior, taken together, will create a completely different car, which even the owners of some foreign cars will look at with envy.
Acoustics Lada Granta
As a rule, installing acoustics in a car has three main stages of development:
- Car radio installation.
- Installation of front speakers.
- Installation of rear speakers.
Let's look at everything in more detail.
Level four. Complete replacement of the standard system
There are situations when you are not satisfied not only with the sound of the standard system, but also with the functionality of the head unit itself. In this case, thoughts about replacing it become especially annoying. But this cannot always be done with small forces.
Initially, this Honda was equipped with a standard head unit integrated into the dashboard. Using a non-standard panel, it was possible to install a new head unit of standard DIN sizes
First of all, take a close look at what the standard head unit is. If it has its own display, and all audio system controls are not connected to other car systems (climate control, on-board computer, etc.), then it can most likely be safely removed, while all other systems will remain unaffected.
Don't let the original shape and size of the standard GI confuse you. Firstly, there are now many alternative head units that are produced for specific car brands and fit into the panel using the pin-to-pin principle - the seats and connectors are completely the same. Or you can use an adapter frame to install a standard 1DIN or 2DIN size device and an adapter from a standard connector to a standard ISO. They are produced by many manufacturers, so choosing the right set is usually not difficult. As a last resort, no one has canceled the custom solution either.
If the standard head unit has many standard functions, then replacing it is a very difficult task; there are not simple solutions for every car. Pictured is an Alpine kit designed specifically for Mercedes
But if the standard “head” is combined with other car systems, then it’s more complicated. It is far from a fact that there is an alternative head unit for your car. In this case, the approach will be individual, and most likely costly.
This McIntosh became the head of the new audio system, and a mounting frame was made especially for it. All that remains of the standard system is the head unit, which now serves as the second most important source
But there is another option. It looks quite extravagant, but sometimes the only way to organize a truly high-quality audio source in a car is to leave the standard head unit unchanged and install a second one. In this case, it becomes the main one in the system, and the audio system is built from it. The standard one is shifted from the role of the main one in the system and becomes additional - its outputs are connected to the AUX inputs of the new head unit.
HOW TO IMPROVE THE SOUND OF YOUR HI-FI SYSTEM WITHOUT SPENDING ALMOST NOTHING BUT TIME
A. J. van den Hul is known primarily for his cables, but in fact his range of professional interests is much wider. He designs and assembles the most expensive phono cartridges himself, and is well versed in amplification technology and acoustics. He has repeatedly carried out orders for recording studios, so he knows the whole “kitchen” from the inside. Has several academic degrees. Today we begin to publish the advice of Professor van den Hoole, which he kindly provided to our magazine.
1. An inexpensive but most effective way to improve the sound of your speakers is to replace the internal wiring with better quality. Try our CS-12 cable, or better yet, SCS-12. The next step forward is replacing electrolytic capacitors in filters with film ones. For example, from metallized polycarbonate*.
2. Solder all connections, avoid crimp contacts. The inner wire must also be soldered to the input terminal. No petals or nuts.
3. Duplicate all the tracks on the crossover PCB with a thicker conductor, the same one you used for the internal wiring. Clean it thoroughly before soldering, otherwise you won’t be able to get rid of the dirt and the sound.
4. Reinforce the column body with internal struts, and apply a layer of bitumen to the walls. This will reduce the coloration of the sound.
5. Compared to traditional bi-wiring, it has a number of advantages. Separate the LF and HF/MF sections of the crossover by cutting the tracks on the PCB. Install an additional pair of terminals to supply a signal to the midrange and tweeter.
6. Remove speakers from corners of the room. Any angle accentuates low frequencies and introduces a “horn” coloration. Each speaker should stand freely, away from the walls. Of course, this depends on the size of your listening room. Getting rid of unnecessary furniture is useful in any case, and the improvement in sound will certainly please you.
7. If you can, place the speakers so that the line connecting their front panels is 15 degrees. from one of the walls. This really helps eliminate room resonances if the bass is too punchy. This way, both speakers will be placed asymmetrically in the listening room. In a symmetrical installation, both speakers produce the same mode. Each speaker excites its own resonant frequency (i.e. mode) in the room, depending on the distance to the nearest wall. The distance between the speakers and the ceiling gives the second frequency dominant. With an absolutely symmetrical arrangement of speakers in the room, the resonance effects are doubled, which leads to breaks in the frequency response at frequencies higher than the dominant ones. To break this structure, I advise you to place the speakers as shown in the figure. The problem with sound coloration will be solved by 99%. If that doesn't help, try 20 degrees. The method also gives excellent results at Hi-Fi Shows in hotels, where not too smart demonstrators like to arrange everything symmetrically. That's exactly what you shouldn't do.
8. If there is an excessive abundance of high frequencies, place a nice rug, a gift from your mother-in-law, in the center of the room. It will absorb reflections from the floor, and there will be less ringing.
9. If you can bring paving slabs measuring 30 x 30 cm or more from the street, slip them under the column. The second one can be taken in front of the neighbor's house and placed on top. Between them it is worth placing a sheet of flexible and adhesive material. Thus, one day four tiles will disappear from the street. Oh times, oh morals!
10. Do your speakers have soft grills? Please take them off. But not if you love children and cats. Otherwise, the losses will upset you more than the sound with protective nets.
11. If your bass reflex speakers still produce too much bass, stuff a T-shirt or old socks into the port. It is so easy to change the quality factor of the system in the range of 30 - 50 Hz by increasing the air flow resistance. It also helps to reduce port noise.
12. It is very useful to purchase a second, exactly the same amplifier. Use one channel of each for the bass section, the other for the mid/high frequencies**. The result is bi-amping, which reduces the load on the amplifier's power supply. The left and right channel inputs are shorted to the pre-section output. Use special adapter cords for this.
13. Minimize the distance between the power amplifier and the speakers. It will be even better if you place the amplifier directly on the speaker (more precisely, on the tile). The speaker cable should be as short as possible. At the same time, of course, the interconnects are lengthened, but this is exactly how it should be. The sound improvement will amaze you.
14. New speakers need warming up. It is best to put them “face to face” and turn them out of phase with respect to each other, changing the polarity of one of the cables. Give them pink noise from a generator or a music signal from an FM receiver. Turn it up loud. Close the door and visit your mother-in-law, whom you have not seen for at least two years. Smile, no matter what she says - after all, the speakers will either warm up or burn out by the time you return.
15. Warming up at low frequencies will help increase the mechanical quality factor of the system at the main resonance frequency. A sine generator tuned between 10 and 20 Hz will work fine. Remember that if the speaker plays very loudly, this means only one thing - the speaker is no longer there. It's a shame if this happens.
* In our specifications, polycarbonate capacitors are designated K-77. They are not scarce and inexpensive.
** It’s more logical to use one amplifier for bass, and the second for everything else. Moreover, they can (and even should) be of different power.
Just recently I talked about the design of the UMZCH power indicator. Today I want to return again to the topic of the reanimated Solntsev amplifier. The resuscitation process itself was troublesome, but painless. However, when listening to phonograms, gradually but surely the impression of constriction of one channel began to take shape. There was a feeling that one channel was missing something to breathe “fully.” The lows were somehow sluggish and smeared, the mids were a failure, the highs seemed to be seeping through the felt.
Initially, suspicion fell on the amplifier itself, since during the reincarnation it had to be practically remade. I started checking the pre-amplifier, tone block, UMZCH, and made sure that there was no drop in the supply voltage when the power increased. I swapped channels, replaced feed-through ceramic capacitors with film capacitors, fed a signal from an audio frequency generator, and looked at the output signal with an oscilloscope. Everything turned out to be in order, but the study gradually suggested that the acoustic system was not working correctly. The amplifier, like 20 years ago in its first life, is loaded with Yugoslavian speakers from Ei model HZK 12031 with a power of 120/100 watts and a resistance of 4 ohms.
The global network is stubbornly silent about their characteristics, and documentation on them has not been preserved. We only managed to find out that the volume is 55 liters, and the sensitivity is 91 dB/W/m2. However, the nameplate on the front decorative panel indicates that this is not just that, but Hi-Fi.
It should be noted that the woofer has a rubber surround, and speakers with such a surround have always been valued above speakers with a foam surround because of their durability. I decided to perform an autopsy.
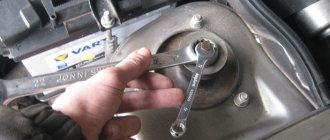
Car radio installation
Acoustics in Lada Granta
The car radio for the Lada Granta must be selected in such a way that its connection corresponds to the 1 din connector.
Note. You can also install a car radio with 2 din on the Lada Granta, but then you will have to cut out the partition and adjust the frame in the console to the size, which is very, very labor-intensive.
- We dismantle the plastic pocket that stands in place of the future car radio. We use a flat blade screwdriver. On the back of the pocket we see slots where you will need to insert ISO connectors.
Installation of car radio in Lada Granta
- The metal frame is removed from the radio and installed in the same place where the pocket was removed. We unbend the frame's antennae and securely fix it.
- We connect the connectors to the car radio. Then we insert it into the frame.
We check the operation of the car radio, and if it is functioning normally, then we move on to the next stage of our operation.
Algorithm of actions
- First you need to remove the door trim (details in this article).
- We take measurements and estimate certain dimensions. The most convenient way is to pre-make a layout from cardboard.
- Based on the layout, we figure it out on the spot and see if the column fits into the door niche. We are trying to understand whether the glove compartment can open with this column, since the column may interfere with it.
- We cut out spacers, if necessary; below we will consider options for columns for which it is not necessary to make spacers.
- We cut out a decorative plug for the column on the door trim.
For convenience, you can first drill holes around the perimeter of the cutWe cut the trim with a utility knife.
- After making the spacers, once again estimate everything in place, fasten the spacer with one bolt to the door body, put the column on the spacer with one bolt, and attach the door trim. If everything is beautiful, then start attaching the elements.
- Screw the spacer to the door body.
Treat the drilling areas, if any, with mastic to prevent rust from occurring in the future. Install and secure the spacer - Screw the column onto the spacer, having previously connected the wires.
It would be a good idea to check the operation of the speakers. It will be a shame if after assembly there is no sound coming from the speakers. Attach the column to the spacer - Place the trim on the door.
We put on the trim - Place a decorative mesh over the column.
Ready! - Test the sound system, try opening the glove compartment.
Installing front speakers
Acoustics for Lada Granta
Before moving on to the actual algorithm for installing the front speakers (see How to choose speakers for a car radio on your own), let us remind you that this car has already been equipped with standard seats and there is no need to do anything new. But a serious problem arises when installing two-component acoustics. And yet, modernization will have to be carried out, since the diameter of the standard seats is quite limited, however, as on other car models.
Note. If, for example, we want to install high-quality 16 cm acoustics on a Lada Granta, then another intractable problem will arise. The front windows may not open all the way and will hit the speaker. You will have to make special spacers from plywood or chipboard.
Making podiums
- The first thing to do is to make podiums.
Let's sum it up
Now the installation of 16 cm speakers in the door panels of the Lada Granta can be considered complete. After this, only the final assembly of all door components will be required. The installation procedure considered will allow the owner to be guaranteed to enjoy excellent sound. As you can see, installing speakers in a car in the front doors is not a complicated procedure.
Sources
- https://Vaz-Lada-Granta.com/elektrika-tormoza/ustanovka-kolonok.html
- https://InfoKuzov.ru/remont/perednij-zvuk-na-grantu
- https://car-fact.ru/marki-i-modeli/otechestvennye/lada-granta/dinamiki-v-grantu.html
- https://avtozvuk-info.ru/shemy-podklyucheniya-akusticheskoj-sistemy/podklyuchenie-kolonok/ustanovka-akustiki-v-lada-granta-386
[collapse]
Installing rear speakers in Lada Granta
Acoustic systems in Lada Granta
As a rule, without rear acoustics there can be no talk of any high-quality sound. Of course, the main thing is the front speakers, but the sound coming from the rear is an undeniable addition to the overall sound stage created in the cabin of any car. Speakers from Morel Tempo Coax are ideal for the rear doors of the Lada Granta. This is a two-way speaker with a power of 6 dB. Rear speakers in the car door:
- We remove the door trim.
- We try on the speakers for the doors.
- To ensure that the speakers are firmly fixed and the sound quality is not lost, you need to cut off the protruding edges of the metal, and screw the cut pieces of plywood into this place. Material with a thickness of 10-15 mm is quite suitable for this.
Rear speakers in Lada Granta
- We also install crossovers from the inside so that they are not visible and do not interfere with the trim.
- We are modifying the rear door trim so that the peculiar pancakes for the speakers do not protrude. It is recommended to install aluminum mesh. They will need to be cut according to the pattern, and then secured to the rear doors using hot glue.
Note. If the color of the Lada Granta is light, then the metal of the door may be visible through the mesh cells. In this case, it will be enough to hide everything with a model or a piece of carpet.
- The wires are usually already laid here. You just need to connect them to the speakers.
How to improve the sound from your speakers
When the owner of a decent-sounding home audio system spends a lot of time behind the wheel, sooner or later he pays attention to the standard audio in his car. And he comes to the conclusion that the automaker was lying, promising him a good sound, and sometimes even seasoning the promise with some famous nameplate. The standard question that arises is “What can be done to make the headphone sound normal?”
The concept “sounds normal” usually means something different to everyone. For some, it is enough to simply increase the reserve of undistorted volume, while others are trying to get closer to the home High End (the “dolbit normalno” options, sorry, I don’t want to consider). However, home principles still don’t work in a car. At least because the acoustic properties of a car interior are completely different from those of a room. And there are no speakers as such, but the speakers are scattered according to the principle “where there is room, they put it there.” There is nothing to say about the acoustic design for them - its role is played by the design elements of the car. In general, it has nothing to do with “homework”.
For some reason, marketers often associate the quality of an audio system with the number of speakers in it.
Hence, by the way, the assertion that exists among evil tongues that a high-end car is absurd, and it is impossible in principle to build a high-end audio system in a car. Personally, I don’t really like this approach; well, I don’t like spending two or three hours a day in the car, stuck in city traffic jams, listening only to the radio. And I think I'm not the only one. This means we will look for other solutions, not homemade ones. And, as practice shows, such solutions exist.
It would probably be wrong to lump everything into one article. Explaining all the nuances of sound in a car in one go is something from the realm of “Quantum physics in a nutshell.” But choosing the right direction to take the right first step towards good sound is, perhaps, half the success. Let's start with this.
I wouldn't go so far as to say that all stock systems sound bad. There are a lot of interesting ones that sound really great. But, unfortunately, with one big drawback - the monstrous cost
The first thing we need to decide is what we actually need. If you want to make a truly high-class system, then in any case you cannot do it with simple means; you will have to approach the issue comprehensively and prepare for decent financial investments. If the goal is not to match the sound quality of multi-kilobuck home systems, then you can approach it step by step. But at what stage to stop is everyone’s business. Let's start with something simple.