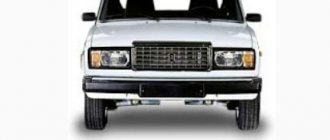
The VAZ-2106, despite the many modern new car models, is still very popular among lovers of domestic vehicles. Based on the age of the car, the owners of such cars have to use different types of tuning in order to improve their external appearance and internal comfort.
To improve the interior appearance of the vehicle, car owners are faced with the issue of tuning the VAZ-2106 torpedo, since it is not particularly perfect and is the first element that people pay attention to in the vehicle’s interior.
Tuning options for the VAZ-2106 torpedo
Tuning the six torpedo has several options.
You can add individuality to the interior of the vehicle by replacing the standard dashboard with a suitable-sized product from a modern car model. This method of modernization is easiest to do with your own hands, however, the cost of a new torpedo may not be affordable for everyone.
The next option for transforming a torpedo is painting it with liquid rubber. This does not require significant financial investments. The disadvantage of this modernization is the fragility of the paint. In about a year you will have to paint the product again.
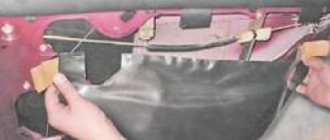
The most effective way to transform a torpedo is to reupholster it. It is best to use special automotive leather for this, which is wear-resistant. However, you can take artificial leather, which is cheaper and has good characteristics. Reupholstery is a very meticulous and time-consuming process. If you are unsure of your abilities, then it is better to turn to professionals. The work requires the performer to be attentive and have cutting and sewing skills, and if you have the desire and the necessary skills, you can re-tighten the torpedo with your own hands.
First you need to remove the product, completely disassemble it, degrease it and sand it with sandpaper. The next stage is applying markings to the torpedo. Here it is important to decide where to make the seams so that they are less noticeable. Next, the torpedo is covered with non-woven material, which we will later use as a pattern. Non-woven fabric is a translucent material, which allows you to easily transfer pre-made markings onto it. We remove the interlining and get a cover that follows the curves of the product as accurately as possible. Now all that remains is to cut it according to the markings and transfer the pattern to the leather with an overlap of one centimeter for stitching. It is very important to use strong, high-quality threads for sewing. On the inside of the finished product, it is important to straighten and glue the seams so that the seams are less noticeable.
Now all that remains is to put the sewn cover on the torpedo. To do this, you need to treat the underside of the cover and the dashboard with special glue. Then the cover is carefully placed on the dashboard and smoothed over the surface using a roller. Difficult areas are treated with a hairdryer for a tighter fit. The upgraded torpedo must be assembled in the reverse order and placed in a standard place.
Tuning the instrument panel of the VAZ-2106
Not the least place in modernizing a torpedo is tuning the vehicle’s instruments. Domestic UAZ cars are distinguished by an unpresentable dashboard. Tuning the VAZ-2106 dashboard can be done in several directions. Firstly, the instrument panel is subject to tuning, and secondly, modernization is also necessary for the car’s instruments themselves.
To improve the appearance of the tidy, you can use a special trim, to install which you need to dismantle the part of the dashboard where the instrument panel is located. Next, it is important to degrease the tidy and treat it with sandpaper. The special overlay is processed similarly. Then the surfaces that need to be fastened are treated with glue and connected. After complete drying, the updated tuning panel can be installed in place if you do not transform the instruments and sensors. If the devices will also be subject to tuning, then assembly should be postponed until the tuning elements are completely ready.
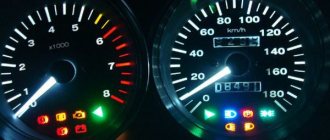
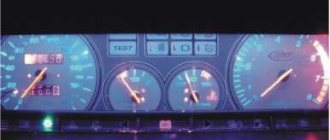
Tuning the instrument panel of the VAZ-2106 includes not only the aesthetic side of the transformation, but also the practical one. The VAZ-2106 has a dim instrument panel, which can be unsafe at night. To improve the appearance and increase safety, LED tuning of the VAZ-2106 tidy is often used. At the same time, using self-adhesive film, markers and paint for the arrows, the appearance of the instruments is updated and contrast is added to them. If the scales on the devices have already lost their appearance, they can also be replaced by printing new ones from the Internet. To improve the appearance of devices and sensors, you can add LED elements to them, which will improve the visibility of devices at night.
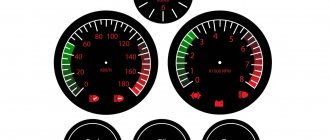
When upgrading, it is important to pay special attention to the speedometer of the VAZ-2106. On the dashboard there are a speedometer and a tachometer nearby, which show the speed of the car and the number of engine revolutions. Removing the speedometer is a little more difficult than other elements. In order to pull out the speedometer, first the dashboard clamps are pressed out and the tidy is pushed slightly towards itself. Next you need to unscrew the speedometer cable attached to the back of the product. After the fastenings are disconnected, the cable of the daily mileage mechanism is carefully removed.
Speedometer tuning can be done in the same way as all instruments using LEDs, updating scales and arrows. If necessary, you can replace the speedometer cable and drive with new products. Replacement is carried out on a lift or pit. And also, some car owners replace the speedometer with an electronic version, then the speedometer cable will be redundant and will need to be removed. To install an electronic speedometer, you will need an additional impulse sensor with wires and an M18 thread. According to the connection diagram of the new product, additional soldering is carried out. During installation, it is important to connect the plus of the tachometer and speedometer together so that they show synchronous results.
After transforming all the sensors and instruments, as well as updating the dashboard, all elements are installed in their places.
Radio tape recorder
No upgrade of the “six” is complete without installing a speaker system or at least a simple radio. A standard place for a radio receiver in the beard of a small-sized “six”. It should be trimmed to standard 1DIN. This can be done with a metal file. Then sand the edges with sandpaper.
Installing a radio
The radio tape recorder is attached to the beard using a metal case. Radio installation steps:
- Having bent all the tabs, use special spatulas to remove the radio from the case.
- The metal base is inserted into the prepared hole.
- We fix it using special tongues.
Cables are included to connect the player. The most commonly used are:
- black - “earth”;
- red and yellow (often wound together) - ignition “+”;
- blue - power for the active antenna;
- white - front left (FL) speaker;
- gray - front right (FR) speaker;
- green - rear left (RL) speaker;
- purple - right rear (RR) speaker.
You can connect the radio to the ignition switch to the free INT terminal. Then it will only work when the engine is running and the ignition is on. This connection scheme will protect forgetful car owners from completely draining the battery.
If you twist the red and yellow wires together, the radio will no longer depend on the ignition. You can listen to music with the ignition off too.
Typically, a connection manual comes with the audio system. Following the instructions and color scheme, installing audio equipment in the “classic” will not be difficult.
Speaker installation
A good place to place the speakers would be the front door panels. If you choose the right size speakers, they will fit here very well. To install, perform the following steps:
- Remove the trim from the doors.
- On the casing we cut a hole for the speaker. A hole of the required size can be made using a template. To do this, trace the speaker on paper. You need to work carefully so as not to miss the size.
- We attach the column and screw it to the casing using the fastening that comes with the kit.
- We carefully lay the wires in the cavity of the doors so that they do not sag or fall out.
- We install the casing in place.
Don't forget to buy new fasteners for the door trim. Often, when removing the casing, the fasteners break.
Additional speakers are placed on the dashboard or on the side pillars of the windshield.
If the car owner changes the entire beard, creating it himself to his own size, then he can place a 2DIN radio in it. A player with a large screen will add charm to the appearance of the car.
Some craftsmen insert speakers instead of air ducts. But from personal experience I know that the standard “six” torpedo does not have side window blowing. In humid and cold weather, windows fog up and freeze. If you remove the air ducts for the windshield, the airflow will worsen even more. Therefore, I do not recommend this installation of speakers.
Video: installing speakers and Shumka
Antenna installation
The “six” did not have a standard antenna installed, but a place for it was provided on models before 1996. Adherents of original spare parts can find their original antenna on the car market. It is attached to the front fender of the car.
To do this, you will need to make a hole in the wing, install the antenna, tighten the bolts and connect the wires to the radio and ground. This installation method is quite complicated and not every car owner will decide to make holes in the body.
The ease of installation is distinguished by the interior active antenna, which is attached to the windshield. It is not exposed to precipitation, does not require additional care, and does not interfere with aerodynamics when the car is moving. When purchasing an interior antenna, please note that the kit should include instructions, fasteners and stencils to simplify installation. There are two ways to install a radio antenna inside the cabin:
- The housing is attached to the glass behind the rear view mirror, and the whiskers are glued in opposite directions at the top of the glass.
- The antenna body is secured to the top of the windshield on the passenger side, and the poles are glued along the edges of the glass at right angles to each other.
Replacing the instrument panel
Don't stop at just replacing the chairs. The field for activity is the instrument panel of the VAZ 2106. You can make a new panel yourself, adjusting it to the dimensions of the “native” one, then installing and covering the surface with fabric, or you can choose a ready-made box. To make the replacement, you need to remove the instrument panel on the VAZ 2106. You will need a Phillips and flathead screwdriver, as well as a No. 10 wrench.
We start with a shelf for things. It is removed by unscrewing the four fastening screws. Having removed it, unscrew the screws on all sides of the radio panel, as well as the upper right screw.
Now let's use a flathead screwdriver. We pry up the panel and remove the mounting strip. Behind it we again see a couple of screws that need to be unscrewed, after which we remove the receiver panel.
We remove the covers by unscrewing the fasteners, and also remove the decorative parts. Finally, we dismantle the instrument panel. We unscrew the speedometer fastening nut, unfasten the cable, moving it to the side. When removing VAZ 2106 devices, mark all connectors for connections.
Having removed the instruments, unscrew the screws of the lower fastening connecting the instrument panel and the body of the VAZ 2106. Carefully inspect it and unscrew the remaining fastenings. Carefully lift the panel and wire away from the lamp, then disconnect it completely. The only thing left to do is install the panel spare parts for the VAZ 2106, securing all the bolts in the reverse order.
Exclusive speedometer on the instrument panel
Dismantling instructions
Removing the VAZ 2106 instrument scale may be necessary when repairing and replacing its elements, tuning and modification. Dismantling is not difficult and will require a small set of tools: wrenches and screwdrivers.
Stages of dismantling the tidy
The removal procedure consists of the following steps:
- First of all, you need to remove the front box from below the tidy.
- Then you need to unscrew all the fasteners and pull out the lower latches.
- Remove the radio plate.
- Next, remove the casing from the steering column.
- The next step is to disconnect the wires. Each one needs to be marked to make assembly easier.
- Now you can dismantle the shield by disconnecting all connectors.
- After removing the sensors, they need to be sorted in order to assemble correctly.
After upgrading the instrument panel, assembly is carried out in the reverse order (the author of the video is Nikolay).
Recommendations
Here are some tips that will help you upgrade your VAZ without any problems.
- To adjust the carburetor on a VAZ 2106, pay attention to the options instead of the standard Ozone - Solex and Pekar. But if you don’t want to change the carburetor, then you will need to dig around, remove the spring from the vacuum drive and convert it into a mechanical one.
- Non-contact ignition type is the best for VAZ.
- The heating system in the car leaves much to be desired, so it should be strengthened with the help of deflectors and equipped with ventilation.
- Install a heating system on the engine.
- When performing internal tuning, do not try to replace the standard VAZ steering wheel with a steering wheel from sports models. It is smaller and will not fit our car.
Having finished with the tips, let's look at how to tune the body of a VAZ 2106 and create a stylish car interior.
Modernization ideas: headlights and everything else
Headlights are the eyes of the car. Over time, glass becomes dull, turns yellow, or even becomes unusable. But this is not the reason for their modification or complete replacement, but the desire to turn the VAZ into a beast with bright, powerful headlights.
Oddly enough, a simple way to improve is complete replacement. It is worth noting that body parts for the VAZ 2106 are similar to BMW parts, so we will replace the old headlights with new ones from BMW.
The process will not take much time. Open the hood and, having completed the necessary steps, take out the old headlights. We try on the new headlight and drill the holes necessary for installation, after which we install it and tighten the fasteners. All that remains is to properly adjust the light, and the work is completed.
If you have not found spare parts for the VAZ 2106 from foreign brands, but still want to update the headlights, you will need to visit a car store and purchase several diodes that will diversify the appearance of the car.
Angel eyes give 2106 brutality to the domestic auto industry
Working with the dashboard
To shock others and give yourself pleasure, we will tune the instrument panel of the VAZ 2106 using LEDs.
A popular accessory is LED strip. It is not difficult to install it yourself, and the wide range of colors and brightness attracts car owners.
The backlight is connected in two ways: directly to the battery and to the wires leading to the car’s dashboard. The first method attracts with its reliability, while the second captivates with the ability to turn on the backlight immediately during ignition.
Make sure you have two wires, switches and a fuse. When installing the latter, please note that it should be close to the battery. After soldering the first wire, put a protective tube on it, then connect the second wire to the battery.
But the tuning of the VAZ 2106 is not finished yet.
Installation of double glazing
Most car owners dream of installing double windows on their VAZs. Why dream if it’s easy to realize your idea?
Since the second glass is tinted. it is located from inside the car. We cut it from the bottom edge so that during installation the corner of the glass remains visible and there is a distance of about 1 mm between the two glasses, otherwise the surfaces will be scratched against each other. Do not forget that when installing the second glass, the weight of the door will increase.
Brave car enthusiasts will not forget about tuning the VAZ 2106 bumper; it allows you to realize all your ideas and express the character of the car owner with the help of all kinds of drawings or even entire scenes on the bumper. Painting it yourself is not easy, so it’s better to contact a service station.
Don't be afraid to experiment, and then the car will become the most noticeable on the road.
- Airbrush
- Painting defects
- Body repair
- Materials
- Equipment
- Spray booth
- Salon
- Painting theory
- Tuning
- Do you want to know how to remove dents on your car in different ways?
- You don’t know how much material is needed to paint a car: a painter’s secret
- How to remove corrosion and rust from a car
- Removing rust from a car body: a simple solution
- I made and adjusted the air pressure switch for the compressor myself: find out how
- July 2017
- March 2017
- August 2016
- July 2016
- June 2016
- May 2016
- March 2016
- February 2016
© 2015-2016 Any partial or complete copying is permitted provided a link to our website is provided. KrasimAvtomobil.ru
Torpedo VAZ
The torpedo (correctly - torpedo) is the upper part of the front panel of the car. The lower part (where the gearshift knob and radio is located) is called the BEARD. The torpedoes of old VAZ models are distinguished by their asceticism and unpretentious design, which is why many car owners have a desire to improve them.
There are several methods to improve them.
1. The most radical thing is to replace the VAZ torpedo with a torpedo from a foreign car, or from an older VAZ model. This will be explained in more detail below.
Here is a video of a torpedo on a VAZ 2101 from a Mercedes 123
2. Painting the torpedo - this method is the least common, due to this. That the surface of the torpedo is not hard and is difficult to paint correctly. Also, the painted surface of the vase torpedo often does not look as attractive as other methods.
Tuning the interior of the “six”
After the “six” left the assembly line of the Volzhsky Automobile Plant in 1976, traces of a serious modernization of the car and its difference from the “third” model became noticeable. The changes affected not only the exterior of the vehicle, where the emphasis was on the predominance of plastic parts and accessories, the interior of the VAZ 2106 became different - it became more convenient to use and multifunctional.
The interior trim of the “six” has also undergone changes, which has become easier to treat with synthetic detergents. The lighting of the car interior at night and in the evening has received a positive modernization.
Along with replacing the door trims, the front seat headrests became height-adjustable and much more. External changes to the interior of the VAZ 2106 can be seen in the photo below:
During the subsequent restyling in 1990, the interior of the cabin received high-quality upholstery of seats, which acquired greater ergonomics, and night lighting of the VAZ 2106-90 interior, which became more independent from other electrical equipment of the vehicle.
Tuning the interior of the “six”
Most Russian fans of this car believe that the “six” is very convenient for tuning the interior, because a sufficiently large volume of internal space has been structurally created in it. This is extremely important for replacing seats, as an element of finalizing this modification of the Lada. Installing, for example, “Scorpion” seats from such a Ford model will give the interior the interior of a sports car, and this impression will be enhanced by installing a stylish “dashboard” and steering wheel.
You can purchase these elements of the car interior at salvage yards, and their price will be reasonable due to the low popularity of such spare parts among buyers. When tuning the interior of a VAZ sixth model, it is very important, if the vehicle has already been modernized in some style, to continue decorating it in this design direction. For example, if the tuning of the Six’s interior is close to a retro style, then the modernization of the components of the interior compartment should continue in a similar direction.
The same applies to the design of tuning the interior of the Zhiguli 2106 in a sporty style, especially since the Scorpio seats will complement the sporty style and create the illusion of driving a sports car. When tuning the interior of a VAZ 2106 with your own hands, you can use the free volumes of the “six” interior, and the installed interior components, selected in one style solution at dismantling yards and auto shops, will significantly change its appearance and design.
When upgrading the interior of a Six with your own hands and installing seats, you may get the false impression that rearranging the seats will not be difficult and it’s just a matter of unscrewing the fasteners. We warn you that this is quite a large job, because you will have to change the seat guides, because... The regular ones from the “six” are not adapted for foreign cars.
Let's sum it up
Tuning the VAZ-2106 is a common concept among owners of domestic sixes. The process of upgrading the instrument panel and dashboard of a car can be done without the involvement of specialists with your own hands. Each owner of a domestic car can choose his own version of its transformation, depending on his wishes and financial capabilities.
The VAZ “six” is considered the standard of reliability and simplicity of the Soviet automobile industry. She has “raised” more than one generation of car enthusiasts. With its simplicity and pliability, it won the hearts of many car owners. Until now, the “sixes” travel along the roads of cities and villages. To stand out from the crowd of cars, owners think about tuning, which transforms the external and internal appearance of the car. You can change the appearance of the VAZ 2106 interior with your own hands.
Modernization of the instrument panel
You can often see photos of the interior of a VAZ 2106 with a stylish instrument panel, which, when looking at the car, immediately attracts attention to itself. This is natural, a view of the car from all windows most clearly shows the driver’s instrument panel, so upgrading the panel in a VAZ 2106 salon with your own hands can be done in the simplest way: take a panel from a BMW E-36 and install it in place of the “six” instrument panel.
True, the services of an experienced auto electrician will be required to fully connect the functionality of the dashboard, but this is the most inexpensive way to modernize this element of the Six’s interior. The simplest way, available to every car enthusiast who has ever held a screwdriver in his hands, is to replace the instrument dials with brighter and more colorful products.
When changing the dashboard, special attention should be paid to connecting the interior lighting of the “six”, which is so necessary in the evening and at night, as well as to the interior lighting and the driver’s box for small items.
The upholstery of the VAZ “sixth” model, or rather its condition, is of no small importance. If the car has been in use for a considerable time, then the upholstery fabric has become frayed and frayed, and this immediately spoils the initial impression of the tuned interior. The LED strip with so-called “running lights” looks quite interesting, connected parallel to the brake lights and laid out along the perimeter of the rear window.
On our Internet resource you can watch a video “tuning the interior of a VAZ 2106”, which offers numerous options for upgrading the interior compartment of the “six”.
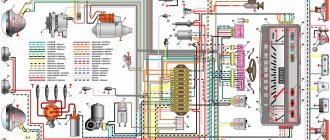
Electrical supply diagram
These are the main components of the VAZ-2104 power supply system.
Its full diagram is presented below:
| 1 | Block headlights (includes low and high beam lamps, front dimensions) | 40 | Lamp switches (in door pillars) |
| 2 | Side turn signals (located on the fenders) | 41 | Body interior lamp |
| 3 | battery | 42 | Rear window heating switch with indicator light |
| 4 | Starter relay | 43 | Handbrake control |
| 5 | Electro-pneumatic carburetor valve (idle speed) | 44 | Rear PTF activation control |
| 6 | TDC sensor of the first cylinder | 45 | Checking the brake fluid level |
| 7 | Starter | 46 | Switch for washing and cleaning the rear window |
| 8 | Carburetor microswitch | 47 | Hazard switch |
| 9 | Electric motors for headlight cleaners | 48 | Handbrake control relay breaker |
| 10 | Generator | 49 | Turn signal switch |
| 11 | Sound signals | 50 | Headlight switch |
| 12 | Candles; | 51 | Horn switch |
| 13 | Engine compartment lamp | 52 | Switch for washing and cleaning glass and headlights |
| 14 | Coolant temperature sensor | 53 | Warning lamp block |
| 15 | Oil pressure lamp sensor | 54 | Switch for washing and cleaning glass and headlights |
| 16 | Distributor-breaker | 55 | Egnition lock |
| 17 | Windshield washer motor | 56 | Instrument panel lighting switch |
| 18 | Coil | 57 | PTF switch in the rear headlights |
| 19 | Brake fluid level sensor | 58 | Coolant temperature indicator |
| 20 | Headlight washer motors | 59 | Dashboard |
| 21 | Pneumatic valve control unit | 60 | Oil pressure check |
| 22 | Diagnostic block | 61 | Gasoline level indicator with reserve control |
| 23 | Windshield wiper relay | 62 | Battery charge control |
| 24 | Turn signal and emergency flasher relay; | 63 | Voltmeter |
| 25 | Window cleaning system motor; | 64 | Speedometer |
| 26 | Socket for connecting a portable lamp; | 65 | Checking side lights |
| 27 | Brake light switch | 66 | Turn signal control |
| 28 | Engine with interior heating | 67 | High beam control |
| 29 | Heating motor resistor | 68 | Dashboard light bulb |
| 30 | Handbrake warning lamp switch | 69 | Engine switch with ventilation and heating |
| 31 | Reverse light switch | 70 | Rear window washer motor |
| 32 | Mounting block | 71 | Rear block lights |
| 33 | Low beam relay | 72 | License plate lights |
| 34 | High beam relay | 73 | Rear window heating element |
| 35 | Jumper (instead of horn relay) | 74 | Rear window wiper motor |
| 36 | Relay for turning on the headlight washer and cleaning system | 75 | Luggage compartment lamp |
| 37 | Heated rear window relay | 76 | Gasoline level and reserve sensor |
| 38 | Glove box light | 77 | Ignition relay |
| 39 | Cigarette lighter |
Note that initially only export models of the VAZ-2104 were equipped with this electrical equipment system. It became standard for the subsequent modification of the station wagon - 21043.
For comparison, below is a diagram of the electrical equipment of the VAZ-2105, which was standard for the first station wagon models:
The diagram shows that the first station wagons were not equipped with a rear window heating and cleaning system, headlight washers and cleaners, as well as their control mechanisms. The rest of the electrical circuit is identical.
The electrical circuit of the VAZ-2104 injector is different in that this car already uses electrical equipment borrowed from the VAZ-2107 injection model. This modification of the station wagon was designated VAZ-21047 and it was the last in the history of this car.
Alternative panel tuning option
To tune the interior of the “six” in an alternative version, it is recommended to stock up on plywood, several tubes of “liquid nails”, plumbing and carpentry tools, fasteners and fabric for upholstery. We carry out the work in the following sequence:
- Using a pencil on the plywood, we mark out the elements of the dashboard, the locations for the instrument scales, and then cut out the individual panel elements. Do not forget about the stove faucet, the place for which must be beautifully cut out;
- We take and adjust a small wooden block to the location for installation in the factory version of the panel. After that, we place it between the plywood sheets, so that it is integrated into the dashboard and secure it with self-tapping screws to the plywood;
- We cut a place in the plywood for a radio or CD and for the manual transmission knob, as well as for the emergency lights and cigarette lighter;
- After preliminary cutting and fitting of the base of the “six” dashboard, we cover the outer surface of the plywood frame with “liquid nails”, after which we carefully apply carpet-type cladding fabric;
- After final drying, we install this structure in place of the dashboard.
Replacing seats
The first part that is replaced in the cabin is the seats. Even a person with minimal knowledge of structural assembly can handle the installation. It is not difficult to select seats for the VAZ 2106, since Ford Scorpio seats, which have won the love of car enthusiasts with their convenient design for long trips, are suitable for replacement.
To replace it yourself you will need:
- Drill;
- Brackets (the thickness of which is from 5 mm);
- Bolts 8*25 and 10*75 mm.
First we dismantle the old chairs. Using bolts, we attach the brackets to the legs of the new seats, taking into account that each chair requires 2 brackets. We drill holes on the bottom under the chairs, and repeat the same on the brackets themselves. Now we install the seats and secure them with bolts.
Advice. When working, use large washers to securely fasten the chairs. After installation, treat all metal parts with anti-corrosion agents.
Seats
Tuning VAZ 2106 seats can be done in two ways:
- change the upholstery;
- replace the seats by taking them from another car.
Seat reupholstery
To reupholster the upholstery yourself, follow the instructions:
- Remove the seats from the interior. To do this, move the chair back all the way and unscrew the bolts in the runners. Then slide it forward and also remove the bolts. Remove the seats from the interior.
Installing seats from another car
Updated seat upholstery will decorate the interior, but will not make them ergonomic or comfortable. To do this, seats from another car are placed in the “six”. Seats with a distance between the runners of approximately 490 mm are suitable here. Many car owners say that seats from Ford Scorpio, Hyundai Solaris, VAZ 2105, VAZ 2107 fit well into the cabin . But to get a good result, you cannot do without replacing the fasteners.
Replacing the instrument panel
Don't stop at just replacing the chairs. The field for activity is the instrument panel of the VAZ 2106. You can make a new panel yourself, adjusting it to the dimensions of the “native” one, then installing and covering the surface with fabric, or you can choose a ready-made box. To make the replacement, you need to remove the instrument panel on the VAZ 2106. You will need a Phillips and flathead screwdriver, as well as a No. 10 wrench.
We start with a shelf for things. It is removed by unscrewing the four fastening screws. Having removed it, unscrew the screws on all sides of the radio panel, as well as the upper right screw.
Now let's use a flathead screwdriver. We pry up the panel and remove the mounting strip. Behind it we again see a couple of screws that need to be unscrewed, after which we remove the receiver panel.
We remove the covers by unscrewing the fasteners, and also remove the decorative parts. Finally, we dismantle the instrument panel. We unscrew the speedometer fastening nut, unfasten the cable, moving it to the side. When removing VAZ 2106 devices, mark all connectors for connections.
Having removed the instruments, unscrew the screws of the lower fastening connecting the instrument panel and the body of the VAZ 2106. Carefully inspect it and unscrew the remaining fastenings. Carefully lift the panel and wire away from the lamp, then disconnect it completely. The only thing left to do is install the panel spare parts for the VAZ 2106, securing all the bolts in the reverse order.
Exclusive speedometer on the instrument panel
So, everything seems to have been pulled together, now let’s get to work:
We remove the standard tidy along with the steering wheel. Removing the instrument panel 2101 is described in detail in the manual for 2101. The steering wheel can not be removed, but then the inconvenience during operation greatly increases.
We try on the dashboard to the seats on the body. The differences in the 2101 and –06 devices immediately become visible:
We begin to eliminate the listed interference:
Installation of both stove levers and places for mismatched fastening (Fig. 6)
The heater valve cable is short. Looking carefully at the end of the cable that fits onto the heater valve lever, we see that it is twisted into a ring 3 times - this is the necessary reserve. Unwind the ring - leaving 1 turn (Figure
The cables are sorted out. Now let's figure out where to place the offset fasteners!
We make a U-shaped bracket (Fig. 9)
Figure 9 – bracket for fastening
And we weld it to the intended place for fastening the dashboard -06. The result is a picture - Fig. 10
Figure 10 – Displacement of the fastening point
Now let's take care of the suction - we need to make brackets for it and place it approximately in the place of the old suction. The bracket is made according to TheForester's drawing (special thanks!)
Figure 11 – Homemade suction bracket
Figure 12 – Hand-made bracket for suction
We weld this example of crazy hands to the crossbar:
Figure 13 – Welded to the cross member
After welding, do not forget to prime to avoid rusting.
We insert a cable with suction into the manufactured bracket and screw in the end switch.
There is another important point - because. the speedometer in 2106 is shifted to the right than in 2101, then it is necessary to rewind the sidometer cable differently (see Fig. 14), however, due to the fact that the cable 2101 is longer, in the new place its length turns out to be excessive even after installing the panel due to excess radii If the cable bends, the speedometer needle may shake, so I recommend using a cable from 2103, 2106 that has a shorter length.
Figure 14 – location of the speedometer cable
This is where the mechanical part of the installation actually ends and the electrical part begins:
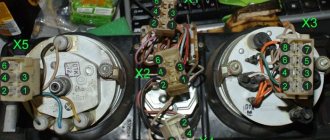
We screw the oil pressure indicator sensor with a tee (Fig. 4) and tighten the wire from the sensor into the passenger compartment, do not forget to put on the boot (2101-3724114 Fig. 4). We tighten the wire from terminal K - the ignition coil into the passenger compartment. We make a connection with the instrument panel harness 2106. The connection diagram when connecting new devices can differ greatly from model to model due to differences in the colors of the on-board network wires, and even the instrument panel harness 2106, so the correct one will be look at your diagram in place and make the appropriate connections.
In short, the decision comes down to a banal reconnection of wires. In 2101 there are 2 connectors of 6 contacts on the left and right, in 2106 - the left connector has 8 contacts, and the right one also has 6, like 2101.
Reconnecting the left connector:
From the existing left connector 2101, bending the contact locking plate, pull out the contact and insert it into the corresponding socket of the new 8-pin connector. We determine compliance using the paper diagram of our 2101 and 2106 harnesses. It often happens that the colors of the wires on the tank (on the CL contact and the rheostat) are mixed up - one option is indicated in the diagram, but in fact it’s the other way around. Having rearranged all 6 contacts of the left connector 2101 into a new 8-pin one, we deliver 2 more wires with contacts that we pre-tightened in steps 1 and 2.
Discontinued - old 6-pin connector 2101.
Reconnecting the right connector:
In principle, the number and list of wires here are the same, and it would seem that the VAZ designers should have left the sequence of wires similar to our 2101 (for the purpose of unification) - but NO, dear designers decided, at least a little, but to add a little more hassle to Kulibin like you and me, so here It also requires studying both schemes, searching for matches and rearranging contacts. To make it more clear, we rearrange it from the old 6-pin connector to the empty 6-pin connector we removed earlier in the previous paragraph of the text.
Connecting the buttons, I think, will not cause any problems.
Since talking on paper is very good, but I also want something as an example, Figure 15 shows a diagram of the connection to the wiring of a VAZ 2101 (precisely 2101). The diagram should be used as a guide, not forgetting about possible differences in reality. I think it will help you figure it out faster.
Next, for complete similarity with the 2106, you need to install the 2106 tape recorder console, but this is not for everyone - and in fact the topic of a separate article, because there it will be necessary to install an emergency light, a fuel pressure control lamp, and a rheostat, which IMHO is not needed at all - it is better to leave the switch in the dashboard as in 2101.
Recommendations
Here are some tips that will help you upgrade your VAZ without any problems.
- To adjust the carburetor on a VAZ 2106, pay attention to the options instead of the standard Ozone - Solex and Pekar. But if you don’t want to change the carburetor, then you will need to dig around, remove the spring from the vacuum drive and convert it into a mechanical one.
- Non-contact ignition type is the best for VAZ.
- The heating system in the car leaves much to be desired, so it should be strengthened with the help of deflectors and equipped with ventilation.
- Install a heating system on the engine.
- When performing internal tuning, do not try to replace the standard VAZ steering wheel with a steering wheel from sports models. It is smaller and will not fit our car.
Having finished with the tips, let's look at how to tune the body of a VAZ 2106 and create a stylish car interior.
What is suitable for VAZ two thousand one hundred seven from foreign cars
During its entire stay on the market, fourteen versions of this car with carburetor and injection units were released. Their working volume ranged from 1.3 liters to 1.7 liters. The weakest engine of the twenty-one thousand thirty-four brand was installed in a sedan. 21079 had one of the most powerful engines. It developed power up to one hundred forty hp. With.
VAZ-2107 owners are rarely satisfied with their engine, so they strive to change it. Of course, everyone wants to drive at high speed, even if the car is not exactly designed for this. Let's find out which engine is best to install on this model and what are the criteria for choosing this device.
Modernization ideas: headlights and everything else
Headlights are the eyes of the car. Over time, glass becomes dull, turns yellow, or even becomes unusable. But this is not the reason for their modification or complete replacement, but the desire to turn the VAZ into a beast with bright, powerful headlights.
Oddly enough, a simple way to improve is complete replacement. It is worth noting that body parts for the VAZ 2106 are similar to BMW parts, so we will replace the old headlights with new ones from BMW.
The process will not take much time. Open the hood and, having completed the necessary steps, take out the old headlights. We try on the new headlight and drill the holes necessary for installation, after which we install it and tighten the fasteners. All that remains is to properly adjust the light, and the work is completed.
If you have not found spare parts for the VAZ 2106 from foreign brands, but still want to update the headlights, you will need to visit a car store and purchase several diodes that will diversify the appearance of the car.
Angel eyes give 2106 brutality to the domestic auto industry
Working with the dashboard
To shock others and give yourself pleasure, we will tune the instrument panel of the VAZ 2106 using LEDs.
A popular accessory is LED strip. It is not difficult to install it yourself, and the wide range of colors and brightness attracts car owners.
The backlight is connected in two ways: directly to the battery and to the wires leading to the car’s dashboard. The first method attracts with its reliability, while the second captivates with the ability to turn on the backlight immediately during ignition.
Make sure you have two wires, switches and a fuse. When installing the latter, please note that it should be close to the battery. After soldering the first wire, put a protective tube on it, then connect the second wire to the battery.
But the tuning of the VAZ 2106 is not finished yet.
Installation of double glazing
Most car owners dream of installing double windows on their VAZs. Why dream if it’s easy to realize your idea?
Since the second glass is tinted, it is placed from the inside of the car. We cut it from the bottom edge so that during installation the corner of the glass remains visible and there is a distance of about 1 mm between the two glasses, otherwise the surfaces will be scratched against each other. Do not forget that when installing the second glass, the weight of the door will increase.
Brave car enthusiasts will not forget about tuning the VAZ 2106 bumper; it allows you to realize all your ideas and express the character of the car owner with the help of all kinds of drawings or even entire scenes on the bumper. Painting it yourself is not easy, so it’s better to contact a service station.
Don't be afraid to experiment, and then the car will become the most noticeable on the road.
Installation highlights
Before deciding which panel you can install, you should take into account that the original VAZ 2107 torpedo can be returned at any time. If such a procedure is carried out independently, it is recommended to use a book on repairing classics. It will take a lot of time to complete the work.
When connecting the wires, you need to remember that one goes to ground, and the second goes to the panel to the corresponding contact. It is recommended to label which connector goes where. To operate the speedometer, a speed sensor from model 2110 with 6 pulses is installed. If the “seven” is equipped with an econometer, it is recommended to install a tee from 2106 on 2 sensors, including a pressure sensor from engine 402.
The panel from the BVM is also suitable for the VAZ 2107 torpedo. But not all car enthusiasts know which model. It is recommended to use a BMW E30 torpedo with some modifications. You will need to install front electric windows. This is due to the fact that with this panel the handles will interfere with closing the doors. Since the gear knob in the standard position is not suitable for use with this torpedo, you will have to bend the gear lever. The stove also requires some changes.
Auto mechanics know everything about the specifics of the work ahead. For example, the torpedo from this BMW model is slightly wider, but when installing it there is no need to make major changes.
The advantages of the new panel include:
- larger parameters - the length of the hood has increased by 10 cm,
- the height of the car increased by 5 cm,
- about 20 liters added. pp., of which 5 l. With. within 2 days it takes new caps on the disks.
So, after a week of leisurely fitting, today I finally installed and stuck the frame of the torpedo into the car. And since few people install this torpedo, and there is not enough information about the compatibility of the torpedo with the VAZ 2107 on the Internet, I will describe everything in more detail... Everyone knows that the Vectra torpedo is almost ideal for the family of chisels, Moskvich 2141, Tavria...Is it suitable for the VAZ 2107? When buying, I only knew that this torpedo was seriously wider, and that “sticking it in” would be problematic, unlike the torpedo from the Astra F (it on the contrary already) Well, “wider” is not “narrower”, you can trim it, I thought and without hesitation I took it... It lay in my garage for a year, and now its time has come) I disassembled the torpedo (down to the skeleton), removed the old one and for the first time Having tried it on, I was a little shocked at how much wider it was... I was upset ((I even had thoughts of selling... And after 2 days of thinking I decided to try installing it (after all, I knew that some select people managed to do it, and why am I worse?!) By the way, I’ll say that it’s on the drive I’ve only seen 2 sevens with similar torpedoes, and I don’t even know why, but it makes me happy) In short, it’s all lyrics... in general, I stuffed it in, tried it on for a long time, of course, cut it off millimeter by millimeter, tried it on again, cut it off again... In the end, it fit as it should, tightly, clearly , not intrusive (who knows, we will understand) I attached the torpedo to two original mountings + to two homemade fastenings in the middle + one central fastening... and on the sides, 2 screws per side... besides, the original seven-pack shelf (the one under the glove compartment) remains in its place, the torpedo is also screwed to it
...here everything came together clearly...
And so the time has come for the main... PROBLEMS that have arisen, namely: - We need to do something with the suction, since it remains all the way inside the torpedo... we need to move it - We need to make a remote ecomonera sensor or plug it the fuck out * - We need to make a casing for the steering column, since the Opel one doesn’t fit, the VAZA one doesn’t fit either - Relocating the gearshift knob (I knew that this would happen, so I was preparing for it) and a bunch of small problems that I don’t take into account, since eliminating them is not problematic)
In the following parts, as I progress, I’ll tell you about the electrics and other little things, such as moving the handle and so on. I really don’t know when I’ll finish with the torpedo, today I was frozen in the garage, now I don’t feel like going to the garage).
All vehicles are equipped with instrument gauges and fixing sensors. They serve to monitor the operation of the engine and other important systems. The VAZ-2107 torpedo is no exception. The driver can prevent the failure of components if he promptly responds to instrument readings. Let's consider the features of the panel of a domestic car, the possibilities of its improvement and other features.