Signs of trouble
The breakdown of the caliper components and their impending repair can be understood by some signs that occur during braking:
- The car pulls and pulls to the side when braking.
- It feels like when braking you have to put more force on the pedal or, conversely, less.
- The brakes rattle or knock when driving over bumps or when stopping.
- The brakes are jamming, which will be indicated by possible skidding.
- The appearance of brake fluid leaks on the wheel.
- Feedback in the pedal, expressed in a strong pulsation when pressing the brake.
If these symptoms appear, you should not delay repairing faulty caliper elements. You must first figure out why this happened and make repairs immediately. You can learn more about the signs and causes in the attached videos at the end of the article.
DIY caliper development procedure
Let's move on to a description of the repair itself. The algorithm will be something like this:
- First you need to lift the car using a jack and unscrew the wheel, locking the steering wheel in the extreme position.
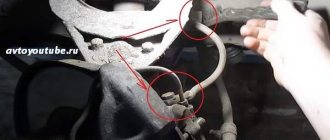
- The mounting spring is removed, and the surface near the brake hose is thoroughly cleaned. To do this, you can blow it with compressed air.
- The brake hose must be clamped with a clamp to prevent leakage of working fluid.
- We continue to repair the caliper ourselves. After this, unscrew the bolt that secures it and remove the hose itself to the side. It is necessary to ensure that dirt particles do not penetrate inside it.
- After this, the caps on the guides are removed, and they themselves are unscrewed using a 7 mm hexagon.
- Using a screwdriver, we recess the piston, moving its body away from the disk to a sufficient distance. You can begin dismantling the old caliper.
- First, take it out of the case and check for moisture. We take the piston out of the housing. To do this, you can remove it from the disk without disconnecting the caliper from the hose. Just press the brake pedal and it should fall out on its own. How to clamp a brake hose? Any tight clamp will do, you can even use the one that is used to secure caps to wheel rims at a tire shop. You can use a vice in which to firmly clamp the body, and remove the piston itself with pliers. Or use compressed air, making sure that the part is not damaged during removal.
- We take out the old cuff, first removing the remaining working fluid. We thoroughly clean the surface in which the protective cover was located and the cuff seats. We rinse and blow with air, after which you can install a new cuff.
- When repairing the front caliper, lightly water the working surfaces of the piston with brake fluid. The piston itself is laid strictly vertically and slightly recessed. We put a protective cover on top. In this case, you need to make sure that the rubber band does not jam.
- Now the piston can be recessed completely, but you need to be careful to prevent the boot from twisting.
- We unscrew the brackets that are equipped with the caliper. We clean the surfaces on which the pads move. Care must be taken not to damage the threads in which the guides are attached. The bracket is screwed into its original place.
- We lay the block, making sure that it has taken its position and is not stuck anywhere. The guides must be cleaned of the slightest particles of dirt. The caliper is put on the bracket, and its guides are tightened with your fingers. We put on the caps and fix the springs. Don't forget to put grease under the brake pistons boot and remove any excess grease from around it.
- All that remains is to put the hydraulic fluid hose back in place and bleed the entire system with a few presses of the brake pedal. We lower the car to the ground using a jack and check the level of working fluid in the tank - refill if necessary. This completes the caliper rebuild.
The design of this brake element
There are two types of disc calipers - front and rear, their design and repair method are slightly different, but their main elements are the same:
- The housing in which the piston (cylinder) is mounted.
- Bypass valve.
- Sealing ring.
- Piston (cylinder).
- Cylinder boot.
- Retaining ring.
- Frame.
- Pressure bar.
- Pads.
- Guide boot.
- Guides.
- 14. Fastening bolt.
- Brake hose.
The difference between the rear disc caliper is the presence of a parking brake.
Therefore, the piston (4) has a special thread through which it is screwed onto the parking brake rod (1). Thanks to this, it can operate under the influence of two drives - mechanical (parking) and hydraulic.
Difficulties in selecting parts
Before you begin replacement, you must select a suitable set of pads. There are many options for the Lada Priora on the market. Conventionally, they can be divided into two categories - parts equipped with ABS and those without this system. It is not difficult to understand what type your Lada Priora is - the diagram of cars with an anti-lock braking system includes an ABS sensor and a wire connected to it.
The basic principles of selection are common to the two categories. The product must be well packaged, have protective holograms and quality certificates. When purchasing a whole set with release springs, it is advisable to check them. We often came across sets from China where the spring brackets were turned in the wrong direction.
There is no need to look for how much the cheapest kit for a VAZ will cost. It is better to give preference to original parts or famous analogues. Even at a higher cost, the pads will provide excellent service life and excellent braking dynamics.
Selection for cars with ABS
Below is a list of pad sets with the best price-quality ratio.
| Part name and number | Minimum price, rub. |
| AT 2090-118BP | 400 |
| AutoReal AV18-350-2090 | 450 |
| Pilenga BSP1005N | 600 |
Selection for cars without ABS
If your Lada Priora is not equipped with an anti-lock braking system, then you should purchase special pads. The most popular sets are the following.
| Parts brand | Initial cost, rub. |
| Fortech FB-2102 | 500 |
| Pilenga BST1002N | 550 |
| Bosch 0986487219 | 800 |
Do-it-yourself caliper repair - preliminary inspection
The return movement of the piston in this unit is ensured by a cuff. Firstly, it creates a tightness, and, secondly, it acts as a kind of spring. When the piston moves, it undergoes a slight deformation, but then returns to its previous state, slightly pressing it into the body. Determining the malfunction is quite simple - if you hang the wheel, it should rotate freely as soon as you press or release the brake pedal. There should be no signs of overheating on the discs themselves, otherwise you will need to repair the caliper yourself.
When conducting a visual inspection, we must make sure that there is no noticeable difference in the thickness of the outer and inner pads. The piston should move so that when pressed it easily sinks into its body. Its surface should not have noticeable traces of dirt or corrosion particles. You also need to conduct a superficial inspection of the boot and ensure its integrity.
How to replace the handbrake cable on a Lada?
Sometimes situations arise when adjustment manipulations alone cannot solve the problem. Here, the only measure to eliminate the breakdown will be to replace the cable, which could simply stretch beyond the limit or even break. This often happens with cables that are not of the best quality.
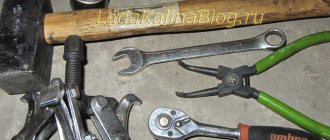
By analogy with the first case, we also prepare suitable tools. Their list is expanding a little. So, we need to get help from:
- keys or heads, sizes “13” and “10”;
- “ratchet”, which is more convenient than a regular wrench;
- a medium-sized flat-head screwdriver;
- pliers and WD-40.
Starting the repair procedure, we ensure that the rear axle wheels are suspended using any of the previously discussed methods. Also, as part of the preparatory stage, we remove both brake drums.
Now directly replacing the cable.
- In the same way as during adjustment, unscrew and slide the heat-insulating screen of the exhaust circuit.
- We remove the part of the muffler adjacent to the parking unit from the suspension of the Lada Kalina and move it to the side, subsequently supporting it with a suitable block.
- We use the wrench at “13” to unscrew the two nuts located on the central rod.
- Now we need to remove the right and left branches of the cable from the equalizer bar and the corresponding brackets, which are located on the bottom.
- On each of the wheel brake units, using the indicated screwdriver, we remove the pad activation lever, after which we disconnect the cable end using pliers.
- Difficulties may arise when removing the tip from a specialized hole located in the casing (shield) of the Lada Kalina brake mechanism. We recommend treating this area generously with a penetrating substance. We wait time and remove the specified section of the cable using the staggering manipulation. This method should be used to remove the cable ends on both sides of the vehicle.
Replacing rear brake pads
As you know, rear brake pads do not wear out as much and do not have to be replaced as often as the front ones. But if the deadline has already come, and your Kalina needs to install new ones, then below I will tell you everything point by point on how to make the replacement as easily and simply as possible.
Required tool:
- Balloon key
- Head 7 (deep) with knob
- Pliers
- Long-nose pliers (for greater convenience)
- Flat thin screwdriver
- A large wrench with a 30mm head: will be needed if it is not possible to remove the drum separately without a cage with a bearing. Then you will have to unscrew the hub nut and remove the drum along with the bearing.
Detailed guide to replacing rear brake pads on Lada Kalina
- First of all, we put the car at speed, put stops under the front and one rear wheel and lift the rear of the car with a jack, having first slightly loosened the wheel bolts with a wheel wrench.
- When the wheel is in a suspended state, you can completely unscrew all the wheel bolts and remove it.
- After this, take a small wrench with a deep head of 7 and unscrew the two studs securing the drum.
- After that we try to remove the drum. First, you can spray the seating area of the drum and bearing race, just around the plastic protective cap. And wait 5-10 minutes until it all settles down. If you cannot remove the drum, then read about a slightly different removal procedure.
- Next, the following picture appears before us, where, in fact, the entire brake mechanism of the rear wheel is located:
- Now, using pliers, we squeeze the cotter pin, which is located on the right, as shown in the photo below, and remove it, turning the rod slightly clockwise if it is in a position that is inconvenient for removal:
- After this, we take pliers and use them to remove the lower spring of the brake pads, it is more convenient to do this on the right side, as shown in the photo below - grab it and pull it to the right side:
- Then we take out the short spring that fixes the block in the center:
- Now you can remove the right shoe without even removing the top spring. Just grab it firmly in the center and move it to the side, lifting it up a little, until the plate located under the upper spring falls down:
- Now that the plate does not fix the pads, you can safely disconnect the spring from above, simply by hand, since there will no longer be any tension. We take out the plate and remove the left part - the block along with the handbrake lever, having previously disconnected the central fixing spring:
We install new pads in the reverse order of removal. The replacement will not take more than an hour if you have all the necessary tools at hand.
How to properly replace front pads
The replacement technology is not difficult. The task can be completed by a person with minimal technical knowledge and repair skills. After replacement, the system will operate normally.
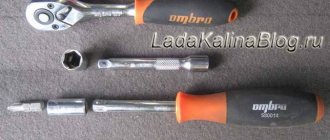
Tools and accessories
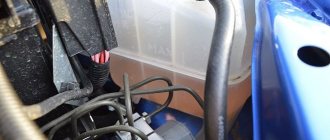
At the initial stage, the tool is prepared. Replacing brake parts on Lada Kalina at service stations is carried out on a lift. In garage conditions, there is no need to use an inspection hole or overpass. The front part of the Lada Kalina is lifted with a jack.
Tools and accessories required for replacement:
- The wheel wrench is for removing wheels.
- Spanners. To speed up replacement, ratchet heads are used.
- Jack. The standard mechanism supplied by the manufacturer with the car will do.
- Lubricant for caliper guides. It is necessary to use a lubricant designed specifically for these purposes. This lubricant can withstand high temperatures, reducing the degree of friction between parts.
- Flathead screwdriver.
- Recoil devices.
- Stops that prevent the Kalina car from falling from the jack.
- A device for pressing the piston into the caliper. You can purchase a ready-made tool or make it yourself.
- Wire brush.
To remove small abrasive particles from the surfaces of components, use a jet of compressed air.
Replacing brake pads Kalina
Before starting work, place the vehicle on a level surface. To prevent the car from rolling spontaneously, anti-roll devices are installed under the rear wheels.
Replacement is carried out in the following sequence:
- Remove the wheel bolts before jacking them up. Failure to comply with this rule will result in the cylinder turning when trying to unscrew the bolts. If the work is done together, in order to immobilize the wheel, the partner must press the brake pedal.
- Jack up the front of the car. Raise both wheels or perform the procedure one by one for each mechanism.
- The fasteners securing the disc to the hub are unscrewed.
- Remove the wheel.
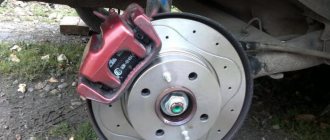
- Unscrew the lower caliper mounting bolt. If you remove the upper fastening element, you will not be able to move the bracket completely. Retraction will be obstructed by the brake hose.
- Repress the piston. A flathead screwdriver is inserted between the outer block and the bracket. After moving the piston, remove the caliper.
- Move the bracket by rotating it on the top guide.
- Remove worn front pads.
- Press the piston into the caliper using a tool.
- Inspect the guide and piston boots for damage. Cracked or cut elastic seals must be replaced. Abrasive particles can enter the surface of moving parts through cracks. This will lead to rapid wear of the elements.
- Apply specialized lubricant to the guides.
Pressing the piston into the caliper using a device. After disassembling, clean the inner surface of the caliper from dirt. Abrasive particles are removed with a jet of compressed air.
Assembly is carried out in reverse order. When installing, maintain the tightening torque of the threaded connections.
Replacing brake drums Lada Kalina
You will need : remove the rear wheel and prepare a high hex head “7”, a hammer, a wooden block, mounting blades.
To remove the Kalina brake drum :
- Unscrew the two wheel guide pins using a 7mm hex socket.
- Try to remove the drum with your own hands.
- If that doesn't work, try knocking it off with a hammer through a wooden spacer.
After removing the drum, do not press the brake pedal, otherwise the pistons may come out of the cylinder completely.
To install the brake drums, you must first recess the pistons into the working cylinder. To do this, we press on the pads with two mounting blades, leaning against the shoulder of the brake shield.
For Kalina's brakes to start functioning, with the car standing, press the brake pedal 2-3 times to bring the pads to the drum.
Required spare parts
On the Russian market, rear pads for “classics” are offered in a wide range. But practice shows that you should not purchase Chinese parts. They are of low quality: ferodo has a low coefficient of friction, and the linings come off quickly. It is advisable to purchase parts with the following article numbers: 2101-3502090-55, 21010350209055, 2101-3502090, VR311, BS-T 1001 N, 13.0460-2966.2, 602966, 2101-3501089, 2101-3 501800-82, 21010350180082, 2101-3501089. These are Russian and European products, the price varies from 500 to 1100 rubles, but you will put really high-quality parts on the car that will last a long time.
FakeHeader
Comments 37
But there are no negative consequences in undermining the bar?
No, but it’s better to do it only as a last resort, like mine.
Is it by any chance that you have this kind of garbage because of the handbrake cables? I also didn’t think about sharpening it... it turned out that one of the cables was rusty because it was bent on the beam and burst. Today I changed both the cables and the brakes completely. And everything is fine)
No, everything was fine with the handbrake cable)
What was the mileage?
approximately 50 thousand km.
Wow, my drums are oval, but so far it doesn’t hit the pedal much. Mileage 67 thousand. I thought I would change early.
For some it happens earlier, and for others it takes longer.
I got the same set, how did the drums perform?
Everything is fine so far, only the paint has peeled off.
thanks, well the paint isn't the worst thing
I got the same set, how did the drums perform?
As I understand from here www.drive2.ru/b/1370301 cast iron drums are not only not better, but worse than aluminum ones.
I wouldn’t blindly believe this article, especially since aluminum has a cast-iron insert...
The same bullshit hits the brake pedal but doesn't give way to the steering wheel.
that means you need to change the drums.
Why are cast iron drums better?
I didn’t delve into this issue myself, from my own observations I didn’t notice a difference in braking, I just needed to install something and decided to try cast iron ones. They are also heavier. As far as I know, they are stronger and do not behave like aluminum ones...
Hi all. I haven't looked here for a long time. The car serves properly, there was nothing to write about. I just filled up the car and drove off. I think there is no point in writing about how I washed the car, pumped up the tires or installed a new air freshener. I don't want to be like others.
Over the past few weeks, the squeaking sound of the rear brakes when braking has begun to bother me. I didn’t pay much attention to this, but just a couple of days ago a strong metallic grinding noise began and a feeling that the brake pad was being bitten. I very much doubted that the rear brake pads could wear out in 15 thousand km, but doubts about the quality of our automobile industry and the direct hands of the assemblers did not leave me. I was afraid that the wheel might slip at an inconvenient moment, I quietly got home and planned to go to the service.
At home, after calculating the budget and the likelihood of buying new brake pads, I decided to try to do everything myself, although I had never touched the rear brakes in my life. I started looking on the Internet for guides on how to disassemble a brake drum with ABS and, to my surprise, came across my own photos Replacing the front brake pads,
which someone successfully appropriated and wrote their own
Article
. I think the second part of this article about the rear pads is also from somewhere behind.
According to my already old tradition, I decided to post my guide for dummies like me. I went to the garage to figure out how everything worked there and where the metallic grinding noise was coming from.
The very first step is to find a level surface for repairs, since the car will be parked without brakes. Secure the front wheels by placing stops made of boards or bricks, always in front and behind, on both sides. Remove the car from the handbrake. Loosen the wheel nuts, jack it up, and remove the rear wheel. Here we see the brake drum.
Here we unscrew the two clamps counterclockwise while holding the brake drum with our hands.
Here you should pay attention to two more small threaded holes; when assembling, do not screw the clamps into these holes inadvertently. As they told me, they can be used to press the drum out of the hub
It is better to use long bolts, screw them in carefully without damaging the threads, and tap on the drum. The drum is removed with a rocking motion, you can tap it lightly, but on new cars it can be easily removed simply by hand. Next, there is a view of the insides of the brake drum itself. Here you can see an interesting disc with slots. This is the disc for the ABS sensor. Due to the sensor and this disk, the wheel rotation speed is recorded to control the ABS system.
The entire brake mechanism is hidden under the disc: the pads themselves, the brake cylinder, the ABS sensor, the tension springs and the lever with the handbrake cable. Please note that the pads have a special hole for the ABS sensor, so you need to buy special ones for replacement. Then I noticed the first trouble - the cylinder boot had slipped off, and the ABS sensor had become overgrown with a “beard” of fine metal chips. Since the sensor is inductive, metal chips can interfere with its normal operation. The pads themselves are fine and show minor wear.
Troubleshooting methods
Before we talk about ways to remove the rear brake drum if it is stuck, you need to name the reasons why this can happen:
- Heating the brake pad causes the metal that makes up the drum to expand, causing the cover to stick to the body.
- Dirt accumulated between the cover and body.
- Rapid heating of the element during braking, and then sudden cooling (for example, in a puddle of water).
All this leads to sticking of the brake drum. Note that dismantling it is quite difficult. Therefore, experts do not recommend resorting to sharp braking in rainy weather, which is quite difficult to dismantle when replacing the pads. Now let’s talk about the most acceptable ways to remove a stuck drum.
If car service technicians cope with this task almost effortlessly, having sufficient experience and the necessary tools, then an ordinary motorist who decides to do such work on his own needs to stock up on a certain tool. Moreover, for each specific case this tool may be different.
But you will always need WD40, which is used when repairing various vehicles.
Sledgehammer to help you
Using this method requires reliable fixation of the car. It is better to perform all actions on a lift (a car jack is not able to provide maximum stability to a raised car). In addition, a metal goat designed to support the machine, or an ordinary stump from a large tree, may be suitable for this. Let's move on directly to the sequence of actions when dismantling the brake drum. You will need:
- Remove the wheel.
- Using a wire brush, clean the cavity from any accumulated dirt.
- Spray the surface generously with WD40.
- Gently tap the drum collar at the bottom until it becomes movable. There is no need to strike too hard - this can lead to damage to car parts.
But it is advisable to warn that this method has one significant drawback - not everyone has a sledgehammer and not everyone knows how to handle it. Therefore, it is advisable to consider other options for solving this problem.
Extreme way
This method involves absolute fixation of the machine . Before starting work, you should check everything carefully, because if the car comes off, the risk of serious injury increases by almost 100%. Having chosen this option for removing a stuck drum, you will need to perform the following steps:
- Get behind the wheel.
- Turn on the ignition.
- Engage 2nd (3rd) gear and release the clutch.
- Rotate the engine to medium speed.
- Shut down the power unit and remove the drum.
The meaning of this method is to spin the moving part of the axis, and therefore the drum itself, using centrifugal force. In this embodiment, the drum will simply be descaled.
Radical measure
If suddenly the methods described above did not lead to the required result , in addition, the brake system cylinder is jammed, then it is advisable to take radical measures. To complete the work you will need a drill with a drill (diameter size 2-3mm), a medical syringe, and a sledgehammer. Here's what to do if all else fails:
- Make several holes at the junction of the axle shaft and the drum.
- Use a syringe to pour brake fluid into the holes and at the same time gently hit the drum with a sledgehammer.
Removing the rear drum yourself
To remove the rear brake drum on Kalina, we will need no more than 20 minutes of time and the tools listed below:
- Jack
- Wheel key
- 30mm socket with long collar
- Flat head screwdriver
Work progress when removing and installing the rear brake drum
- First of all, we put the car at speed and remove the handbrake so that the rear wheels are not braked.
- Then, take the wheel wrench and tear off the wheel mounting bolts, all four of them, and use a flat screwdriver to pry up the protective cap on the hub nut and take it out:
- We jack it up to such a height that the wheel rotates freely and can be removed without any problems.
- After the car is raised, completely unscrew all the bolts and remove the wheel.
Once the rear wheel is removed, you can begin to unscrew the hub nut. For this we just need a key - a 30mm socket and a wrench
Please note that the hub nut is very tightly tightened from the factory and even more so, it will have to be a lot of force to move the nut out of place. If it doesn’t work out the first time, you can adjust the knob longer or put on a pipe, but in my case everything worked out like this:
Then, when the nut has been unscrewed and the thick washer underneath has been removed, you can begin to remove the brake drum. It can be removed quite simply, just pull it with both hands and turn it a little, pulling it towards you.
If you can’t remove the drum with both hands, you can knock it out a little with a hammer from the back, just without making any effort so as not to damage the body.
When replacing the drum, install all parts in the reverse order of removal, and do not forget to tighten the nut on the hub after tightening.
ladakalinablog.ru
Replacing a brake drum on a VAZ 1117-VAZ 1119
Removal
Place the car at speed and remove the parking brake handle all the way down. With the handbrake raised, removing the drum from the car is much more problematic. Remove the wheel from the car (for more details, see the article: “Replacing wheels on modern cars”).
Take a rag soaked in water and clean the entire brake mechanism from excess dirt.
Note! We recommend using a rag or brush instead of a rag. Remember, under no circumstances should you wash off dirt with gasoline, diesel fuel or any solvent!
Now, using a small wrench or socket wrench, unscrew the two guide pins (indicated by the arrows in the picture below) and set them aside in a safe place (such as a small bucket or car). The main thing is not to lose them.
The arrows in the photo indicate the location where WD-40 was applied. This must be done around the entire circumference, because over time the brake mechanism rusts or sours, which means it will be almost impossible to remove the drum from the hub (indicated by the blue arrow). We recommend that you take such preventive measures to make repairs easier for yourself in the future.
With your bare hands, try to remove the drum from the car by tugging. If difficulties arise, take a rubber hammer (at least a regular one, just act extremely carefully) and move the drum: apply many blows to different places on the drum. Basically, hit closer to the edge and hit until you feel the drum begin to gradually come off the hub.
Note! If the above method does not help, gently tap the edges of the drum with a rubber mallet.
The brake system of the Lada Kalina car
The hydraulic brake system of a VAZ 1118 car consists of a pedal lever, a hydraulic master cylinder, a vacuum brake booster 1118, a hydraulic reservoir, a pressure regulator, a regulator drive lever, pipelines, flexible reinforced rubber hoses, tees, and fastening clamps. At the same time, the brakes on this VAZ model can be equipped with an anti-lock braking system, but it was not installed in the first series of Kalina production. Today, almost the entire line of cars comes with an ABS system.
Vacuum booster on a VAZ 2170 2171 2172 Lada Priora: 1 - tip mounting flange; 2 — rod; 3 — diaphragm return spring; 4 — sealing ring of the master cylinder flange; 5 - main cylinder; 6 — amplifier pin; 7 — amplifier housing; 8 - diaphragm; 9 — amplifier housing cover; 10 - piston; 11 — protective cover of the valve body; 12 — pusher; 13 — pusher return spring; 14 — valve spring; 15 - valve; 16 — rod buffer; 17 — valve body; A - vacuum chamber; B - atmospheric chamber; C, D - channels
Features of the front wheel braking system
The front wheels of the VAZ 1118 are equipped with a ventilated disc system with a piston floating caliper. It includes a wheel cylinder and a caliper, which are tightened together with special screws. The cylinder itself is attached to the guide pins with two bolts installed in the guide block (holes). The pads are pressed against the guide grooves by springs. Inside the cylinder there is a piston with a sealing ring having a rectangular cross-section. The elasticity of the ring provides an optimal gap between the disc and the brake pads, which ensures high-quality functioning of the system.
Front wheel brake mechanism on a VAZ 2170 2171 2172 Lada Priora: 1 - brake disc; 2 — pad guide; 3 - caliper; 4 — protective casing; 5 - working cylinder; 6 — brake hose; 7 — air release valve; 8 - guide pin; 9 — protective cover of the guide pin; 10 — brake pads
Features of the rear wheel braking system
The brake system of the Lada Kalina, the design of which significantly increases its safety, is distinguished by its thoughtfulness and high reliability. The rear wheels of Kalina are of the drum type, with a two-piston wheel-type cylinder, as well as automatic adjustment of the clearance space between the drum and the block. A drum brake consists of the drum itself, shoes, hydraulic cylinder, tension springs, protective disc, retainer and shoe spacer.
Rear wheel brake mechanism on a VAZ 2170 2171 2172 Lada Priora: 1 - rear brake pad; 2 — parking brake drive lever; 3 — lower tension spring of the pads; 4 — brake mechanism shield; 5 — parking brake cable; 6 — front brake pad; 7 — guide spring; 8 — expansion bar; 9 - working cylinder; 10 — upper tension spring of the pads; 11 — finger of the parking brake drive lever
Function of the braking system
It is important to note that only the smooth functioning of all elements of the device ensures safety and reliable deceleration of the vehicle.
The brake system of the Lada Kalina operates as follows: when you press the brake pedal, the piston, moving in the cylinder, displaces fluid through the main outlet valve into the brake hydraulic system hose. The fluid moves through pipelines to the main wheel mechanisms, which helps move the pads to the discs in the front wheels, and the rear ones to the drums. When contact occurs, braking begins, and the angle of change of the pedal lever affects the speed of deceleration of the car.
Parking brake and its device
In addition to the main brake system, mention should be made of the parking brake, which has a standard mechanical configuration and consists of an adjusting rod, a lever, two cables, an equalizer, spacer bars, and pad drive levers. The parking brake system of the VAZ Kalina is driven by the brake mechanism of the rear pads, which ensure reliable fixation of the car from accidental movement.
It is important to remember that a properly configured brake should ensure vehicle immobility on a slope of up to 23% when empty, and up to 19% with a full load.
How the rear brakes of the Kalina work
The rear brake assembly consists of:
- from brake drums;
- two-piston cylinder;
- pads;
- hand brake mechanism;
- “soldiers” holding pads;
- return springs;
- adjusting bolts with eccentrics.
Rear wheel brake
The size of the rear drums on Kalina is 256 mm. This is the outer diameter. But when purchasing a spare part, it is not necessary to know the exact parameters. It is enough to tell the seller the make and model of the car, as well as the year of manufacture. The same information must be provided when ordering parts online.
Causes of Brake Wear
According to modern rules for monitoring the technical condition of vehicles, disc brake pads must be changed once every 10,000 kilometers. But this figure cannot be a single standard for everyone, since the wear of consumables greatly depends on driving style.
If you brake smoothly and not often (the mileage is mainly on the highway), then you can change the pads after 20,000 kilometers. On the contrary, if you brake frequently and sharply (aggressive driving style in the city), then the pads may wear off after 5,000 kilometers.
An important factor is the quality characteristics of the pads themselves. Some manufacturers openly save on raw materials. The same manufacturer may have several models of pads - more expensive and cheaper, softer and harder.
Everyone is different, so it is important to check your brake wear from time to time.
LADA > Kalina
In most cars, during normal use, the inner pad wears out a little faster than the outer one, and this does not depend on the design of the brake mechanisms. However, under specific operating conditions or due to the design features of some machines, the internal pads sometimes wear out noticeably more intensively than the external ones. For example, on a second-generation Mazda 6, the inner pad on the front right wheel wears out one and a half times faster than the outer one.
In addition to design nuances, malfunctions may also occur. For example, increased pad wear due to a soured piston
Therefore, when inspecting the brakes for the first time on a car you have never driven before, it is important to remove the wheel to assess the condition of both the outer and inner pads. Unscrupulous servicemen often limit themselves to an approximate assessment of the wear of only the outer pads, looking at them through the spokes of the wheel rim, without removing the wheel itself
It is possible that soon a dissatisfied customer will return to this service station with worn out internal pads and complaints!
As an example, let's check the condition of the brakes on the editorial Kalina, which has driven almost 63,000 km. In addition, we provide approximate indicators for critical wear of various elements of the brake system. For each specific car model, they may differ either up or down. This data can be found in repair and maintenance books or on the Internet.
But let's return to our Kalina. Only after removing the wheel is the real picture visible. The thickness of the friction lining is approximately equal to the thickness of the pad base: wear is about 60%. If the thickness of the friction lining decreases to 2 mm, this will mean 100% wear. Many cars have a metal tongue at the base of the block. When the lining wears critically, it begins to come into contact with the brake disc, producing a characteristic squeak. Most often, the tongue is installed only on the inner pads.
How to assess the condition of the drum and the entire wheel brake mechanism
To check it is not necessary to contact a car service. It is not difficult to notice problems in the system.
Signs of a malfunction of the drum and other elements are:
- Grinding and creaking when braking, which often indicates dirty elements. In this case, you will need to remove the brake drum of the rear wheel of the Kalina for cleaning.
- Deterioration in braking quality.
- Dips in the brake pedal.
- The car pulls to the side when braking.
- Pedal travel is too free.
The drum has a relatively long service life: it can travel 100,000 km or more. But sometimes the element wears out earlier for various reasons. In this case, it needs to be changed. Experts do not advise saving on drums. Therefore, you need to buy only high-quality spare parts.
Brake pad replacement is required much more often. They are usually changed at least every 30,000 km. When carrying out maintenance of the brake system, it is recommended to adhere to the regulations established by the car manufacturer. But the wear time of parts varies individually. It depends on their quality and the driver’s accuracy, as well as driving style. You can diagnose and service the brakes yourself. However, if this causes difficulties, it is better to contact a service station.
What to do with classics and Niva
On the “classic” VAZ, problems often arise with the rear disk units, since the drive here is from the rear wheels, and they are more loaded. Let's figure out how to remove a defective brake drum on a VAZ 2107.
We will need:
- wrenches;
- jack, wheel wrench;
- rubber hammer;
- penetrating lubricant "VD".
- First of all, we jack up the rear on both sides, make linings and remove the desired wheel.
- We treat the connections of the studs and the assembly to be dismantled with penetrating lubricant.
- Unscrew the guide pins.
- We start the engine, accelerate the rear wheels to speed 4, then apply sharp braking.
- The disk element should break free.
- Turn off the engine and knock down the part with a rubber hammer.
This instruction is relevant for all modifications of the “classics”. Therefore, if, for example, it is not clear how to remove a defective drum on a VAZ 2106, you need to contact her. She points out one of the tricky ways to remove a part. Next we will consider a slightly different method.
Replacing a brake drum on a viburnum
Welcome! When you press the brake pedal, friction occurs on the brake pads and the car stops.
The brake drum on VAZs and budget foreign cars is installed only on the rear wheels. Despite its durable appearance and metal body, it sometimes breaks or wears down too much - there is a need to replace it. Note! You will need the following tools: a 7" wrench, a file, two mounting blades or pry bars instead, a rubber hammer, WD-40 fluid.
Drum location
On very old cars, for example IZH 2715 “1972–82”, there were drums at the front and rear. On our cars only from the rear. The photo shows what the drum looks like and its approximate location.
Time to replace the drum?
- any deformations;
- cracks;
- shape changes;
- scoring and deep marks on the working surface (indicated by arrows in the photo).
If such damage is detected, it is recommended to grind the entire working surface of the drum, and after grinding, be sure to go over it with a fine-grained abrasive stone or fine-grained sandpaper and sand the surface of the drum, achieving smoothness.
Note! After removing the drum and grooving, a ruler will help you determine the wear: measure the inner diameter of the drum (shown in the photo below). If the indicator is 201.5 mm or more, we urgently change the drum!