Good day! Today I was working on my ten and decided to make a guide on how to replace the rear wheel bearing. Since Kalina has a completely identical design, the procedure for this repair will be the same. All this took me about half an hour, but this was with almost all the necessary tools. Regarding supplies, it’s worth noting everything I needed today:
- Vise
- Puller with rotating jaws
- Curved circlip pliers
- The hammer is powerful
- Wrench with extension or pipe
- Socket head for 30 and 7 mm
- Ratchet handle
- Wood block
Removing the hub from the car axle shaft
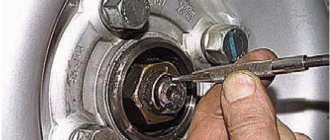
So, the first step, when the car is still on wheels, is to rip off the hub nut by first prying up and removing the protective plastic cap in the center of the wheel.
We also tear off the wheel rim bolts, and after lifting the car with a jack, we finally turn them out. In principle, the pads do not need to be removed, but I carried out the work when they were no longer there. Unscrew the rear hub nut completely, as shown in the photo:
Then the fun begins. It happens that even with a little hand effort, pulling towards yourself, the hub can be removed from the axle shaft without any problems, but this does not always happen, fortunately. The ideal option for dismantling is to use a special puller with rotary grips. We put it on the hub, grabbing it by the inner part and tighten the central rod of the puller with a wrench, thereby pulling the hub off the axle shaft.
As a result, after a few turns of the bolt, everything can be dismantled without any problems. The final result can be seen below:
There doesn’t seem to be anything difficult with removal, but then it will be a little more interesting, especially without a bearing puller.
Helpful advice
When purchasing a new bearing, it is important to check that it contains grease. Often unscrupulous manufacturers do not report it to the required level. As a result, the element is constantly subjected to stress and fails.
It is not uncommon for a part to break down after 3,000 km (especially on UAZ vehicles). The best option is to gut out all the existing grease and apply a new one, purchased separately. Fortunately, specialized lubricants are now sold. They are resistant to washout and do not change properties at high temperatures.
Signs of a bad wheel bearing
The rear wheel bearing on Kalina wears out gradually. Instant breakdown is possible in the event of a traffic accident. Excessive wear has virtually no effect on the driving performance of the car. You can suspect impending bearing failure by an uncharacteristic hum that appears in the rear wheel area when driving.
In this case, the hum appears only when the spare part is worn out. Moreover, immediately before a breakdown, the hum increases and turns into a permanent crunch; problems with handling begin - the car drives from side to side. In the early stages, a breakdown can only be diagnosed using service equipment.
Problems when paying with bank cards
Sometimes difficulties may arise when paying with Visa/MasterCard bank cards. The most common of them:
- There is a restriction on the card for paying for online purchases
- A plastic card is not intended for making payments online.
- The plastic card is not activated for making payments online.
- There are not enough funds on the plastic card.
In order to solve these problems, you need to call or write to the technical support of the bank where you are served. Bank specialists will help you resolve them and make payments.
That's basically it. The entire process of paying for a book in PDF format on car repair on our website takes 1-2 minutes.
“>
How to replace a wheel bearing on a rear wheel
You will need: a thin chisel, a socket wrench 30, a puller for retaining rings, a press or puller to press out the bearing, a universal puller.
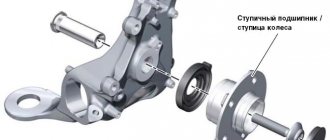
A 2-row ball bearing 2 is installed in the hub, which does not require adjustment or lubrication during use. If the swinging of the suspended wheel causes play, or there is noise while driving, the bearing from the hub may be faulty.
Hub from the rear wheel: 1 - mud ring, 2 - bearing from the hub, 3 - hub, 4 - thrust washer, 5 - nut for fastening the hub, 6 - o-ring, 7 - hub cap, 8 - retaining ring, 9 - axle from the hub.
Helpful advice
To press the bearing, you need to use the appropriate size mandrels from the kit. If there are no mandrels, you can use rings from an old bearing.
1. Engage first gear and place chocks under the front wheels.
2. Remove the protective cap and unlock nut 5 from the hub fastening.
3. Loosen the bolts for securing the wheel and the nut from the hub. The hub nut is tightened with a large torque, so it is better to select a lever such as, for example, a piece of pipe.
4. Raise the rear of the machine and place it on secure supports.
5. Remove the necessary wheel and brake drum (see the article on how to remove and install the brake drum).
6. Completely unscrew the nut from the hub and remove the thrust washer.
7. Install the puller and press the hub off the axle (to make the puller easy to install, it may be necessary to remove the brake pads).
8. Clamp the hub in a vice and remove the retaining ring from it
9. Press the bearing out of the hub and clean the internal cavity in the hub. Press in the new bearing and install the retaining ring.
Warning
You need to make sure that the retaining ring fits completely into the groove of the hub.
10. Press the hub onto the axle using a suitable mandrel by applying force to the inner ring in the bearing. After this, you need to install the pads, brake drum and wheel.
Before installing the brake drum, it is necessary to thoroughly clean the mating surfaces of the drum and hub from scale and rust, because even the smallest particles sandwiched between these surfaces can cause drum beating and vibration during braking.
11. Finally tighten the hub nut and bolts to secure the wheel to the machine standing on the ground.
Warning
Only use a new hub nut.
You can use nuts from other wheels (so that the jammed and old parts of the shoulder of nut A do not fall into the grooves B of the axle during the punching process).
12. After fully tightening the nut from the hub, lock it and install the protective cap.
Replacing the rear bearing
Replacement of the rear wheel hub bearing Lada Kalina 1117 2004 - 2013
Tools:
- Jack
- Support stand, 2 pcs.
- Straight box spanner 7 mm
- Tubular socket wrench 17 mm
- Driver for socket attachment
- Knob attachment 30 mm
- Torque wrench
- Medium flat screwdriver
- Universal puller
- Cup puller
- Vise
- Circlip pliers
- Large hammer
- Wheel bearing size guide
- Narrow chisel
Parts and consumables:
- Rear wheel bearing
- Solid oil
- Rags
1. Remove the rear wheel and securely fix the car on a factory-made support stand.
2. Using a 7mm spanner, unscrew the two wheel guide pins.
3. Remove the brake drum.
4. Use a screwdriver to pry it off and remove the wheel hub protective cap. The O-ring remains on the cap.
5. Use a narrow chisel or screwdriver to straighten the jammed collar of the nut.
6. Using a 30mm socket, unscrew the hub nut.
7. Remove the nut and thrust washer.
8. The bearing is mounted on the axle with a transitional fit, so the hub can be removed by hand.
9. If there is difficulty, compress the hub using a universal two- or three-jaw puller.
10. Remove the hub from the axle. In this case, a cage with rollers, a protective ring and an inner ring of the bearing remain on the axis.
11. Remove several rollers from the bearing cage and remove the cage and protective ring.
12. To remove the inner ring of the bearing, two flats are made on the axle for installing a puller. The flats are located parallel to the brake pad spacer. We hook the legs of the two-jaw puller to the inner ring of the bearing.
13. Press the inner ring of the bearing.
14. Holding the hub in a vice, remove the retaining ring using pliers.
15. Use a cup puller to press out the bearing.
16. If there is no puller, knock out the bearing using a suitable head or piece of pipe, striking the inner ring of the bearing.
17. Press the new bearing into the cleaned and lubricated hub using a cup puller, applying force to the outer ring of the bearing. If a puller is not available, the bearing can be pressed into place in a vice by applying force to the outer ring through the ring from the old bearing.
18. Install the retaining ring. Carefully, with light blows on the inner ring of the bearing, press the hub with the bearing onto the axle to a depth that allows you to tighten the nut.
19. Finally press in the hub, tightening the nut to a torque of 186-225 N•m. We jam the collar of the nut into the groove of the hub axle. We carry out the final assembly in reverse order.
Replacing the rear wheel bearing of Lada Kalina: photo, video
If while driving (especially when cornering - approx.) you find that there is excessive noise or buzzing from the rear wheel, it is possible that the hub bearing on the rear wheel has failed. If similar symptoms are observed at the front, then the front wheel bearing should be checked. It is quite simple to diagnose this problem; it is enough to make successive loosening movements on the suspended wheel, and if significant play is felt on it, then it is time to change the bearing.
Replacing the rear wheel bearing on a Lada Kalina in this video:
Work on installing a new part on a seat
- Lubricate everything generously with lubricant. (Please note that in this case you don’t have to skimp on lubricants – approx.).
- Then, we install the hub again in a vice, place the new bearing strictly in the center, and lightly hit the body with a hammer, or better yet, through a wooden block, hammer it into place.
When the bearing is level with the hub body, the easiest way to get it in place is to use the same “30” socket. (When performing work in this way, you will achieve success if you do not rush and strike with light and alternate movements - approx.). The goal of this operation is not to break the new bearing. - You can also press the bearing into the hub using a long bolt and thick metal washers.
The hub is installed in a vice, and the bolt and washers are used as a press and by careful and precise movements when tightening the nut. (This method is not the easiest, but it is also relevant for performing these works - approx.). To press the bearing in this way, you will have to put in a lot of effort. - When the bearing is pressed in, put the retaining ring back on it.
- We put the hub on the axle shaft and attach a new nut to it (Please note that the nut should be put on either a new one or from another wheel so that the cored parts of the old nut do not fall into the grooves).
- Then, by turning the nut on the hub, it will be pressed in at the same time.
- We install the brake mechanism, drum and wheel.
- When the car is already on the ground, we finally tighten the nut.
If these rules are correctly and strictly followed, replacing the wheel bearing on a Lada Kalina can be done within 1.5-2 hours.
Replacement algorithm
Before starting work, you need to place wedges under the front wheels of Kalina.
- We remove the protective cap of the hub nut so that it does not interfere with us in the future.
First we remove the wheel nuts.
Unscrew the hub nut with a 30mm head.
If the hub does not come off by hand, we use a three-legged puller.
The bearing is secured in the hub with a retaining ring.
To press in a new bearing we use a race from the old bearing.
We press the hub onto the axle with light blows of a hammer on the inner ring of the bearing, then attach the nut and use it to push the hub until it stops. After the final tightening of the nut, we jam the collar into the groove.
When to change
The rear wheel bearing is characterized by gradual wear . It can fail immediately only in the event of an accident. Often wear occurs so slowly that many motorists do not notice a deterioration in the car's performance.
In the early stages, a malfunction can only be recognized with the help of service equipment. When jacking up the rear wheel, we begin to rotate it. If a crunching sound is heard and play is felt, then the bearing should be changed.
Let's look at the main signs that the rear wheel bearing has failed:
- While driving, a hum . This indicates significant depletion of the part.
- Gradually the hum increases and begins to be accompanied by a crunching sound .
- There are problems with controllability . The car is driven to the sides.
- When you tap the tires with your foot you feel play and the car begins to wobble.
Removing and replacing the rear wheel bearing on Kalina
Further, it is most convenient to carry out all the work in such a way as to fix everything in a stationary state. The ideal option for this would be a vice. When everything is clamped properly, take the pliers and use them to remove the retaining ring:
After this, we turn the hub over and again firmly fix it in a vice.
And now we take a spacer of a suitable size so that the area approximately fits the bearing and place it on top. In this case, I used a 30 socket - the same one I used to unscrew the hub nut, putting a wrench on it. And applying careful but strong blows, we knock the bearing down:
If the vice is small in size, then soon the bearing will begin to rest against the bottom, which was the case in my case. Therefore, I placed two small pieces of wood between the top of the vise and the hub itself in order to complete this operation without any problems.
And this is the end result of all our torment:
Method No. 1
This method involves checking the condition of an element without dismantling it. Moreover, you don’t have to go on a lift or use specialized equipment. How to check the front wheel bearing? The essence of the method is extremely clear. It is necessary to accelerate the car to 70-80 kilometers per hour and switch to “neutral”. Next, you need to carefully listen to the noise of the suspension. It is important to choose the most flat section of the road so that the suspension moves are minimal. If you hear any humming noise, this indicates a bad bearing.
How to check and replace the rear wheel bearing of Lada Kalina
To check the condition of the wheel bearings, you need to hang the wheel and rotate it by hand. The wheel should rotate evenly, without jamming or knocking.
We take the wheel in a vertical plane and alternately pull the upper part toward us, and the lower part away from us, and vice versa. We make sure there is no backlash.
Typically, when driving, a “squealing” noise is heard from a faulty wheel bearing.
Disassembly
We place the shoes under the front wheels of the car. Loosen the rear wheel mounting bolts. Raise the rear of the car and place a safety device. Unscrew and remove the rear wheel. Fully lower the parking brake lever. Release the tension on the parking brake cables.
| Using a 7 mm socket wrench, unscrew the two guide pins. | We clean the cylindrical seating surface of the brake drum on the hub from dirt and corrosion. |
| We treat the drum seat on the hub with penetrating liquid (VD-40, kerosene or brake fluid). | To ensure removal of the drum, tap it with a rubber mallet or through a wooden spacer with a hammer. |
| Using a puller or screwing M8 bolts into the two threaded holes of the drum (the length of the threaded part is 60 - 70 mm) and evenly turning them, we press the drum from the hub. | You can also remove it using a wooden spacer or a hammer with a soft working part. Tapping the drum from the back, evenly in a circle. |
To prevent the pistons from falling out of the brake wheel cylinder, do not press the brake pedal with the drum removed.
| 1. Use a screwdriver to pry and remove the protective cap from the wheel hub. The O-ring remains on the cap. | 2. Use a narrow chisel or screwdriver to straighten the jammed collar of the nut. |
| 3. Use a 30mm socket to unscrew the hub nut. | 4. Remove the nut and thrust washer. |
Installing the wheel bearing in its place
First of all, thoroughly lubricate the inside of the hub, as shown in the photo below:
And also, without removing it from the vice, it is necessary to install the new bearing in place. To do this, we set it exactly in the center, and use a suitable spacer to hammer it in. If you act carefully, you can do this even with the help of an ordinary block (wooden), tapping evenly from different sides so that there are no distortions:
Then you can also take a 30mm head or an old bearing and drive in a new one until a seat for the retaining ring appears:
We install the ring in its original place and then you can put this entire assembly on the axle shaft. Installation, fortunately, is carried out quite quickly and without unnecessary problems, since everything gets clogged even with the efforts of two hands. Of course, the axle shaft should also be better lubricated beforehand!
Payment via PayPal
After selecting payment via PayPal, the PayPal payment system will launch, where you need to select the payment method: bank card or PayPal account.
If you already have a PayPal account, then you need to log into it and make a payment.
If you do not have a PayPal account, and you want to pay using a bank card via PayPal, you need to click on the “Create an Account” button - shown with an arrow in the picture.
PayPal will then prompt you to select your country and provide your credit card information.
After specifying the information required to make the payment, you must click on the “Pay Now” button.
Official website of the PayPal payment system https://www.paypal.com
Preparatory stage before replacing the hub mechanism
Required materials and tools:
- hydraulic (mechanical) jack;
- wooden stand;
- wheel wrench;
- screwdriver with a flat, cross-shaped bit;
- hammer;
- knob, nozzles;
- spanners;
- stationary vice;
- chisel;
- two-jaw and cup pullers. The exact dimensions of the pullers are indicated in the operating instructions;
- forceps;
- metal brush;
- lubricant type “CV joint - 4”;
- rags;
- caliper for measuring diameter;
- new wheel bearings;
- additional lighting provided that the work is carried out in the dark.
Replacing the front wheel bearing Kalina - preparation for repair
Replace on a flat surface, but it would be better to use an inspection hole. Put the car in first gear, secure it with wheel chocks, and remove the car from the handbrake. You will need a set of locksmith tools:
- hub puller with a set of discs of various diameters;
- hammer and chisel;
- socket wrench at “30”;
- impact screwdriver;
- round nose pliers.
- a set of open-end and ring wrenches, including a torque one (torque).
We lift the entire front of the car (both wheels) and begin replacement. Check out the design of the Kalina front hub:
Replacing rear wheel bearings
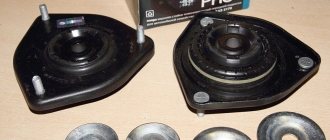
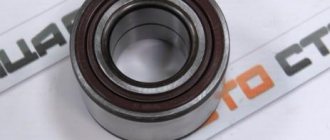
Bearing SAMARA SPZ-4.
Let's start replacing the bearings. I want to say right away that no pullers or vices were used during the replacement. Everything was done the old fashioned way on “knees” and birch wood.1). I took off the wheel;
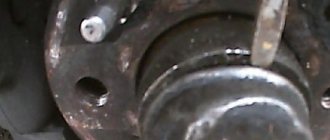
The bearings have not been changed from the factory, this is indicated by the factory paint. The nuts were not touched and that's a fact.
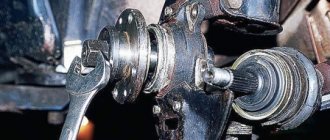
2). Unscrewed the hub nut;
I had to increase the leverage.
3). Removed the pads;4). I removed the hub by hand (I didn’t believe it myself), the tension was small.
Changing the wheel bearing of a VAZ 2110 with your own hands
There is factory marking paint.
I removed the hub assembly.
5). Removed the retaining ring. I knocked out the old bearing with a 32 head.
I disassembled the bearing for analysis. According to the Vologda labeling.
I disassembled the bearing and found it with lubricant without cavities, damage or dirt. It means it has simply exhausted its resource.
How to replace the rear wheel hub bearing. How to remove the rear wheel hub with your own hands? bearing removal and installation
No shells, cracks, etc.
6). I washed the hub and pressed in a new bearing, having previously lubricated the seats with a thin layer of grease. Just in case, I checked whether there was grease in the new bearing.
There is grease in the new SAMARA bearing.
I pressed in the new bearing using a birch block and a race of the old bearing.
At first he pressed it against the chick like that, with gentle blows.
This is how I pressed it further using the old bearing race.
- Replacing the rear wheel bearing of a Lada Priora
7). I installed the retaining ring by hand without tools and this is possible.8). I installed the hub in place using a 32 socket and then pressed it in with the hub nut. The tension was small. Perhaps because he lubricated the seats.
Gently tap slowly on the inner race of the bearing.
Everything is in place. I tightened the nut just like at the factory. According to old marks.
9). We put everything back together in reverse order and check if there is any play. In my case it is not on both wheels.
A pile of used bearings.
P S. Now find, as they say, “three differences.” Today I went to the garage to put things in order after repairing the car. I cleaned the bearings of grease and found the following differences, see below.
What does a bearing consist of?
The markings are printed in different fonts. Not visible in the photo.
The separators are plastic and come in different colors and different barely noticeable shapes.
One has a collar, the other does not. There are also different collars on the inside.
Rear wheel bearing on Kalina: design features and typical faults. Algorithm for replacing the rear wheel bearing on Kalina with photos and videos.
The Lada Kalina rear wheel bearing is a resource-intensive part (the bearing remains functional at levels up to 200,000 km and above), however, Russian operational realities reduce the resource potential and the bearing often fails even on relatively new cars. The breakdown is that the bearing cage falls apart and the rollers get knocked to one side.
What affects the resource?
The key factor influencing this parameter is lubrication. It is embedded inside a non-separable housing. The material is designed for the entire service life. Although on some domestic cars the element can be disassembled and serviced. Below we highlight several factors that can cause a wheel bearing to fail:
- Quality of roads. This is the main reason why this element fails. The fact is that the bearing does not have damping parts in its design and absorbs all the impacts from road irregularities. Accordingly, the higher the speed and the deeper the hole, the higher the risk of being left without a bearing. Yes, the design is impact resistant. But if this continues constantly, the element simply cannot withstand it and will crumble.
- Operating environment. Every winter, tons of chemicals are spilled onto the roads. As a result, the salt begins to corrode not only the body, but also the suspension parts. This also applies to the wheel bearing. Also, the element does not like exposure to water. This does not mean that the car should not be washed frequently or that it should not be driven in the rain. It is enough to periodically check the tightness of the protective cap and the presence of lubricant under it.
How to check the serviceability of a wheel bearing? There are several ways to do this. We will tell you about each of them in more detail.
Typical symptoms
This is the most interesting thing. In order to determine the failure of a node, there are several ways. At the very initial stage, the behavior of the bearing can be ignored; at this stage, a slight hum, buzzing, and small tapping noises can be heard. Also, one of the first symptoms is a hum when turning (at the very initial stages of a breakdown). This sound is often confused with tire noise. However, over time the sound can be compared to a jet plane. An indirect sign can be considered the complete disappearance of any noise at the moment of turning, but when the car moves in a straight line, everything returns.
Replacing rear wheel bearings
Good morning everybody. I decided to describe how I changed the rear wheel bearings. It all started, as I can say, I intuitively decided to check whether the rear wheels of my Kalinka were dangling or not. He came up and began to swing first one rear wheel, and then the other of the stationary car. And I didn't like how the car seemed to wobble from side to side. Then he lifted one wheel, then the other, and shook it. The result is kickback on both wheels. Upon inspection, the bearings did not rustle or hum. I discovered this by accident. The odometer reading at the time of inspection was 66,843 km. I decided to change. I went to the car market and bought SAMARA SPZ-4 bearings for 425 rubles. Many people bet on Vologda; I bet on Samara, I want to see how many kilometers to travel.
We are starting to replace the bearings. I want to say right away that during the replacement, neither exhaust devices nor vices were used. Everything was done the old fashioned way on “knees” and birch forests. 1). I took off the steering wheel;
The factory bearings have not been changed, the factory paint indicates this. The nuts were not touched and this is a fact.
2). Unscrew the hub nut;
I had to build a lever.
3). He removed the sanitary pads; 4). I removed the hub by hand (I couldn’t even believe it), the seal was small.
There is factory marking paint.
I removed the hub assembly.
5). Removed the safety ring. I removed the old bearing with 32 heads.
I disassembled the bearing for analysis. Marking Vologda.
I disassembled the bearing with grease, there are no liners, no damage, no dirt. This means that he simply recycled his resource.
No shells, cracks, etc.
6). I washed the hub and pressed in a new bearing, having previously lubricated the seats with a thin layer of lubricant. Just in case, I checked the grease in the new bearing.
The new SAMARA bearing contains grease.
Pressing in a new bearing using a birch wedge and a race from the old bearing.
First, he pressed her against the chicken with light movements.
this is how I pressed it further using the old bearing holder.
7). I installed the safety ring with my own hands without tools, which means it’s possible. Eight). I installed the hub in place with the 32 head and then tightened it down with the hub nut. The estate was small. Maybe because I lubricated the seats.
Gently tap on the inner race of the bearing.
Everything is fine. The nut was tightened instantly, just like at the factory. From old tags.
Nine). We put everything back together in reverse order and check if there is any play. In my case it is not on both wheels.
Sliding bearing is used.
P.S. Now he finds, as they say, “three differences.” I went to the garage today to put things in order after fixing my car. I cleaned the bearings of grease and found the following differences, see below.
What does a bearing consist of?
The marking is embossed in a different font. Not visible in the photo.
The separators are made of plastic, of different colors and shapes, and are hardly noticeable.
One has a collar, the other doesn't. There are also several collars inside.
If you experience excessive noise or rumble from the rear wheel while driving (especially when turning - rough), the wheel bearing on the rear wheel may have failed. If similar symptoms are observed at the front, the front wheel bearing should be checked. It is quite simple to diagnose this problem; it is enough to make successive unscrewing movements on the suspended wheel, and if there is significant play, then it is time to change the bearing.
Replacing the rear wheel bearing on a Lada Kalina in this video:
Payment via Yandex Cashier
After selecting payment via Yandex, the Yandex Cashier payment system will launch, where you need to select a convenient payment method (bank card, QIWI, Yandex Money account, etc.)
After specifying payment details and confirming payment, payment for the goods will occur.
If you have a bank card in a currency other than the ruble, then the money will be debited from the card at the rate of the Central Bank of Russia at the time of the purchase.
The hub bearing is humming: how long can you drive?
Newbie motorists often ask this question. It must be said that the distance depends on the quality of the roads. In some places, the road surface can easily ruin even the chassis of an SUV. Therefore, once again there is no need to take risks, human life is one.
Now you know how to determine which wheel bearing is humming. These tips should help novice motorists who have just gotten behind the wheel of a vehicle.
The hub is the main connecting link between the car body and the road through the wheel, and it is the one that experiences the greatest loads, both in motion and at rest.
At the same time, not only the driving and speed characteristics of the car, but also safety depend on the serviceability of the hub.
If a failed hub is not repaired or replaced in time, then it is likely that you will get into a serious accident - either due to the wheel jamming at speed, or due to the disc coming off the shaft.
In addition, a faulty hub gets very hot, and thus has a negative impact on the normal operation of the wheel braking system.
Method number 3
In this case, we will need to apply emergency driving skills. The advantage of this method is that we do not need to look for a long stretch of road and accelerate the car to high speeds. But the evenness of the coating is also important. So how do you check a wheel bearing? We accelerate the car to 20-30 kilometers per hour and begin to sharply turn the steering wheel left and right. This way we will check how much the car body rolls. The skid should increase if the wheel bearing is faulty. All this will be accompanied by a characteristic hum. On turns it intensifies significantly.
Also, in this way we can determine which side the element is faulty on. When turning right, the load goes to the left bearing (since the body moves in the opposite direction). But you can find out whether it is a rear element or a front one only on a lift.
Replacing rear wheel bearings
Good day everyone. I decided to describe how I changed the rear wheel bearings. It all started when, as I can say, I intuitively decided to check whether the rear wheels on my Kalinka were “dangling” or not. He came up and started pumping first one rear wheel and then the other on a standing car. And I didn’t like how the car seemed to “dangle” from side to side. Then he jacked up first one wheel, then the other and shook it. The result is play on both wheels. The bearings did not make noise or hum at the time of inspection. I discovered it purely by accident. The mileage at the time of inspection was 66,843 km. I decided to change. I went to the car market and bought “SAMARA SPZ-4” bearings for 425 rubles. every. Many people put “Vologda”, I put Samara, I want to see how many kilometers they go.
Bearing SAMARA SPZ-4.
Let's start replacing the bearings. I want to say right away that no pullers or vices were used during the replacement. Everything was done the old fashioned way on “knees” and birch wood. 1). I took off the wheel;
The bearings have not been changed from the factory, this is indicated by the factory paint. The nuts were not touched and that's a fact.
2). Unscrewed the hub nut;
I had to increase the leverage.
3). Removed the pads; 4). I removed the hub by hand (I didn’t believe it myself), the tension was small.
There is factory marking paint.
I removed the hub assembly.
5). Removed the retaining ring. I knocked out the old bearing with a 32 head.
I disassembled the bearing for analysis. According to the Vologda labeling.
I disassembled the bearing and found it with lubricant without cavities, damage or dirt. It means it has simply exhausted its resource.
No shells, cracks, etc.
6). I washed the hub and pressed in a new bearing, having previously lubricated the seats with a thin layer of grease. Just in case, I checked whether there was grease in the new bearing.
There is grease in the new SAMARA bearing.
I pressed in the new bearing using a birch block and a race of the old bearing.
At first he pressed it against the chick like that, with gentle blows.
Replacing the front hub of Lada Granta
- We place the car within the perimeter of the repair area and provide priority safety measures.
- Let's jack up the right (left) side.
- Unscrew the bolts and remove the wheel.
- Let's unlock the hub.
- On the back side, unscrew the two bolts that guide the brake caliper.
Location of two bolts
- We remove the caliper, hang it on a wire (we fix it on the steering tip).
- Unscrew the hub nut and remove the brake disc.
Removing the hub nut
- We unscrew the two bolts - the rack clamps. If necessary, we use a liquid to remove deposits like WD-40.
- Disconnect the strut with the steering knuckle and unscrew the ball joint fasteners.
- We remove the CV joint.
Next, install the new hub assembly and assemble the structure in the reverse order.
Causes and consequences
If this is not done on time, this can lead to a minimum of sudden blocking and uneven wear of the wheel, and accordingly further damage, and at most it can lead to a traffic accident.
In this article we will tell you in detail how to replace the bearing on the rear hub of a Lada Kalina car with your own hands in a garage.
Note!
Lada Kalina cars are equipped with a double-row ball bearing, which during operation does not require additional lubrication or adjustment; just to say, this device does not require any maintenance during the entire period of its operation.
Bearing 256707 - front hub VAZ-1118 Kalina
Its main area of application is the front wheel bearing of VAZ 1118, 2190 cars and other models of this series produced by the Tolyatti Automobile Plant. It has the following design characteristics - ball, angular contact, double-row, closed type (seals on both sides and with plastic lubrication). Since it has two rows of rolling elements, it is capable of fixing the shaft under axial load in both directions. There is a roller analogue of this bearing - 537807, it has an increased load capacity, but a lower rotation speed; its use may be more advisable on our roads, which are not characterized by smooth surfaces. The smaller bearing 256706 is installed in the rear hubs of the predecessor models of Granta and Kalina. Full product marking - 6-256707EK12 or AEKL20 (there may be others, primarily Vologda ones, but, by and large, there is not much difference)
Read more: Transport tax and luxury tax calculator
This type is produced at several factories in the country, which differ in the quality and prices of their products:
- Saratov Bearing Plant (3 GPZ, marking SPZ) and Volzhsky Bearing Plant (15 GPZ, VPZ) - according to experts, they produce the best front hub bearings in our country, and they are not very expensive. What they have in common is that they are both members of the European Bearing Corporation. Its products are best purchased from official representatives, which are located in many regions. This guarantees quality and low prices (just over 400 rubles). The 15th plant relatively recently began producing automotive bearings under the Volzhsky Standard brand, which have improved characteristics and have more attractive and convenient packaging, but also cost a little more.
- 23 GPZ (or VBF, Vologda) - it just so happens that among car enthusiasts its bearings are considered the best and they are often asked only for them, discarding all other options, which is not entirely true. In terms of quality, they are not much different from EPK bearings, but are often more expensive.
- In addition, there are Slovak LSA bearings on sale (not bad, but expensive) and various Chinese options, which are best avoided due to low reliability (it’s unlikely to save on the quality of hub bearings) - Craft, APP.
Technical parameters and dimensions of the front hub bearing 256707:
Inner diameter (d): 35mm;
Outer Diameter (D): 68mm;
Dynamic load capacity: 40 kN;
Static load capacity: 32 kN;
Rated speed: 3500 rpm.
In order for the entire work process to go as quickly as possible and without unnecessary hiccups, we will need the following tools:
How to change the rear wheel bearing on Kalina
Before you begin the replacement procedure, you need to give the car a working position - hang the rear wheels, while securely fixing the front ones. It is enough to post only the side on which repair work is planned. Next, we sequentially follow the algorithm outlined below:
- We unscrew the wheel bolts and remove the wheel from the “damaged” side;
- Remove the nut in the center of the hub and the cap;
- Lightly tap the guide bolts with a hammer and then remove them;
- We dismantle the brake drum: before the procedure, it is recommended to treat the fasteners of the part with VD-40 (for these purposes, car shops have special drum pullers);
- After dismantling the drum, access to the central nut opens. We remove it;
- Push back the hub axle to gain access to the bearing races. Before proceeding with dismantling, you need to carefully inspect the unit. If there are signs of bearing rotation on the axle, then the hub is not suitable for routine repairs - replacement is required;
- Use pliers to pull off the hub retaining ring; after this, the edge of the ring is thoroughly coated with “Vedashka” or liquid to remove corrosion spots;
- Now you can remove the hub completely and remove the race with bearings. The part can be removed using a special press or puller. But most “experienced” people simply knock out the cage with a sledgehammer, having first secured the hub in a vice;
- The bearing seat is cleaned of dirt, rust, etc. using sandpaper. Then the landing niche must be treated with lubricant: used motor oil is quite suitable.
- Now you need to start “driving” the new bearing into the hub. First, place the hub on a flat, hard surface;
- The new bearing is generously lubricated with a special lubricant (the specification of the lubricating fluid can be clarified in the vehicle’s operating manual. Using a lubricant that does not meet the operating requirements accelerates the wear of this chassis element);
- Now you can “drive” the part into the hub. This is done using a light (up to 1.5 kg) hammer: the cage is easily tapped around the circumference, the bearing is gradually immersed inside the hub. Caution should be exercised as the double row bearings may crack if applied with excessive force. In this case, before installation, it is recommended to apply a series of gentle blows to the part in order to further compress the bearing;
- The bearing must be tapped so that there are no distortions while it is being inserted into the working hole. You can use the clip of the old component to guide the movement of the working part;
- When the bearing reaches its extreme position, put the retaining ring in place. But before this, you must check that the bearing has reached the “bottom” of the hub;
- Replacement of the Kalina rear wheel bearing is completed.
Upon completion of the work, you need to hang the car and rotate the wheel. If there is no noise or crunching, the hub is “healthy”.
Sources
[collapse]