If you are the proud owner of a Gazelle car and have noticed that the free play (number of clicks) of the parking brake lever has increased enormously, this information will be useful. There are malfunctions in the car that do not affect the speed, but have no less important functions.
In general, in Soviet-Russian trucks, a handbrake with a mechanical drive is something abstract and is never remembered until the time comes to use it and the question arises of how to separate the brake pads on a Gazelle.
Signs of faulty brake pads
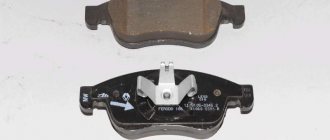
You can always check the condition of the brake pad linings. For this purpose, there are special brake windows on the supporting disk. From opposite sides. When opening the plug, the thickness of the lining is clearly visible
Also a clear sign that the linings are worn out is the absence of a handbrake. The adjusting screws on the handbrake cables are unscrewed all the way. And when you press the handbrake lever. There is no hand brake. This only means one thing: the linings on the pads are completely worn out. Pads need replacing
Attention - gases!
THERE HAVE BEEN CHANGES IN THE PROGRAM...
In Nizhny they make, let's say, serious cars - if such an animal picks up speed, then the rest would be better off not pretending to be matadors. Just look at a detachment of minibuses - Hitchcock is resting... Therefore, providing these cars with excellent brakes is a task, if you like, of national importance and utmost importance.
Adherents of the brand, of course, do not object, but they also put forward their own demands - they say, give us not only efficiency, but also a resource! And since the pads alone do not wear out, it is necessary to evaluate the condition of the duet - the pad-disc friction pair...
Well, let's change the usual testing program to please the operators. A dozen brand new sets of front brake pads are waiting their turn at the NAMI stand.
THE BLOCK IS...
They say that in the thirties, some closed institute was given the task of creating a system for instantly stopping trains.
Removing the brake drum
Before removing the wheels to install the brake drum. You need to remove the wheel nuts while the wheels are on the ground. Then the side needs to be jacked up along the bridge and an additional stop must be installed. Even if it is not a special factory-made metal stop. It is enough to lay a set of boards and bars. Lower the jack a little. Press the stop. To prevent the car from rolling. The vehicle must be hung stable and secure. First of all, health and life depend on this. Perhaps this is the most important procedure when carrying out repair work. Everything else is technical stuff. Once the side to be repaired is securely hung
The drum is in addition to being tightened by the wheel nuts. It has an additional three screws screwed to the wheel hub. This is not difficult to do with an impact screwdriver. Sometimes they come off easily. It would seem that you can do without them. The screws come to the rescue when the wheel comes loose and falls off the studs. The drum remains in place. All elements of the brake system and the hub are preserved. Located under the drum. Unfortunately, loose wheels are not uncommon. It is enough to leave the car service center and not tighten the wheel nuts yourself.
During the service they use a wrench. Its power is enough to tear off a wheel stud. Therefore, mechanics try not to tighten the wheels. To prevent this from happening. Then they either get lazy or forget to tighten the wheel nuts. As a result, an accident occurs.
After the screws are unscrewed, you need to remove the drum. This can be done using a puller. But it is unlikely to be at hand. Buying it on purpose is expensive. Therefore, the drum must be knocked down. It is better to strike from the inside along the edge of the drum and use an extension. If the drum does not give in, you can loosen the wheel studs a little. So that they go inside the hub. This will allow you to destroy the carbon deposits and rust that form between the studs and the drum. This will make removing the drum from the hub much easier. It sticks to both the hub along the plane and the seat. If you tap the drum from opposite sides along the edge. He'll do.
How to glue carbon film onto car parts with your own hands
- First stage. At the first stage, the initial removal of a layer 0.5 mm thick is carried out. This makes it clear how much the drum material is worn, what its current condition is, and whether there are more serious defects;
- Second phase. Next comes the procedure of smoothing, leveling and subsequent removal of all existing irregularities. About 0.25 mm of the metal layer is removed;
- Third stage. He's the finisher. This involves finishing sanding and removing all remaining small nicks and chips.
Removing the brake pads
The pads are held in place using tension springs at the top and bottom. It is more convenient to remove these springs using a sharpened awl rod. It’s even easier to tie a wire to the edge of the spring and pull it through some kind of stop.
The pads are also held in place by springs that press the pads to the support disc. To remove them, just rest your finger on the cap of the rod on which the spring sits. Press the cup so that the spring compresses. And turn the cup 90 degrees, but the rod should not turn. The force of your hand is enough to hold it in place. In the rotated position, the cup will jump off the rod along with the spring. After which you can remove the rod itself. In the same way, the spring is installed in its place after replacing the pads with new ones.
After removing the springs, all that remains is to disconnect the handbrake cable from the shoe tensioning mechanism.
Let's get started
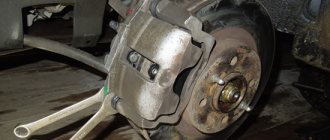
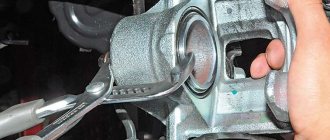
To change the front pads on a GAZelle, you need to jack up its front part. We attach a hydraulic jack to the frame (because it will not rest against the “beam”, since it is too low). We also remove the wheel bolts. With the front end hanging up, we finally unscrew them and remove the wheel. For greater convenience, twist the steering wheel to its extreme position (so that the brake caliper looks out from under the wheel arch). Then, using a 17mm wrench, remove the bolt that secures the bracket. We rotate the bracket body around the second guide pin. This will give us access to the worn linings. They can be safely removed by hand, without any tools. Then we clean the ledges of the base and the guide grooves on which the lining will rest from dirt.
That's it, the procedure for replacing the front pads of the GAZelle has been successfully completed. Now you can assemble the wheel and move to the adjacent side. The procedure is performed in a similar way. If you have drained some of the liquid, do not forget to add it to the reservoir. For GAZelle, it is recommended to use RosDot liquid of the fourth class.
Installing new brake pads
Before installing new pads you must:
1. Carefully inspect the brake slave cylinder. For the possibility of brake fluid leakage. It is advisable to remove the protective cover and make sure there are no leaks. If there is liquid under the cover. The cylinder assembly must be replaced with a new one. Replacing the belt kit may help for a while. The cylinder will still begin to lose brake fluid after a short period of time. And all the work of removing the brake fluid installation will have to be repeated again. Because if liquid begins to leak through the cuff, it is not only his fault. Most likely there is a wear on the inner surface of the cylinder. He got the wrong shape. Even a new cuff or sealing ring will not be able to contain the pressure of the brake fluid. Due to the resulting irregularities. Therefore, it is better to replace the cylinder.
2. It is necessary to unscrew the handbrake and pad spreading mechanisms from the old pads
3. Carefully inspect the brake drum for wear on it. Of course, the brake drum can be machined along the inner surface. But as a rule, even if the size of the drum groove is acceptable. After even a slight groove. The brakes will start working from the second stroke. It will no longer be possible to upgrade them.
Definitely. If there is a deep hole, the drum must be replaced with a new one. Otherwise, there will be no brakes from the first pump of the pedal.
4. The handbrake cables should be inspected. They should be able to walk freely inside their shirt. If the cable jams, soak it in diesel fuel or oil, it may work, but it will jam again. Because oil and diesel fuel will then collect even more dust and dirt. Not working cables also need to be replaced with new ones. All elements of the brake system must work smoothly without jamming.
When installing the brake pads, it is necessary to secure the parking brake cable to the brake lever.
mechanism. Install the pads in their places. Install tension and pressure springs. Loosen the eccentric nut. In order to separate the pads after installing the drum and fix them in this position.
Separating the pads
The drum is installed. It is advisable to put it in the same place as it stood. To do this, before removing it, it was necessary to mark with a marker its position relative to the hub studs. Because the drum is machined along with the hub. To avoid drum beating.
The final replacement of the rear brake pads on a Gazelle Next car is completed when they are moved to the permissible extreme position. Wheels are installed for this purpose. The bridge is in the raised position. So that the wheel can spin. The eccentric must be turned through the viewing window behind the protruding shaft before the wheel is locked with the pads set apart. Then the eccentric is released until the wheel begins to turn freely. The eccentric shaft is held in this position and secured with a nut. It is not very convenient to tighten the nut. It is enough to pull it in this position with a little effort. Then tighten it further without holding the eccentric shaft.
After the pads are spread and fixed on both wheels, it is necessary to tighten the handbrake cable. Using adjusting nuts. The cable is also tensioned until the wheels stop and is released until the wheel rotates freely. The handbrake lever in the cabin must be released all the way down. There is an opinion that a correctly tensioned handbrake before it locks when the lever is raised should be three clicks of the locking mechanism. This was true on older trucks. When rods were used to transmit force from the lever to the handbrake pads. The handbrake brake drum was located at the gearbox. With the use of cables to transmit force, three clicks are not possible. Because the cable is elastic and stretches when tensioned. The main condition is that the lever does not reach the very end when tensioned. And the car confidently stood on an inclined plane when using the handbrake.
If the brake cylinders have been changed. The brake system must be bled to remove air. The system is pumped, just like on all cars, from the farthest point from the master brake cylinder. More details about pumping and the difficulties that arise are described in this article.
Replacing rear brake pads on a Gazelle Next car is not much different from installing pads on other cars. The design of the distributing mechanism is an exception. The design is the same as on early Gazelle car models. On more modern models, disc brakes are installed on the rear axle.
Source
Diagnostics and breakdowns in the caliper
If the functioning of the entire assembly in the brake system is impaired, then uneven wear of the pads is observed. To check the operation of the system, it will be enough to simply pull them out and look. If the wear is almost the same (the error can be up to 10%), then the operation of the unit is correct. If the rear is thicker than the front, then the entire caliper is not functioning properly.
Appearance of a worn caliper
You need to look at the disk. Its wear should also be uniform. If this is not the case, and the deviations are pronounced (for example, on the outside than on the inside), then it is necessary to urgently replace the caliper or repair this structure. You can't wait for the caliper to jam. Uneven wear indicates that the pistons are putting too much pressure on one pad and the other is simply not working.
We advise you to watch: how to repair a caliper.
There are several main reasons that can cause such violations. This applies to guides and pistons. They either coke or sour. This may happen for the following reasons:
- Poor service, non-compliance with rules. Many garage craftsmen pour graphite lubricant or lithol into the guides. This causes the anthers of these parts to swell and later begin to sour.
- Anther rupture. Because of this, water may enter the guides. This subsequently leads to corrosion and souring of the part. If the boot is broken, the piston may also suffer, which also begins to malfunction due to moisture.
- Using low-quality brake fluid. It is distinguished by its hygroscopicity. Because of this, after some time, water begins to collect in it, and in large quantities. If you do not change the brake fluid, it will simply corrode the entire piston inside, which also provokes the souring process.
How to properly space the rear pads on a gazelle
If you are the proud owner of a Gazelle car and have noticed that the free play (number of clicks) of the parking brake lever has increased enormously, this information will be useful. There are malfunctions in the car that do not affect the speed, but have no less important functions.
In general, in Soviet-Russian trucks, a handbrake with a mechanical drive is something abstract and is never remembered until the time comes to use it and the question arises of how to separate the brake pads on a Gazelle.
The final stage
Repeat all the above steps with the other wheel. Do not neglect the plugs: if they are not installed, then, thanks to dirt, sand and water, the next repair will not be as simple as this one.
All that remains is to tighten the handbrake drive. The optimal travel of the parking brake lever is 8-10, but no more than 15 clicks until it is firmly tightened. That's all, actually.
The parking brake should hold the vehicle on a 25% grade when the parking brake lever is moved 15 to 20 teeth (clicks) of the ratchet.
1. To check the correct adjustment of the parking brake, find an overpass or loading ramp with a height of H = 1.25 m and an entrance length of L = 5 m near the parking area of your car. This ratio corresponds to a slope of 25%
2. If there is no such ramp, for a simplified check of the parking brake, place the car on a level surface.
Set the gear shift lever to neutral and fully raise the parking brake lever.
Get out of the car and try to move it.
If you succeed, you need to urgently adjust the parking brake drive
Adjustment
installing the leveler in a position “perpendicular” to the axis of the car. To do this, it is necessary to loosen the fastening nuts; they move along the thread until the desired position of the equalizer is reached. The position is fixed using locknuts.
The handbrake is set to the “one click” position. By rotating the rear end nut (sheath of the central cable), the cable moves to the forward position until the free wheel movement is slowed down. Having tightened – with moderate force – the fixing nuts, turn off the parking brake.
Adjusting the parking brake drive GAZ 2705
If, when braking the car with the parking brake, lever 1 (see), when a force of 600 N (60 kgf) or more is applied to it, is fixed on the outermost teeth of the sector, then the drive should be adjusted in the following order:
— set the drive lever to the lowest position;
— remove plugs 20 (see) in the brake mechanisms of the rear wheels. Using a 17 mm star wrench, loosen the nut securing the eccentric of the adjusting mechanism of one of the brakes by 1.0-1.5 turns;
- eliminate the gap between the expanding link 11 and the lever 12, for which, using a special tubular wrench measuring 9 mm, turn the eccentric bolt 25 in the direction indicated by the arrow until rotational resistance is felt, which is associated with the expansion of the pads (the movement of the pads can begin also determined through inspection windows in the panel);
— tighten the eccentric fastening nut to a torque of 24–35 N·m (2.4–3.5 kgf·m) in the position where the pads begin to decompress. In this case, using a 9 mm wrench, you should hold the eccentric bolt 25 from turning;
— adjust in a similar way the position of the expansion link 11 in the other brake mechanism;
— install plugs in the brake mechanisms;
— check for gaps between the tips of cables 5 (see) and 8 and the depressions on the equalizer 9. The gaps are eliminated by tightening the nuts securing the cables on the bracket 4. The adjustment should be made in such a way that after adjustment the equalizer is at a distance B from the front wall of the bracket and perpendicular longitudinal axis of the car.
With a correctly adjusted parking brake drive, the drive lever under a force of 600 N (60 kgf) should not move more than 15 teeth of the locking mechanism.
↓ Comments ↓
2. Vehicle registration details
2.0 Vehicle identification data 2.1 Vehicle identification number (VIN)
3. Technical data and characteristics of cars
3.0 Technical data and characteristics of vehicles
4. Controls and instruments
4.0 Controls and instruments
6.0 Transmission 6.1. Clutch 6.2. Gearbox 6.3. Cardan transmission 6.4. Rear axle
7.0 Chassis 7.1. Suspension 7.2. Wheels and tires 7.3. Rear wheel hubs 7.4. Front wheel hubs 7.5. Front suspension beam and steering rods
8. Steering
8.0 Steering 8.1 Possible faults in the steering and how to eliminate them 8.2 Maintenance of the steering 8.3. Steering adjustment 8.4. Steering repair
9. Brake system
9.0 Brake system 9.1 Possible malfunctions of brake systems and methods for eliminating them 9.2 Service brake system 9.3 Spare brake system 9.4. Vacuum booster 9.5 Main brake cylinder 9.6 Pressure regulator 9.7 Front wheel brakes 9.8 Rear wheel brakes 9.9 Parking brake system 9.10. Maintenance and repair of brake systems
10.0 Electrical equipment 10.1. Electrical equipment of cars with engines ZMZ-4025, ZMZ-4026 10.2 Electrical equipment of cars with engines 4215С, 42150 10.3. Electrical equipment of cars with engines ZMZ-4061, ZMZ-4063
11. Car body
11.0 Car body 11.1 Features of body maintenance 11.2 Body repair 11.3. Replacing the body 11.4. Doors 11.5. Body heating and ventilation
12. Maintenance
12.0 Maintenance 12.1 Daily maintenance (EO) 12.2 Frequency of TO-1 and TO-2 depending on operating conditions 12.3 Periodic maintenance* (TO-1, TO-2, CO) 12.4 Vehicle lubrication
13.0 Appendix 13.1 Appendix 1. Filling volumes 13.2 Appendix 2. Lamps used on the car 13.3 Appendix 3. Rolling bearings used on the car 13.4 Appendix 4. Cuffs and seals used on the car 13.5 Appendix 5. Tightening torques 13.6 Appendix 6. Operating materials 13.7 Appendix 7. List of products containing precious metals 13.8 Scheme 1. 13.9 Scheme 2.
Rear wheel brakes
Rear wheel brake:
- working cylinder fastening bolt;
- working cylinder;
- bleeding valve;
- brake shield;
- block;
- protective case;
- piston;
- thrust ring;
- springs;
- springs;
- expansion link;
- parking brake actuator lever;
- pad mounting plate;
- springs;
- cotter pin;
- screw;
- washers;
- washers;
- bolt;
- plugs;
- eccentric bushings;
- plugs;
- eccentric bushings;
- eccentric;
- eccentric axis;
- screw;
- cups;
- springs;
- kernel.
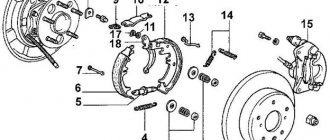
The brake mechanisms of the rear wheels are shoe, drum type.
Cylinder 2 (Fig. 7.8), pad support with plate 13, pads 5 are fixed on shield 4.
The upper ends of the pads enter the slots of the pistons, and the lower ends touch the support plate, on which they are held by tension springs 9 and 14. Lateral fixation of each pad on the shield is provided at three fastening points, to which spring 28 presses it.
The thrust split metal ring 8 is installed in the brake cylinder with tension. The ring cut is located in the upper part of the cylinder near the bleeder hole. A piston 7 is inserted into the central hole of the thrust ring so that after it is rotated 90°, the slot on the piston rod is parallel to the plane of attachment of the cylinder to the shield. The piston rests against the ring and can move freely in it towards the pads within 1.7-1.9 mm.
As the brake linings and drum wear out, the piston moves in the cylinder during braking, dragging the thrust ring 8 with it. After braking, under the action of the tension springs of the pads, the piston will move relative to the ring by the distance indicated above, which will ensure a constant gap between the pads and the drum.
Brake drums are cast, made of gray cast iron.
The rear brake mechanism includes parts of the parking brake system: drive lever 12, expansion link 11 and adjustment parts 21, 23, 24, 25.
How to separate the brake pads on a gazelle, tightening the handbrake
How to properly tighten the handbrake on a gazelle
by placing the leveler in a “perpendicular” position to the vehicle axis. To do this, loosen the fastening nuts; they move along the threads until the desired equalizer position is reached. The position is fixed using locknuts.
Read:
The handbrake is set to the one-click position. By rotating the rear nut (cable sheath), the rope is moved to the forward position. until the freewheel brakes are applied. Tighten. with moderate strength. nuts, release the parking brake.
An indicator of efficiency will be the free rotation of the rear wheels.
In addition, the “activation” of the handbrake is characterized by a maximum movement of the lever of 15 clicks. In this case, you can safely say: the setup was done correctly, the desired result is achieved.
The above gives some idea of what steps you need to take to set it up correctly.
The description provided is not exhaustive. There are other ways to achieve a similar result, but experts strongly recommend using the above option
As already mentioned, adjusting the hand brake on the Gazelle. A relatively simple process, but it must be done with great care, avoiding the slightest inaccuracies, because success ultimately determines the safety of the driver and passengers. And security, as you know, does not tolerate the slightest negligence.
Working hours: Mon. - Fri. from 9:00 to 20:00 Sat. 9:00-18:00 Sun. 9:00-17:00 E-mail Address: Moscow, MKAD 23 km, Vlad.3, building 1 (Razvilka complex)
Travel safety largely depends on how well all the mechanisms and systems of the Gazelle work. Of course, the highest quality and professional repairs are carried out at service stations. Moreover, it is important that original spare parts produced at the factory are used. A wide range of parts and components for the entire GAZ model range is sold by the Alfa-Auto online store.
When does adjustment become necessary?
Indications for adjustment are: lever travel of 20 teeth or more (determined by the corresponding number of clicks); repair or replacement of elements related to the brake mechanism.
The presence of any of these circumstances indicates the need for adjustment. The goal is to achieve movement of the lever by no more than 15 clicks - this value is optimal for all modifications of the Gazelle.
Indications for adjustment are: lever travel of 20 teeth or more (determined by the corresponding number of clicks); repair or replacement of elements related to the brake mechanism.
The presence of any of these circumstances indicates the need for adjustment. The goal is to move the lever no more than 15 clicks
– this value is optimal for all modifications of the Gazelle.
Handbrake parts for GAZ (GAZelle Business, GAZelle Next, Volga, GAZon, Sobol)
We are the official representative of the GAZ plant. Therefore, we can guarantee the lowest price and the highest quality of parts for the parking brake and other car parts.
Product Warranty:
provided Calculation:
cash and non-cash
Delivery:
carried out in Moscow and Russia
Pickup:
possible in our store or from a warehouse
| Rice. 8.7. Parking brake system: 1 — lever; 2 — front cable; 3 - nut; 4 — bracket; 5 and 8 — rear cables; 6 — expansion link; 7 — drive lever; 9 - equalizer | Rice. 8.6. Rear wheel brake mechanism: 1 — wheel cylinder mounting bolt; 2 — wheel cylinder; 3 — bleeding valve; 4 — brake shield; 5 — block; 6 — protective cover; 7 - piston; 8 - thrust ring; 9, 10, 14 and 28 - springs; 11 — expansion link; 12 — driving lever of the parking brake; 13 — pad fastening plate; 15 — cotter pin; 16 - nut; 17 and 18 — washers; 19 - bolt; 20 and 22 - plugs; 21 and 23 — eccentric bushings; 24 - eccentric; 25 — eccentric axis; 26 - nut; 27 - cups; 29 — rod; 30 - parking brake cable | ||||||
| Name | Remainder | Availability | Order code | Manufacturer | Price, rub.) | Price, rub | Buy |
| Hand brake drum GAZ-53 51-3507052-G251-3507052-G2 Hand brake drum GAZ-53 | pa-0 ha-0 ar-11 nb-3 K15-0 | Warehouse 14 pcs. | 119465 | GAS | 1424 | 1424 rub. | |
| Plug for rear brake shield Gazelle, Gazelle NEXT, Sable 3302-3508178-103302-3508178-10 Plug for rear brake shield Gazelle, Gazelle NEXT, Sable | pa-0 ha-0 ar-0 nb-0 K15-13 | Magazine 13 pcs. | 102645 | AUTO COMPONENT | 15 | 15 rub. | |
| Plug for rear brake shield Gazelle, Gazelle NEXT. Sable 52-810116452-8101164 Plug for rear brake shield Gazelle, Gazelle NEXT. Sable | pa-0 ha-0 ar-21 nb-560 K15-11 | Magazine 11 pcs. Warehouse 581 pcs. | 106081 | AUTO COMPONENT | 10 | 10 rub. | |
| Repair kit for parking brake drive GAZ-3110, 31105 3110-35089003110-3508900 Repair kit for parking brake drive GAZ-3110, 31105 | pa-0 ha-0 ar-0 nb-0 K15-0 | To order | 106078 | GAS | 441 | 441 rub. | |
| Repair kit for parking brake drive Gazelle, Gazelle NEXT, Sable 3302-35089003302-3508900 Repair kit for parking brake drive Gazelle, Gazelle NEXT, Sable | pa-0 ha-0 ar-2 nb-0 K15-1 | Magazine 1 pc. Warehouse 2 pcs. | 105717 | GAS | 1300 | 1300 rub. | |
| Hand brake lever GAZ-3110, 31105 3110-35080103110-3508010 Hand brake lever GAZ-3110, 31105 | pa-0 ha-0 ar-21 nb-3 K15-0 | Warehouse 24 pcs. | 21041 | GAS | 1756 | 1756 rub. | |
| Hand brake lever GAZ-3307, 3309 33078-350801533078-3508015 Hand brake lever GAZ-3307, 3309 | pa-0 ha-0 ar-2 nb-42 K15-0 | Warehouse 44 pcs. | 138935 | GAS | 3615 | 3615 rub. | |
| Hand brake lever GAZ-3308, 33081, 33086 4301-35080154301-3508015 Hand brake lever GAZ-3308, 33081, 33086 | pa-0 ha-0 ar-3 nb-0 K15-0 | Warehouse 3 pcs. | 138936 | GAS | 4024 | 4024 rub. | |
| Hand brake lever GAZ-66, 3308, 33081 with fork 66-11-350710066-11-3507100 Hand brake lever GAZ-66, 3308, 33081 with fork | pa-0 ha-0 ar-2 nb-9 K15-0 | Warehouse 11 pcs. | 138937 | GAS | 2212 | 2212 rub. | |
| Hand brake lever Gazelle 3302-3508015-013302-3508015-01 Hand brake lever Gazelle | pa-0 ha-0 ar-6 nb-30 K15-2 | Magazine 2 pcs. Warehouse 36 pcs. | 22124 | GAS | 3820 | 3820 rub. | |
| Hand brake lever Gazelle NEXT A21R23-3508015A21R23-3508015 Hand brake lever Gazelle NEXT | pa-0 ha-0 ar-0 nb-4 K15-1 | Magazine 1 pc. Warehouse 4 pcs. | 130542 | GAS | 4450 | 4450 rub. | |
| Hand brake lever Sobol 2217-35080152217-3508015 Hand brake lever Sobol | pa-0 ha-0 ar-4 nb-1 K15-1 | Magazine 1 pc. Warehouse 5 pcs. | 24071 | GAS | 2920 | 2920 rub. | |
| Gazelle NEXT parking brake cable bracket A21R23-1868200-01A21R23-1868200-01 Gazelle NEXT parking brake cable bracket | pa-0 ha-0 ar-10 nb-0 K15-0 | Warehouse 10 pcs. | 104638 | GAS | 16 | 16 rub. | |
| Manual brake lever pawl Gazelle, GAZ-3307, 3308 4301-35080304301-3508030 Manual brake lever pawl Gazelle, GAZ-3307, 3308 | pa-0 ha-0 ar-13 nb-0 K15-1 | Magazine 1 pc. Warehouse 13 pcs. | 104026 | GAS | 490 | 490 rub. | |
| Manual brake lever pawl Sable 2217-35080302217-3508030 Manual brake lever pawl Sable | pa-0 ha-0 ar-0 nb-17 K15-5 | Magazine 5 pcs. Warehouse 17 pcs. | 106076 | GAS | 340 | 340 rub. | |
| Parking brake GAZ-52, 53, 3307 52-350701052-3507010 Parking brake GAZ-52, 53, 3307 | pa-0 ha-0 ar-0 nb-7 K15-0 | Warehouse 7 pcs. | 106413 | GAS | 2837 | 2837 rub. | |
| Parking brake GAZ-66 66-350701066-3507010 Parking brake GAZ-66 | pa-0 ha-0 ar-2 nb-3 K15-0 | Warehouse 5 pcs. | 124906 | GAS | 3380 | 3380 rub. | |
| Parking brake Gazelle NEXT 4.6t left C41R92.3507011C41R92.3507011 Parking brake Gazelle NEXT 4.6t left | pa-0 ha-0 ar-4 nb-0 K15-1 | Magazine 1 pc. Warehouse 4 pcs. | 109687 | GAS | 3780 | 3780 rub. | |
| Parking brake Gazelle NEXT 4.6t right C41R92.3507010C41R92.3507010 Parking brake Gazelle NEXT 4.6t right | pa-0 ha-0 ar-4 nb-0 K15-1 | Magazine 1 pc. Warehouse 4 pcs. | 101202 | GAS | 3780 | 3780 rub. | |
| Hand brake cable GAZ-3110, 31105 left 3110-35081813110-3508181 Hand brake cable GAZ-3110, 31105 left | pa-0 ha-0 ar-11 nb-0 K15-0 | Warehouse 11 pcs. | 127318 | DAAZ | 433 | 433 rub. | |
| Hand brake cable GAZ-31105 left/right since 2007. 31105-3508180/18131105-3508180/181 Hand brake cable GAZ-31105 left/right since 2007. | pa-0 ha-0 ar-0 nb-1 K15-1 | Magazine 1 pc. Warehouse 1 pc. | 117044 | 720 | 720 rub. | ||
| GAZ-31105 right hand brake cable from 2007. 31105-350818031105-3508180 Right hand brake cable GAZ-31105 from 2007. | pa-0 ha-0 ar-1 nb-0 K15-0 | Warehouse 1 pc. | 115865 | 437 | 437 rub. | ||
| Hand brake cable GAZ-3302 (set of 3 pcs.) 3302-35088003302-3508800 Hand brake cable GAZ-3302 (set of 3 pcs.) | pa-0 ha-0 ar-11 nb-0 K15-0 | Warehouse 11 pcs. | 124925 | GAS | 1519 | 1519 rub. | |
| Hand brake cable GAZ-3307, 3309 (3 pieces) 3307-3508800-013307-3508800-01 Hand brake cable GAZ-3307, 3309 (3 pieces) | pa-0 ha-0 ar-8 nb-0 K15-0 | Warehouse 8 pcs. | 124927 | GAS | 1805 | 1805 rub. | |
| Hand brake cable GAZ-3307, 3309 rear left 3307-3508180-023307-3508180-02 Hand brake cable GAZ-3307, 3309 rear left | pa-0 ha-0 ar-21 nb-0 K15-0 | Warehouse 21 pcs. | 122075 | LETZ | 849 | 849 rub. | |
| Hand brake cable GAZ-3307, 3309 rear left G-part 3307-3508181-023307-3508181-02 Hand brake cable GAZ-3307, 3309 rear left G-part | pa-0 ha-0 ar-0 nb-20 K15-0 | Warehouse 20 pcs. | 111343 | GAS | 453 | 453 rub. | |
| Hand brake cable GAZ-3307, 3309 rear right 3307-3508180-023307-3508180-02 Hand brake cable GAZ-3307, 3309 rear right | pa-0 ha-0 ar-4 nb-0 K15-0 | Warehouse 4 pcs. | 120539 | LETZ | 709 | 709 rub. | |
| Hand brake cable GAZ-3307, 3309 rear right G-part 3307-3508180-023307-3508180-02 Hand brake cable GAZ-3307, 3309 rear right G-part | pa-0 ha-0 ar-0 nb-46 K15-0 | Warehouse 46 pcs. | 111344 | GAS | 453 | 453 rub. | |
| Hand brake cable GAZ-3307, 3309 front 3307-3508068-023307-3508068-02 Hand brake cable GAZ-3307, 3309 front | pa-0 ha-0 ar-17 nb-62 K15-0 | Warehouse 79 pcs. | 127329 | LETZ | 451 | 451 rub. | |
| Hand brake cable GAZ-3307, 3309 front G-part 3307-35080683307-3508068 Hand brake cable GAZ-3307, 3309 front G-part | pa-0 ha-0 ar-0 nb-25 K15-0 | Warehouse 25 pcs. | 111345 | GAS | 476 | 476 rub. |
Parts parking brake GAZ 1 - 49 of 49
How many “clicks” should you pull the brake lever on a Gazelle?
For optimal wheel fixation, for the new GAZ 3302, 13-15 clicks of the handbrake ratchet mechanism are enough so as not to fear for the immobility of the abandoned car. If after some time it becomes noticeable that the handle has to be raised above the level of the driver’s seat, and 20 or more clicks are needed, then the “handbrake” requires urgent adjustment.
Suspension front and rear
1. Replacement of the rear shock absorber 1 piece - replacement 4002. Replacement of the front shock absorber 1 piece - replacement 4503. Replacement of the propeller shaft 3004. Replacement of the crosspiece with the cardan removed - replacement 5005. Replacement of the rear axle assembly - replacement 55006. Replacement of the suspension bearing with the cardan removed 5007. Replacement of the hub bearing (1 side) 7008. Replacement of the axle shaft (one) - replacement 3509. Front springs - replacement 1 side Sable * 10. Replacement of the rear axle gearbox 300011. Replacement of rear springs 150012. Front springs - replacement 150013. Replacement of the upper arm Sable 1 side. — replacement * 14. Replacement of the lower lever Sable 1 side. — replacement * 15. Replacement of the upper one side silent blocks * 16. Replacement of the stabilizer - 1 pc./55017. Replacement of the front hub 70018. Replacement of the steering trapezoid 100019. Replacement of the ball joint 1 — pcs. (Sable) * 20. Replacement of king pins (two) 600021. Replacement of king pins and threaded bushings * 22. Syringe 50023. Replacement of silent blocks lower one side *
How to replace handbrake cables
If adjusting the Gazelle hand brake turned out to be insufficiently effective or did not lead to anything at all, therefore, you will have to change the brake pad drive cables. In addition to the critical stretch of the cable, it should be changed if damage is detected during an external inspection. And also an indicator for replacement is corrosion and jamming of the cable in the protective sheath.
In order to successfully complete the task, prepare two “22” wrenches, a “12” socket and pliers. We, in turn, will tell you how to change the handbrake cable on a Gazelle:
The second cable is dismantled in the same way. As for installing new parts, you can also use these instructions for this, but in reverse order. After completing the replacement, be sure to adjust the parking brake according to the instructions given in the first part of the article.
When you urgently need to adjust the handbrake, the Gazelle is far from the easiest car to repair. It would seem that the problem is trivial, but its consequences can be very serious. Therefore, if there is a need for adjustment, do not delay the decision. This article is just about this - how to adjust the brakes in a garage.
Adjusting the hand brake on a Gazelle is a simple but important task. Naturally, the process must be carried out professionally and clearly. This way you can guarantee your own safety. After all, in the event of an emergency, it is the handbrake that can quickly stop a moving vehicle. Since adjusting the brake consists of several stages, we will describe each of them in detail.
The final stage
Repeat all the above steps with the other wheel. Do not neglect the plugs: if they are not installed, then, thanks to dirt, sand and water, the next repair will not be as simple as this one.
All that remains is to tighten the handbrake drive. The optimal travel of the parking brake lever is 8-10, but no more than 15 clicks until it is firmly tightened. That's all, actually.
The handbrake on Gazelle cars is part of the overall braking system, and at the same time it is an independently functioning mechanism. The parking wheel locking system on this car is reliable, durable and easy to maintain. The simplicity of the design allows, if necessary, to carry out repairs without the help of a specialist. Even if you have never performed work of this kind before, adjusting the handbrake on the Gazelle will not seem difficult to you - you just need to be careful and strictly follow the instructions given below in this article.
How to adjust the handbrake on a Gazelle - in our new article
How can you determine when it’s time to tighten the handbrake on a Gazelle? To do this, simply set its lever to the working position and, if it turns out that even after 20 clicks of the ratchet mechanism, the rear wheels are not blocked with the proper force, the handbrake cable should be tightened. You will learn how to do this further.
Handbrake on Gazelle
Evidence that the job was done correctly is that the rear wheelset rotates freely, and the handbrake is activated by moving the lever fifteen clicks.
This option for carrying out repair work is not the only one. In each specific case, specialists will determine the degree of wear of parts and how to replace them. They will also indicate which parts are more profitable to purchase: original ones from the manufacturer or cheaper analogues. In some cases this is justified. As for the AlfaAuto online store, you can purchase all types of spare parts: they are of high quality and have certificates of conformity. In addition, you are guaranteed fast delivery to any region. In the event that you need to replace a part, you will do it without hindrance, as required by law. You can find out the details of concluding an agreement for the supply of parts from the manager, whom you will contact online or by phone.
Source
Causes of malfunction and their elimination
As a rule, the reasons why the handbrake does not work are quite simple and do not require long or expensive repairs:
- torn cable. One of the common causes is a broken cable on the handbrake or under the car. The problem is solved by simply replacing the cable;
- jammed cable. Due to damage to the sheath in which the cable moves, it may become jammed, preventing you from using the handbrake. And the cable itself consists of many steel strands, which, if damaged, can also prevent proper operation. The solution is to replace the cable;
- dirty brakes. If dust, dirt, ice or reagents that are sprinkled on roads in winter get on the pads, this can cause the brakes to not work properly. The solution is to press the brake pedal several times smoothly while the car is moving. Thanks to friction, the pads will be cleaned;
- incorrect adjustment. It may happen that the cable system is not adjusted properly, the bolt is not tightened correctly, or the length of the cables is incorrectly selected. The solution is to adjust the system and correct tension of the cables;
- pad wear. The pads are subject to abrasion during operation. Every time you apply the brakes, the pads gradually become unusable. The solution is to replace the pads;
- oil in the pads. Oil or brake fluid leaks can cause the car to not hold up with the handbrake. The most important thing in this case is to identify the cause of the leak - it could be the rear axle seal or the brake cylinder. The solution is to eliminate the leak and clean the pads. If the pads are very oily, replace them.