The weak link of the VAZ 2107 brake system is the rubber hoses connecting the metal liquid tubes to the working cylinders of the front and rear wheels. The pipes are bent many times during the operation of the car, which is why the rubber begins to crack and leak liquid. The problem cannot be ignored - over time, the level in the expansion tank will drop to a critical level and the brakes will simply fail. Replacing defective hoses on the “seven” is not difficult and is often performed by car enthusiasts in garage conditions.
- When to change hoses
Video: diagnostics of flexible brake pipes
- Video: how to distinguish counterfeit parts
- Installing the front hoses
Video: Tips for replacing front hoses
- Video: replacing the rear axle brake hose
The principle of operation of the braking system
- Press the brake pedal
- It is secured by a rod with the piston of the main brake cylinder (MBC)
- The force from the pedal is transmitted through the rod to the piston, which compresses the brake fluid located in the tubes and cylinders
- Compression energy is transmitted to the working cylinders, which move the pistons along with the brake pads to the disc. He starts to slow down.
The harder we press the pedal, the more the brake fluid is compressed and the more energy is transferred to the pads, which means the faster the car will slow down, until it comes to a complete stop.
The principle of operation is perfectly demonstrated in the video below:
How to unscrew an old brake hose
1. Carefully clean with a metal brush all the bolted connections that we will unscrew: the fastening of the brake hose clamp to the working cylinder, the bolt connecting it to the cylinder, the joint between the hose and the brake pipe and their fixing plate. These places are located in the wheel area and serve as an excellent storage area for road dirt and rust. This must be done so that there are no problems when dismantling all these parts.
2. Unscrew the cap from the brake fluid reservoir and instead put on a plastic bag and screw the cap onto the clutch reservoir. This is necessary to seal the brake system. Having done this “trick”, you will not lose much “brake fluid” when replacing the front brake hoses on a classic.
3. Using pliers or round nose pliers, remove the fixing bracket from the junction of the tube and hose. It is needed to prevent spontaneous unscrewing of the fitting.
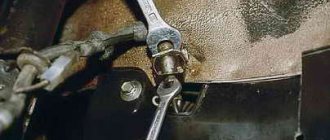
4. Using a special split wrench set to “10”, unscrew the metal tube from the hose fitting, fixing it with the wrench set to “17”.
Important! When unscrewing the tube fitting, make sure that it does not rotate with the fitting. There is a chance to break it
To prevent this, you need to “soak” the contact area with WD-40 and develop it by slightly swinging the key in the direction of opening and closing. If this does not help, then remove the opposite end of the front brake hose, fix the fitting, and use a key to “17” to unscrew the hose.
Having removed the hose from the metal tube, close its fitting with the cap mentioned above. This will prevent loss of brake fluid.
5. To unscrew the brake hose from the working cylinder, you need to use a “10” key to unscrew the bolt securing the hose clamp from the wheel hub. Remove the fixing bracket.
6. Using a spanner wrench or a 14mm socket, unscrew the bolt securing the hose from the brake cylinder.
It is recommended to replace the old copper sealing washers with new ones. You will see them when you remove the fastening bolt from the hose fitting and the working cylinder seat. They seal the joint, so there should be two of them - one on top under the bolt head, the second on the bottom, between the cylinder and the fitting.
Removal is complete; reassembly is done in reverse order. After this, it is recommended to bleed the brake system; how to do this was described in detail in the previous article. We check the connection points for leaks and tighten them if necessary.
Video, replacing the front brake hoses of VAZ 2106, VAZ 2107:
Installation nuances
- The fitting of the new hose on the caliper side must be screwed on with a special cut-out downwards. Otherwise, it may rest against the brake pipe of the cylinder and break it.
- If, when dismantling the old front brake hose, the tube fitting was rotated along with the tube, then installation of a new one begins by screwing it to the iron tube. We fix it with a split wrench, and with an open-end wrench we twist the hose and tighten it.
- We tighten all threaded connections carefully so as not to strip the threads. We clearly get into it and try. They should twist without much effort. If you feel that it is difficult to “go”, then separate them and try to get clearly into the thread again.
- You need to tighten everything without any hassle, the threads are small, and the metal is fragile, you can tear it off and then nothing will be able to eliminate the brake fluid leak unless you pull the fittings and bolts.
Brake system VAZ 2107
The braking system on the “seven” ensures safety when driving. And if the engine is needed for movement, then the brakes are needed for braking
At the same time, it is very important that braking is also safe - for this purpose, the VAZ 2107 was equipped with brake mechanisms that use the friction forces of various materials. Why was this necessary? This is the only way in the 1970s–1980s to quickly and safely stop a car speeding at high speed.
Brake system elements
The brake system of the “seven” consists of two main components:
- service brake;
- parking brake.
The main task of the service brake is to quickly reduce the speed of the machine until it comes to a complete stop. Accordingly, the service brake is used in almost all cases of driving a car: in the city at traffic lights and parking lots, when the speed of traffic decreases, when disembarking passengers, etc.
The service brake is assembled from two elements:
- Braking mechanisms are various parts and assemblies that have a stopping effect on the wheels, as a result of which braking occurs.
- The drive system is a series of elements that the driver controls to apply the brakes.
The purpose of the parking brake is to completely lock the wheels on the axle. Since the VAZ 2107 is a rear-wheel drive car, in this case the wheels of the rear axle are blocked. Locking is necessary when the car is parked to prevent the wheels from moving arbitrarily.
The parking brake has a separate drive that is in no way connected to the drive part of the service brake.
The handbrake is the element of the parking brake visible to the driver.
How does it all work
The principle of operation of the VAZ 2107 brake system can be briefly described as follows:
- The driver, while driving along the highway, decides to slow down or stop.
- To do this, he presses the brake pedal with his foot.
- This force immediately falls on the valve mechanism of the amplifier.
- The valve slightly opens the supply of atmospheric pressure to the membrane.
- The membrane acts on the rod through vibration.
- Next, the rod itself exerts pressure on the piston element of the master cylinder.
- The brake fluid, in turn, begins to move the pistons of the working cylinders under pressure.
- Due to pressure, the cylinders are expanded or pressed (depending on whether disc or drum brakes are on a given vehicle axle). The mechanisms begin to rub the pads and discs (or drums), due to which the movement speed is reset.
The system includes more than 30 elements and assemblies, each of which performs its own function during braking
Features of braking on the VAZ 2107
Despite the fact that the VAZ 2107 is far from the most modern and safe car, the designers made sure that the brakes worked flawlessly in emergency situations. Just because the system on the “seven” is dual-circuit (that is, the service brake is divided into two parts), it is possible to brake even one part of the circuit if the other is depressurized.
Purpose of flexible pipes
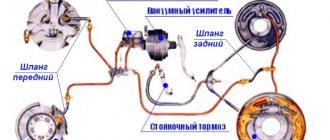
The contours of the VAZ 2107 liquid brakes are made of metal tubes leading from the master cylinder (abbreviated as GTZ) to all wheels. It is impossible to connect these lines directly to the working cylinders, since the wheel brake mechanisms are constantly moving relative to the body - the chassis absorbs unevenness, and the front wheels also turn left and right.
To connect rigid tubes to the calipers, flexible connections are used - brake hoses made of moisture-resistant reinforced rubber. The “seven” has 3 pipes - two on the front wheels, the third supplies fluid to the brake pressure regulator of the rear axle. Short thin hoses between the expansion tank and the gas turbine engine do not count - they do not have high pressure, spare parts rarely become unusable.
Flexible eyeliner consists of 3 elements:
The first end of the hose, connecting to the circuit tube, is always attached with a fixing bracket to a special bracket on the body. On the rear axle the second tip remains free, on the front wheels it is additionally fixed to the calipers with overhead brackets. To prevent liquid from seeping through the threaded connection, 2 copper sealing washers are put on the bolt.
About bleeding the brakes
To carry out the operation in the traditional way, you will need the services of an assistant. Its job is to press and hold the brake pedal repeatedly while you bleed air through the fittings on each wheel. The procedure is repeated until there are no air bubbles left in the transparent tube connected to the fitting.
To bleed the brakes, a transparent tube directed into a bottle is connected to the caliper fitting.
Before pumping, do not forget to add fluid to the reservoir. Waste material with air bubbles that you have drained from the brake mechanisms cannot be reused.
To bleed the brakes without an assistant, you need to have a mini-compressor for inflating tires and make a fitting - an adapter in the form of an expansion tank plug. The supercharger is connected to the spool and pumps up a pressure of 1 bar, simulating pressing the brake pedal. Your task is to loosen the fittings, release air and add new fluid.
The integrity of the brake hoses must be constantly monitored, especially when the elements are well worn. If you notice a network of small cracks or a tear with protruding textiles, purchase and install a new pipe. Spare parts do not have to be replaced in pairs; hoses can be installed individually.
Replacing brake pipes on VAZ 2110, VAZ 2111, VAZ 2112
Welcome! Brake pipes - unlike brake hoses, they do not crack over time, because the pipes are made of metal, and besides, they are not so easy to break (We are not talking about brake hoses at all, because they are easier to break and are more susceptible to deformation), that’s why tubes are used in a car, and hoses are only placed at the end, most often this occurs on the front wheels, because the wheels turn when the steering wheel is rotated and if tubes are installed instead of hoses, they will simply burst and you will be left without a braking system.
Note! Why do the tubes change at all? Most often this happens precisely during the replacement of brake hoses, because the tubes burst (namely their tips) and in this case you cannot do without replacement; in order to replace the tubes, you need to take: A set of all kinds of keys , as well as special Be sure to stock up on a brake bleeding wrench, a rubber bulb and everything you need to bleed your car’s brake system!
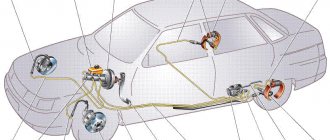
Where are the brake lines located? They go to all four wheels, you can find out in more detail the location of each tube only if the car is nearby, this is as easy as shelling pears, you just need to find the master brake cylinder at the beginning (see small photo), to which all four tubes are connected and then Well, you need to go from the pipe you need with your eyes, so you will understand their more detailed location, but to put it in a nutshell, the pipes are located in the engine compartment and are connected to both front wheels, and two more brake pipes (Main pipes are also called ) go to the sorcerer, and they pass under the bottom of the car (Indicated by a red arrow), so that they do not hang down, the tubes are secured using special. protection to the body, at the end (When they approach the sorcerer) there is a branching of pipes (from the sorcerer there is a branching, the sorcerer himself is indicated by a blue arrow) and they go separately to each rear wheel, you can see all this perfectly in the photograph, but there The picture shows a slightly different car, namely the Lada Kalina, but their braking systems are not too different (If the Kalina is without ABS), so don’t pay too much attention to the fact that the photo shows a different car.
When do you need to change brake lines? It’s rare that anyone changes them from time to time, and there’s no reason to do this, it’s not rubber, they won’t crack and basically nothing serious will happen to them, they most often change when deformed or if obvious rust appears on the tube, in addition, the tubes are changed if they are handled incorrectly, namely if the tube begins to leak, or you have deformed it in some way, then it must be replaced, in some cases the tubes also become clogged with dirt and the brake fluid does not reach the rear wheels, for example, to one of the front wheels, in this regard, this wheel will not brake and the brake pipe will need to either be replaced or thoroughly blown with compressed air so that it breaks through and the wheel starts working again.
Instructions for replacing liners
Worn or damaged brake hoses cannot be repaired. If any defect is detected, a replacement will be made. Causes:
- a small crack and leakage of fluid from the pipe can lead to brake failure and a major accident;
- the non-removable design of the hose does not imply restoration or replacement of the damaged part;
- Filling a through crack with improvised means will not yield results - due to the high pressure in the line, the liquid will still leak out when the brake pedal is pressed.
To disassemble and install new flexible hoses, it is advisable to drive the car onto an inspection hole or overpass. If the front pipes can still be changed without a ditch, then getting to the rear is much more difficult - you will have to lie under the car, lifting the left side with a jack.
While on a long trip, my friend encountered a leak in the rear pipe (the car is a VAZ 2104, the brake system is identical to the “seven”). He bought a new spare part at a roadside store and installed it without an inspection ditch, on a flat area. The operation is simple, but extremely inconvenient - during disassembly, a drop of brake fluid got into a friend’s eye. I had to urgently get out from under the car and wash my eyes with clean water.
To change worn pipes, you must have the following tools:
- wheel removal kit - wheel wrench, jack, wheel chocks;
- open-end wrenches with dimensions of 8-17 mm;
- brush with metal bristles;
- flat screwdriver;
- head 14 with knob;
- pliers;
- aerosol composition WD-40;
- rags.
To unscrew metal brake pipes, it is recommended to use a special clamping wrench with a slot for a 10 mm nut. If you work with a regular open-end wrench, you can easily lick the edges on the coupling. The nut will have to be loosened using a barbaric method - a hand vice or a pipe wrench, and then change the tube.
During the replacement process, brake fluid loss is inevitable. Prepare a supply of this material for refilling and buy a rubber boot (these are placed on the brake caliper fittings) to block the flow of fluid from the unscrewed iron tube.
Installing the front hoses
Before starting repair work, prepare the liquid brake system of the VAZ 2107 for disassembly:
- Place the car on the inspection hole, turn on the handbrake, open the hood.
- Unscrew the cap of the brake expansion tank and move it to the side, placing a rag. Fill the container with fresh liquid to the maximum.
- Unscrew the cap from the clutch reservoir located nearby.
- Take a piece of plastic film, fold it 2-4 times and cover the neck of the brake tank. Screw the clutch reservoir cap onto the top and tighten by hand.
Now, when the system depressurizes (due to disassembly), a vacuum is formed in the tank, preventing liquid from escaping through the removed tube. If you work carefully and follow further recommendations, air will not enter the disassembled circuit, and very little liquid will leak out.
Having prepared the system for depressurization, install the wheel chocks and remove the front wheel from the desired side. Further work order:
- Use a brush to clean the connections between the brake hose and the main line and the caliper. Treat the joints with WD-40 and wait 5-10 minutes.
- Place a special wrench on the metal tube coupling and tighten it with a bolt. Hold the tip of the pipe with a 17 mm open-end wrench and loosen the nut.
When connecting a new pipe to the main pipe, do not fuss or rush, otherwise you risk distorting the coupling and breaking the thread. It is better to add a portion of liquid than to buy and replace damaged tubes.
After installing the pipe, return the expansion tank cap to its place and try pressing the brake several times. If the pedal does not fail, then the operation was successful - no air entered the system. Otherwise, proceed to bleeding or replacing the remaining hoses.
Video: Tips for replacing front hoses
How to change the rear pipe
The algorithm for replacing this hose differs little from the installation of front rubber products. There is a slight difference in the mounting method - the rear tip of the pipe is made in the form of a cone, which is screwed into the tee. The latter is installed on the rear axle housing. The work order looks like this:
- Preparing for disassembly - installing a sealed gasket under the expansion tank cap.
- Cleaning the dirt with a brush, treating the joints with aerosol lubricant and unscrewing the iron tube coupling from the hose.
Since the flare fitting rotates with the hose, it will not be possible to squeeze out air with the fluid. The tip is twisted with the tee first, then the main tube is attached. The rear circuit will have to be pumped.
Video: replacing the rear axle brake hose
The use of tubes in the design of vehicles
Modern machines use several hydraulic systems with different main lines. One of them is the braking system. The working fluid moving through it must be isolated from the external environment due to tightness.
The success of reliable connections depends on the quality of the flaring. This operation uniformly increases the diameter of one tube tip. At the counter tube, the diameter of the tip is reduced to ensure rolling (entering a small diameter into a larger one and holding the pair in this position for a long time).
If the tubes in any of the sections receive mechanical damage, then due to depressurization of the system, part of the main wiring must be replaced. At a car factory, flaring is done using special equipment that contains hydraulic, electrical and mechanical drives. In garage conditions, a device for flaring brake pipes is most often mechanically driven by the muscular strength of the performer.
How to change front brake hoses on a VAZ 2107
Good afternoon dear friends. The brake system of any car includes brake lines and rubber hoses. The latter have the ability to “crack” during operation, losing their tightness. If there is no tightness in the system, brake fluid leaks out, which means there will be no effective brakes, resulting in an accident or expensive body repairs.
To avoid this, you need to monitor the condition of the brake hoses. If cracks and breaks are observed on their surface, replace them urgently. Today we will learn how to independently change the front brake hoses on a VAZ 2107, and a specialist will show on video how to do it correctly, reveal all the secrets and nuances of replacing them using the example of a Lada 2106.
How to repair brake pipes
This process requires the car enthusiast to have extensive locksmith skills and the ability to use special tools. Repairs are carried out in cases where it is not possible to replace the damaged line; it involves saving money on the purchase of a new pipe system and extends the service life of the old one.
To carry out repairs you must:
1. Unscrew the damaged tube from the cylinder or brake caliper.
2. After disconnecting, it is necessary to cut off the damaged area using a pipe cutter.
3. Clamp the tube 50 millimeters from the edge of the cut and chamfer the edge of the tube using a drill.
4. Remove all that remains of the chips and insert a fitting intended for connecting the tube to the brake operating mechanism into the cut area.
5. Insert the end of the tube into the special equipment and flare it. The main line that has undergone repairs must be purged with compressed air. And only after this is it installed with a working mechanism or another pipeline system using an adapter.
As for the length of the tube, this parameter depends on the car model. On some cars, the brake pipes have a reserve that allows you to shorten the pipe and reconnect it to the working mechanism. The metal from which the brake tube is made is flexible, so there should not be any difficulties with its position.
How to unscrew an old brake hose
1. Carefully clean with a metal brush all the bolted connections that we will unscrew: the fastening of the brake hose clamp to the working cylinder, the bolt connecting it to the cylinder, the joint between the hose and the brake pipe and their fixing plate. These places are located in the wheel area and serve as an excellent storage area for road dirt and rust. This must be done so that there are no problems when dismantling all these parts.
2. Unscrew the cap from the brake fluid reservoir and instead put on a plastic bag and screw the cap onto the clutch reservoir. This is necessary to seal the brake system. Having done this “trick”, you will not lose much “brake fluid” when replacing the front brake hoses on a classic.
3. Using pliers or round nose pliers, remove the fixing bracket from the junction of the tube and hose. It is needed to prevent spontaneous unscrewing of the fitting.
4. Using a special split wrench set to “10”, unscrew the metal tube from the hose fitting, fixing it with the wrench set to “17”.
Important! When unscrewing the tube fitting, make sure that it does not rotate with the fitting. There is a chance to break it
To prevent this, you need to “soak” the contact area with WD-40 and develop it by slightly swinging the key in the direction of opening and closing. If this does not help, then remove the opposite end of the front brake hose, fix the fitting, and use a key to “17” to unscrew the hose.
Having removed the hose from the metal tube, close its fitting with the cap mentioned above. This will prevent loss of brake fluid.
5. To unscrew the brake hose from the working cylinder, you need to use a “10” key to unscrew the bolt securing the hose clamp from the wheel hub. Remove the fixing bracket.
6. Using a spanner wrench or a 14mm socket, unscrew the bolt securing the hose from the brake cylinder.
It is recommended to replace the old copper sealing washers with new ones. You will see them when you remove the fastening bolt from the hose fitting and the working cylinder seat. They seal the joint, so there should be two of them - one on top under the bolt head, the second on the bottom, between the cylinder and the fitting.
Removal is complete; reassembly is done in reverse order. After this, it is recommended to bleed the brake system; how to do this was described in detail in the previous article. We check the connection points for leaks and tighten them if necessary.
Video, replacing the front brake hoses of VAZ 2106, VAZ 2107:
Required Tools
- Special split wrench “8/10” for unscrewing brake pipes
- Open-end wrench "17"
- Socket wrenches for “14” and “10” or heads for the same bolts
- Pliers or round nose pliers
To replace the front brake hoses on a classic, you will need a narrow metal brush to clean the bolted joints from dirt and a rubber cap to “plug” the metal tube. This cap can be taken from the bleeder fitting of the working brake cylinder. We'll talk about how to use it below. I advise you to buy new copper sealing washers in the amount of 4 pieces.
How often should you change front pads?
Let's start with the fact that on the VAZ 2107 the front brakes are represented by a disc system, which in some ways is much better than a drum one, but that’s not about that now. There are 2 pads on each caliper at the front, which are responsible for effective braking of the car. The front brake pads of the VAZ 2107 have the following appearance, shown in the photo above.
Essentially, the products are a steel plate onto which a special friction layer is applied. It is this friction layer that is the basis for car braking. When this layer wears off, which depends not only on the frequency of use of the brake pedal, but also on the nature of driving, then the car owner urgently needs to replace the brake pads on the VAZ 2107. If this is not done in a timely manner, then you understand what the outcome may be.
How often it is necessary to change the parts in question depends on the following factors:
- condition of the brake system;
- character and driving habits;
- product manufacturer;
- regular maintenance.
But our mentality is such that we don’t pay attention to how often we need to change the pads, and we do it when it’s pressing. The reasons that indicate that the car requires repair work on the brake system are due to the following symptoms:
- the appearance of extraneous sounds when you press the brake pedal: creaking or grinding;
- to brake, you need to apply force;
- When braking, the car begins to skid.
Approximately, it is necessary to replace the front pads on a car every 25-30 thousand km. But this range is average, since someone can travel 50 thousand km without replacing products, but they can only do 10. Let’s look at what it is to replace the front brake pads of a VAZ 2107 in more detail.
Detailed description of replacing front pads on a VAZ 2107
Replacing pads on a VAZ 2107 is a simple process that needs to be taken seriously. First you need to purchase new products. You need to buy them as a set, and replacement should be done on both wheels at once. After this, make sure that you have a basic list of tools:
- screwdriver;
- hammer and chisel;
- pliers;
- standard set of wrenches;
- WD-40 lubricant;
- Brake Cleaner (optional).
Let's start the workflow:
- Initially, some of the fluid should be removed from the brake reservoir, which is done to prevent it from overflowing and entering the engine compartment.
- Place shoes under the wheels, then install a jack and lift the front end. Afterwards, the wheel is removed, and then the surface of the caliper is cleaned of dirt and dust.
- Using a thin screwdriver, remove the two visible cotter pins. These cotter pins are designed to hold the pad rods. The photo below shows the location of these two cotter pins.
- Using a screwdriver, you need to press out the pad rods. If your own efforts are not enough, then you can use a hammer and a punch.
- The products are additionally held by spring structures, which can be seen in the photo above. They also need to be dismantled, for which you need to use pliers.
- When the rods and springs are removed, you can begin to dismantle the products themselves. Usually the pads do not sit tightly, so you just need to pry them off with a screwdriver and remove them, as shown in the photo below.
- Once the pads are removed, it is recommended to clean the seat using special products, and you can begin installing new ones.
- To do this, using a mounting tool or a screwdriver, you need to separate both cylinders, thereby preparing a place for new (thicker) pads. At the same time, do not forget to monitor the level of the displaced liquid in the barrel and, if necessary, remove it.
After installing the new products in their places, install the rods and mounting springs in the reverse order. This completes the replacement of the front pads on the popular VAZ 2107 car. As you can see, there is nothing complicated at all. Everything is simple and clear, but the main thing is to perform all the steps in the order described above. After installing new system elements according to the instructions, there is no need to bleed the brakes.
If you decide to replace worn-out products, then it is recommended to purchase new ones from companies such as Ferodo, ATE or Nippon. They will last much longer and will also delight you with their quality and braking performance. If you still don’t know how to change the front brake pads on a Zhiguli, then this material will be a good help. And remember that you will always have time to overpay the mechanic at the service station, but only then will you not be able to gain invaluable experience in repairing your car.
Removal and repair
To remove, repair and reinstall, you will need a minimum of tools:
- key to 13;
- special wrench for brake pipes;
- flat screwdriver;
- brake master cylinder repair kit;
- brake fluid container;
- syringe;
- brake fluid.
To avoid spilling brake fluid from the reservoir, it must be poured into a prepared container using a syringe. The procedure for removing the cylinder is as follows:
- loosen the rubber hose clamps on the brake cylinder fittings;
- remove the hoses coming from the brake fluid reservoir to the cylinder fittings;
use a special wrench to unscrew the three brake pipes;
- unscrew the nuts securing the main brake cylinder to the vacuum booster;
- remove the brake cylinder.
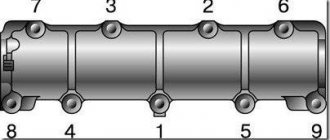
Now it is necessary to disassemble the master brake cylinder and inspect it for scratches or shells; if they are not found, if the mirror is clean, then repair is possible, otherwise, replace the master brake cylinder with a new one. At this stage there should not be any problems - you need to unscrew the locking screws one by one, starting from the plug. When you unscrew the second screw, hold the piston so that it does not fly out under the force of the spring. The first piston will come out on its own, the second will need to be knocked out, tap the body on a piece of wood.
- remove all o-rings from the pistons and thoroughly wipe all parts - pistons, springs, housing;
- replace the rubber seals on the pistons;
- Assemble the master cylinder parts and tighten the plug nut.
Screw it to the vacuum body, connect the tubes and hoses from the tank. The tubes should not be screwed in completely; fill the reservoir with brake fluid and, as soon as it begins to flow out from under the tubes, screw them in completely. After final assembly, the system will most likely need to be bled to remove air from it, and the fluid will be completely replaced.
We check the connections and the main brake itself for leaks. It is also necessary to check the effectiveness of the brakes. If everything is fine, then your car is ready for further use.
Basic faults
The brake system itself is quite simple, but some of its elements require special attention. Main types of faults:
- The brake fluid leaks, resulting in a drop in pressure in the system. If a preliminary inspection does not find a leak, it is necessary to check the brake master cylinder. We bend the noise-insulating mat located under the brake pedal and inspect for streaks in the area of the rubber seal of the master cylinder. The presence of drips will indicate that the cause has been found and requires disassembling the cylinder and then replacing the cuff. If there is a vacuum booster, the brake master cylinder must be removed and inspected.
- When you release the brake pedal, the car drives sluggishly. Reason: the rear or front pads are jammed. Seized pads are identified by checking the heat of the corresponding wheel. We touch each disk - the hottest one will be jammed. In the case when these are the front wheels, you can, after removing the wheel, move the brake cylinder. If this fails, you will have to replace it with a new one. In the case of rear pads, the brake wheel cylinder will need to be replaced.
- When you press the pedal, braking does not occur, but it does when you press it several times in a row. This may indicate the presence of air in the system. The solution to the problem is to bleed the brakes to remove air.
- Problem with the handbrake. Most often this problem occurs in winter. It manifests itself in the fact that after a long period of parking, when the handbrake is released, the wheels remain locked. The reason is that the parking brake cable is frozen. During its operation, moisture gets there and freezes in winter. If the casing is severely damaged, it will have to be replaced.
Read this, it might come in handy: Why do brakes squeak?
Brake master cylinder diagram
Vibration when braking
This is a fairly common malfunction that is associated solely with critical or uneven wear of the discs or drums, and the repair will consist of replacing them.
Car shifts to the side when braking
The malfunction is due to either a failure of the working (wheel) cylinder or wear of the pads. Replacing them (or repairing them) will solve the problem.
The VAZ 2107 brake pedal fails: the main reasons
The brake system must be sealed and free of air. If the pedal begins to fail, then, with a greater degree of probability, we can say that depressurization has occurred, that is, air has entered the system.
Other reasons:
- rust formation on the pedal linkage;
- failure of the vacuum booster;
- unadjusted distance between the cylinder piston and the pedal itself;
- lack of fuel fluid in the system.
It is also important to remember that brake fluid is an aggressive substance that can destroy thin pipes and even lines. That is why it is important to use only high-quality TZ. Low-quality liquid can form cracks through which it then flows out safely
But the flip side of the coin is that when you press the brake pedal, air leaks through these cracks
Low-quality liquid can form cracks through which it then flows out safely. But the flip side of the coin is that when you press the brake pedal, air leaks through these cracks.
Auto repair school – DIY car repair
Jun 14, 2022 VAZ 2101, VAZ 2102, VAZ 2105, VAZ 2106, VAZ 2107, Zhiguli, Classics by admin
Let's return to our immortal and beloved Classics! In this article we will look at the process of replacing the front brake hose on VAZ-2101, VAZ-2102, VAZ-2104, VAZ-2105, VAZ-2106, VAZ-2107, Classic cars. I hope that it will be useful to you and after reading it, you will be able (or will have information) on how to replace the front brake hoses yourself. I, in turn, will try to describe the replacement process in as much detail as possible and warn you about possible problems that may arise during operation.
Pay special attention to the list of necessary tools and the quality of purchased spare parts. In general, please...
Let's start, perhaps, with the tool that you will need to replace the front brake hose on a VAZ-2101, VAZ-2102, VAZ-2104, VAZ-2105, VAZ-2106, VAZ-2107, Classic car: 14mm socket wrench, socket wrench for 10, pliers, an open-end wrench for 17, a rubber cap from the bleeder fitting (after disconnecting the tube and hose, it will be necessary to “plug” the brake pipe to prevent brake fluid leakage), special keys for unscrewing the brake fittings for 10 - split or crimped (photo 1).
The presence of at least one special key is necessary. Without it, in 9 out of 10 cases, you will not unscrew the brake pipe fitting!
What you should pay attention to when purchasing spare parts... First, we buy brake hoses from “Balakovo” or “Dimitrovgrad” production. Hoses from these manufacturers, although not cheap, are of high quality and durable
As they say - time-tested.
Included with the front brake hose you should buy two new copper sealing washers
When purchasing washers, you should pay attention to their thickness. According to the standard, the thickness should be 1.5 mm
But unscrupulous sellers may sell washers of thinner thickness (see photos 2 and 3), using which you will not be able to tightly tighten the brake hose bolt.
We can also advise you to buy a new brake hose mounting bolt. This is not necessary, but believe me, this cheap detail can save quite a lot of nerves. Since the old bolts are generally very stretched (photo 4) and even with new copper sealing washers, such a bolt will have to be pulled long and hard until there is no brake fluid leakage (and don’t forget that the threads in an aluminum brake cylinder are very easy to break).
We're done with the tools and spare parts. Now let's move on to a step-by-step description of replacing the front brake hose on VAZ-2101, VAZ-2102, VAZ-2104, VAZ-2105, VAZ-2106, VAZ-2107, Classic cars:
1. Use pliers to pull out the fixing bracket (photo 5)
2. Using an open-end wrench size 17 and a special clamp wrench 10, unscrew the brake pipe fitting (photo 6). We disconnect the hose and brake pipe, and put a rubber cap on the end of the pipe.
3. Using a 10 mm spanner, unscrew the fastening bolt securing the brake hose bracket (photo 7), if you have one, of course))).
4. Using a 14 mm socket wrench, unscrew the bolt securing the brake hose to the brake cylinder (photo 8). We remove traces of dirt and sand from the brake cylinder.
We carry out assembly in reverse order. We install the brake hose as shown in photo 9, with the bevel down. We install two sealing copper washers. When tightening the brake hose and tube, tighten the tube fitting and do not twist the hose, thereby preventing the brake hose from twisting.
When using an article or photographs, an active direct hyperlink to the website www.avtorem.info is required!
Which spare parts are better
The main problem when choosing brake hoses is the saturation of the market with counterfeit parts of low quality. Such eyeliners do not last long, quickly become covered with cracks or begin to leak near the pressed tips literally a week after installation. How to choose the right rubber pipes:
- Do not buy cheap hoses without packaging, sold individually. Usually the front tubes come in pairs.
- Carefully examine the metal surfaces of the fastening fittings - there should be no traces of rough machining on them - nicks, grooves from a cutter and similar defects.
- Examine the markings on the rubber tube. As a rule, the manufacturer puts its logo and indicates the product catalog number, which matches the inscription on the packaging. Some hieroglyphs clearly indicate the origin of the spare part - China.
- Try stretching the pipe. If the rubber stretches like a hand expander, refrain from purchasing it. Factory hoses are quite stiff and difficult to stretch.
The inscriptions on the paper insert must correspond to the markings of the nozzles
An additional sign of a quality product is 2 pressing contours instead of one. Counterfeit pipes are not made with such care.
Trusted brands that produce brake pipes of decent quality:
- BRT - Balakovo Rubber Products Plant;
- DAAZ - Dimitrovgrad aggregate;
- KRAFTTECH;
- Fenox.
The embossed logo and inscription on BRT products are molded along with the rubber shell
Hoses from the Balakovo plant are considered original. The parts are sold in transparent packaging with a hologram, the marking is in relief (molded along with the rubber product), and not a colored inscription with paint.
Copper washers serve to seal the bolted connection; overhead brackets additionally secure the ends of the pipes
Along with a set of front pipes, it is worth buying 4 new O-rings made of copper 1.5 mm thick, since the old ones are probably flattened from strong tightening. It also doesn’t hurt to make sure there are fixing brackets screwed to the calipers - many drivers don’t bother installing them.