The life and health of the driver and passengers depend on the condition of the braking system. Owners of “sevens” often independently monitor the condition and replace the brake pads of the car. This is a simple operation that does not require special tools or high qualifications. It is enough to have basic plumbing skills and know how to change brake pads on a VAZ 2107 .
↑ Front brake design of VAZ 2107
1 — fitting for bleeding the front brake drive; 2 — connecting tube of working cylinders; 3 — brake pad wear indicator wire; 4 — wheel cylinder piston; 5 — wheel cylinder clamp; 6 — brake pad lining; 7 - sealing ring; 8 — dust cap; 9 — pins for securing the pads; 10 — bolt securing the caliper to the bracket; 11 — steering knuckle; 12 — caliper mounting bracket; 13 — caliper; 14 — protective casing; 15 — cotter pin; 16 — pad pressure spring; 17 — brake pads; 18 — wheel cylinder; 19 — brake disc.
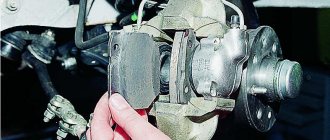
- Having disconnected the wires of the 3 front pad wear indicators from the plug connections of the wires, remove the cotter pins 15, and then the pins 9 with the springs, remove the springs 16 and the brake pads 17. Mark the pads so that during reassembly you can install them in their original places.
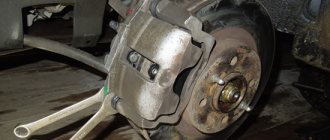
- Having straightened the locking plates, unscrew the two bolts 10 that secure the caliper to the bracket, and remove the caliper.
NOTE! It is possible to remove the front brake (without brake disc) complete with brake pads. In this case, it is enough to disconnect the plug connections of the brake pad wear indicator wires, disconnect the caliper hose and unscrew the caliper mounting bolts 10.
↑ Installation of front brakes
Installation of the front brake caliper is carried out in the reverse order of removal.
After installation, restore the brake fluid level in the reservoir and bleed the system to remove air.
Replacing front pads
It’s very easy to remove the front pads on the “classic” yourself thanks to the design of the two-piston caliper:
- Clean the caliper from dirt with a wire brush.
- Using narrow-nose pliers, remove the cotter pins of the pad guide pins.
- Knock the pins out.
- Using a flat-head screwdriver, press the caliper pistons so that they go as far into the caliper body as possible.
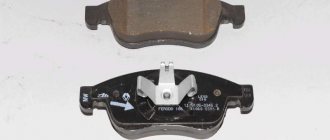
- Remove the pads and replace them with new ones.
- Install and tighten the pins.
Photo instructions:
Video instruction:
↑ Front brake caliper parts
1 - piston; 2 — dust cap; 3 - sealing ring; 4 — caliper with cylinders; 5 — connecting tube of wheel cylinders; 6 — air release fitting; 7 — pad pressure springs; 8 — brake pad mounting pins; 9 — cotter pins; 10 — springs; 11 — lining wear indicator wire; 12 — brake pads.
Replacing rear pads
Replacing the classic rear pads with your own hands is a little more difficult - after hanging the rear axle with the handbrake released, start in order:
- Remove the pins holding the drum to the hub.
- Knock the drum outward if it cannot be removed by hand (care is required - it is easily damaged!).
- Clean the mating surfaces of the hub and drum. It won’t hurt to apply a thin layer of graphite lubricant to one of them - in the future, removing the drum will be noticeably easier.
- Using needle nose pliers, remove the upper spring that presses the pads to the working cylinder.
- Remove the soldiers by pressing on their spring-loaded cups and turning them 90 degrees.
- After removing the front shoe from the groove of the working cylinder, remove the lower spring.
- Disconnect the handbrake cable from the lever on the rear block.
- Depending on the design of the purchased set of pads, it may be necessary to move the handbrake lever from the old pad to the new one - to do this, you only need to unscrew the lever axis.
Before installing new pads, you will need to press the pistons into the cylinder - they have a primitive mechanism for maintaining the gap between the pads and the drum in the form of elastic spacer rings installed in the grooves on the pistons. Available means usually use a gas wrench “number two” or a clamp. The main thing is that the device presses on both pistons at once.
Having sunk the pistons, you can install the pads in the reverse order of disassembly.
Video instruction:
↑ Disassembly and assembly of the front brake
- Disconnect tube 5 and remove dust caps 2 from the cylinders.
- Then, pumping a stream of compressed air through the brake fluid inlet, push the pistons 1 out of the cylinders on the caliper 4 and remove the O-rings 3 from the cylinders.
Assemble the front brake in the reverse order of disassembly. Lubricate the sealing rings, pistons and cylinder mirror with brake fluid during assembly.
After installation, restore the brake fluid level and bleed the hydraulic drive system.
What tools will be needed to carry out the work?
To perform the replacement you will need:
- A jack and handy stops to prevent the car from rolling.
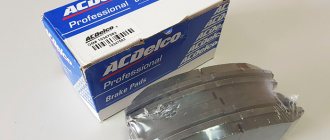
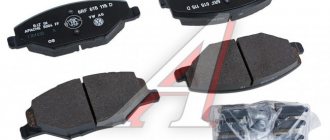
- 2 sets of new pads.
- Grease, WD-40 or any other rust softener.
- Ruler.
- Phillips and flat head screwdriver.
- Hammer with drift.
- Pliers.
- Needle nose pliers.
- Keys for removing wheels.
- Rags.
Replacement of rear pads on VAZ 2101-2107 (CLASSICS) (Lada).
in the video I make the replacement
rear
pads for VAZ 2107
. By analogy, it changes to VAZ 2101,2102,2103,2104,2105,2106.
How to replace the front brake pads of a VAZ.
Replacement
front
brake pads
VAZ
cars , nuances when
replacing
.... VKontakte groups for remo...
Required Tools
- Pliers, screwdriver, hammer
- A set of keys for “12”, “13”, “7”. Can be caps, can be carob
It is recommended to use a special wrench to install the tension spring. I don’t have one; instead I use pliers, which is not always convenient. In such cases, I often remember the designer’s relatives on my mother’s side - the spring doesn’t want to hold on to the pliers and tends to break.
Therefore, it is better to buy such a thing (it is shown in the screenshot below), borrow it from a neighbor in the garage, or make it yourself. In the video at the end of the article, a car mechanic will show you how to easily put on the lower spring using one screwdriver, take note.
Similar articles:
- Which front springs are better to install on a VAZ 2107 replacement, removal and installation instructions with photos and videos
- Signs of malfunction and repair of the VAZ 2106 fuel pump, instructions with photos and videos
- Muffler VAZ 2107 injector and carburetor: malfunctions, replacement and repair, instructions with photos and videos
- Front shock absorber VAZ 2107 which is the best mount replacement instructions with photos and videos
Brake pad problems
The parts of the braking system in question have to be changed not only when they wear out, but also when malfunctions occur that are associated with the use of low-quality consumables or too active driving. The following characteristic signs indicate problems with the pads:
- creaking, grinding and other extraneous sounds when braking;
- car skidding when pressing the brake pedal;
- to operate the pedal you have to exert more or less force than usual;
- beating of the pedal when braking;
- after releasing the pedal, it does not return to its original position;
- the presence of black dust on the rims.
Extraneous sounds
Modern brake pads are equipped with special indicators that indicate wear of these car parts. The indicator is a metal strip that is attached below the friction lining. When most of the material is worn out, but the pad is still able to decelerate, a characteristic grinding or whistling sound appears when the brake pedal is applied. If the pads are not equipped with such indicators, the presence of extraneous sounds indicates obvious wear of the elements in the brake mechanism and the need to replace them.
Pad wear can manifest itself in different ways, and one of the signs is extraneous sounds when braking.
Skid
If the car skids to one side when braking, then the likely cause is wear on one of the pads. The car can skid until it turns around, even on a dry surface. In addition to the pads, skidding can occur due to scuffing or deformation of the brake discs.
Some time ago I was faced with a situation where the car began to pull to the side when braking. It didn't take long to find the reason for this behavior. After a quick inspection of the car's underside, it was discovered that one of the rear brake wheel cylinders was leaking. This caused brake fluid to get on the working surface of the pad and drum, as a result of which the mechanism was unable to perform its function. The problem was resolved by replacing the cylinder and bleeding the brakes. If you encounter a similar situation, I recommend replacing the entire cylinder rather than installing a repair kit, since the quality of rubber products today leaves much to be desired.
Increase or decrease pedal effort
If the pedal has to be pressed unusually hard or lightly, the problem may be caused by worn or dirty pads. If everything is in order with them, then you should check the integrity of the entire brake system for fluid leaks.
Vibration
If there is vibration when you press the brake pedal, then a possible reason is that dirt has gotten between the brake disc and the pads, or a crack or chips have appeared on the latter. As a result, parts are subject to premature wear. However, you should be aware that a similar phenomenon is also possible due to problems with the hub or hydraulic cylinders of the brake system.
The pedal goes down
Sometimes it happens that the brake pedal does not move back after being pressed. This indicates that the pads are “stuck” to the disc. This phenomenon can be observed at sub-zero temperatures when moisture gets on the pads. In addition, air may enter the braking system, which requires inspection and subsequent repair or bleeding of the brakes.
Plaque on discs
Plaque on wheel rims is black dust, which indicates wear on the pads. If the dust contains metal particles, then not only the pads are erased, but also the brake disc itself. If such a situation arises, you should not delay inspecting the brake mechanism, as well as replacing failed parts.
The appearance of black deposits on wheels can be caused by active driving or natural wear of the pads.
One day I noticed that the front wheel rims were covered with black dust, and it was not road dust. It is no longer known what brake pads were installed at that time, but after replacing them with factory ones from AvtoVAZ, the situation remained unchanged. Therefore, I came to the conclusion that the appearance of black dust is a normal phenomenon, indicating natural wear of the pads.