21.05.2013
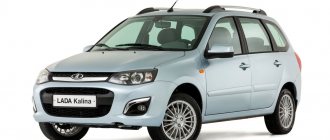
Today I decided to make a few more topics on repairing the Lada Kalina and stopped at the rear bumper, I decided to prepare material on the removal and installation of this body part. It took me personally at least one hour to complete this work, although at first I thought that I could do it faster. So, consider below the tool that you will need for this procedure:
- Ratchet or wrench with 10mm head
- Extension
- crosshead screwdriver
Purpose of a car bumper
The front bumper, like the rear bumper in the Lada Kalina car, serves to protect body components and assemblies of various systems from external mechanical influence, for example, during an accident. The device is not a protective element for the driver or his companions, because airbags and other power components of the body are used for this. The body element is capable of absorbing part of the energy from a collision, thereby reducing the level of destructive impact exerted by inertia on the body components located behind it. This is true for high speeds. When driving at minimum speeds, the plastic element is able to completely absorb the impact energy of a collision, preventing destruction of the car body and systems.
Manufacturers in the vast majority of models use plastic as a material for this design. The device is secured using clips, screws, and self-tapping screws.
Let's return to the question, how to remove the bumper? The removal procedure itself should not be difficult if the owner is aware of all the attachment points of the product, since forgetting to unscrew a well-hidden fastening component during dismantling creates a risk of breaking a section of the plastic element or one of its brackets.
Some Lada Kalina owners are inclined to replace the bumper in order to install a tuning product. This is done for the sake of improving the appearance of the car, but we should not forget about the standards governing the size and location of mounting points in height. Next, we will tell you how to remove the bumper, as well as how to replace it.
This is interesting: Which country produces KIA cars
Removing the front element
Let us remind you that the front bumper is dismantled not only for its own repairs, replacement with a tuning product, but also to replace some other components. For example, to replace the headlights you will also need to remove the structure we are considering.
If it is not possible to dismantle the front bumper yourself, we recommend contacting a competent service center; they will know exactly how to remove it. Most owners can easily remove the bumper themselves, spending little time.
Let's move on to describing the sequence of actions that allow you to quickly remove the product.
- Initially, before dismantling, we de-energize the electrical network by removing the terminals from the battery terminals.
- Under the hood we find three bolts. They fix the radiator grille. We carefully unscrew them, being careful not to damage the adjacent painted surfaces with the tool.
- After removing the grille, we unscrew two bolts and a pair of screws that hold the frontal part of the bumper. Now unscrew the two fastening components of the lower grille and dismantle it.
- Next, we “defeat” two bolts located under the bottom of the product.
- We unscrew the three fasteners holding the bumper to the body and a pair of screws connecting the structure to the fender liners.
- We move to the wheel arches, where we unscrew two screws on each side. For ease of operation, you can twist the steering wheel to the appropriate side.
- We remove the product after prying it off.
The owners of Lada Kalina spend about an hour on the entire dismantling process. To do this, you should acquire the necessary tools in advance. We recommend grouping the entire list of fasteners so that when installing the product you do not confuse them or lose them. Next, replacement is carried out, and the installation algorithm itself is absolutely the opposite of the removal process.
Armrest for Kalina
Instrument panel Kalina
Wheel size Kalina
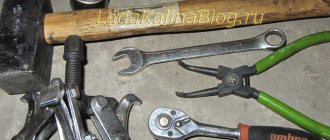
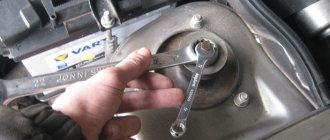
Necessary tool
All you need to remove the rear bumper is time and the following tools: a 10mm socket wrench and a Phillips screwdriver .
Work schedule
Rear bumper mounting diagram.
To avoid problems with soured bolts , treat them with WD-40 . Next we perform the removal as follows:
- If the car has fender liners and mudguards, then we begin work by dismantling them.
Using a Phillips screwdriver, unscrew the 3 screws on the mudguards.
- We unscrew the main screws that secure the bumper to the body.
- Unscrew 4 top bolts, which are located under the trunk sealing rubber.
Upper bumper mounting bolts.
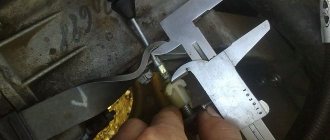
- Now we find 3 boltslocated at the bottom of the trunk. You may need an extension cord to unscrew them. The outermost bolt is located next to the exhaust pipe. The rest are located to the right of it.
One of the three lower bumper mounting bolts.
- We remove the bumper from the latches, first on one side and then on the other. We just grab the end and pull it towards ourselves with a little effort. The bumper will give in without any problems, since nothing else holds it.
The view with the bumper removed is a version with a plastic reinforcement beam (sometimes it may not be there).
In Kalina, there is a plastic amplifier under the bumper. It is held in place by three bolts .
- About the author:
- Latest articles:
I am the editor-in-chief of the site. In our editorial office: Hyundai Accent, Hyundai Solaris, Hyundai Santa FE (turbo-diesel 2015). I now have a Lada Kalina LUX (98 horses). A car fanatic, he has owned both left and right hand drive cars. Robots, CVTs, mechanics. The only thing missing was DSG. But it will be soon.
- We change the clutch on a Lada Kalina without removing the box - 02/20/2020
- Changing the front brake pads on Lada Kalina - 02/12/2020
- We change the rear struts on a Lada Kalina with our own hands - 02/09/2020
- Next article Adjusting the clutch on the Lada Kalina for yourself - the basics
- Previous article Changing rear brake pads on Lada Kalina (+ articles)
Tags: QuestionsQuestions Lada KalinaLada Kalina
Types of repairs
The recovery technology depends on the type of damage. The following types of repairs are distinguished:
- Renewing the paint layer.
- Replacement of brackets and fastenings.
- Elimination of deformation (dents).
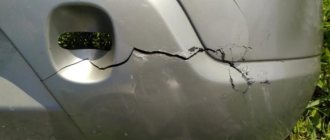
- Removal of through damage (cracks, breaks, holes, breaks in material) by welding.
The last option is considered the most labor-intensive. Therefore it costs the most.
There are three types of painting:
- Point (used in the presence of cracks).
- Partial (a specific area is processed).
- Complete (the entire part is covered with the dye).
In what cases should the bumper be replaced?
Only the owner of the car can decide whether to replace the bumper. The reasons for this step are as follows:
- at some point the car hit the road barrier;
- the car was in an accident;
- the owner had a desire to stand out or do some tuning.
Lada Kalina is running, but the front bumper and headlight require replacement
Changing the part itself is not so difficult; you need to be patient, time and a set of tools. And it’s also worth purchasing a new bumper in advance or agreeing with a car repair shop where they will repair your old one.
Approximate prices
Russian car services set approximately the following prices for bumper repairs:
- Welding a crack up to 3 cm long - from 1000, up to 6 cm - from 1500 rubles.
- Welding with geometry correction - from 2000 to 6000 rubles.
- Repair of headlight brackets – 1500 rubles.
- Partial painting – from 1300.
- Full – from 2000 rubles.
- Repairing cracks in headlight housings – 300.
- Restoration of headlight and bumper mounts - from 500 to 5000 rubles.
- Removing, installing, adjusting the bumper - from 1000 rubles.
Sports modification
Using a modernized plastic element, you can give your car a unique look. Since the Lada Kalina model has been on the assembly line for quite a long time, auto accessory stores have a wide selection of tuning bumpers. Here you will need to choose the bumper wisely so as not to go wrong with the combination of the color of the product and the car body. If this action fails, then you can paint the purchased bumper yourself.
The sports version of the product for LADA Kalina consists of some components:
- gratings;
- reinforcing element;
- spoiler;
- overlays.
The design includes integrated air intake deflectors located on both sides. Also, the tuning version involves the installation of several ribs to improve rigidity.
The modified bumper for the stern has an original element - a diffuser, placed by the designers in the central part of the product.
To independently tune the bumper, you will need to first dismantle it. Then the installation of the structure is carried out as follows:
- install the amplifier;
- We mount the main component with the grille.
Usually there are no problems with this procedure. However, for example, the “I am a robot” version of the bumper is a few centimeters lower than the standard product, so during installation there is a certain risk of breaking the structure. It is also recommended to cover the bottom panel of this LADA Kalina body component with film to prevent damage to the coating.
Technical characteristics of Kalina Sport 2
Now it’s time to talk about the most interesting component of the car, which promises to show solid sales results this year.
Does AvtoVAZ really have any reason to call this hatchback charged and add the word Sport to its name? Let's try to figure this issue out.
So, the car will be offered on the market in two options for equipping the engine compartment.
- The Sport version involves the use of a 1.6-liter 4-cylinder gasoline engine. Its power is a pretty good 118 horsepower. Such a power unit will allow the car to accelerate from a standstill to a hundred kilometers per hour in 9.5 seconds. At the same time, the maximum speed freezes at around 197 kilometers per hour.
- The NFR version perhaps looks more preferable. The fact is that with a similar volume of 1.6 liters, the power of such a unit is increased to 140 horsepower. This also led to an improvement in dynamic characteristics to 8.5 seconds for acceleration from zero to hundreds.
AvtoVAZ offers both engines with only one uncontested 5-speed manual transmission. However, it is adapted specifically for improved acceleration of the car.
General form
It is worth noting that Kalina 2 Sport was built on the platform of the second generation civilian Kalina, but quite a lot of changes have occurred.
- The steering has been reconfigured.
- Changes have been made to the suspension design.
- The car was equipped with other braking system mechanisms.
It’s worth mentioning separately about the NFR version, for which:
- We made a separate subframe for the power unit;
- Made major changes to the suspension settings;
- The brake discs were enlarged.
Due to these manipulations, the car has become sportier not only in terms of the amount of horsepower, but also in the operation of all systems and mechanisms responsible for speed, cornering, braking, and so on.
Conclusion
The new generation of Lada Kalina served as an excellent platform for creating a charged hatchback.
The best part is that the car was not just equipped with sports body kits and an engine with improved power. Serious adjustments were made to the design, important components were improved, allowing Kalina 2 Sport to be called a truly sports car.
Back view
Yes, many may complain about the lack of horsepower or some other shortcomings, which, of course, occur in a hatchback. However, take a look at the prices and study the equipment list. For the money this is a very attractive option. Will you find better alternatives among the cars presented in Russia? You can count them on your fingers.
One way or another, the choice will always be yours.
Removing and attaching rear body kits
To remove the rear bumper of the first generation model, the tool kit must be supplemented with a short Phillips screwdriver, since it is impossible to insert a long one between the tire and the wheel arch, and turning it from the side is inconvenient. In addition, TORX key screws (the so-called sprocket) are used for fastening to the fender liner.
Advice. Usually the back of the car gets more dirty than the front, so it is recommended to wash and dry the car before disassembling.
Later generations of hatchback and station wagon cars are even more difficult to disassemble, because the rear lights have to be removed to remove the body kit. The primary fastening of the elements is also provided with latches, so they are removed in the same way as the front bumper. But due to the difference in design, disassembly must be considered separately.
To install the rear body kit, you must repeat the presented algorithm in reverse order.
Removing the rear element of Kalina 1
Disassembly work can be carried out without an inspection hole, since the lower bolts are located close to the overhang and access to them is not difficult. The procedure is as follows:
- Unscrew the 3 screws located at the rear of the wheel arch. Two of them hold the mudguard, the third is located a little higher.
- At the back of the mudguard there is 1 more bolt with a 10 mm head, unscrew it.
- Using a 10 mm wrench, remove the 3 bolts securing the bumper from the bottom. Two of them stand in the middle, the third is a little to the left (in the direction of travel).
- Open the trunk lid and unscrew the 4 screws of the upper body kit mounting.
The main thing is to carefully pull the edge of the part and release the latches
Then proceed in the same way as with the front element. Pull the side of the part, unlocking the plastic latches, and carefully remove it with an assistant. If you need to get to the body, then unscrew 3 more bolts and remove the plastic bumper reinforcement.
Places where fasteners are located
Differences in disassembling Kalina 2
To remove the rear bumper of a station wagon or hatchback, you will need to open access to the bolts that are hidden under the bottom of the lights, for which the latter will have to be removed. Their fastening consists of bolts with 8 mm socket heads located behind the rubber seal of the trunk lid. The bolts need to be unscrewed, and the lights need to be pulled out, disconnecting all the wires.
Attention! Before disassembling, be sure to disconnect the battery terminal.
2 of the 8 bolts are hidden under the taillights
Removing the body kit from the Lada Kalina 2 hatchback body is carried out in the following order:
- From below, the part is screwed to the body with a pair of bolts (located in the middle) and two self-tapping screws (at the edges). Loosen and unscrew them.
- Under the wheel arches, unscrew 3 screws (TORX keys T10 and T20) and remove the rubber retainer from the mudguard.
In addition to 3 TORX screws, there is a plug
- Unscrew the 8 top mounting bolts. Six of them are located near the threshold of the luggage compartment, two more are in the sockets of the removed lights. Location of the lower bolts
On a hatchback there are a couple of bolts in the center and a couple of screws on the sides
- Now unlock the latches and remove the bumper.
The difference between disassembling Kalina 2 in a station wagon is that the element is attached to the body from below with 3 bolts, but there are no side screws. In other places the fastening is the same - 3 screws under the arches and 8 bolts around the luggage opening.
In a station wagon, the body kit is screwed on from below with 3 bolts
Photos of the Lada Kalina Sport 2015 interior
But where the VAZ people didn’t bother too much was inside the car.
The fact is that the Lada Kalina 2 Sport has minimal differences in terms of interior design. Here only new sports seats have appeared, characterized by a much more comfortable fit. They have special logos on them, making it clear which version of the hatchback you are driving.
Salon of the new Kalina Sport 2015-2016
Otherwise, the interior has not undergone any further changes. Although many expected this. The second generation of Kalina demonstrated that our craftsmen are capable of creating interiors that are quite close in their level to leading automakers.
Interior of Sportivnaya Kalina 2
Yes, there are some shortcomings, and the ergonomics are not at the highest level. Nevertheless, the interior looks attractive and interesting. The most important thing is the level of comfort for front and rear passengers. In this component, Kalina has practically lost all of its shortcomings that were relevant for the first generation.
Redesigned interior design
It’s better to study the photo and video materials yourself, which will allow you to get a complete picture of what the Kalina 2 Sport is like inside, and whether anything needed to be changed there.
Tools required for dismantling
Replacing Klin bumpers is easy to handle when the right tools are used. These include:
- wrenches 8 and 10 (wrench heads);
- Phillips screwdriver, both long and short;
- small ratchet;
- wrench and head 13, used for unscrewing the shock absorber reinforcement beam when removing the headlight.
This set of tools must be prepared in advance so as not to select it as the work progresses. In addition, using any other “suitable” tool is highly undesirable, since in this case you can damage the body of the car itself and the damper. As a result, you will have to spend extra money because of such a trifle.
Choose your new LADA car
Granta liftback Granta hatchback Granta station wagon XRAY
1 — the cost of maintenance is indicated taking into account the use of LADA engine oil. For detailed information about mandatory maintenance operations, the cost of spare parts and materials for your car, please contact the official dealers of AVTOVAZ JSC. — the total cost of maintenance (MOT) indicated in this calculator is recommended by AVTOVAZ JSC as the maximum retail price and may differ from the actual prices of official LADA dealers. LADA dealers can set the offer price less than the recommended maximum retail price. The indicated prices do not cover cases of using materials other than those specified by AVTOVAZ JSC for maintenance, as well as performing work in addition to the routine ones. — the information on the maximum recommended retail prices for maintenance in this section is for reference only and under no circumstances constitutes a public offer as defined by the provisions of Article 437 of the Civil Code of the Russian Federation. JSC AVTOVAZ reserves the right to make changes to the maintenance schedule, as well as to change the composition of spare parts and materials without prior notice. — the information in this section is intended exclusively for non-commercial purposes (personal, informational, research and other not related to business activities). Visitors to the website www.lada.ru do not have the right to use information for commercial purposes, including the right to reproduce, modify, distribute or publish information in part or in full without obtaining the prior written consent of AVTOVAZ JSC.
Due to changes in the structure of AVTOVAZ JSC and the company’s standards, the production of documentation for the maintenance and repair of LADA vehicles in printed form using a printing method has been discontinued since 2013, incl. collections of technological instructions, labor intensity of work, catalogs of parts and assembly units, etc. The sale of documentation to third parties has also been stopped. Over the past period, the documentation has been constantly updated in connection with changes in the design of vehicles, and based on the results of experimental work, many labor intensity standards have been revised. Currently, up-to-date documentation is available only to enterprises of the dealer network and partners of AVTOVAZ JSC by providing authorized access to the specialized Internet portal of AVTOVAZ JSC under separate agreements.