Despite the fact that the Lada Priora has a completely modern appearance by today's standards, not all owners of this car are satisfied with its factory design. And in order to improve the appearance and add originality, many carry out external tuning (aka facelift). Only some elements of the car body are subject to changes, including optical instruments. Tuning headlights on a Priora is a fairly popular operation for changing the appearance of a domestic car. Let's consider the topic in more detail.
Adjusting Priora headlights using a corrector
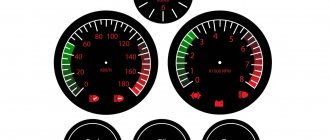
Adjusting the light beam is extremely important for safe, comfortable driving. If you have a suitable place and desire, you can carry out the procedure yourself at home. You will need to place the car on a flat horizontal surface at a distance of five meters from the wall to the car. Check the operation of the manual corrector located directly on the back of the block (small movable wheel). At the level of the middle of the headlights, draw a horizontal line on the wall (L. 1), approximately 65-75mm. Below we draw a line (l. 2). Two vertical lines in the middle of each headlight (l. A) (l. B), another vertical line strictly in the middle between them. There should be 1 person in the car, the tire pressure should be within normal limits and be the same everywhere. The low beam turns on, we try to adjust the light. Close one headlight tightly. We turn the corrector wheel until the horizontal and oblique beams of light intersect at the point of intersection of lines A. and B. with line L. 2. Electronic adjustment in the car interior should be zero.
Hatchback body features
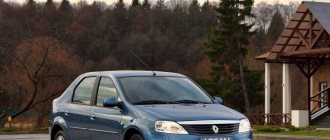
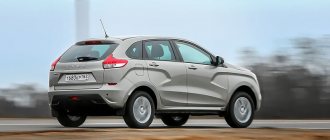
The white Priora hatchback body (photo below) also has some features that I would like to mention separately. The advantages of this design:
• Capacious trunk. The white Priora hatchback (pictured is a rear view) allows you to increase it even more if you fold the rear seat flush with the floor. In addition, by opening the rear door slightly, you can transport fairly large items.
• As you can see in the photo, the white Priora hatchback has a stylish and slightly sporty look, aimed at young buyers. The rear part of the body, made with bevels, especially emphasizes this design. The appearance of the car greatly benefits due to this, despite the fact that the useful volume of the luggage compartment is reduced.
• Judging by the reviews of passengers, sitting in the back seat in a car with a hatchback body is much more convenient.
• The interior cabin is separated from the luggage compartment by a partition, which makes it much more comfortable.
• Having a compact design and streamlined shape, the white Priora (pictured), with a hatchback body, is suitable for maneuvers both in the city and on the highway. It behaves well when overtaking and changing gears.
The hatchback body design also has a disadvantage - the passenger compartment quickly cools down when the rear door is open in the cold season.
studio
atelierTuning Priora headlights in the style called “angel eyes” requires not only dismantling the headlight, but also disassembling it.
This will allow you to wear out the “eyes” and tint the surface of the reflector (mask, blender) using black paint. List of materials and tools required to complete the work:
- masking tape, which allows you to preserve the glass during dismantling;
- to remove the blender - a screwdriver with a T20 tip;
- technical hair dryer;
- black spray paint;
- plastic tube;
- a set of LEDs with corresponding resistors;
- aluminum tape;
- glue;
- hacksaw for metal;
- automotive sealant.
Main conclusions
For high beams on a Lada Priora, depending on the year of manufacture, lamps with a power of 55 watts are used, with two types of base:
- Pre-styling - H1.
- Restyled - H15.
Among reliable, high-quality and durable lamps, the most popular models are Bosch Gigalight, Vision and LongLife EcoVision from the Philips line (for pre-restyling), and Philips Standart, Original Line and Cool Blue Intense from Osram (for restyled ones). When replacing burnt-out ones with new ones, you must strictly follow the instructions and follow safety rules.
If you have personal experience in replacing high beam lamps on a Priora, taking into account the characteristics of a particular model, share it in the comments.
Step-by-step instructions for installing angel eyes
First stage. The headlight is dismantled strictly according to the instructions supplied with the car. Masking tape is glued to its glass, which will prevent damage to the surface during the removal process.
Second phase. If the headlights are from Bosch, then the brackets are bent, and on the headlights produced in Kirzhach there are plastic sides. Next, the sealant is heated using a technical hair dryer and removed. The glass is removed.
Third stage. Use a Phillips screwdriver to remove the chrome reflectors. Tape is applied to the turn signal lens.
Fourth stage. The chrome surface is cleaned with sandpaper and an aerosol primer for plastic is applied to it in two layers. The parts are dried within an hour.
Fifth stage. Black aerosol paint is applied in several layers to a well-dried surface. Moreover, before applying each new layer, the previous one is given time to dry completely. After painting is completed, the tape is removed from the turn signals.
If only tinting of the reflector was necessary, then the headlight can be assembled, for which a layer of automotive sealant is applied to the junction of the body and glass. If the installation of “angel eyes” was also planned, then the work must be continued. To do this, it is possible to use simple gas-discharge tubes, but you can also try to create something completely unique.
This is done as follows:
- Eye rings are bent from plastic tubes or brackets used in blinds. To do this, they are heated using a technical hair dryer, which allows them to be given any desired shape, which should resemble an open ring with “legs”. For each headlight, two rings of different diameters are made.
- As soon as the rings have cooled, transverse notches are applied to them along the entire perimeter. To do this, you can use a hacksaw. There should be a distance of at least 2.5 millimeters between the notches.
- LEDs of the desired color are glued to the ends of the tubes using sealant or glue. The diodes of each ring should be connected in parallel by soldering a resistor into a gap made in one of the wires.
- The surface of the rings facing the headlight body is covered with aluminum tape to avoid reflection of the tube light in the reflective layer of the headlights. The ends of the tubes are completely wrapped with tape.
- The rings are attached to the blender using instant glue.
- The headlight is assembled and installed, while the “eye” wires are connected to the side lighting connectors.
Option “false eyelashes”
linings The first method is extremely simple - ready-made “cilia” are simply glued to the top of the headlight.
To give them the required shape, you can use a stationery cutter. To implement the second “cilia” method, it is necessary to prepare the following materials and tools in advance:
- vinyl film;
- paper, preferably thick, for making a template;
- pencil and scissors.
mesh A template is invented that is most suitable in the opinion of the car owner for the headlights of his car, which is cut out of paper.
Using the finished template, “eyelashes” are cut out of the film and glued to the surface of the headlight in the same way as the tinting film is applied. If one layer is not enough to block the light from the headlight, another layer is glued on. Technically, the third method is somewhat more complicated than the first two, but the effect of its use is also somewhat better. It uses plastic to make eyelashes. To tune Priora headlights using this method, the headlights will have to be dismantled. To do this you need to prepare the following:
- plastic, its thickness should not be more than two millimeters;
- technical hair dryer;
- marker or felt-tip pen;
- stationery knife or shoe cutter.
Headlights are removed according to the instructions available for each car. A piece of plastic is applied to the headlight glass and heated using a technical hair dryer to give it the required shape. The heated plastic is secured with pieces of tape so that it cannot move until it cools completely. After that, using a marker, the contours of the “eyelashes” are drawn on it, along which the excess plastic is cut off. Now you can paint the plastic in the desired color and glue it in place.
lens
lens Films of different colors are used to tint headlights, but the most common of them is black. If desired, you can tune the Priora headlights by choosing the color of the film to match the color of the car body. It should be remembered that with tinted headlights, the power of the luminous flux may change and the illumination of the road section may deteriorate in the direction of travel.
You can tint the entire surface of the headlight glass, or some of it. You can also apply some kind of design using paint or film specifically designed for this purpose.
Flaws
• The white Priora hatchback (photo below) is difficult to see in heavy snow and fog, as it blends in with the environment. In this case, good side lights and driving in compliance with all traffic rules can help.
• In wet and dirty weather it gets dirty quickly, just like cars of any other color. However, on a white car, dirt is clearly visible and striking. Therefore, in the autumn-spring slushy season you will have to wash it more often.
• Drops of bitumen that will inevitably fall on the lower part of the body if you drive along a newly repaired road are best wiped off as quickly as possible. A slight delay and the rye-colored spots will remain on the surface of the Priora hatchback white car forever.
Painting headlights
Tuning the front and rear lights on a Priora is not limited to increasing the aperture ratio. They can be tinted. But this does not mean that you need to paint the glass - the light will simply become cloudy. The tinting effect is obtained due to a change in the color of the substrate. This is done using high temperature paint.
This is done in the following order:
- The entire block is removed and the backing is removed;
- Wipe off the chrome from the substrate (zero polish will help). Cover the substrate with two or three layers of primer and wait about an hour;
- Apply 4-5 layers of paint over the primer, wait for each layer to dry;
- Assemble the block lights, close all the cracks to prevent fogging;
- After painting, all that remains is to adjust them. The main thing is that the light is not too dim and does not cause inconvenience when driving.
Adjustment after any modification of the optics is performed as follows:
- Place the car at a distance of 5 m from a flat wall (for example, opposite the garage);
- Set the adjusting screws under the hood to “0”. Put a person of similar height behind the wheel;
- The headlights are adjusted one by one; while one is being adjusted, the second one is closed;
- The clear edge of the light should be 10 mm below the top edge of the headlight.
If the problem is cloudiness
The glass of the lampshade may become cloudy over time due to frequent driving. This problem, as a rule, indicates the advanced age of the device. Cloudiness occurs due to constant exposure to dust and sand. Upon closer inspection, the “haze” that has shrouded the once transparent surface looks like hundreds of small scratches. They prevent light from reaching its target by scattering it everywhere.
There are ways to prevent this unpleasant phenomenon. In order to properly care for your headlights, you need to know what material is used to create them. Glass, for example, requires virtually no special care. But soft polycarbonate, which is increasingly used in the assembly of such devices due to its lightness and safety, will require attention from the car owner.
The work on disassembling the headlights of the Lada Priora takes place in several stages:
- The first and one of the most difficult stages is removing the headlight of the Lada Priora. This may even require separate step-by-step instructions. First, disconnect the block with wires from the headlight. Remove all headlight mounting bolts one by one. Remove the headlight housing and remove it from its socket.
- Now it's time to use a hair dryer. Heat it to a temperature of 250 degrees and start processing the joint. Heat the glue evenly around the entire circumference of the headlight until it begins to melt.
Note! Before “melting” the headlight, some “masters” recommend cutting off the plastic edge that runs along the entire circumference of the headlight with a knife. Although this greatly simplifies the process, it is not at all necessary to cut off the side; it will be enough to just bend it slightly. If the joint is well heated, opening the headlight usually takes place without complications. It's not worth damaging the headlight housing for this.
- After a good warm-up, try to carefully separate the front part of the headlight. At the same time, continue to heat the entire joint along the rim. If you come across Bosch headlights, you will additionally need to disconnect the four fixing brackets.
- When the glass is completely removed from the headlight housing, clean the joints. There will probably be traces of already hardened sealant on them. It is most convenient to clean with a utility knife and fine-grained sandpaper.
- Next, carry out the repairs for which the headlight was opened. Reassemble the headlight in reverse order.
- To glue the headlight glass back to the body, apply sealant to both halves. Press both parts of the headlight firmly.
- To ensure that the gluing is as strong as possible without any gaps, wrap both halves of the headlight with cling film. Wrap the parts with tape over the film. This is a proven way to fix both halves of the headlight for a certain time required for the sealant to polymerize. The cling film will not leave marks on the headlight after removal, as would be the case if it was simply fixed with tape.
After gluing the headlight, install it in place. Now everything will work as it should.
Also read with this article:
Step-by-step instructions for replacing the cabin filter on your Lada Priora yourself
We change the steering tips of Lada Priora
Replacing the air filter Lada Priora
Step-by-step instructions for soundproofing the floor of a Lada Priora with your own hands
Self-recovery methods
To get to the reflector, the headlight removed from the car must be disassembled. The first option involves repeatedly passing the hot air of a hair dryer over the seam. The second option involves leaving the headlight in an oven preheated to 100°C for 20 minutes. After opening, all parts are cleaned of sealant residues, washed without using alcohol-containing liquids and dried.
Using metallic tape
Let's start with how to restore the reflector on a headlight using tape foil. All you need is metallized tape, purchased at a hardware store for about 30 rubles. Its adhesive base copes well with high and low temperatures, and the aluminum film is very wear-resistant.
Advantages of the method: durability, low cost, ease of implementation.
Disadvantages: when gluing, irregularities and seams remain, which impair the properties of the reflector.
Using metal foil
Aluminum foil is highly reflective, which allows it to be used in the restoration of headlight reflectors. You will also need some epoxy resin. To maintain a perfectly smooth surface of the foil, the entire pattern is made from plain paper. Then the parts are duplicated from aluminum sheet, a thin layer of resin is applied to the reflector and glued, removing excess resin.
Disadvantages: being between the metal foil and the plastic base, epoxy glue lacks air and takes a very long time to dry. It is almost impossible to remove dried glue. Therefore, such a reflector is not suitable for repeated restoration. With the advent of tape foil, this method is practically not used.
Using chrome paint
Headlight reflector repair using chrome paint is the most popular. No need to cut and glue anything. Paint is sprayed onto the degreased surface of the reflector from a can of white chrome until a uniform, uniform layer is obtained. After painting, the headlight is dried according to the instructions on the can.
Disadvantages: does not tolerate high temperatures. You should try to find heat-resistant chrome paint.
Using mirror film
No less effective is the restoration of the reflector by applying a metallized self-adhesive film of the Oracal brand. Films from the Oracal 351 and Oracal 352 series can withstand temperature changes from -40 to +120°C and, according to the manufacturer, can be used outdoors for two years without deterioration in performance. Since the headlight is a hermetically sealed space, the service life of the self-adhesive film increases.
It is necessary to make templates from paper or ordinary tape that exactly replicate the shape of the reflector. Then cut out the polyester film of a similar shape. Using a hairdryer, glue it onto the prepared surface of the reflector, smoothing it out and preventing the appearance of bubbles. The joints and edges can be additionally treated with chrome paint.
Advantages: reliable manufacturer, excellent reflective effect.
Disadvantages: the price of 1 m2 starts from $5.
As you can see, restoring headlight reflectors is a simple procedure and quite feasible in a garage. Considering the fact that auto repair shops charge an order of magnitude more money for similar work, it always makes sense to try to return the headlight to its previous brightness with your own hands using one of the proposed methods.
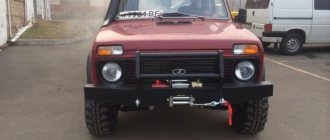
Sport car
Very often, cars of the VAZ family are chosen as racing cars, especially for amateur competitions. One of the most suitable for these purposes is the white Priora hatchback. Pictures of sponsors advertising, riders' names and serial numbers are visible from afar on a white background.
Even the basic version of the car, the white Priora hatchback, features a sporty look. Tuning (photo below) will give it an aggressive and brutal look. Of course, a lot of work is required to upgrade the standard equipment to the racing version. But, as shown in the photo, the white Priora hatchback allows you to do it even in a garage, especially since there are no problems with purchasing components and spare parts for the Lada.
Sources:
https://vazgarage.ru/ladapriora/kuzovpriora/456-krasim-masku-far-na-priore.html https://ladatuningshop.ru/komplekt-chernyh-far-dlya-lada-priora https://wroom. ru/forum/topic/4375 https://avtoform-plast.ru/catalog/optika/vaz/lada_priora/ https://priorapro.ru/tyuning-stajling/belaya-priora-xetchbek.html
Installation of LED DRLs
LEDs for replacing daytime running light bulbs must comply with GOST. They provide excellent light during daylight hours, and if connected correctly, light up when the ignition is turned on.
The connection is made through a five-pin relay; plastic corrugations can be used to insulate the wires. Each LED block will have a black and a red wire coming from it. It is advisable to connect the black one to the windshield wiper fuse F11 (20), and the red one to the left side light fuse F14(5).
The use of LED DRLs instead of factory ones after the first week will change the Priora owner’s view of his own car. Such a small part can cost about 500 rubles for two lights, but its appearance on the road will be noticeable to everyone.
In what cases is it necessary to replace and adjust headlights?
The main reason why optics are replaced is their failure and the inability to perform their functions: high-quality road lighting. In addition, the lamps in the lanterns are changed. Bosch lamps are in demand. Bosch brand xenon produces better quality light and has a longer service life.
Bosch xenon lamps
Optics should be changed for the following reasons:
- the headlight sweats, its ventilation is impaired;
- cracks, chips on glass;
- reflector malfunction;
- faults in electrical connectors;
- defects in fasteners;
- tuning
During the replacement process, you can not only restore the functionality of the flashlight, but also improve its performance characteristics by replacing halogens with xenon. Using xenon in lamps, the driver receives better lighting. At the same time, tuning of the headlights is also carried out: lens glass is installed, black headlights look impressive. LED lamps are installed in the parking lamps, as well as in fog lamps.
Front lights with lenses
To make your car tuned, you need to know how to remove the front and rear optics.
Tuning
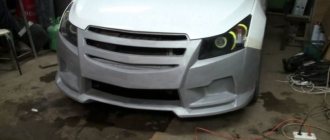
As shown in the photo, the white Lada Priora hatchback is one of the cars that most successfully accepts the modernization of its appearance. Even a simple replacement of standard bumpers with restyled ones and tinting the windows gives the car individuality. However, the fantasies of car owners do not end there.
• Various types of body kits are used in the color of the Priora (pictured) hatchback white. Tuning bumpers and radiator grilles, installing a spoiler sometimes make a car completely unrecognizable, aggressive and impressive.
• Photo of a white Priora hatchback, tuning it in a retro style, can often be seen on the streets. Chrome-plated hubcaps in the style of the 50s of the last century and white rims on the wheels leave no one indifferent.
• The Lada Priora hatchback (pictured) is white, with red lighting at the bottom and looks very original.
• High-quality LEDs and eyelashes installed on a white Priora hatchback (photo below) will make the headlight tuning complete and the appearance seamless.
How to remove a taillight on a Priora and glue vinyl
Car enthusiasts often have a desire to highlight the uniqueness of the vehicle on the road in every possible way. To achieve the goal, the owners are upgrading the taillights on the Priora. They change the color of the vinyl film glued on top and install additional LEDs. Additional modifications to the design of the light signaling system must comply with safety standards.
It will be easier to work by removing the rear light. What is not difficult:
- You need to disconnect the wiring connector going to the light on the trunk side;
- unscrew the three plastic wing nuts;
- remove the lantern;
- pull out the wires along with the rubber seal through the mounting hole.
That's it, the lantern is removed, you can put the lantern in the reverse order. Before dismantling or installing the lamp, it is recommended to disconnect the wire from the terminal. Pasting vinyl is a procedure somewhat similar to the process of tinting car windows. You need to remove dirt, wash the glass of the lantern, remove greasy stains and stains using window cleaners. Cut a piece of vinyl of the required size (with a small margin), moisten the surface of the lantern with a soap solution (without fanaticism). Glue the prepared piece of vinyl, removing the protective layer, remove air bubbles, and remove excess moisture. The remaining vinyl around the edges of the tail light can be cut off with a sharp utility knife.
How to remove a taillight
Removing the taillight on a Priora is much easier than removing the front one. You don't have to remove the bumper to do this. Before starting work, you must disconnect the battery. You need to act in the following sequence:
- First, you should carefully bend back the luggage compartment trim;
- release the fasteners that secure the wire block and then disconnect them;
- Next you will need to unscrew the bolt that secures the headlight;
- then you need to unscrew the wing nuts that are attached to the mounting studs;
- All that remains is to pull the headlight out of its mounting location.
Reassembly must be done in reverse order
It is important to disconnect the wire when doing this. Otherwise, the harness may be damaged or completely disassembled, which often causes a short circuit in the car wiring
What do you need to know when choosing paint for a reflector?
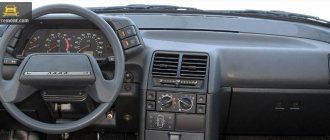
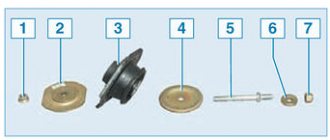
Lighting devices of any car consist of the following elements: body, reflector, mask, diffuser, lighting lamps.
Headlight parts
Most often the mask that holds the reflector is painted. Alkyd or acrylic paint is used for it. To update the reflector, special chrome paint is used. When choosing paint, remember that the temperature inside the headlight is very high. Therefore, you should choose one that is resistant to thermal influences. The paint must withstand temperatures of more than 100 degrees Celsius. Usually the manufacturer indicates this on the can or in the specification. Chrome paint and mask paint can be purchased at an auto body shop. It is also better to buy a primer for plastic here. It is advisable to take consumables from the same manufacturer. This will ensure high-quality painting.
Why should it be eliminated?
It's simple, and there are several reasons for this:
- The efficiency of lighting drops significantly; if you like, it can be compared to a dirty headlight. Which is already dangerous, because you simply may not see the crossing pedestrian.
- Fogging is often accompanied by the accumulation of water inside the headlight, which leads to corrosion and destruction of all metal parts of the headlight. Although now many manufacturers are made of plastic, the lamp itself is made of glass and metal.
- If moisture gets on a heated lamp, it may simply burst.
- Water is a good conductor; it can short-circuit the lamp contacts. At a minimum, it will burn out, at a maximum, the fuses will blow out, and if this happens on the road, you risk being left without road lighting.
- The lamps will burn out more often, again due to moisture getting on the contacts.
In general, problems are guaranteed, so something needs to be done. Often the reasons are trivial.
Step by step guide
Removing a headlight on a Priora is a simple process, but it has some features that you should familiarize yourself with in advance.
- To completely detach the headlight from the existing mounts, you first need to remove the bumper. In order not to unscrew extra nuts and bolts, you can try to partially remove the bumper. After removing the bumper, you need to unscrew the fastening bolt from above, and then from below.
- The third headlight mount is located on the side. To remove the headlight from this mount, you need a Phillips screwdriver.
- After working with a screwdriver, all that remains is to unfasten the block and the harness from the headlight itself. To make removal easier, you can pry the lock with a thin screwdriver.
- After all the above steps, you can easily pull out the headlight; nothing will hold it in place.
You will need to install the headlight back in the reverse order.
You can learn how to adjust the headlights yourself from the detailed material from our specialist.
The best lamp manufacturers
According to car owners, manufacturers such as Osram, Koito and Philips are more trustworthy. The advantages of the products of these companies include their long service life.
Advantages of the most popular models:
- Philips X-treme Vision – excellent visibility in the rain;
- Osram H7 - low price, long service life, used for factory assembly;
- Bosch Pure light - works great in bad weather conditions, low price;
- Philips Long Life - have a longer service life (about 500 hours).
Due to the high popularity of these brands, fakes are increasingly found at a price lower than the original. It is difficult to distinguish a fake visually. Sometimes sellers themselves cannot give an accurate answer regarding the quality of the product.
Counterfeit lamps produce poor performance during operation and can be harmful to the lighting system. To avoid damage, it is recommended to install original spare parts. To be sure of your purchase, you should study the characteristics of the original products of the brand you are interested in.
Replacing the lamp yourself takes no more than 30 minutes. Before you begin installation, carefully study the technical requirements, make sure you choose the right type of lamp and take into account the features when working with them.
Priora car headlight: Bosch and Kirzhach - what is the difference
Let's highlight two manufacturers (not taking into account the copies of Chinese origin) that have a number of differences. Popularly known as kirzhach, bosh. There is a significant difference between them: Kirzhach - a corrugated inner surface of the well, a cast low-beam lamp reflector without a cutout, glass (plastic) attached with a refractory sealant. The marker lamp is located at the bottom of the reflector well. Two separate plugs for the rear of the optical device. The device from the Bocsh brand has a smooth inner surface of the well, a low-beam lamp reflector with a cutout, and a low-melting sealant is used to fix the glass (plastic). The size lamp is placed in the upper part of the well; one plug from the rear of the lighting unit is used. Minor differences in design, quality of parts, presence of a chrome-plated rim of the signal amplifier of the rotary element. The number of taillight design variations available to the buyer is numerous.
Eliminating the causes of water appearance
Removing fogging of taillights or headlights:
- The cables are disconnected and the corrector hose is disconnected.
- Remove the headlight, thoroughly clean the surfaces, check the technical holes and breathers.
- Be sure to check the O-rings that are located in the connectors and sockets of the lamps - any rings that are even slightly damaged must be replaced immediately.
- Carefully examine the surface for the formation of cracks. Small ones can be sealed with sealant.
- Check the seam for tightness. It is necessary to replace the seal, it is advisable to go around the sealant in a circle.
- If a lot of water collects in the housing or the headlight on the Granta Liftback constantly sweats heavily, some car owners drill a small hole in the glass at the bottom. This often helps, but it is not the best solution to the problem.
Priora headlights | Club LADA
Not long ago they came up with an interesting way to make your car stand out from the crowd - by making turn signals instead of dimensions. That is, one area of the headlights performs two functions at once (direction indicators and side lights). There are many ways to implement such tuning, but we will focus on one of the simple ones.
Headlights play one of the main roles in the exterior design of a car.
It doesn’t matter whether it’s repairing or tuning headlights, it all starts with their dismantling. We are studying the question of how to remove the headlights of a LADA Priora
Many saw angel eyes on a BMW for the first time. Now, thanks to the rapid development of the lighting industry, you can easily install angel eyes with your own hands in almost any car, and Lada Priora is no exception.
Without a doubt, tuning headlights significantly changes the appearance of a car, which is why tinting headlights is very popular. You can tint the head optics with film or paint. In this article we will figure out what is required to paint the Lada Priora headlight mask with your own hands.
In the Norma configuration on the Priora there are no PTFs, and there is also no wiring harness for them, a power button in the light control module (LCM) and a relay. But this is not scary, because you can install and connect fog lights on a VAZ 2170 with your own hands.
The life of the lamps in the headlights is not eternal, so they should be changed during the operation of the car. This article contains instructions for replacing Priora lamps with your own hands.
Dimensions Priora initially have a yellow color and a dim glow. To get rid of yellowness and increase brightness, you can replace the lamps in the dimensions with LEDs.
Tuning Lada Priora headlights, on the one hand, can be like decorating a car, on the other, improving the headlights. The most correct way to improve lighting is to install bi-xenon lenses in the Priora.
How to inexpensively, quickly and easily tune Lada Priora headlights? Install eyelashes! You can make them yourself, or buy a ready-made kit, but how to install them correctly? First things first...
If you decide to tune the optics of a VAZ 2170 (paint the headlight mask, install angel eyes), then the first thing you will need to do is remove the headlight glass. Let's look at all the intricacies of disassembling a Priora headlight with our own hands.
Almost every owner had to change the headlights on a Priora. And the reasons for this may be different:
- road accident damage
- to perform modifications (tuning)
- to eliminate fogging (sizing)
- to replace the internal parts of the headlight - corrector, reflector, etc.
To replace the headlight unit on a Priora, we will need the following tool:
- Phillips screwdriver
- 8 mm head
- Ratchet
- Extension
Installation of LEDs and overlays
A fairly simple way to transform your Priora is to buy ready-made “eyelashes” in specialized tuning stores. However, it will be much cheaper to make them yourself. To do this, just take tubes or a piece of plastic (an alternative is vinyl film) and cut them into thin lines with a stationery knife. You can curl future “eyelashes” with your own hands using a hair dryer and soap solution. They are then attached to the car body using double-sided tape, glue or sealant.
Some drivers believe that “angel eyes” tuning looks much more impressive and useful in poor lighting conditions of Russian roads. It involves attaching LEDs to the headlights or taillights.
For this DIY upgrade you will need:
- disassemble the front or rear headlight, having previously dismantled the element;
- stick masking tape on the outer part of the glass of the optics, which will prevent it from being damaged;
- bend the plastic sides (brackets) of the optics, under which the reflector is located;
- heat the sealed adhesive with which the glass is fixed in the headlight using a household or construction hair dryer and remove the glass;
- remove the reflectors using a Phillips screwdriver. Don’t forget to cover the turn signal lens with tape for protection;
- Apply several layers of black paint to the reflector. This, combined with bright LEDs, will provide a greater tuning effect. Let the paint dry;
- take an LED strip with a cross section of 2.6 mm. Remove the reflector's metallic backing, bend the tape into a circle and attach it using fasteners or glue;
- After the glue has dried (about 2 hours), reassemble the headlight or lantern. Don't forget to re-apply the sealant to the glass.