To find out when it is necessary to replace the rear brake pads of a VAZ 2110, you should focus not only on your own sensations or the appearance of squeaks when braking, but also on their actual wear.
You can assess the condition of the pads through the inspection window without even removing the drum. To do this, remove the rubber plug in the dust shield, pry it off with a screwdriver, and look at the pads. Their thickness should be more than 1.5 mm.
Pry off the plug with a screwdriver
We remove it from the shield
If it is less, then they will no longer provide a quick stop after pressing the pedal. In addition, with such a thickness, the piston stroke of the cylinder will be greater than normal. Hence, leaks leading to loss of fluid, a drop in its pressure, that is, the entire braking system is at risk.
Rear wheel brake
Design features and reasons for tuning
It is worth saying that law enforcement agencies rarely find fault with this type of tuning, but there is still a chance of getting a fine during a technical inspection. If in standard rear mechanisms the “drums” do all the work, then disc brakes have pads, a disc and a caliper. The main advantage of this unit is the absence of overheating of the disc at high speeds; disc brakes also feel better on wet road surfaces.
Installation of non-standard rear mechanisms is performed for the following reasons:
- Dismantling and disassembly are easier to carry out when compared with drum analogues.
- The braking distance is noticeably reduced, regardless of whether the car is driving on dry or wet surfaces.
- It is not necessary to adjust the parking brake after each service of the rear mechanisms - this should only be done after installation.
- In cold weather, disc brakes do not freeze, unlike drum brakes.
VAZ 2110 owners who plan to install disk mechanisms need to know that before starting to operate the car, the sorcerer needs to be modified. Otherwise, the rear wheelset will brake much more than the front. This defect will especially manifest itself on wet asphalt. If the installation can be carried out independently, then the adjustment or modification of the sorcerer should be carried out by professionals from the service station.
How to change front pads
- To install new brake pads, perform the above steps in reverse order. However, you must remember to clean the seats from dirt, install the internal block, and move the bracket to the working position. Then we move the bracket with a screwdriver, resting it on the brake disc and retracting the piston with a screwdriver, which is inserted through the hole for the caliper.
- If the new front pads are equipped with a wear sensor, then you need to connect it. We cut the wire responsible for pad wear.
- Disconnect the brake pad connector.
- We take out the rest of the wire.
- We connect a new block with a new connector.
- After changing the brake pads, bleed the brakes by pressing the brake pedal several times. This is done so that the pistons take their working position. Now we check the brake fluid level under the hood. If it is minimal, add brake fluid. By the way, be careful, it is very toxic and can corrode rubber hoses and even paintwork!
It happens that the brake disc piston does not return to its original position. In this case, you should unscrew the brake bleeder, which will make it easier to return the piston. If this does not help, then remove the entire brake mechanism of this wheel to squeeze out the piston in a vice and replace the seals
It is very important that when performing these works, do not hit the piston, as this can lead to its distortion and scratches on the cylinder surface.
When to change pads
The brake pads of the VAZ 2110, if you don’t delve into their design, consist of a friction lining and a special frame. Friction linings perform braking and, precisely by the material from which they are made, these linings are distinguished. This material (for the friction lining) is based on a special reinforcing component, which determines such design parameters as strength, stability, heat resistance and reliability of the braking qualities of the system.
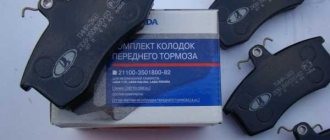
New brake pads for VAZ 2110
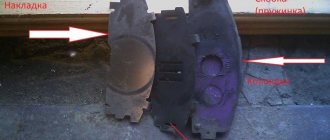
Like any part, VAZ 2110 brake pads have their own service life, which is usually 30,000–50,000 km of vehicle mileage or the friction lining reaches a thickness of 1.5 mm. (that is, they practically grind down to zero, but most often when braking, piercing unpleasant sounds arise from under the wheels). When the thickness of the brake linings is less than 1.5 mm. Excessive stroke of the brake cylinder pistons occurs, which leads to its leakage.
Brake pads should also be replaced if:
- the friction linings are covered with an oily substance (oiled);
- mobility of the linings on the base was detected;
- Deep chips, grooves or cracks have appeared on the surface of the friction linings.
It is also necessary to monitor the wear of the brake discs, which should be replaced when they reach a thickness of 17.8 mm. (for ventilated discs) or 10.8 mm. (for non-ventilated ones).
Features of the system
VAZ 2110 cars have a special design. In them, the brake drums are controlled by different hydraulic drives, that is, the front and rear left wheels are controlled by one hydraulic drive, and the front left and rear right wheels are controlled by another.
The peculiarity is that these systems are interchangeable. If any circuit fails, the second one is able to provide insurance and prevent an accident.
The hydraulic drive is based on four main elements - a brake cylinder, a brake pad, a rear brake shield and a guide spring. Moreover, the efficiency of the entire system depends on the integrity of the cylinder and its serviceability.
During operation, the unit may wear out, become damaged and fail. The only solution here is to replace the rear brake cylinder of the VAZ 2110.
Which ones to choose for replacement?
The quality of braking and comfort when slowing down the car (no whistling or grinding noise) also depend on the quality of the brake pads. It is also necessary to consider the following when choosing a consumable:
- Poor quality pad material can be the main cause of squeaking, as well as accelerated pad failure;
- When purchasing, choose front brake pads with manufacturer catalog number 21100-3501080-00;
- The same brake pads can behave differently with different brake discs, which significantly complicates the choice;
- To make the right choice when buying brake pads, you need to read reviews in magazines about cars, directly at points of sale, among friends.
Recently, Ferodo, ATE, Allied Nippon and Lucas brake discs have become very popular for the VAZ 2110.
How to remove the pads
In order to remove defective rear pads from a VAZ-2110, you need to prepare the following arsenal of a car mechanic:
- a jack is needed to raise the rear of the car
- key 12, it will become the main tool in our business
- pliers are useful for removing parts
- hammer, yes, you will have to make physical efforts to knock out old parts
- a screwdriver, a good helper in removing old pads
- the block is an excellent stand.
Work begins
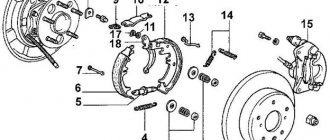
The very first thing you need to do is put the car on a jack. Remove the rear wheel and disc. Our view opens to a drum (6), attached to the entire structure with two bolts (cotter pins (7)). These need to be removed. Here you will need a 12 key (you can also use an 8 key). it is just suitable for working with tens of pads. Remove the brake drum (6). This is probably the most difficult thing in the process of replacing the rear pads, because over the years of the car’s service the drum “sticks” almost tightly, and in order to remove it without damaging it, you will have to work hard. A hammer, which needs to be tapped, will help here on the drum, but only before this it is important to place a previously prepared block in order to prevent deformation of the drum, otherwise it will not take long and break into pieces, which we, of course, do not need. Carefully and slowly remove the spring securing the rear pads of the car
The spring is removed using pliers or a simple screwdriver (9). Now you should disconnect the spring (8) fixing the block on the shield (1). We loosen the upper spring (3), which secures the unit. In order to loosen the spring, you need to turn the block a little to the side, about 50-60 degrees. To remove the unit, carefully remove the part from the support and the brake cylinder (2)). To do this, you need to grab the block (4), not connected to the handbrake (a sorcerer in common parlance)
We pull the part as if we are trying to move the pads apart from each other. You will have to loosen the part several times until it is disconnected and pulled out. In order to remove the second block, we disconnect the handbrake rod (sorcerer) from the cable. Now the block is easy to pull out
The process of removing the units is completed, now you can begin replacing the old pads with new ones.
Installation is always carried out in the reverse order of dismantling. But in order not to get confused in this work, we will discuss this issue in more detail.
- To begin with, we need to push the piston of the brake system cylinder all the way inside.
- It is necessary to attach the handbrake rod to the new rear block. This must be done in exactly the same way as was the case with the old node, and in no other way.
- We put the cotter pin in place.
- How much we suffered before we pulled out the guide spring. Now it's time to bring her back. We attach it to the block.
- The cable is connected to the handbrake rod.
- The previously removed upper spring is now attached to the pads at one end and the other.
- Now get ready to perform the most important stage of the work: we place the block on the brake cylinder, in the place where it should be. We tighten it a little from below so that the spring stretches and makes it possible to place a spacer bar in the niche. We insert the bar. After this, we put the second block in place, but only so that it does not fit into the hole of the strip.
- Armed with pliers, we engage another spring with the assembly. But here, keep in mind one important nuance: the cable should under no circumstances touch the drum parts that move. otherwise, serious consequences may result.
- We are approaching the end of the work process. We install the drum in place, fasten it with bolts, and install the wheel.
The work is completed. For the first time, it is better to put detailed instructions in front of your eyes, so as not to get confused and make a mistake, it would be good to also watch video materials on installing brake pads.
The second time, this work will be performed automatically and will take no more than half an hour. The main thing is not to delay replacement: brake pads are a serious matter that cannot be tolerated, because they ensure the safety of the vehicle.
We wish you good luck and good mood!
Let's start replacing
To replace the rear pads on a VAZ 2112, you need to place your car on a level surface, place “shoes” or other supports under the front wheels, and engage first gear. Then:
- Loosen the rear wheel bolts
- Using a jack, we hang up the rear part of the car body, and instead of a jack we use special supports (chocks or sawhorses, if available)
- Then we finally unscrew the bolts securing the rear wheels and remove the wheels
- Before disassembling the rear brake mechanism, it is necessary to wash it with water and a special detergent, then dry the mechanism thoroughly
Unscrew the pins from the brake drum
- Using a brush, clean the seating surface of the drum, then screw special bolts into the service holes of the drum.
- Screw in the bolts one turn at a time to remove the drum.
- From many years of practice, we know that the drum often sticks tightly to the hub due to the peculiarities of the operating mode
- In this case, it can be removed by tapping it through a wooden block with a hammer (in this case, the blows should be applied alternately and preferably from opposite sides)
- You can try to remove the drum using a flat screwdriver (insert the screwdriver between the edge of the drum and the casing and squeeze it out)
- At the same time, do not forget that the drum is made of aluminum alloy; if handled roughly, it can simply burst; the cost of careless and rough handling will be unexpected
- Having removed the drum, take a ruler or a caliper and measure the thickness of the linings on the brake pads
- The permissible thickness of the overlays is 1.5 millimeters
- When the thickness is slightly more than the maximum permissible thickness, operation of the machine is allowed, but you should not be deluded by this fact
- Just a couple of hundred kilometers of driving on our Russian roads and then the prospect of dismantling the rear brake mechanisms is again on the horizon
- Therefore, if the thickness of the linings approaches the maximum permissible value, it is better to replace them immediately and forget about problems with them for a long time
Use a screwdriver to remove the pressure spring
Then, use pliers (nose-nose pliers) to disconnect the lower return spring
Disconnect the lower brake spring using needle nose pliers
- Now, using a screwdriver, remove the pressure spring from the rear brake pad
- Unscrew the lower part of the brake pad upwards, move it up and disconnect the upper return spring
Disconnect the upper return spring
- Using needle-nose pliers, disconnect the parking (hand) brake cable from the operating lever
- Then remove both pad assemblies from the brake shield
- We disconnect the spacer bar from the pads, then remove the cotter pin and take out the axial pin and washer together
- Remove the parking (hand) brake lever from the brake pad
We take out the cotter pin, shown in the figure with a red arrow, take out the pin and remove the hand brake lever
- When installing new brake pads, it is necessary to recess the pistons of the working brake cylinders
- Now is the time to remember the warnings at the beginning of the article that the liquid may overflow. Check the level, pump out if necessary
- Don't forget to hook the end of the handbrake cable to the lever attached to the block!
- We install the rear pads on a VAZ 2112 in strictly reverse order.
- Considering the fact that after assembling and placing the car on wheels, you should press the brake pedal all the way down several times to return the pads to their working position
- Put on the brake drum, then install the wheel
- Carry out the same actions on the other side, do not lower the wheels to the ground
- Then press the brake pedal several times
- We go down under the car and adjust (pull) the handbrake cable
- By tightening the nut on the cable equalizer, check the tension
- Inside, we lift the handle of our parking brake, count the clicks, if there are more than eight clicks, then tighten the nut a little and check again
- The optimal number of clicks is considered to be from two to seven
- The main thing is to check that when the parking brake lever is raised, the wheels are locked (our wheels are not lowered, so we try to turn them by hand)
- When the handbrake is removed, the wheels should rotate freely, without jamming or friction of the pads. Otherwise, when the car is moving, the drum may jam when heated
That's it, the process is completed, everything seems to have been taken into account, all that remains is to watch the video if something is still not clear.
How to replace the rear ones
Replacing rear pads on VAZ-2110 series cars and their derivatives is somewhat more difficult, since they are of the drum type. Replacement work is carried out as follows:
- The rear of the car is jacked up, after which the wheel is removed.
- The guide pins located on the drum are unscrewed (if the pins become soured, it is possible to remove the drum along with the hub after unscrewing it).
- If the drum cannot be dismantled, tap it.
- Using long-nose pliers, remove the cotter pin located on the left side.
- Using pliers, disconnect the spring that tightens the brake pads at the bottom.
- The fastening side springs are removed (steps 1–4), the spacer bar (5), after which the pads are removed from the drum body (6 and 7).
- Installation of the pads is carried out in reverse order.
Working with the puller
If you still don’t want to damage the bearing, then you can replace it without knocking it out of the hub. In order to remove it from there, you can use a special puller. Removal is much easier with this device.
To do this, you need to carefully insert the puller's paws into the grooves on the hub and remove the ring. Sometimes this requires some effort; the ring must be pryed with a screwdriver and removed. Using the device, the part is removed and the nicks on the component are smoothed out.
Then, using a puller, you can also press the new part into the steering knuckle. This tool allows you to press the hub with high quality. Working with a tool of this type greatly simplifies the entire process, and the technician will need less time for all removal and installation. But operating the unit requires some skill and great care.
As you can see from this article, even such a simple repair job as replacing a wheel bearing can have many nuances.
Sources
- https://mylada.net/remont/zamena-podshipnika-generatora-na-vaz-2110-2112.html
- https://remont2110.ru/kak-zamenit-podshipniki-vala-rulevogo-upravleniya-na-vaz-2110.html
- https://vazweb.ru/desyatka/hodovaya/zamena-stupichnogo-podshipnika.html
Brake cylinder malfunctions
A breakdown can be recognized by several main symptoms:
- Reduced efficiency of the braking system (the braking distance of the vehicle increases noticeably);
- the appearance of “softness” when pressing the pedal.
The first thing to do in the situations described above is to bleed the brakes and check the condition of the pads. If no problem is identified, then most likely the cause is a failure of the brake cylinder.
The appearance of a leak in the cylinder area. This can be diagnosed by the appearance of an oil stain on the brake support disc. In such a situation, you cannot hesitate, because we are talking about depressurization of the system.
In such a situation, the pedal simply “falls” to the floor, and braking does not occur. Disassembling the unit and installing new cuffs most likely does not help. The rear brake cylinder needs to be replaced.
Installation
Installation of the new element is carried out in the reverse order. Before installation, you need to thoroughly clean the brake mechanism from dirt using sandpaper. Degrease the seat with white spirit.
So, first you need to open the hood and add brake fluid to the maximum level. It is not recommended to mix different classes of products. Cars of the “tenth” family are filled with RosDot-4 class fluid
Please note that during pumping the level in the tank will drop. As soon as it drops 1.5 centimeters, you need to top it up again
Next we need an assistant. He will press the brake pedal at your command. So, unscrew the cap from the bleeder fitting and put the hose on it. We put its second end into a plastic bottle. We give the command to the assistant. He must press the pedal 5 times and at the last stage press it “to the floor”. At this time, you will observe how aired liquid flows out of the fitting.
The process of replacing front brake pads on VAZ 2110, 2111, 2112
Replacing the front pads on cars of the “tenth” family is quite simple. To do this you need:
- Jack up the car and remove the front wheel.
- Bend the locking plate to gain access to the bolt and unscrew it, installing the keys “17” inside and “13” on top.
- Unscrew the bolt located on the caliper and remove it along with the plate.
- Pry off the caliper and then open it.
- Remove the brake pads.
- Using a wrench, press the brake cylinder into the caliper body and cut the wire responsible for indicating pad wear.
- Disconnect the connector and remove the remaining wire.
- Connect the new connector and wire.
- Reassemble in reverse order.
- After completing the work, press the brake pedal several times to restore the working efficiency of the braking system.
The work process takes about 30 minutes for one wheel and can be completed with minimal knowledge in the field of auto repair.
Setting up the parking brake
To do this, we need access to the bottom, so we put the car in a pit or lift it up as much as possible. To adjust the handbrake on the “ten”, it is enough to have two open-end wrenches “13” and pliers. First, we sit down in the cabin and pull the lever until the first click. Then we go down into the pit and find the tension adjustment nuts on the bottom.
First, unscrew the locknut. Next, use the second key to screw the main one clockwise. This is how we tighten the handbrake cable. Then we sit back in the cabin and check the handbrake movement. It should work in 3-4 clicks. If the lever stretches further, go down and loosen the nut by rotating it counterclockwise. Having set the normal position, tighten the locknut. This completes the adjustment procedure.
Replacing the front brake hose of VAZ 2106, VAZ 2107, VAZ 2109, VAZ 2110, VAZ 2114, VAZ 2115
The braking system is a system that the driver must pay special attention to, since the operation of its elements directly affects the safety of the vehicle. To study the structure and help in servicing the brake system, the website has a section called - Brake system structure, in which you can disassemble this system into its component parts in more detail
As for this article, it is devoted to a topic called - How to replace brake hoses of VAZ 2106, VAZ 2107, VAZ 2109, VAZ 2110, VAZ 2114, VAZ 2115, Lada Kalina, VAZ 2170 with your own hands.
Many motorists believe that replacing brake hoses does not deserve a separate topic, since it is not at all difficult, but for novice motorists, I think this article will be useful.
After all, you will agree that no matter what job a person takes on, there will always be nuances that would be better to learn from advice than from your own bitter experience.
I would highlight several basic questions that a beginner should pay attention to when replacing brake hoses on a VAZ 2106, VAZ 2107, VAZ 2109, VAZ 2110, VAZ 2114, VAZ 2115, Lada Kalina, VAZ 2170:
- Which brake hose manufacturer is best?
- What tools are needed to replace brake hoses?
- Consistently work on replacing brake hoses.
We will try to consider all these questions in this article. In order to make your work easier, just find on the Internet the answer to the question - how to replace the brake hose on a VAZ 2106, VAZ 2107, VAZ 2109, VAZ 2110, VAZ 2114, VAZ 2115, Lada Kalina, VAZ 2170.
So, let's start studying information on how to replace the front brake hoses of a VAZ 2106, VAZ 2107, VAZ 2109, VAZ 2110, VAZ 2114, VAZ 2115, Lada Kalina, VAZ 2170.
Tools for replacing brake hose:
- Open-end and ring wrenches for 8, 14, 15.
- Socket wrench 8.
- Special split key and crimp key for 10.
- Hammer.
- Metal brush.
- Don't forget to get WD-40 liquid (it currently costs about 80 hryvnia, but you will need it in the future).
- Transparent bottle for easy brake bleeding.
- It is better to carry out work on replacing brake hoses with a partner.
What brake hoses should I buy and what spare parts should I buy to replace the brake hoses?
Brake hoses produced by Balakovo have proven themselves well, they are of good quality and a little expensive. If you want to save a little money, you can buy brake hoses produced by DAAZ, which are also of good quality.
You should also buy copper washers 1.5 mm thick, brake fluid, which is necessary for bleeding the brake system. I recommend buying brake fluid DOT 4 400 grams.
If you have purchased everything and are ready to replace the brake hose, then the first thing you need to do is remove the wheel. Using a metal brush, clean the brake hose fitting after spraying it with WD-40.
After this, unscrew the bleeder fitting using a socket wrench (Figure 1,2,3). I recommend performing this operation first, since most often the front caliper bleeder often gets very stuck, which can lead to its breakdown.
Then you can change the brake hose. Using a crimp wrench, grab the brake pipe fitting, hold the brake hose with the wrench and slowly tear the fitting out of place. When the tube fitting rotates freely, unscrew it using a split wrench. To prevent brake fluid from spilling out, plug the tube with a cap (Fig. 4).
Remove the rubber ring of the hose from the front pillar holder (Figure 5).
After removing the brake hose, thoroughly clean the area where the hose connects to the caliper, then attach a new hose with a new washer (Fig. 9). Tighten, but do not pinch. Secure the brake hose using a holder. The job is done, all that remains is to bleed the brake system.
How to bleed the brake system after replacing the brake hose?
Ask an assistant to press the brake pedal at intervals of 2-3 seconds, about 3-4 times, press, hold. At this moment you release the fitting and the liquid with air comes out. As in the picture below. After bleeding, tighten the fitting. You can tell that the brake system has been bled by the disappearance of air bubbles. Then all that remains is to check the connections for leaks and the level of brake fluid in the brake reservoir.
Symptoms of wear
As a rule, pads last 15-30 thousand kilometers. But this is an average figure, because a lot depends on the driving style, the quality of the linings, operating conditions, and so on.
Extreme driving with sudden acceleration and the same braking can lead to wear of the linings after 5-8 thousand kilometers.
So to the question “when to change brake pads?”, the best answer is “as they wear out.”
Focus on the characteristic signs of a malfunction:
- The appearance of a creaking or grinding noise during braking;
- drop in brake fluid level in the reservoir;
- presence of beating when pressing the brake;
- increase in braking distance;
- the appearance of dust from the linings (as a rule, it settles on the discs and is easy to notice);
- the decrease in the thickness of the linings is less than permissible (can only be seen when removing the wheel).
If all of the above symptoms occur, your brake pads will most likely need to be replaced. Your task, as a good car enthusiast, is to be able to do this correctly.
The middle pads will last about 30 thousand mileage and they wear out three times faster than the rear ones, since the main load during braking falls on them. Under no circumstances should you use pads from different sets or different degrees of wear; we install only a new set, from only one manufacturer.
Difference in thickness of old and new pads.
Regardless of the mileage, if these symptoms appear, we at least check the condition of the pads and discs:
- Creaks and clanks when braking.
- Vibration during braking.
- Increased braking distance.
- Large brake pedal travel.
- Uniform impacts when braking.
- Traces of dust and chips on the brake mechanisms.
Upon completion of work, the brake system should be adjusted. The rear brakes should lock a little earlier than the front ones.
This is done as follows. At a speed of no more than 40 km/h, we brake sharply. If it feels like the front brakes are engaging earlier, use the brake pressure regulator located under the hood to reduce the gap between the bracket and the spring by 2 mm. Next, we test for braking again. By adjusting the distance of the lever, we achieve the desired result.
The service life of the pads on VAZ-2110 cars and its derivative modifications is, on average, 15–20 thousand kilometers for the front ones, and 40–50 thousand for the rear ones. However, their wear directly depends on a number of factors. Thus, during city driving, the degree of wear is higher, as well as when operating on dusty roads, when there is a high risk of mechanical particles getting on the working surfaces.
The main sign of a malfunction is the appearance of a characteristic whistle during braking. This is due to the fact that the pad design contains signal indicator strips, and when the working surface of the pad wears down to a critical minimum, the strips are exposed and create this sound.
Along with this, problems can be expressed in the form of a metallic grinding sound in the event of destruction of the friction layer and exposure of the metal structure of the pad. In this case, during the braking stage, vibrations and knocks may appear, as well as a characteristic creaking sound in the area of the front wheel (or the rear wheel if the rear pads become unusable). In other words, the pads whistle, rattle or knock, indicating a malfunction.
Difference in thickness of old and new pads
Rear brake pads and their types
Brake pads are the most important element of the braking system, ensuring the process of slowing down and stopping a vehicle. Pads are divided into two types:
- on the front wheels (disc)
- on the rear wheels (braking occurs using linings adjacent to the drum)
It is the latter type that we are talking about today.
The principle of operation of the pads is that when the driver presses the brake pedal, the impulse from it is transmitted to the brake system, to the pads.
Fitting tightly to the drum (this is the case with the rear units, and the disc, if we talk about the front units), the pads act as a barrier that prevents the wheel from spinning, as a result of which the car stops. If the pads fail, this has the most negative impact on the operation of the braking system, which can lead to serious consequences, such as loss of control of the car while on the road and an accident.
That is why it is so important to keep under control the condition of the vehicle’s brake system components, as one of the most important systems responsible for traffic safety.
You can determine that the components are out of order by a characteristic squeaking noise, which intensifies as the car accelerates.
There are two ways to solve this problem:
- Contact a mechanic
- Fix the node defect yourself.
But contacting a specialist can cost a pretty penny, because, to hide it, our country has now taken the path of market relations, where man is a wolf to man, which is not good, and sometimes in auto repair shops they also increase the price for the simplest work.
Doing this work yourself will not be so difficult, it is only important to be patient, have the necessary equipment, read the instructions in detail, and also purchase new rear pads. There is a large selection of these parts on the car market.
But most often motorists give their preference to three options:
There is a large selection of these parts on the car market. But most often motorists give their preference to three options:
The pads have been purchased and a free day has been carved out for work. Here we go?
Choosing the best pads
After all, brakes are about safety. The market offers about two dozen different pads, differing in price, country of production and brand status. True, the difference in prices is not so great, as can be judged from the list of the most popular kits:
- The most inexpensive pads can be bought for 480–500 rubles a set. They are produced by the domestic company ARTEX. The catalog number of all ten rear pads is 2108–3502090. The pads are not remarkable for anything except that they are afraid of overheating - they lose about 40% of their friction properties at 150 degrees.
- The VAZINTERSERVICE kit, at a price of about 580–600 rubles, showed itself to be worthy. The only negative is their low resource and they also don’t like high temperatures.
Rear brake pads VAZINTERSERVICE.
Rear brake pads FERODO.
Rear brake pads ALLIED NIPPON.
LUCAS brake pads.
Good luck to everyone, stable brakes and sunny roads!
Video which pads are better
Welcome! Brake pads - they are used to stop the car, and they are also the basis of the braking mechanism; absolutely any car is equipped with them, from budget cars to expensive premium foreign cars; in addition, a lot depends on the quality of the pads, for example, how quickly will the car slow down, will it brake with a squeak and will the pads eat up the brake drum or brake disc (It all depends on what mechanism they are installed on; if there are disc brakes, for example, and poor, low-quality pads, then over time they will wear out the brake brake to such an extent disk, that the car will no longer even be able to be driven), so approach the choice of new pads very carefully and before purchasing them, make sure which part is in front of you, the original or the original (They are very easy to distinguish if you know some of the nuances, more about this described “in this article”).
Note! To replace the brake pads with new ones, stock up on the following tools: Pliers and wrenches, in principle, you don’t need anything else besides these tools, but still, just in case, take WD-40, otherwise you never know what happens, suddenly the bolts securing the brake the drum is stuck!
Where are the rear brake pads located? They are located under the brake drum and when braking they press against it and thereby the car stops. We won’t show where exactly this drum is located, because it doesn’t make any sense, since everyone knows its location, but we’ll still say a few words and we will give advice, from time to time we recommend looking at the drum itself and, if possible, removing it, because when everything gets stuck, there is a chance that you will not remove it at all, but you need to look at the brake drum for this purpose, with a strong When it wears out, the walls of the drum become very, very thin, and therefore it can begin to crack and eventually break, which will lead to very bad consequences and may even lead to an accident.
When do you need to change rear brake pads? They need to be replaced when the thickness of the linings has become less than 1.5 mm (Each pad has a lining that slows down the car) and when the lining peels off from the metal body of the pad, they also need to be replaced (We’ll immediately explain why we wrote they and not she , when replacing the pads, if you decide to do this replacement, you definitely need to change all four, that is, if you change in the rear, then four pads in the back must be replaced, if in the front, then all four must also be replaced, otherwise the car will not slow down evenly and it will be pulled to the side during emergency braking) and we wanted to give you one more piece of advice: when you remove the drum, check its internal diameter with a ruler or something else (How to check the internal diameter, see the photo below) but only it check in several places at once, and not in just one, because the brake drum, like the pads themselves, does not wear out evenly and by the way, the internal diameter of the drum should not exceed 201.5 mm, and the drum should not have defects, chips or should not be po kotsan.
VAZ 2112: replacing rear pads with your own hands
Set of rear pads VAZ
On VAZ cars, the rear brake pads wear out much more slowly than the front ones. Their service life under standard operating conditions and high-quality linings is up to 50 thousand kilometers, after which their braking efficiency decreases, while the hand (parking) brake weakens, which signals the need to replace the rear pads of the VAZ 2112. This task is feasible for everyone and can be easily solved at home (or garage) conditions, done with your own hands, does not require scarce tools and the skills of a professional auto repairman.
Replacing rear pads
Replacing the rear pads of a VAZ 2110
First you need to prepare the necessary instrumental support. In order for the replacement of the rear pads on a VAZ 2110 to be successful, you should arm yourself with the necessary tools. In this case, we will need:
- Key for 12;
- Hammer;
- Wooden block;
- Pliers;
- Screwdriver;
- Jack.
Removing the pads
The set of tools is not so extensive. You can start working. The first step is to clear the workspace and put the car on a jack. So, let's get started with the repair work. Step 1:
- First you need to prepare the car for removing the rear wheel;
- Carry out the operation to remove the rear wheel;
- When the wheel and disc are removed, you can see two mounting bolts on the drum that should be unscrewed. A wrench will come in handy here (usually suitable for 12).
Removing the drum
Step 2:
We remove the brake drum.
Step 3:
Taking a screwdriver or pliers, carefully remove the spring that tightens the rear brake pads of the VAZ 2110; Disconnect the guide spring - the one that secures the brake pad to the shield.
Replacing the rear pads of a VAZ 2110 is easy
Step 4:
We remove the block from the support bar.
Step 5:
Replace the rear brake pads of a VAZ 2110
Now you should try to loosen the spring, which is located on top; it tightens the brake pads.
Step 6:
Replace rear brake pads on a VAZ 2110
After the second spring is disconnected, the spacer bar should be removed.
Step 7:
Disconnect the handbrake linkage from the cable.
VAZ 2110 rear drum pads
Step 8:
- You should definitely look and remember, or even better, sketch the connection between the handbrake rod and the brake pad;
- Using pliers, you need to disconnect the guide spring and remove the cotter pin, after which the block will detach by itself.
This completes the dismantling process.
Installation of pads
VAZ 2110 rear brake pads
The next step is to prepare for the installation of new brake pads, and in fact, their installation is all the steps that were taken during disassembly, only in reverse order. So, here's what you'll need to install your brake pads: Step 1:
- Install the brake cylinder piston: to do this, push it in as far as it will go;
- Connect the handbrake rod to the new block in the same way as it was connected to the old block;
- Insert the cotter pin.
Step 2:
- Take the guide spring and connect it to the brake pad of the VAZ 2110;
- Attach the handbrake rod to the cable.
VAZ 2110 rear block
Step 3:
The upper spring needs to be connected to the newly installed brake pad, and its other end must be connected to the second new pad, which is now to be installed.
Installing rear brake pads
Step 4:
- First you need to rest the brake pad on the corresponding heel of the brake cylinder;
- Then pull the brake shoe by the lower edge, while the spring should tighten, which will allow you to insert the spacer bar;
- Insert spacer bar;
- You need to take the second brake pad and slide it into place so that it fits into the slot in the spacer bar.
Step 5:
Engage the remaining spring with the brake pad of the VAZ 2110 using pliers.
Rear wheel drum diagram
Step 6:
- Now you need to tighten the two mounting bolts using a 12mm wrench;
- Reinstall the wheel.
All that remains is to put the wheel in place
So, the brake pads of the VAZ 2110 were replaced. Now you can start replacing the other side of the car, all operations are similar. Video and photo materials will help during the work process. If you do everything yourself, be sure to follow what the instructions indicate! This way you can avoid mistakes. In addition, by carrying out the work yourself, you can save a lot of money, because the price for such services from specialists is sky-high. You can also find out about replacing front brake pads on our website.
Device
Before disassembling, you need to know the structure of the braking system. The VAZ 2110 has hydraulic brakes with distributed circuits. One circuit is the front right and rear left mechanisms, the second circuit is diagonal.
The hydraulic drive includes a (also dual-circuit) pressure regulator. It helps regulate the brake fluid pressure on the rear brake systems. It is through the regulator that the fluid flows to both rear mechanisms.
Hydraulic brake circuit diagram
Adjustment is carried out through four chambers. Their design is as follows: two are connected to the main cylinder, and two, respectively, to both cylinders of the rear brakes.
For high-quality braking, it is necessary that the entire system works smoothly, there is correct adjustment and reliable mechanisms.
Parsing order
It is better to carry out the repair operation on an overpass (you can use an inspection hole), or just a flat area with a hard surface, because you will have to remove the rear wheels, naturally, first jacking up the car.
So:
- Remove the wheel and disk;
- We unscrew the guide bolts, of which there are 2, and remove the drum;
- A common problem is the drum sticking, so sometimes it is not so easy to remove it. The problem has long been solved by tapping a drum with a hammer (through a board);
- Using pliers, remove the tension spring;
- After this, a fixing guide spring holding the block;
- We remove the block from the support bar that is not connected to the handbrake rod. To do this, pull its free edge to the side and along the shield;
- Loosen the upper spring. To do this, you need to turn the block to the side until you can disconnect the spring;
- We do the same with the spring of the second pad;
- Remove the spacer bar;
- Disconnect the handbrake rod from the cable;
- We note to ourselves or sketch how the connection to the rod is made;
- Unhook the spring, remove the cotter pin, and disconnect the brake pad.
Using a "12" wrench, unscrew the two guide pins. Scroll the drum evenly, apply light blows to its end with a hammer or the edge of a mounting blade. Use a screwdriver to disconnect the end of the upper tension spring from the block. Remove the spring. Use a screwdriver to remove the guide spring from engagement with the block. Disconnect the lower tension spring, remove the front block. Remove the lower tension spring Remove the expansion bar Having disconnected the guide spring from the rear brake shoe, remove the manual shoe drive lever from the cable tip. To replace the shoe guide spring, remove it from the hole in the brake mechanism shield.
Thus, the disassembly process is completed.
Replacement
In principle, assembly occurs in the reverse order, although there are some peculiarities:
- To achieve normal brake fluid pressure, in the future, it is necessary to drive the piston of the brake cylinder inside;
- Connect the handbrake rod and the block, be sure to insert the cotter pin;
- Connect the guide spring to the brake pad;
- Connect the cable to the handbrake rod;
- Connect the upper spring to the installed new block;
- You need to rest the second shoe on the heel of the brake cylinder and pull its lower edge. The spring is tensioned, the bar can be inserted;
- All that remains is to insert the second block and place it in the slot of the bar;
- Using pliers, engage the spring with the second block;
- After making sure that the cable does not get affected by the movement of the parts that make up the brake mechanism, it is necessary to install the brake drum in place;
- All that remains is to tighten the guide bolts, then install the wheel.
We do the same with the other wheel.
Adjusting the pressure
First, you need to adjust the parking brake. This device always requires adjustment after repair work.
Secondly, the rear brakes are adjusted so that the system locks the rear wheels a little later than the front ones.
Knowing the structure of the brakes, loosen the bolt securing the pressure regulator, using a screwdriver, move the bracket of the regulator drive lever to create a gap of about 2 mm between the lever and its spring.
We carry out a test - we accelerate the car to 40 kilometers, then sharply brake. Someone observing the process from the outside notes whether the wheels are locked correctly. If the front wheels lock later than the rear ones, then the adjuster must be moved in the direction of decreasing the gap. Then test again until correct wheel locking is achieved.
- Benjamin
THIS IS WORTH PAYING SPECIAL ATTENTION
Replacing rear pads on a VAZ 2112 has its own characteristics, without knowledge of which you can add unnecessary work and unnecessary problems to yourself:
- Loosen and tighten the wheel bolts only when the vehicle is on the ground. The instructions specify bolt tightening torques of 65–95 Newtons per meter (which corresponds to 6.5–9.5 kilograms of force per meter)
- The use of gasoline, diesel fuel or any mineral solvents for washing brakes (drums, pads, etc.) is not allowed, in order to avoid problems
- When installing old pads back, it is not allowed to replace the rear and front pads with each other, as well as to move them from the right to the left wheel. Such a rearrangement will lead to uneven braking.
- Brake pad sets must be replaced on both sides of the car at once.
- Check the fluid level in the brake reservoir; if it reaches or is very close to it, you need to pump out some of the fluid using a syringe. Otherwise, the brake fluid will overflow when you install new pads.
Required spare parts
Just 10 years ago, old pads were not replaced; they were glued on, linings were changed, or they were riveted. Today on the market you can easily purchase the entire mechanism. To replace, you need to prepare new pads. Experts believe that it is better to install replacement factory parts, article number 2110-3501080-60 (TIIR-260), 21100350180082 or 2110-3501080. There are other opinions. Some motorists believe that pads from well-known brands provide the best braking parameters on the VAZ 2110, 2111, 2112. These are parts from brands such as Brembo, ABS, Ferodo, TRW, Bosch, Optimal or Delphi.