03/04/2022 1,733 VAZ 2107
Author: Ivan Baranov
The starter mechanism is considered one of the main ones in the ignition system, since its correct operation allows the engine to start. Repair of the VAZ-2107 starter or its replacement will be required in the event of a unit failure and when the first symptoms of a malfunction appear.
[Hide]
The design of the VAZ-2107 starter and the principle of its operation
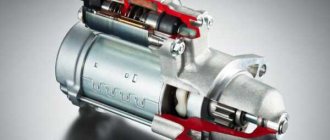
The starter unit on domestic “sevens” is a four-lane electric motor equipped with four currents. This unit is a DC motor. If it breaks, the crankshaft of the power unit will not be able to turn when trying to start the engine.
Design features
On domestic “sevens” one of two models of starter devices can be installed:
- 4216.3708-02;
- 5722.3708.
Design of the starter device model 4216.3708-02 for VAZ-2107
Design of the mechanism 4216.3708-02:
- 1 — front protective cover of the device;
- 2 - sealing element, designed to protect the unit from moisture and dust entering the structure;
- 3 — overrunning clutch, equipped with a drive gear;
- 4 — the drive lever itself;
- 5 - partition separating the two components of the mechanism;
- 6 — tie rod;
- 7 - rod;
- 8 — mechanism retractor relay;
- 9 — washers intended for adjustment;
- 10 — anchor device pulley casing;
- 11 — lock washer;
- 12 — rear protective cover made of metal;
- 13 — brush mechanism holder;
- 14 — housing in which the stator device is installed;
- 15 — anchor assembly of the mechanism;
- 16 — axis on which the lever device of the drive unit is mounted;
- 17 — retaining metal ring;
- 18 — sealing element made in the form of a ring;
- 19 - limiter, made in the form of a ring and designed to limit the travel of the gear.
Design of the starter device for the “seven” 57722.3708
Main structural elements of the model 5722.3708:
- 1 - nuts, used to secure the back cover of the mechanism to the main part of the device;
- 2 — back cover of the unit, made of metal;
- 3 - bolts used to fix the brush mechanism;
- 4 — spring elements for brushes;
- 5 - brush mechanism itself;
- 6 — stator unit, equipped with magnetic elements;
- 7 — anchor device;
- 8 — thrust washer;
- 9 — anchor mechanism pulley support;
- 10 — central gear of the gearbox;
- 11 — planetary gears of the reduction mechanism;
- 12 — main shaft of the drive unit;
- 13 - external gear of the reduction device, equipped with internal teeth;
- 14 - a sealing element made in the form of a ring is used to prevent the negative impact of water and dust on the design of the device;
- 15 — drive mechanism pulley support;
- 16 — thrust washer;
- 17 — locking element for the drive pulley, made in the form of a ring;
- 18 - another locking component, only intended for the lever of the drive unit;
- 19 — washer;
- 20 — drive unit lever coupling;
- 21 — lever support;
- 22 — lever of the drive device;
- 23 — the drive unit itself;
- 24 — element for limiting the travel of the drive unit, made in the form of a ring;
- 25 — locking ring of the limiting element;
- 26 — mechanism retractor relay;
- 27 - bolts used to fix the solenoid relay of the device;
- 28 — return spring element;
- 29 — core of the retractor relay mechanism;
- 30 — protective cover of the mechanism, installed at the front;
- 31 — tie rods of the device.
Location of the starter in the car
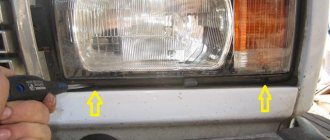
Regardless of the device model, the unit is mounted in the engine compartment. The starter mechanism can be seen to the right of the cylinder block of the power unit. It is fixed in the seat using three screws and mounted on the clutch system housing.
Photo gallery
The photo shows the installation location of the starter device on the “seven”
Location of the starter mechanism on the VAZ-2107
Device connection diagram
On VAZ-2107 vehicles, the connection diagram for the starter mechanism will be the same, regardless of the device model:
- 1 - generator unit, necessary for charging the battery and generating voltage when the engine is running;
- 2 - battery;
- 3 — starter unit;
- 4 — mechanism activation relay;
- 5 - block;
- 6 - ignition switch.
Starter mechanism connection diagram
Connection diagram and possible difficulties
To prevent a starter failure from taking you by surprise, let’s look at how to replace it yourself. But before we talk directly about connecting the VAZ 2107 starter, you should find out how to dismantle the old element. The only problem you will encounter is the inconvenient location of the part; both carburetor and injection models suffer from this.
We install the car above the inspection hole, since the unit can only be reached through the bottom. Be sure to turn off the ignition. Then remove the battery cover and disconnect the ground terminal. To free access, the battery must be removed, and we do this together with the support. It's time to unscrew the wire harness clamp and remove them from the traction relay. And the last operation is to unscrew the bolted connections securing the part.
Next, we are interested in the connection diagram for the starter on the VAZ 2107. Having installed the new element in its regular place, we screw the longest bolt first, and then we fix the remaining fasteners. We install back the wire terminals, harness supports and battery. We connect the battery and do not forget to replace the protective cover and the dirt shield.
For non-carburetor models, some inconvenience may arise during installation, so when replacing a VAZ 2107 injection-type starter, it would be useful for the owner to remove the inlet pipe extension.
With careful attention and no haste, this entire operation is unlikely to pose any complications, so even an inexperienced car owner will be able to handle the replacement process. The scheme is already known, and for clarity, we tried to duplicate all the steps with photographic materials; now everyone can change the starter on a VAZ 2107. The main thing is to choose the right mechanism for your car, and the principle of operation can be either conventional or geared; when replacing, many do not miss the opportunity to acquire a more complex but effective mechanism.
Main causes of starter malfunction
Reasons why a unit on a VAZ-2107 injector or carburetor stops working and requires its removal and disassembly:
- Battery. The battery on carburetor and injection internal combustion engines can be completely discharged or fail. It is possible that the battery is not completely discharged, but the remaining charge is not enough to turn the starter mechanism and crankshaft. The discharge problem is solved by recharging, and the faulty battery will have to be replaced with a new one.
- Oxidation of contact parts on the battery. If there is oxidation, a white coating will appear on the terminals of the device. It must be carefully removed using a brush or fine-grained sandpaper.
- Malfunction of the contact components of the starter unit. They may be damaged or have carbon deposits on them. Oxidation may form on the contacts of the mechanism.
- There has been a break in the windings of the devices or the electrical circuit to which the unit is connected. Detailed diagnostics and ringing of power lines will be required.
- The brush assembly has worn out or the commutator device has burned out. Such problems are solved by replacing the constituent elements.
- The appearance of a short circuit in the windings or on the brush holder. A short circuit indicates a malfunction in the electrical component. Need a call.
- Problems with the solenoid relay. Such a malfunction will be indicated by repeated clicks or random shutdown of the device. The problem is usually caused by a decrease in the voltage in the vehicle's on-board network. You need to check the contacts on the relay.
- Bendix malfunctions. This element is called a freewheel.
- Damage to the teeth of the drive mechanism or flywheel. Worn elements must be replaced.
- Wear of bearing devices or spring elements of the solenoid relay. This part is usually beyond repair, so it must be replaced.
The Avtoelektrika HF channel spoke about the causes of malfunctions in the operation of starter mechanisms.
Diagnosis of faults and disassembly of the mechanism
The starter, removed from the engine compartment, must be cleaned of dirt and traces of technical fluids. The procedure for disassembling the mechanism is as follows:
- We remove the solenoid relay from the starter housing and, having unscrewed the tightening screws, disassemble it into its component parts. During the inspection, special attention is paid to brass contact groups, the burning of which can lead to failure of the mechanism.
- We remove the cover of the device and check the condition of the brush assembly. Significant wear on the tracks and wear of carbon parts is a common cause of starter failure.
- The integrity of the rotor winding is checked using a multimeter set to resistance measurement mode.
- The overrunning clutch is checked by hand; a working device allows only one-way rotation.
After establishing the cause of the failure of the electric starter, you should take care of purchasing the necessary spare parts.
How to check the starter for performance?
Before repairing the device, it is necessary to diagnose it. This will allow you to determine the type of malfunction and the procedure for doing the repair yourself. There are two options for checking the starter - with or without removal.
Checking the starter without removing it
To diagnose the operation of the starter device without dismantling, you will need a metal product. It will be used to close the contact terminals at the output of the mechanism. As a metal object, you can use a piece of electrical cable or a screwdriver with a bare shaft.
If there is sparking, but there is no cranking of the starter device, do the following:
- The contact terminals on the battery are being diagnosed; you need to make sure that there is no oxidation on the terminals. If there is white or other color deposits, cleaning is done using sandpaper. If it is not available, you can use a knife, but you must act carefully.
- The operation of the solenoid relay is checked. The unit should be disassembled and the device replaced if necessary.
- The integrity of the electrical circuit between the solenoid relay of the device and the mechanism itself is diagnosed. The assembly will also have to be disassembled. The cause may be damaged wiring.
The starter assembly rotates the crankshaft, but the rotation is not sufficient to start the engine:
- You need to check the battery charge and replenish it if necessary. If recharging is not possible, it is permissible to “light” the car from a vehicle with a charged battery.
- It is necessary to diagnose the integrity of the power cables connected to the starter mechanism. There may be an insulation break or breakdown.
When the key is turned in the lock slot, the crankshaft does not turn, but the device clicks:
- Low battery. Requires recharging.
- The contacts are damaged or their quality is poor. We are talking about contact elements connected to the starter unit. It is necessary to check the integrity of the parts and tighten them if necessary.
If the steps described above did not help, you need to check the operation of the traction relay. The problem may also be with the ignition switch. If the diagnostics did not determine the cause, the switch will need to be disassembled and checked. To make sure that the lock is not working properly, you need to thoroughly clean all contacts and connections.
User Battery Man showed how you can check the current of the starter device on a mechanism that has not been removed from the car.
Checking the starter with removal
After removal, the starter mechanism must be securely fixed in a vice. This should be done carefully so as not to damage the device. Then you need to connect battery power to it and use a screwdriver or a piece of cable to close the contact screws. If the mechanism begins to spin, then the problem lies in the operation of the retractor relay.
Further diagnostics:
- To ensure that the traction relay is working, the positive terminal from the battery is connected to it. The negative contact is connected to the mechanism body. If this element is working, then the anchor device will extend the gear. You may not see this, but you will hear a characteristic click.
- Then the integrity of the brush mechanism and armature is checked, for this purpose a 12-volt voltage is supplied to the unit. To check the operation of the anchor device, take a 220-volt household lamp and connect it to the break point between the winding and the pulley. If, as a result of connection, the light source begins to burn or sparks appear, then the anchor element must be replaced. When sparking, you can smell a burning smell.
- To diagnose the brush assembly, a 12 volt lamp is used. The device is connected to the brush assembly or mechanism body. If, as a result of connection, the light source begins to burn, then the brushes must be replaced.
- Bendix diagnostics are being performed. To do this, place a soft pad around the part and clamp it in a vice. It is necessary to check the quality of functioning of the coupling itself. If, as a result of physical impact, it turns in different directions, then the bendix must be replaced. The clutch should only turn in one direction.
When diagnosing the starter on a VAZ-2107, you must remember that most malfunctions are caused by problems with electrical circuits, as well as the battery or solenoid relay.
How to properly dismantle the starter?
To remove the device, proceed as follows:
- The car is placed in a garage with a pit or on an overpass. The handbrake lever is raised to prevent the vehicle from rolling away.
- The engine compartment is opened and the ground wire is disconnected from the battery. The terminal clamp must be loosened with a wrench in advance.
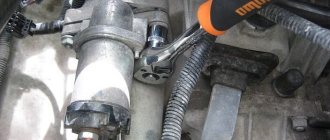
- Using a 10mm socket wrench, unscrew the screws that secure the heat shield of the starter mechanism.
- The air filter device is removed, then its housing is dismantled. You also need to turn off the air flow supply pipe.
- Using a 13mm socket wrench, unscrew the nut that secures the starter shield. Then this element is dismantled.
- Using the same 13 key, the three screws that secure the starter mechanism housing are unscrewed. The key will be required with an extension cord. It will be more convenient to unscrew the lowest screw from under the bottom, from the hole.
- A wrench is used to unscrew the nut that secures the tip of the cable connected to the positive terminal of the battery.
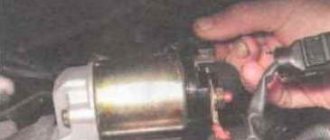
- The cable with the contact connected to the start relay is disconnected.
- The starter mechanism is being dismantled. When removing, you must act from the rear wall of the engine compartment.
The Dvigatel channel talked about dismantling the starter device on VAZ-2107 cars.
If the car has an injection engine
When performing work on a vehicle equipped with a fuel-injected internal combustion engine, it is necessary to dismantle the intake manifold extension. It connects directly to the power unit. Also, on injection engines, instead of one nut that secures the starter mechanism shield, two are used.
If the car has a carburetor engine
The main feature of dismantling work on carburetor internal combustion engines is the need to remove the air filter housing. Without this, it will not be possible to remove the knot.
Review: Gear starter StartVolt VAZ-2101 - A powerful replacement for the standard classic starter.
View from the side of the box:
Another side surface of the package:
The next side shows the starter power, its starting speed, and the minimum temperature of its efficiency:
Starter power 1550W. significantly exceeds the power of the standard Zhiguli starter, which has a power of 1300W. The starter kit comes with a passport with a warranty card, but it all consists of advertising parts for the electrical equipment of the car manufactured by the StartVolt company. The photo shows a receipt pasted by the seller with the cost of this starter:
The starter itself in the box is carefully placed in a foam shock-absorbing cell:
At the rear end of the starter you can see its power terminals and copper parts:
The starter itself is manufactured in China under license and under the control of a Russian company, it is compact and its weight is small, about 3 kg:
The working part of the starter is somewhat smaller than the similar part of a standard starter; the gear feed mechanism and the starter fastening itself are, of course, standard:
View of the starter itself from the other side:
I would like to note the fact that the 13 wrench nut on the upper terminal at the top right in the photo (the lower nut on the copper bolt) was loosely tightened, and we managed to tighten it well. When tightening this nut, the force may cause the black cage of the round insulator of the solenoid relay to turn slightly, from where the copper bolts come out. To prevent this from happening, you need to tighten the nut carefully, without excessive lateral forces, and hold the cage itself with your hands. If the clip still turns a little, you need to carefully return it to its place with your hands and force. In the working position, this clip is fixed with an internal lock, and you can feel this fixation with your hand. In the following photo you can evaluate the comparative dimensions of the new and old standard Zhiguli starter:
The difference, as they say, is visible to the naked eye. After installing the new starter, the car's engine was started. To be honest, I was delighted when the starter was working. The speed of the crankshaft at startup is such that it seems that the spark plugs have been pulled out of the engine, and cylinder compression has ceased to interfere with the operation of the starter. The startup sound has also changed dramatically. I also liked the fact that when the starter is turned on, the voltage drop in the on-board electrical network is relatively small. So far, the operation of this starter on the car brings true satisfaction. All that remains is to wait for the winter cold and check the confidence of starting the engine in the cold. I think such a starter will be able to do it.
This is interesting: How to disassemble a spark plug
How to repair a car starter with your own hands?
The VAZ-2107 starter repair procedure includes two stages. We are talking about disassembling the device and troubleshooting its component parts.
Disassembling the device
When disassembling the device, it is necessary to replace the defective parts with new ones:
- First, unscrew the nut located on the lower contact screw of the solenoid relay. The output with the windings is disconnected from the screw; for this, the spring element is dismantled, as well as two washers. Three bolts are unscrewed, which secure the relay itself to the mechanism cover. The screws are located on the drive side. Holding the anchor mechanism, the retractor relay is removed.
- The spring element is removed from the anchor mechanism. The anchor is pulled upward and disengaged from the lever of the drive device. The element is retrieved.
- The two bolts securing the protective casing of the device are unscrewed, then the protection is removed. Using a screwdriver, pry off the retaining ring of the rotor mechanism pulley, as well as the washer. The two tightening screws are unscrewed, after which the cover is disconnected from the drive device side from the mechanism body. Dismantling is carried out together with the stator device.
- The bolts that secure the winding of the stator mechanism and the connecting electrical circuit are unscrewed. The jumpers are disconnected from the brush holder. The insulating tube is dismantled.
- The cover of the starter mechanism on the side of the commutator device is disconnected from the housing.
- The winding jumper is removed from the mechanism for fixing the brushes. The stator brushes and the spring element are dismantled; these parts must be pryed off using a screwdriver.
- The rear bearing device, made in the form of a bushing, is pressed out. This part is located on the rear cover of the starter mechanism. To remove it, you will need a mandrel of the appropriate diameter. The cotter pin of the drive mechanism lever axis is also removed; it is located in the front cover. To perform this task, you will need a flat blade screwdriver.
- The rubber plug is removed, after which the lever of the drive device is removed from engagement with the bendicosm. The anchor mechanism with the clutch is being dismantled.
- Then you need to move the thrust washer, which is fixed on the pulley of the anchor element. It moves towards the coupling of the drive device. The locking element, made in the form of a ring, is dismantled; to do this, it must be opened using two screwdrivers. If you have forceps, it will be more convenient to use this tool. The clutch is removed from the drive.
- The front bearing is dismantled from the mechanism cover; to do this, it must be pressed out. The procedure is performed from the drive device side.
The Auto Repair and Maintenance channel showed the procedure for self-disassembling the starter mechanism for classic VAZ models.
Defective starter parts
Defects of constituent elements are performed as follows:
- First, the height of the brushes on the mechanism is measured. Over time, parts wear out. Therefore, if the height is 1.2 cm or less, the brushes must be replaced.
- A visual check of the winding condition is performed. There should be no signs of damage to the insulation or burnout. The poles of the stator device must be free of mechanical damage in the form of cracks and other defects. If present, the winding must be replaced or rewinded.
- The bushing on the cover from the side of the collector device is inspected. It must not be worn, cracks or any other defects are not allowed.
- A visual check of the anchor element is performed. It is not allowed to have burrs or nicks, in particular, we are talking about splines and the shaft. There should be no signs of burning on the armature commutator mechanism, otherwise it must be replaced.
- Then you need to check how easily the retractor anchor device moves. You need to make sure that the contact screws of the plate are closed; for this you will need an ohmmeter or multimeter.
- The clutch gears of the drive device are inspected. There should be no signs of wear on its teeth.
- Perform a visual check of the drive arm. There are no traces of cracks or other defects on it, as well as wear of the grooves.
One of the weakest devices in the VAZ-2017 starter is the bendix, but often it cannot be repaired, only replaced.
The altevaa TV channel talked about checking the windings in order to determine their faults and replace parts.
Assembly Features
The assembly procedure is performed in reverse order:
- If necessary, the surface of the armature commutator device is cleaned. For cleaning, use fine-grained sandpaper. After cleaning, the collector mechanism must be blown with a compressed air stream, and also treated with fuel or an alcohol solution.
- Then the splined surface of the anchor element pulley is treated with motor fluid. Also subject to treatment are the pulley journals, the drive coupling gear and the bearing elements located in the device covers.
- When the assembly of the mechanism is completed, using a caliper, the axial clearance of the anchor device shaft is diagnosed. To do this, the shaft moves in one direction - to the commutator mechanism, and then in the other - to the drive. It is necessary to measure the difference in the parameters of the protrusion of the pulley from the cover on the side of the drive element. The gap should be no more than 0.5 mm.
What is a starter?
A starter is a direct current electric motor capable of driving the crankshaft of an internal combustion engine. Moreover, the starter rotor and crankshaft are constantly open, and at the moment of starting, the gears located on them engage. At the top of the starter housing there is an electromagnetic retractor relay. It gets its name from its operating principle.
When voltage is applied to the relay winding, the core is “pulled” into the housing. In this case, the core performs two important functions:
- Moves the gear with the overrunning clutch along the rotor until it engages with the flywheel ring.
- In the extreme retracted position, the core presses on a small rod, which sets the copper plate in motion. The latter closes the power contacts and supplies voltage to the stator winding.
Please note that the VAZ 2106 starter clicks when it does not have enough power to spin the rotor. This happens when the battery is completely discharged.
It is worth noting that at first the rotor will rotate very slowly, as if with all its strength, after which it will stop completely and clicks will appear. But the battery may be in perfect condition. Yes, this happens too. Double-check all copper bars that lie between the battery negative, the body and the engine housing. They should not be oxidized or show signs of destruction.
Try to carry out timely maintenance of the VAZ 2106 starter. This is an electric DC motor, therefore, it has much less reliability than an asynchronous one. Unfortunately, the latter is very difficult to use in a car.
The service life of a mid-price starter is at least three years. At the same time, the price of one copy will fluctuate in the range of 2300-2700 rubles. For this reason, it is sometimes much easier to replace the entire assembly rather than repair it.
How to replace the starter on a VAZ-2107?
The dismantling procedure is described in the section on diagnostics of the device with removal. The removal process is not much different on injection and carburetor internal combustion engines.
To install, follow these steps:
- The mechanism is being installed into the seat. First, tighten the longest screw to secure the device, and then the remaining short bolts.
- All screws are tightened to securely fix the assembly.
- The power and control cables are connected. The nuts securing the terminal clamps are tightened.
- The support of the harness with the mechanism cables is screwed on.
- The terminals are connected to the battery, the clamps are tightened with a wrench.
- If the device is equipped with a splash guard, it is installed in place. The bolt securing the casing is tightened.
Loading …
Dismantling the unit
To perform this operation, you need a set of wrenches and a portable lamp to illuminate the work area. The procedure for dismantling the starter is as follows:
- Disconnect the battery.
- On the solenoid relay, unscrew the nut on the contact pin and remove the wire connecting it to the battery.
- Turn off the control circuit.
- Using a key set to “13”, unscrew the three bolts securing the starter to the cylinder block.
- Carefully remove the device from its seat and, unfolding it, remove it from the engine compartment.
When dismantling the device, be careful not to damage nearby wiring.
Starter activation relay
When the starter clicks and does not turn, and a cracking noise is heard from the relay, then the fault may concern the control cable that powers the relay or the relay itself. In such a case, the power unit can be started by shorting the positive from the battery to the positive terminal of the relay.
Thanks to this starting method, the starter works, then you can be sure that the problem does not concern the battery. Most often the relay, ignition switch, and wiring are to blame.
Where is
The engineers provided for the location of the relay under the right side of the hood, or rather near the right wing of the car. It is mounted on a stud with a nut.
Examination
If the starter relay clicks, then you should first check its functionality. You must use a special “control” or voltmeter. The work is done as follows: