VAZ-2107, like any other car, requires close and regular attention. However, all its components and parts have a limited service life and periodically require repair or replacement.
- VAZ 2107 body repair
Wing repair - Video: straightening the wing of a VAZ-2107
- Threshold repair
- Jack repair
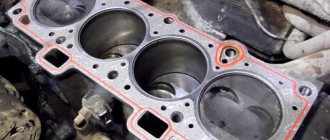
- Cylinder head repair
- Overhaul of VAZ 2107
Causes of breakdown and repair of VAZ-2107
In many ways, of course, the wear and tear of the structure and parts depends on the frequency and accuracy of use. Many novice drivers have no idea how to repair a G7 engine; they don’t even know where to start. For convenience and complete understanding, we explain that the car is far from new, its gasoline consumption is enough to drive, but it itself has lost its traction, so in fifth gear it will refuse to go uphill, so you have to drag yourself to something smaller.
The actual consequences of such driving:
- overheating of the engine itself;
- the appearance of unnecessary noise when driving;
- the appearance of knocks;
- oil pressure pump overvoltage.
All this forces you to get to your original destination on suction. As a result, we notice that the engine temperature exceeds the normal temperature, after which the car simply stalls. And of course, then you will try to figure out what the cause of the breakdown is, but having not found it safely, you will go to the service station to have your car repaired.
In such cases, these are the following malfunctions:
- complete wear of the distribution shafts and the appearance of potholes, nicks and burrs on them;
- defects in the spline, grooves on the shaft with associated clogging of its filter with unnecessary debris.
What reason?
With such engine overloads, the lubrication functions of the motor did not change for the better. The engine simply lost its properties, therefore, the parts that rub became unusable, and the engine simply jammed.
At the service station you were repaired, given a check for a tidy sum, and you are at a loss as to what they did to your car, and this is what was done:
- your chains have been tightened;
- replaced the oil pump with a new one;
- changed the oil in the engine, after washing it;
- cylinder heads were replaced;
- replaced most of the gaskets and oil filter;
- Installed a new relay and changed the spark plugs.
Why do you need a threshold amplifier?
The thresholds on Zhiguli are reinforced with a metal plate, 0.8 mm thick, with perforations (holes) along the length. The cost of the part does not exceed 400 rubles; when replacing, a set of 2 pieces will be required.
The amplifier is designed for the stability of the entire body structure; the part accounts for up to 30% of the entire vibration load and up to 70% of the force load. The structure can be strengthened using a separate, non-production metal, and a plate of the required thickness and length can be selected for repair.
Engine and service station
If you thought that you could do everything yourself, then we have to disappoint you - you cannot do without help at the station. You simply cannot do the procedures that a master at a service station will do, unless, of course, you have done this before. The technician will bore the cylinder block, grind the crankshaft, and the like.
Engine repairs from the “seven” can only be carried out in the service stations designated for such, where the necessary equipment, machines and qualified workers are available.
VAZ-2107 engine and its inherent problems
- Problems and malfunctions of the power system, the fuel pump and both pipelines may even completely stop working.
- The presence of unnecessary dirt in the fuel and air jets.
- Malfunction of the intake device membranes due to their damage.
- Debris in the pump filter and its malfunction.
- Complete wear of the camshaft, timing belt, cylinders and pistons.
- Breaks of high-voltage wires and breakdowns of spark plugs.
There are also defects in the injection engine that you can eliminate with your own hands without outside help, if you try a little.
Motor malfunctions
When a driver takes care of a car, makes sure it is clean and in good working order, this shows that he cares both about the car and about himself, because a well-maintained car is pleasing to the eye and breaks down many times less often. And, of course, care helps save fuel consumption and improve engine performance.
Contamination of the injector on the VAZ-2107 is the cause of a decrease in the throughput for fuel injection into the combustion chamber and a violation of the composition of the fuel-air mixture.
The injectors can be cleaned up a bit by electronic systems. But this method is not the main one, since it will not be possible to completely clean the injectors initially, which means that your “seven” will continue to consume more fuel and traction will decrease.
Selecting replacement parts
The rotten underbody of a car requires painstaking and lengthy repairs. To thoroughly check the condition of the body, it is recommended:
- Free the car interior from the interior, remove the floor.
- Drive the car onto an overpass or turn the car over, in good lighting, tap the bottom with a hammer, having previously cleared it of dirt and dust.
- Carry out a thorough inspection, determine the degree of corrosion and the depth of the lesions.
- For inspection, you need to use a powerful lamp or a portable mirror; with this tool you can inspect pockets, sinuses, and other hard-to-reach places.
If significant pockets of corrosion are identified, the bottom is rusted through, then it is necessary to digest the body, strengthening the damaged areas with sheets of metal. The following aspects are taken into account:
- The recommended thickness of the welding sheet is 1-2 mm.
- When working with thin overlays, it is necessary to ensure optimal temperature conditions.
- Thick metal is more difficult to weld, but is harder to damage.
Bottom repair - patching holes, making sound insulation
Hi all! Last year, I accidentally discovered wet noise and cracked vibration insulation under the front seats; winter was coming, so there was only enough time to replace the wet felt. This year I decided to completely inspect the bottom, and at the same time replace the standard Shumka with vibration and add noise to the engine shield, which should have been done when purchasing the car. Since I had already noticed one rotten area in one place on the bottom, I bought in advance at the car market a sheet of metal for patches, 1.4 mm thick, according to the seller. There was also standard 0.8 mm metal, but it seemed a little thin, and the difference in price was small. The sheet was immediately degreased, matted with P280 sandpaper, primed with epoxy primer, then insulated with regular primer and finally coated with 3in1 rust-resistant enamel.
To get to the Shumka, you need to dismantle the front seats and the sofa, remove the shelf under the glove compartment, the console, the sill panels and the seat belt bobbins with locks.
The new felt also turned out to be soaked through, it’s unclear where the water came from again?
The factory Shumka at the rear was also partially wet and had already begun to rot.
The vibration is cracked and peeling in places, especially at the front, there is water and rust underneath.
I scraped it off with a dull chisel and a sharpened spatula, since it had already hardened, so it came off quite well, and I finished it in a couple of hours. The floor underneath appeared to be primed, unlike the doors where it was molded onto bare metal, and was in good condition, especially at the rear, with only a little surface rust in places.
When checking the bottom with an awl, as it turned out, not everything was good. It has rotted over both underbody reinforcements and the jack on the right front, there is sand and rust inside, although the amplifiers are still intact.
At the rear, the floor above the jacks also rotted, and on the left, the threshold was specifically grabbed, in the place where rot was initially discovered on the bottom. The threshold amplifier is completely rotten.
I cut out the rotten metal with a grinder, cleaned out the cavities and coated the inside with heated pushsal, since it couldn’t really be treated afterwards.
Then, I cut out templates from wrapping paper, calculating the overlap on the healthy metal, and then cut out patches from painted sheets using them. Before welding, I removed the controller and battery so as not to burn anything.
First, I grabbed a patch around the perimeter, and then, tapping with a hammer, I welded the seam and, after beating off the slag and cleaning it, covered it with seam sealant, which I used in the anti-corrosion test. Although, of course, it would be better to paint it first.
I used a 2 mm electrode, since I couldn’t find a smaller one on sale. In principle, it cooks normally, there were burns only in those places where the metal was rotten and was a bit thin. I tried the 3rd one - it’s already burning through.
At the rear left we had to install two patches from the inside and outside; the threshold amplifier, one might say, was absent there, but I think the patches will serve as something of an amplifier.
Then, I completely removed the remaining vibrations with white spirit, cleaned the rusty areas with a flap wheel, etched the rust with a converter and painted it with 3in1 paint with a roller in two layers with intermediate drying.
Just wait until it all dries well.
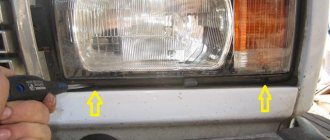
Changing side lights
Next to the low and high beam lamps there is a headlight bulb. It is also installed in the headlight reflector. To replace it, just pull the cartridge and it will come out.
It is not uncommon for him to not want to get out. Therefore, until the low beam lamp is installed in place, we put our finger into its hole in the reflector and use it to push out the oversized bulb from the inside.
To replace the lamp, turn its base in the socket 90 degrees, it is removed from it. We perform assembly in reverse order.
Front suspension
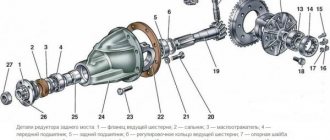
The front end of the VAZ “six” has a more complex suspension design, since the front wheels are steerable and it is on this part of the car that heavy loads fall. The front suspension of the car is an independent double wishbone with coil springs, hydraulic shock absorbers and a stabilizer bar.
Front suspension diagram of VAZ 2106: 1 - hub bearings; 2 — hub cap; 3 - nut; 4 — steering knuckle axle; 5 - cuff; 6 — hub; 7 — brake disc; 8 — protective cover of the upper ball pin; 9 — upper ball pin; 10 — bearing (liner) of the upper support; 11 — upper lever; 12 — compression stroke buffer; 13 — spring insulating gasket; 14 — shock absorber; 15 — shock absorber mounting pad; 16 — axis of the upper arm; 17 — rubber bushing of the hinge; 18 — outer bushing of the hinge; 19 — adjusting washers; 20 — suspension cross member; 21 — stabilizer bar cushion; 22 — stabilizer bar; 23 — axis of the lower arm; 24 - lower arm; 25 — clip for attaching the stabilizer bar; 26 - spring; 27 — rubber bushing of the shock absorber spring; 28 — lower spring support cup; 29 — steering knuckle; 30 — lower ball pin race insert; 31 — lower support bearing; 32 - lower ball pin
Cross member
The front beam is the strength element of the volumetric structure. The material used to manufacture the product is steel. The cross member is located in the engine compartment below. The power unit is fixed to it through the cushions, as well as the lower arms of the shock absorption system.
The cross member is the power element to which the engine and lower suspension arms are attached
Levers
The front suspension consists of four levers - two upper and two lower. The lower elements are fixed to the crossbar using an axle. Between the beam and the axle there are washers and shims that change the camber and angle of the front wheel steering axis. The upper arm axle is a bolt that goes through the mudguard post. Rubber-metal products are installed in the holes of the levers - silent blocks, through which the suspension elements in question can move. Using ball joints, the steering knuckle (trunnion) is mounted to the levers. The wheel hub with the brake disc is fixed on it using tapered roller bearings. The hub is tightened on the axle with a nut, and on the right the fastener has a left-hand thread, and on the left it has a right-hand thread.
The front suspension arms connect and hold the elements of the shock-absorbing system
Shock absorbers
Shock absorbers ensure a smooth ride of the car, i.e., eliminating bouncing on uneven surfaces. Damper devices of almost identical design are installed at the front and rear. The difference lies in the size, mounting methods and whether the front shock absorber has a buffer. The front dampers are mounted with their lower part to the lower arm, and mounted on the top on the support cup.
The shock absorber in the suspension design ensures a smooth ride of the car
Table: parameters of the “six” shock absorbers
| vendor code | Rod diameter, mm | Case diameter, mm | Body height (excluding stem), mm | Rod stroke, mm |
| 2101–2905402 2101–2905402–022101–2905402–04 (front) | 12 | 41 | 217 | 108 |
| 2101–2915402–02 2101–2915402–04 (rear) | 12,5 | 41 | 306 | 183 |
Springs
The “six” is equipped with cylindrical springs, the upper part of which rests against the rack through the gasket and support cup, and the lower part rests against the recess of the lower arm. The purpose of the elastic elements is to provide the necessary vehicle clearance and smooth out shocks while driving on uneven roads.
Springs are an elastic element that provides ground clearance and smoothes out shocks when driving over uneven surfaces.
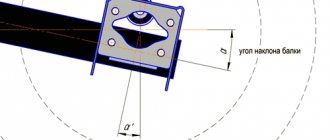
Stabilizer
The stabilizer is a part that reduces body roll when cornering. It is made of special steel. In the middle, the product is fixed to the front side members through rubber elements, and at the edges - to the lower arms.
To reduce roll when cornering, the suspension uses a transverse stabilizer
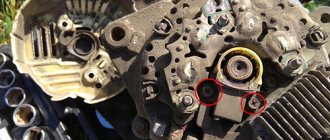
Spherical bearing
The ball joints of the front suspension are a hinge, thanks to which the car is able to maneuver and move smoothly. In addition, these elements make it easy to control the front wheels. The support consists of a housing with a ball pin and a protective element in the form of a rubber boot.
The front suspension contains 4 ball joints that connect the arms and the steering knuckle to each other
Working body deformations
Working body deformations
One way or another, the body of a used “Seven” will not escape aging. The supporting structure takes on all the constant loads from the weight of the transported cargo and the mass of passengers. There is such a thing as dynamic loads that arise when a vehicle moves. In addition, bulges and holes in the road surface, vibrations of a functioning engine and other machine components have a negative impact on the body.
Attention. The body is especially damaged when moving quickly on a bad road.
As a rule, the body of the “seven” is designed for several years of service, or more precisely, for 15-20 thousand kilometers. Here are the types of changes that appear on it over time:
- Individual elements of the body are deformed, warping of their surfaces is observed;
- Doors sag over time;
- The design of the openings is damaged;
- The integrity of the paintwork and anticorrosive coating is compromised;
- The spars are displaced, warping of the wings is observed, especially with frequent body overloads;
- Cracks are observed at the junction of the body and the racks;
- Welded bolts and nuts are no longer the same;
- Welding parts become disconnected, resulting in knocking and squeaking noises;
- Individual welding points are also destroyed.
Note. Deformations of this nature are usually called operational. They are restored along the way.
The most dangerous companion of time is corrosion. It is capable of destroying a metal body when exposed to open air. Corrosion is most severe in tight, inconspicuous parts. Such areas of the car are considered to be pockets, cavities, sinuses, etc.
Note. Without special protection, a sheet of machine steel loses 0.2-0.3 mm in one year if it is left in the open air.
Stages of work
Only in the video tutorial does it take a short period of time to independently overcook the bottom. In fact, repair work takes from 3 days and goes through the following stages:
- dismantling the interior, interior lining;
- bottom preparation;
- welding work;
- anti-corrosion treatment;
- interior installation, electrical connections.
Dismantling the interior involves disconnecting most of the electrical cables that go to power windows, batteries, sensors, also removing seats, carpet, sound insulation, dismantling doors, installing the car on an overpass or lift. Be sure to drain the fuel from the tank.
After dismantling the attachments and panels, it is necessary to check the quality of the metal on the sills and wheel arches. These elements are the first to be damaged by corrosion.
Preparatory work
Before the main stage of repair, it is necessary to prepare the bottom. Algorithm of work step by step:
- Use a grinder to clean the outer part of dirt and rust.
- Check the jacks.
- After cutting away the rusty areas of metal, sand the outside of the bottom to white metal.
- Cut patches to the required size if a partial replacement is being carried out. Drill out the spot welding areas if the entire bottom is being replaced or cut out the factory fastening weld.
Replacement of car underbody elements
The first problems with the body begin with the failure of the same elements, regardless of the manufacturer and operating conditions. Comprehensive bottom re-cooking begins with inspection and repair of those parts that are more susceptible to corrosion due to constant contact with moisture:
- thresholds;
- wheel arches;
- front bumper;
- trunk bottom.
Fixed thresholds are repaired directly on the car. The removable elements are dismantled, and before welding the car's sills, the degree of wear of the central pillar amplifier is checked.
Before you start welding the car wing, the part is dismantled, cut down or boiled away from the factory mounting points. Electric welding is used to install the metal patch. In most cases, the metal wing is replaced with a plastic one; the material is not subject to rotting and is easily installed with bolts.
For the luggage compartment, the place under the spare wheel is considered vulnerable; moisture often accumulates in the pockets, and the first rust forms.
Replacing the entire bottom
Complete overcooking of the bottom will be required if corrosion has covered more than 50% of the surface. It is recommended to use factory spare parts for specific brands. The bottom is sold whole or in parts. The choice of original components will allow you to avoid problems with body distortion due to geometry violations.
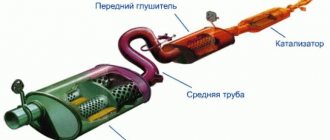
Replacing the entire bottom is a painstaking and complex repair, since the fuel line, muffler elements, and brake hoses are located under the bottom. Complete dismantling of the systems will be required. On VAZ cars more than 10 years old, it is recommended not to dismantle the muffler pipes, but to cut out the assembly and, after overcooking the bottom, make new elements.
The cutting of the bottom is not carried out along the factory welding lines; the mechanics leave part of the old body so that the new elements can be welded overlapping, not end-to-end. This increases body rigidity and prevents welds from cracking.
What can be changed in the “Six”
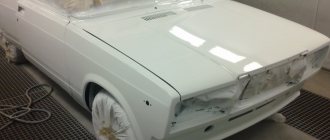
If you have a Six, tuning can be done in various ways - it all depends on how much money, effort and time you are willing to spend on it. One of the simplest and most accessible means is airbrushing - many people do tuning of the VAZ 2106 using a creative approach and brighter colors.
Tuning a VAZ 2106 is done by changing the design of the car's hood, installing a new plastic body kit, and choosing alternative optics instead of standard ones.
There are very interesting and unusual solutions in this regard.
Tuning a VAZ 2106 car
The upholstery of a car can completely copy that of a limousine - for this, some owners choose velor or velvet.
The dashboard is designed in the same spirit - it looks unusual and vintage. It even has a small TV with a kinescope built into it. The sound system speakers are located above the driver.
We talked above about how optics can be improved - in the video you can see how it looks on the “Six”