The starter (starting device) is designed for the initial rotation of the crankshaft for the purpose of subsequently starting the engine. Minimum starter power 3.0 kW. The jump starter is a source of DC current that draws from the battery.
The battery current is not sufficient to drive the crankshaft. Pre-installed brushes and winding increase the current by 3–4 times.
On cars of the Hyundai Accent family until 2000, starting devices were installed without a gearbox, after the 2000s with a gearbox.
- With gearbox (gearbox): characterized by lower consumption of electrical energy and current. The unit rotates the crankshaft even with a minimum battery charge. However, with prolonged use of the gear starter, breakdowns and malfunctions of the rotation gear are possible.
- Without gearbox: direct acting starter. The design is quite simple, unlike the previous analogue. The part can easily be repaired on your own, without turning to workshops for help. After turning the key in the ignition switch, current is supplied to the electromagnetic switch. Which provides instant grip with the flywheel. This class of starting devices is more durable than gear ones, the probability of breakdown is half lower in comparison with its analogue.
The main disadvantage of a starting device without a gearbox is that it operates unstably at low temperatures.
Problems with the starter, ways to solve them on a Hyundai Accent
Conventionally, all faults are divided into mechanical and electrical according to the nature of their origin.
Mechanical
- Wear of roller bearings;
- Poor fixation of fasteners;
- Deformation, chipping of flywheel teeth;
- Anchor wedge;
- Deformation of the retractor relay;
- Sticking of contacts on the board due to overheating, prolonged start-up of current;
- Reverse spring sag (return);
- Wear of the overrunning clutch, bendix.
Electrical breakdowns
- Loose fit of brushes, wear, chipping;
- Open circuit in the traction relay, the control unit does not turn when current is supplied, the crankshaft does not rotate, the fuel pump does not pump fuel into the system;
- The commutator plates are worn;
- Damage to the armature winding;
- Short circuit on the armature plates;
- Contacts, terminals are oxidized;
- The battery is completely discharged, the car does not start;
- Broken power cable in the area from the steering column to the starting device.
Removing the starter Hyundai Accent since 1999 Hyundai Accent
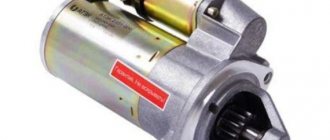
The starter is attached to the clutch housing
1 – bolt securing the starter and the negative terminal of the battery, tightening torque 9.8–16 N/m; 2 – starter;
3 – starter mounting bolt, tightening torque 26–33 N/m.
Work to remove the starter must be carried out from under the car, removing the engine protection.
1. Disconnect the negative battery.
2. Disconnect the wiring harness connector from the starter
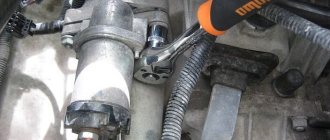
3. Using a 12mm socket, unscrew the nut securing the power cable
4. Remove the power cable terminal from the starter solenoid relay.
5. Use a 14mm socket to unscrew the two fastening bolts (the lower bolt also secures the tip of the ground wire)
6. Remove the starter from the socket.
Starter internals
1 – front cover; 2 – front bushing; 3 – cover; 4 – bolt; 5 – traction relay solenoid; 6 – plunger; 7 – spring; 8 – gasket; 9 – lever; 10 – holders; 11 – spring; 12 – plug; 13 – washer; 14 – thrust ring; 15 – stopper; 16 – overrunning clutch; 17 – rotor; 18 – washers; 19 – stator; 20 – brush holder; 21 – back cover; 22 – rear bushing; 23 – bolt; 24 – screw.
Guys, why not cite a reprint from the literature here. Have you actually been under the car, have you actually removed the starter from the car with your own hands (in particular, from the H-Accent)? Device and mat. I already know some of it without you. I need advice from someone who has actually encountered the problem of removing the starter from the engine
to viled06: But you climb under the car with a camera and make your own. We will be happy to see how this prevents the starter from removing the gearbox.
to Messir: Is it hard to believe without a photo? I'm not having fun here.
to Messir: I recognize the posted photos from an illustrated book for Accent, but in reality the bolt with the “mass” tip could not even be unscrewed (can’t get close), and the other bolt is not even visible at all
SHARE THIS PAGE
SITE SEARCH
Greetings! My name is Mikhail, I want to express my gratitude to you and your site.
Thanks to you, I was able to remove the scratches my wife caused in the parking lot on my own.
It all started when my wife passed her license and began to often take my car to get to the nearest shopping center. There were no signs of trouble, but one day she said with tears in her eyes that she had rubbed herself against a pole in the parking lot. I still don’t understand how it was necessary to manage to do this, but with women everything is possible, you understand)) The scratch was deep enough, but there was no money or time to bother with painting. That's why I simply ignored the scratch.
A week ago I came across Artem Shevchenko’s blog, who in his article told how to get rid of scratches in 10 minutes. At first I didn’t believe it, but I decided to try it anyway and didn’t regret it at all. The method worked 100%, there was not a trace left of the scratch, and nothing was visible at all from any angle.
In general, I’ll keep the intrigue, for those who want to quickly get rid of scratches, come and read the article on Theme’s blog, I guarantee you won’t regret it.
Originals, analogues, articles and prices
| Article / name / OEM | Price, rub.) |
| STARTER | |
| BOSCH 0 986 025 720 | From 6200 |
| 0 986 CR1 751 | —/— |
| 0 986 CR1 808 | —/— |
| F 042 200 052 | —/— |
| KAVO PARTS EST-3005 | From 5700 |
| NIPPON PIECES H521I02 | From 5500 |
| VALEO 438098 | —/— |
| —/— 455964 | —/— |
| VALEO 600258 | —/— |
| WAI 17288N | From 6100 |
| SANDO 6035106.0 | From 6400 |
| 6035106.1 (manual transmission) | —/— |
| 6035115.0 (manual transmission) | —/— |
| 6035237.0 | —/— |
| 6035115.1 (automatic transmission) | —/— |
| 6035105.0 (automatic transmission) | —/— |
| Tagaz ES54535 | From 5800 |
| COMPONENTS | |
| Traction relay ERA 227660 | From 650 |
| ERA 227787 | —/— |
| HOFFER 6646057 | —/— |
| 6646127 | —/— |
| MEAT & DORIA 46057 | From 500 |
| —/— 46127 | —/— |
| Carbon brush ERA 233009 | From 150 |
| ERA 233091 | —/— |
| Drive ERA 225181 | From 700 |
| —/— 225240 | —/— |
*check prices at the time of purchase from an authorized dealer.
Disassembly
The removed starting unit is disassembled in the following order:
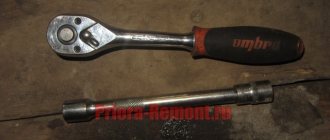
- Using a ratchet with a 13mm head, unscrew the nut connecting the solenoid relay and the starter via the electrical line;
- then use a curved screwdriver to tighten the screws securing the release lever to the motor housing;
- disconnect the traction together with the anchor and spring;
- twist the coupling bolts from the rear cover of the starter - head 8-10;
- remove the screws of the cover securing the brush holder;
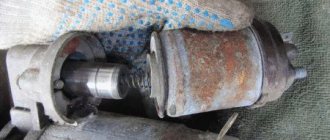
- halve the device - disconnect the electric motor with the armature and brush assembly from the front part with the fork, washer, and rubber seal;
- use an open-end wrench to knock down the limit washer and the locking ring on the drive;
- take out the bendix.
Next, part of the electric motor is disassembled. The brush assembly is removed, the armature is separated from the magnetic stator.
Replacing and installing a starter on a Hyundai Accent
Necessary materials: tools, rags, lubricant, set of heads, components for the starter, gasket repair kit. If natural light is not enough, it is worth installing an additional light source.
- We install the Hyundai Accent on the inspection hole, block the rear row of wheels with shoes, and activate the parking brake. Remove the terminals from the battery;
- Unscrew the nut and remove the power terminals from the starter board. We unscrew the fasteners and remove the PU from the slots.
Subsequent actions depend on the decision: install a new starter or repair the old one. It is cheaper and more rational to restore the old one, but provided that there are no cracks or damage to the body.
Factory recommendations
The manufacturer does not recommend repairing the starter yourself, since it believes that this should be done by specialists who are trained in this. Although, it is possible that many garage repair specialists do an excellent job without special training provided by the manufacturer.
Thus, they admit that anyone can repair the Hyundai Accent starter if they wish, if they have the tools and hands. Although, there are situations when it is worth contacting a specialized station, since it is impossible to diagnose the cause of the malfunction and breakdown.
Grinding, noise when starting, does the engine not start immediately?
As it turned out, the reason is a worn-out bendix, we will change it ourselves, but I’ll tell you how on the My-Elantra.ru website, no service is needed. It will take about 30 minutes - 1 hour and then, roughly speaking...
What is needed to replace the Bendix
To change the Bendix to the Hyundai Elantra HD (and not only) - you need to remove the starter; for DIY repairs we will need:
- wrench "8" (preferably a head or a cap) - for unscrewing the studs;
- key “10” - to remove the terminal from the battery, as well as the air intake;
- key “12” - needed to remove the power, positive wire from the starter;
- socket wrench “14” - for unscrewing the starter from the gearbox;
- Phillips screwdriver - for removing the retractor coil;
- rags (may be useful);
- Bendix itself ASIN (ASIN.EL2313) 3613911140 or similar, they gave me from Accent...
Procedure
! First you need to disconnect the negative terminal from the battery (using the key to “10”)!
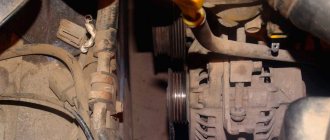
Next, we proceed to remove the air intake, it is held in place by two bolts (No. 1, No. 2 in the photo), unscrew them with a key “10”. Here is a photo - I have removed the battery (this is for another article):
Disconnect the coolant return pipe (the photo shows the mounting locations for this pipe) and move it to the side:
Then we disconnect the cooling fan chip:
Then we move the plastic clamps of the fan housing and remove it from the engine compartment. These are the fasteners:
It was difficult for me to remove the fan - the upper coolant pipe was in the way, but it still worked:
Here are all the fastenings:
Then, using a 14-point socket wrench, unscrew the 2 bolts that secure the starter to the gearbox:
We turn the starter more conveniently towards us. We disconnect the solenoid relay chip and unscrew it with a socket wrench to “12” - power “plus”:
Now we take it out... At first it may seem that there are a lot of “extra” wires getting in the way, but it’s quite easy to take it out, since the fan has been removed and it’s quite spacious...