Replacing the outer CV joint on a VAZ 2112
On cars with front-wheel drive, instead of a driveshaft with crosspieces, constant velocity joints (CV joints) with axle shafts are used. Both crosspieces and CV joints tend to fail. This article discusses in detail: replacing the external grenade of a VAZ 2112, visual photos for a better understanding of the process and practical advice from an auto repair specialist.
- Why does the CV joint fail? Principle and working conditions
- How to determine if a hinge is faulty? Diagnostics
- What will you need?
- Replacement
- Removing the axle shaft
- Grenade replacement
- Installing the axle shaft on the car
Why does the CV joint fail? Principle and working conditions
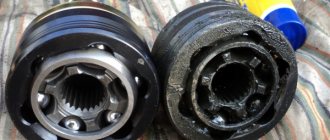
A torn boot is the cause of all troubles with grenades
So:
- A car's wheel is its dirtiest part. The wheel is constantly in contact with the road, and the road is not always asphalt, but often dirt or sand.
- The outer grenade usually wears out much faster than the inner one, since it is closer to the wheel and is more subject to overload when driving on uneven surfaces.
- Anther breakage. One of the reasons for grenade failure is a violation of the integrity of the boot. This usually happens due to a torn boot clamp, a cut of its fastening, or a cut in the boot itself.
- It also happens that the boot loses its rubber properties over time and stretches. Then it does not fit tightly to the axle shaft.
- For all these reasons, dust gets inside the outer CV joint, and even worse, sand and dirt.
- If harmful substances get inside the grenade, the bearing fails - it collapses or jams.
If you notice a torn grenade boot, this means that on a VAZ 2112, replacing the CV joint is simply necessary for its further safe operation.
This is interesting: How to reset the counter on a Skoda Fabia 2
Replacing CV joints VAZ 2110, 2111, 2112
The main reason for replacing a VAZ 2110, 2111 or 2112 CV joint is damage to the boot. In this case, dirt, chemicals, dust, moisture, sand get on the grenade (as this part is often called in everyday life), and it quickly loses its functionality. You can tell that the linkage is out of order when there is a characteristic crunching sound when turning when accelerating. In this case, the car must be urgently taken for repairs. Replacing the CV joint on a VAZ 2110 and other models with your own hands is quite affordable. But initially you need to understand that the work requires care and precision. How to fix it will be described below, but first it is advisable to familiarize yourself with the structure of this unit.
Drive shaft installation
So:
- The shaft is finally fixed in the side gear.
- The drive shaft is installed in the wheel hub.
- Further assembly is carried out reversely to removal.
How to correctly replace the internal grenade on a VAZ 2112 can be clearly seen in the video. Timely replacement of CV joint elements increases the service life of the vehicle in good condition.
Rear-wheel drive cars are being replaced by cars with front-wheel drive. In this regard, the crosspieces are replaced by hinges of equal angular velocities, which are called grenades. This article is instructions for replacing the internal grenade on a VAZ 2112 car and other cars from this family. Here you will find a video describing the process, as well as photos of some of the process steps. So, let's begin:
- Causes of constant velocity joint failure
- Determining the need to replace the internal grenade
- Replacing a grenade Tool for work
- Removing the axle shaft (wheel drive)
- Removing and installing a new CV joint
- Installing the drive on the car
Where to buy?
If a grenade is needed for a VAZ 2112, then the owner of the car should decide on the place of purchase and the type of part. Car mechanics are advised to take new original spare parts due to their ideal compatibility with the car and long service life. Such a CV joint can be purchased at an auto parts store for VAZ cars or an online store.
If you don’t have enough money to purchase a new auto part, then you should consider the old versions of grenades. They are sold at car dismantling points, at the car market, by advertisement.
Replacing the outer CV joint on a VAZ 2112
On cars with front-wheel drive, instead of a driveshaft with crosspieces, constant velocity joints (CV joints) with axle shafts are used. Both crosspieces and CV joints tend to fail. This article discusses in detail: replacing the external grenade of a VAZ 2112, visual photos for a better understanding of the process and practical advice from an auto repair specialist.
- Why does the CV joint fail? Principle and working conditions
- How to determine if a hinge is faulty? Diagnostics
- What will you need?
- Replacement
- Removing the axle shaft
- Grenade replacement
- Installing the axle shaft on the car
Causes of constant velocity joint failure
What can cause the failure of this element of the car:
- Poor quality boot is the first reason and the most important. If the boot on a grenade is made of low-quality material, it will quickly wear out, and all sorts of debris will begin to get inside the grenade.
- Loosening the boot clamp also allows sand and dust to get inside the CV joint.
- Other defects of the boot (see), such as a cut of the clamp, rupture of the boot or its stretching also lead to bad consequences.
- An insufficient amount of lubricant, or, even worse, its absence in the constant velocity joint housing, leads to rapid wear of the bearing and, as a result, wear of the entire part.
Advice! When repairing your car, especially if you have to crawl under the car, do not be lazy and pay attention to the condition of the axle shaft boots. If you notice at least one of the defects listed above, replacing the CV joint on a VAZ 2112 is simply necessary!
Determining the need to replace the internal grenade
Before any repair, it is important to make sure that there is a fault. And now we’ll do this with the CV joint:
- Often, a malfunction can be determined by the sound emanating from the suspected component of the car.
- A joint malfunction is detected while driving or starting the car.
- Of course, sounds can come from a faulty shock absorber strut, or from the engine. Let's learn how to determine what kind of sound should come from the CV joint and when it appears.
- The sound of a faulty grenade is the grinding of metal on metal, similar to a crunch, breaking of metal, or a stone hitting a bearing or other drive mechanism.
- When can this sound be heard? If such a sound appears when turning, it means that you need to change the outer grenade, not the inner one.
Advice! Although external grenades fail much more often than internal ones, when repairing external ones, be sure to check the others for functionality. Lubricants should also be added if necessary.
- On a VAZ 2112, the internal CV joints make a sound when driving straight, and especially when the car starts to move.
To more accurately determine the malfunction of the unit, diagnostics should be carried out in the inspection pit. The following explains how to do it yourself:
- The car is driven into a viewing hole. Wheel chocks must be placed under the rear wheels, and the car must be set to the parking brake.
- Next, you should raise the car with a jack so much that one of the front wheels is lifted off the ground.
- Then you should turn the wheel by hand. When the wheel rotates, a sound appears - there is a malfunction in the internal grenade. If you turn the wheel at the same time, then rotate it, and only then does the sound appear - there is a malfunction in.
- After carrying out such an operation, it should be done on the second side (with the opposite wheel).
Now that the breakdown has been identified, you can begin repairs. Replacement of the internal grenade on the VAZ 2112 begins!
List of tools that may be needed when replacing CV joints
To carry out repair and replacement of CV joints, you will need the following tools and materials:
- hammer,
- punch,
- mount,
- screwdrivers,
- powerful car lock,
- vice,
- wooden spacer,
- gasoline for washing removed components, CV joint-4 lubricant.
Replacing a CV joint on a VAZ 2109 - operating procedure
First, you should remove the handbrake handle and secure the front wheels with a stop. Then you need to unscrew the hub nut while the car is on the ground. Next, you should raise the car and support its front part. The next step is to remove the wheel and wheel hub thrust nut. Next, the tie rod end must be disassembled. Using a special puller, press the finger out of this assembly. Subsequently, you need to unscrew the ball joint mounting bolts. After the steering knuckle with the stand is moved to the side, it is necessary to remove the splined end of the outer CV joint from the wheel hub. Then, in order to squeeze out the CV joint, you need to use a pry bar.
It should be noted that if the repair work affects all CV joints on both sides of the car, then the old part should be installed instead of the removed part, otherwise during assembly you will encounter the fact that the CV joints will not be installed in their designated place.
It should also be noted that if during the operation of your vehicle you could observe oil leaks near the gearbox, then most likely you will have to replace the CV joint seal. The old part should be pulled out with a screwdriver, and the new one should be pressed into this place until it stops.
It should be understood that the entire repair process in this case is not very labor-intensive, just like repairing a steering rack, however, in this case it is necessary to take into account the recommendations of experienced motorists, which state that replacing the inner CV joint, as well as replacing the outer CV joint, should only be done with similar spare parts assembled. In this case, replacing individual elements is not recommended, unless it is possible to replace the inner CV joint boot or other similar components.
After the shaft with CV joints is removed, the following manipulations must be done: the shaft is installed in a vice, after which the cover clamps are removed. Using a drift, the inner CV joint is knocked out. A similar sequence of actions applies to the outer CV joint. But installation on the shaft is done in reverse order.
Here it should be taken into account that the right shaft is longer than the left one
Before final installation, it is necessary to check the presence of the proper amount of lubricant in the CV joints. During assembly, new clamps must be installed, and during the installation process, care should be taken to ensure that no contamination gets inside the CV joint.
Installation of the CV joint in its designated place is carried out using a hammer and a wooden spacer, and the movements should not be sharp or strong. After the CV joint is placed, the CV joint boot should be installed
During the installation process, it is very important to bend the edge of the boot with a screwdriver, thereby equalizing the pressure inside and outside this element
It should also be noted that if the described process seems too labor-intensive to you, you can always contact a car service. Since such a replacement is quite common, it will take very little time for a professional. Another operation that you can do yourself is pressing in the silent block.
Diagnostics of CV joint performance before installation
- The CV joint should be inspected visually, as well as by rotating it relative to the position of the bearings.
- If no crunching or crackling noises are detected when turning, and the presence of dirt and sand on the lubricant is minimal, then the joint can be cleaned in gasoline by soaking and cleaning.
We fill the grease into the CV joint
- Then we dry it and squeeze new lubricant into its body. This also applies to the CV joint boot, which also needs to be coated with the body.
How to determine if a hinge is faulty? Diagnostics
CV joint diagnostics
At any service station, before repairs, they carry out diagnostics of the unit that is going to be repaired. Let's do it ourselves:
- Are there any strange sounds while driving your favorite car? One possibility could be a faulty CV joint.
- Most often, a CV joint in need of repair manifests itself during turns (not necessarily sharp ones). When turning the car, a sound comes from the hood, similar to metal jamming, the sound of metal breaking, metal grinding on metal.
- If such sounds appear even when driving straight, then the CV joint definitely needs to be changed!
Advice! Do not ignore sounds that occur when operating the vehicle. In some cases, this can cost the lives of the driver and passengers.
- After sounds similar to a malfunctioning grenade appear, it is necessary to diagnose the front chassis of the car in a pit or overpass, or, as a last resort, just in the garage.
- To do this, you need to lift the car using a jack. Raise the side from which the sound was heard. Don't forget to put wheel chocks under the rear wheels of the car.
- When the wheel can rotate freely, you should rotate it around its axis and listen for sound. If the sound does not appear, then you should turn the wheel in the direction of the turn at which it occurred.
- When a sound appears, it will become clear that the VAZ 2112 CV joint is faulty and requires replacement as soon as possible.
- If the sound still does not appear, then check the other side (the other wheel) in the same way. By the way, if the sound appears, check it anyway - you may have to change both grenades.
After diagnosing the constant velocity joints, you can begin replacing them.
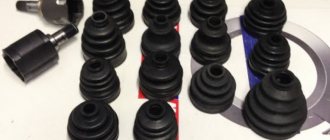
What will you need?
Here is a short list of what is needed to replace a grenade on a VAZ 2112:
- Partner
- A set of sockets or spanners (you will still have to find a 30 socket)
- Rust remover (WD-40 or equivalent)
WD-40 - no repair can be done without it
- Long collar
- Pre-purchased CV joint (average price) and lubricant for it (usually included)
- Hammer
- Pliers
- Flat screwdriver
- Vise
- Petrol
- Brush (a regular paint brush will do)
- Rags
- Copper or bronze tip
- Metal brush
In some cases, you may additionally need the following:
- Oil container
- Plug in the gearbox
- Watering can
This is interesting: How to reset it on a Peugeot 406
Useful tips for replacing CV joints
Use additional recommendations when replacing a grenade on a car:
- When assembling the shaft and grenade, you can use the old boot if it is not worn out and there are no defects on it, but be sure to clean it before installation.
- For better installation of the grant on the shaft, it is recommended to use a special hammer, which is equipped with a hammer made of soft material.
- Be sure to use all the parts included in the CV joint kit.
- Do not use other lubricants to fill the hinges and boot; you should only use the one that came with the grenade.
Removing the drive, boot and CV joint
To replace the outer CV joint, follow the following procedure:
- We place the car on the inspection hole and support it with wheel chocks.
- Using a 30mm socket, loosen the hub nut. If the nut does not break off, then you can extend the key with a pipe.
- Raise the car with a jack in the right place and remove the wheel.
- We unscrew the bolts securing the ball joint of the lower arm to the hub.
- We squeeze out the tie rod end with a puller.
- Unscrew the drive shaft nut completely.
- We pull out the hub by grasping the brake disc and pulling the shock absorber strut towards us.
To change the boot and hinge, you will have to climb into the inspection hole. To remove the CV joint, remove the clamps that hold the boot. Next, we get rid of the old boot, which is easier to do with a knife. Use a rag to remove grease from the hinge. Then you need to knock down the inner race, for which we lightly hit the attachment with a hammer, which must be rested against the end of the hinge. Next, we thoroughly clean the CV joint from dirt, sand, dust and grease.
Build process
When assembling the outer CV joint, you must perform the following steps:
- We put a rubber part on the shaft.
- We stuff the CV joint (new or cleaned) onto the shaft until the part is secured with a retaining ring.
- We place fresh lubricant in the hinge and boot.
- We put the boot on the outer race.
- We remove excess air from the boot by pressing it with your hand.
- We secure the boot with clamps.
Then the drive is put in place, the hub is clamped with a nut. It is also necessary to put back the tie rod end, support and wheel. Next, you can lower the jack and tighten the nut securing the drive. To prevent it from unscrewing on its own, the nut should be capped.
Features of repairing the internal CV joint
To replace the inner CV joint, it is necessary to completely remove the drive, for which the outer joint is first disconnected without subsequent dismantling. Next, using a pry bar, remove the hinge end from the gearbox. To do this, we insert the flat part of the tool between the outer frame and the box, and then move it like a lever.
Further, the procedure for replacing the unit will be similar to the actions when repairing the external hinge. The inner CV joint must be correctly inserted into the transmission. It is recommended to insert the part into the hub, with the help of which the unit is brought into place by pushing movements. But it is also possible to drive the already assembled shaft with a mallet or a wooden pointer and a hammer. The hinge must be secured with a locking ring.
At the final stage, all removed parts are installed back. At this point, the replacement of CV joints is considered completed.
Didn't find the information you are looking for? on our forum.
We recommend reading:
The dimensions of the VAZ 2114 have disappeared
VAZ 2107 carburetor troits at idle
The injector throws antifreeze out of the expansion tank of a VAZ 2114, reasons for how to prevent breakdown
VAZ 2107 carburetor, eats a lot of gasoline
The tachometer does not work on the VAZ 2110 injector reasons
Dismantling and assembling the gearbox of a VAZ 2101 car. Video
How to make a signal on a VAZ 2107
DIY EUR for VAZ 2114
Similar articles
How to replace a heating radiator Lada Kalina
Adjusting VAZ 2106 valves - adjustment and configuration procedure
How to change the radiator of a VAZ 2114 (2115) stove with your own hands
How to clean the injector nozzle on a VAZ 2107 yourself
Do-it-yourself CV joint replacement on VAZ cars Link to main publication
On a VAZ, a grenade flies out of the box, reasons, repairs, photos
Repair manual for VAZ 2108, 2109, 2114, 2115 Wires and fuses It is necessary to change the constant velocity joint (CV joint, or popularly a grenade) on a VAZ-2112 when a peculiar knocking (crackling) noise appears in this part. If such repairs are not carried out on time, the grenade may fly out of its place while moving. Then you will have to call a tow truck to transport the car to the service station, since it will no longer be able to drive on its own.
Why are grenades flying?
The grenade flew out and the boot broke
The fact that the grenade is out of order is indicated by a knocking sound in the area of the front wheel when turning, as well as when the clutch pedal is released while the car is standing still. A crash will be heard in the area of the front wheel where the grenade was fired.
In this case, you should check with the speed turned on (the car must be placed on a lift); if the drive spins, but the wheel does not, then the external grenade has failed. If the drive is stationary at switched on speed, then the internal grenade has broken.
The internal grenade just “flies” out of the gearbox. Or rather, it crumbles, one part remains in the gearbox, the other on the wheel drive. Sometimes a situation arises when the retaining ring falls apart, in this case the grenade will also fly out. The breakdown is not associated with incorrectly selected oil in the gearbox.
Grenade replacement
Trialli external grenade - seems to be praised.
When you hear a cracking sound in the grenade, you can fix this breakdown yourself, without resorting to the services of a specialist. To do this, follow simple steps that will be described below.
Process
Don’t forget to check whether the CV joint kit includes a separate boot and clamps. If not, then you will have to buy it all.
Separate boot and clamps
- The car should be raised from the side where the grenade failed. In this case, wheel chocks should be placed under the rear wheels.
- Remove the protective cap from the wheel and unscrew it.
- Remove the hub nut. This may require a strong tool, since the nut may become welded to the axle during operation. You can also use a special wrench for this (weld the head at “30” to the chisel and use a long wrench).
- Unscrew the ball joint (lower) bolts from the steering knuckle.
- Turn the wheel to its extreme position.
- Pull the steering knuckle together with the strut and pull out the CV joint spline from the hub. We took the CV joint out of the hub
- Using a pry bar, you need to pull out the drive splines from the gearbox. If you need to change two grenades at once, then after removing the drive from one side, you need to fix the box with a technological lock. You can use an old CV joint for this. If this procedure is not done initially, the gears on the differential will shift, and then during assembly it will be impossible to insert the CV joints themselves.
- After removing the drive shaft, it must be clamped in a vice.
- Remove protection from grenades. If the anthers are torn, you can simply cut them off and then install new ones. If they are whole, then you should simply wrap them, being careful not to damage them.
- Using a hammer, knock the CV joints off the drive shaft.
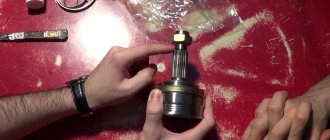
- Next, a new spare part is installed. The CV joint must first be lubricated. You also need to put fresh lubricant in the boot. It is recommended to use MoS2. It will last for the entire service life of the hinge. We check the condition of the separator on the grenade and fill it with lubricant
- The boot is attached to the grenade using clamps. We put on the “fashionable” transparent ACVA boot. Reviews are mostly positive
- If the inner CV joint is being assembled, then do not forget about the plastic plug that is placed on the end of the shaft. The old grenade is on the right, and the new one is on the left, they differ in height
- A retaining ring is also installed on the inner CV joint.
- Then the assembled part is placed in the box drive. It should be seated on the slots to the base. To do this, you can lightly hit it with a hammer, placing a block of wood on it. The inner CV joint is already in the gearbox
- Further assembly is carried out in the reverse order of disassembly.
It is also worth replacing the nut that holds the hub with a new one. It must also be tightened in accordance with the requirements of the car manufacturer.
Stabilizer link failure and grenade flying out
As a result of the stabilizer bar breaking, the wheel went to the side, and grenades flew out with it. The anthers also came to an “end.”
Knowing these points and adhering to the given rules, you can replace CV joints on your own and without resorting to the help of a specialist.
Using grenades in a VAZ 2112 car
They began to use grenades when converting cars to front-wheel drive. If in such a design you use crosspieces in the cardan transmission, as in rear-wheel drive cars that have four needle bearings that work in pairs, then equality of angular velocities on the drive and driven shafts will not be ensured. So:
- The use of such a device will lead to an increase in the dimensions of the unit, the price becomes significantly higher, and strong pulsation occurs during the transmission of torque, which increases as the angle between the shafts increases.
- The design of the grenades initially included the same service life as the entire car, but after using the car, it was clear that its outer part would wear out more. The use of flexible, moisture- and frost-resistant material for manufacturing protects the surface of the grenade, but over time, external factors destroy the element and it cannot be used for a long time.
- Rapid wear is explained by the action of constant deformations, abrasive particles and moisture in large quantities. During operation or during repairs, the boot (see) may be damaged. Cracks appearing on the protective rubber lead to failure of the element. The shaft leading to the grenade must not be damaged, which can be seen during a visual inspection of the part.
Replacing the external grenade of a VAZ 2112 car
The instructions for replacing a grenade on a VAZ 2112 indicate that the work is carried out with the part of the car raised and the wheel removed. So:
- First you need to unscrew the hub nut.
- Remove crankcase protection.
- Release the ball joint from the connection with the lower suspension arm. If the support in the lever is pressed in, unscrew them at the same time.
- The ball joint is removed.
- You need to move the stand to the side, it will be in a bent position, and the splined shaft entering through the bearing into the hub will be located at an angle to the drive shaft. The latter connects the inner and outer grenades.
- The splined shaft of the grenade is knocked out of the bearing using a metal spacer from the outside of the wheel.
- Removed from the grenade drive shaft.
- The boot is removed.
- All old grease is wiped off. To make the work easier, you can use WD-40 or another similar aerosol.
Tip: Replacing a grenade on a VAZ 2112 is carried out simultaneously with replacing the thrust and locking rings. There is a locking ring inside the grenade. The assembly must be well lubricated with a large layer of lubricant.
- After installing the grenade on the drive shaft, before its final pressing, you need to center the assembly so that the fork enters without jamming.
- Installing a grenade on the seat.
- Crimping the boot with clamps.
- Assembling the unit yourself is done in the reverse order.
How to replace an internal grenade
Replacing the internal grenade of a VAZ 2112 differs from the external one in that it needs to be done when all the oil has been drained.
Tip: You need to drain the oil from the gearbox with the car raised. If its quality is low, it is better to replace the liquid so that in the near future you do not have to repeat all the operations again.
So:
- The wheel is removed.
- The ball joint is unscrewed, which frees the strut from the lower arm.
- For the external grenade to move freely, the wheel must be moved to the side.
- You need to knock out the outer grenade from the wheel.
- Both the external and internal elements are removed from the gearbox.
Tip: The hole must be covered to prevent dirt from getting into the gearbox.
- The drive shaft is clamped in a vice carefully so as not to damage it.
- Use a screwdriver to release the clamp securing the boot to the body of the internal grenade.
- The boot is removed. An element that has become unusable can be cut.
- Replacing a VAZ 2112 grenade is done by knocking the old one off the drive shaft.
- A new boot and grenade are put on the shaft.
Tip: A plastic plug is installed at the end of the shaft. The space inside the grenade must be generously lubricated with grease.
- During installation, you need to ensure that the seat coincides with the direction of the drive.
- New rings are replaced and installed - retaining and thrust rings.
- Graphite lubricant must be applied to the spline surfaces of the hinge.
- The assembly is inserted into the gearbox as shown in the photo.
Required spare parts
Each car is equipped with two grenades: internal and external. The first joint transmits rotation to the shaft from the gearbox, the second – to the hub from the shaft. Depending on the scope of the repair, you may need:
- internal hinge (article 302315, 2108-2215056);
- external CV joint (article 3107K, 2110-2215012);
- front wheel drive shaft (article 2110-2215070, 21100221507000);
- cover (article 2110-2215068, 21100221506800, 2108-2215068);
- buffer (article 2108-2215073-01);
- hinge clamp (article 2108-2215086);
- internal hinge retaining ring (article 2108-2215104, 21080221510400, 2121-2215084);
- thrust ring (article 2121-2215082);
- clamp (article 2108-2215034Ч, T-00040, 2108-2215036, 2108-2215034-31, 2108-2215034);
- protective ring (article 2108-3103060, 21080310306000).
Attention! It is better to purchase a new hinge using an old grenade, so the risks of purchasing the wrong part will be reduced to zero. It is better to go to a trusted store for a CV joint.
Tools required for repairs.
To remove and install the VAZ 2110, 2111, 2112 CV joint, you will need the following tools:
- jack;
- keys for 17 and 19;
- pliers
- heads for 13, 14, 15, 16, 17 and 30;
- mount;
- knob;
- wheel wrench;
- lubricant;
- rags.
Do-it-yourself repairs are well justified by saving time and money. Since the price of work on replacing the CV joint of a VAZ 2110 and other models in a car service is: for an external one - 1100 rubles, for an internal one - 1300 rubles. Tariffs are valid as of 02/15/2019. And this is comparable to the cost of the parts themselves.
Replacing a grenade
Before you begin the process of replacing a grenade, you need to arm yourself with the following tools:
- lift;
- a sledgehammer or large hammer;
- an ordinary hammer;
- heads for 17 and 30;
- balloon type wrench;
- a chisel, not necessarily sharp;
- a flat screwdriver, preferably a slotted one;
- wrenches 13 and 17;
- crowbar or pry bar;
- pipe;
- a special puller designed to replace CV joints;
Special puller for CV joints
And, of course, you should purchase a new CV joint kit.
New CV joint kit
Dismantling an old grenade
Let's start the replacement process:
- first you will need to unscrew the nut that sits on the shaft using a 30mm socket, a wrench and a pipe;
Replacing the external grenade of a VAZ 2110
Note. Don't worry if the nut is a little jammed, because if you apply a little force, the pipe and collar will easily unscrew it.
- After the nut is unscrewed, the lift should be installed.
Causes and symptoms of CV joint failure on a VAZ 2115
How to replace the idle speed control on a VAZ 2108, 2109, 2114
The most common reasons:
- low quality CV joints, installation of fakes or defective spare parts;
- lack or poor quality of lubricants;
- damage to the boot and entry of abrasive debris or water into the mechanism;
- aggressive driving style and disgusting condition of the road surface.
One of the signs of replacing a VAZ 2114 CV joint is the appearance of a characteristic “crunch”. This sound can only be produced by balls that roll along grooves, because... have too much output. Working in close contact under constant load inevitably leads to changes in the properties of rubbing parts, their sizes, and the formation of wear.
Where there is no close contact of these elements and extraneous noise appears. The sound can appear at any time, but usually it occurs when turning, sharp acceleration, or overcoming obstacles. There are other signs indicating a hinge failure:
- slight jerks when starting the car or changing dynamics;
- play of the shaft located between the CV joints when trying to move it in different planes.
Determination of CV joint failure and causes of failure
Faulty grenade VAZ 2110
Before starting the process of replacing a grenade, it is recommended to determine which grenade needs replacement. Simply feeling the shaft play on the overpass is an accessible method for determining the malfunction of a particular grenade. As a rule, a working grenade should not create any play at all.
Note. It is worth noting that a faulty grenade does not necessarily occur on older cars. This situation is often observed when the CV joint fails on a car that has recently left the assembly line.
What are the main reasons why a grenade fails? Here they are, listed below:
- the quality of the grenade, which can be low or high (often a fake is sold instead of the original part or a defect is established);
- lubricant that is either completely absent or available in insufficient quantities;
- failure of the boot (see How to replace the boot on a vase), which leads to damage to the grenade (the boot is protection and if it is missing, various abrasive debris and water get into the grenade mechanism);
- incorrect driving style (aggressive driving style);
- poor condition of roads (especially important here in Russia).
So, you can determine the malfunction of the CV joint yourself, as mentioned above, by detecting play in the shaft. In addition, the malfunction of a grenade, like any other part or mechanism of a car, is caused by a change in properties, dimensions, formation of a hole, etc. As mentioned above, the grenade is a hinge, the structure of which contains elements that rub and are under constant load. If the CV joint is a kind of bearing, then its races must have transverse grooves. This is what allows you to change the angle between the drive and driven axle shafts. Since the grenade, forcing the car to move, transfers significant force to the wheels, over time it loses its performance and wear is formed on the part. It also increases the gap. And where there is no close contact between mechanisms and parts, knocking, noise, etc. occur.
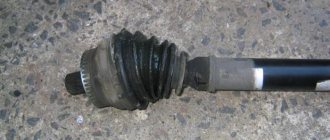
Torn boot on a VAZ 2110 grenade
The appearance of a characteristic crunch when turning the wheels is the main sign of failure of the grenade, which most experienced drivers know about. Such a sound can only be produced by metal balls rolling along the gutters.
Note. Such a crunch can appear at any time, but, as a rule, when turning the wheels or sharply accelerating from a standstill. In addition, a characteristic sound may appear when overcoming obstacles.
Slight jerks when the car starts moving will also help to identify signs of a CV joint malfunction. Also, experts recommend changing driving dynamics to quickly identify faulty grenades. As was said, there are two types of grenade: external and internal. How to determine the malfunction of an external grenade, or as it is also called an external grenade, was indicated above.
Note. The external CV joint differs from the internal one, first of all, in that it is smaller in size and fails much more often than the internal CV joint.
- To determine the malfunction of the external grenade in another way, you need to turn the steering wheel and move away. If the grenade is faulty, it will begin to “crunch”.
- To determine the malfunction of the internal grenade, you will need to drive not in a curved manner, as when checking the outer CV joint, but in a straight line. The internal grenade will especially clearly signal with a sound signal that it is time to replace it when overcoming holes, snowdrifts or shallow ditches.
- You can finally check the malfunction of the grenade on the lift. The front wheels will be suspended and if the CV joint is faulty, a characteristic crunch will appear.
Order of Operations
If there is no inspection hole or overpass, you need to prepare a place for repairs. Raise the car with a jack, put on the handbrake, provide the work area with good lighting, and support the wheels with clamps.
On a note! To replace a broken joint with a new grenade, you will need to perform many operations: removing the VAZ 2110 internal CV joint and wheel, disconnecting the ball joint, and many others.
Replacing the inner CV joint of the VAZ 2110 and other models is carried out in the same way as the outer joint. They are both located on the shaft drive, which you need to get to first:
- On the crankcase protection, two nuts are unscrewed at the front and rear.
- You need to drain the oil from the box - 40 percent of the total volume.
- When replacing the right CV joint on a VAZ 2110, the wheel bolts come off on the right; if the left one is changed, the wheel bolts come off on the left.
- The outer hinge fasteners are completely unscrewed.
- Now you still need to jack up the car and remove the wheel.
- At this stage, two hub bolts securing the grenade become accessible; they need to be removed.
- The hub needs to be separated from the rods, this is done with a pry bar.
- The stand is pulled forward and the CV joint pin is removed from the hub.
- The shaft drive is removed and set aside.
- Now you need to remove the inner grenade from the box. With the hood open, you need to insert a pry bar between these elements. Then the tool jerks the hinge towards the box. The grenade should move. If this does not happen, the operation is repeated again. If the CV joint moves, then both hinges and the shaft can be removed from the wheel arch area.
- You need to remove the covers from the grenades; to do this, use pliers or special pliers to open the small and large clamps.
- The boot must be inspected for integrity. If the cover is damaged, it must be replaced. If the boot is in good condition, you can simply move it away.
- Use a hammer to remove the inner hinge. They need to hit the clip hard. The grenade should fly off. The same action must be performed on the other side.
- The rings are removed from the shaft drive, new ones are installed in their place and the boot is put on.
- The new grenade is also installed using a hammer. It and the boot need to be lubricated.
- The covers are secured to the hinge and shaft with clamps.
- A nut is screwed onto the grenade, then the hinge is driven into the box.
- Further operations are similar to the first, but are performed in reverse order.
See this video for the sequence of replacing the outer and inner CV joints of VAZ 2110 2111 2112:
Design and purpose of CV joint
It is the CV joint of the VAZ 2110 that makes it possible for the front wheel pair, working in conjunction, to make turning movements to the right or to the left. The kinematic diagram of these devices, regardless of the manufacturer, is analog in nature. The difference lies solely in the linear parameters of the products.
In any vehicle that uses a CV joint system, you should know that each wheel is equipped with two “grenades” (the colloquial name for these products), and they differ both in linear parameters and in their own purpose.
There are:
- CV joint internal VAZ 2110, transmitting rotational energy from the transmission to the receiving shaft;
- External CV joint of the VAZ 2110, which transmits rotational energy from the receiving shaft to the wheel hub, which is then converted into motion energy.
In kinematic terms, this product is a hinged transmission, where the transformation of rotational type motion is transmitted from the leading to the driven element using working bodies - metal balls.
Their number may be variable, but usually such a platform with metal balls is structurally located between the body of the product on a forced rotation shaft (driven type) and the leading structural element (drive shaft).
The body part and the platform are equipped with grooves - places for the location and movement of metal balls. In the connecting segment, the product is equipped with the so-called. “boot” - a special protective part in the form of a hemisphere, made of rubber compounds, elastic to the touch and resistant to lubricants, which protects the “grenade” from mechanical shocks and deformations, and also serves as a place for storing lubricant for the product.
Fault diagnosis
The VAZ 2114 has 2 external and 2 internal CV joints. First you need to determine which one is knocking. The optimal test would be on a suspension diagnostic stand. If this is not possible, diagnosis by ear is possible.
Two signs indicate a grenade malfunction in a VAZ 2114:
- the sound resembles a crunch;
- It usually appears when turning.
The simplest and most accurate way to do a garage check is as follows:
- Place the car on a flat surface;
- Turn the wheels to one side (to the middle position or a little further);
- Drive off with medium speed. It is worth remembering that starting too smoothly may not reveal a crunch due to insufficient load on the CV joint, and starting too abruptly may lead to the drive flying out of the wheel.
- Repeat the operation by turning the steering wheel in the other direction. The appearance of a crunch indicates a malfunction of the outer CV joint on the side in which the steering wheel is turned.
Visual detection of ruptured anthers will also be a sign of a CV joint failure. If you discover a damaged protection for any grenade, it must be immediately removed, disassembled and cleaned. If there is enough grease and there is no significant wear on the hinges yet, it is enough to replace the boot and fill it with new grease. If the wear of the balls is obvious, it is better to change the grenade.
It is more difficult to diagnose a malfunction of the internal grenade on a VAZ 2114. If it malfunctions, it crunches when starting off in a straight direction, and not when turning. But the same symptoms, for example, include play in the steering rack or wear on the engine mounts.
Sometimes the problem can be diagnosed from the pit by tugging on the drive from the gearbox side: strong play or the appearance of extraneous sounds indicate that the internal CV joint should be replaced.
Replacement
After all the preparations, you can begin the process of replacing grenades with a VAZ 2112.
Removing the axle shaft
So:
- Perhaps this is the most interesting thing in the process.
- Place the car on a level platform, inspection hole. Install wheel chocks.
- First, remove the hubcap from the wheel, if you have one installed.
- Now you need the help of a partner. He should take a driving position and press the brake pedal hard.
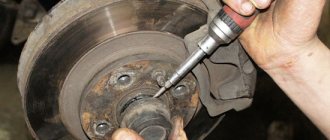
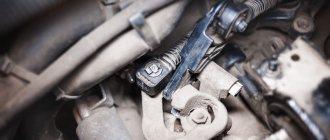
- In this case, you should take a 30 socket (in some cases 27 or 32) and a large wrench. The head is put on the hub nut, which secures the grenade to the hub (located in the middle of the wheel) and unscrew it with a large wrench.
Advice! It will take quite a lot of effort to complete the last step described. Therefore, the longer the driver you take, the easier it will be to unscrew the nut.
- Then you can unscrew the wheel bolts and remove the wheel.
- Spray the splined surface of the hinge with rust remover. Most often, an additional remedy is needed - you can’t just knock it out.
- When the wheel is removed, it is necessary to free the hub from. To do this, take a suitable head and unscrew the two bolts securing the ball joint to the wheel hub.
- When the hub is freed from the ball joint, you can try to remove the splined surface of the grenade from the hub. Remove the entire hub nut and metal washer.
- Now you need to take a copper (bronze) adapter and a hammer, and with their help we knock the splines out of engagement. If necessary, add more WD.
- When the splines are disengaged, move the strut to the side and remove the axle shaft from the hub.
Advice! During operation, make sure that the internal grenade does not jump out of the gearbox housing - this is an unnecessary loss of oil.
Grenade replacement
Two methods will be considered:
- Remove the boot from the grenade. To do this, use pliers to cut through the fastening clamp and, using a screwdriver, remove the boot from one side. Turn it out so that it does not interfere with further work.
- Now again you will need the help of a partner. He needs to hold the axle shaft tightly so that it does not jump out of the gearbox. It is recommended to rest the axle shaft against something (usually a lever or anti-roll bar).
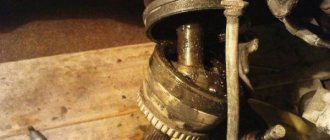
- The outer grenade must be turned with the slots up. This gives access to the grenade's internal bearing.
- It is necessary to place a copper adapter on the inner bearing and knock down the grenade with a hammer. When knocking down, the axle shaft must be rotated so that the bearing moves evenly and does not jam.
- After the outer CV joint has been removed, you can begin installing a new one.
Note! Above is the IDEAL option for removing the CV joint. And then we will talk about how it happens MOST OFTEN.
- After removing the grenade from the hub, the axle shaft is removed and pulled out of the gearbox housing. Place a container under the flow of oil from the box so that you do not have to drain the oil. Ideally, a special plastic plug is inserted into the gearbox hole.
- The axle shaft is clamped in a vice for ease of further work.
- The boot is removed from the grenade, but remains attached to the axle shaft. It turns inside out so it doesn't get in the way. If you plan to replace the boot, then it is either cut off immediately or removed after removing the grenade.
- We remove the grenade in the same way as above. We hit the bearing with a pointer and a hammer, and it comes off the axle shaft.
- If we change a grenade, then we change it. If, for example, we are only replacing a torn boot, then we do the following.
- The boot is removed and a new one is put on the axle shaft.
- The grenade is thoroughly washed with a brush in gasoline and then wiped. Then you need to fill it with special lubricant for CV joints.
- If you install a new grenade, then do not forget to fill it with enough grease and distribute it evenly there by turning the bearing.
Advice! Before installing the grenade on the axle shaft, pay attention to the condition of the retaining rings. Replace them if necessary.
- A new or repaired grenade is installed on the axle shaft much easier than it is removed. One sharp blow with a hammer through the attachment and the grenade is in place. Experienced mechanics can even put a grenade on by hand.
- Next, you need to put the boot on the seat in the grenade and secure it with clamps. There are special clamps for grenades (do not use plastic ones). Metal clamps are installed using pliers and a screwdriver.
Advice! Clean the spline joint, both on the grenade and in the hub, with a metal brush and lubricate.
Now the VAZ 2112 axle shaft with a changed external constant velocity joint is ready for installation on the car!
Installing the axle shaft on the car
So:
- The axle shaft is inserted into the crankcase. Its other end is inserted into the hub until it stops.
- Next you need to reattach the ball joint.
- Don't forget to put the metal washer back on and tighten the nut that secures the grenade to the hub.
- Reinstall the car wheel and lower the car from the jack onto the wheels.
- Again, the partner must press the brakes as hard as possible. You take the wrench and socket and tighten the nut with good force!
- Next you need to tighten the nut. This is done with a hammer and a blunt chisel type attachment. This is done to prevent the nut from unscrewing.
That's basically the whole replacement. If something is not clear in the text, remember that you can always watch a visual video that will show it all live.
Grenade replacement
Tool for the job
What is needed to ensure that the replacement of the VAZ 2112 CV joint takes place as quickly and efficiently as possible:
- Sockets and spanners
- 30mm head (not available in some sets)
- WD-40 or similar product
- Hammer
- Collar - the longer the better
- Pliers
- Jack
- Screwdriver
- Vise
- Gasoline and brush for cleaning surfaces
- Metal brush
- Attachment (bronze, copper)
- Metal brush
- Can't do without a partner
- And, of course, a CV joint complete with lubricant (if it is missing, you should purchase it - the price is reasonable)
Removing the axle shaft (wheel drive)
So, let's begin our renovation:
- The first stage is standard. We drive the car into the pit, put wheel chocks, put the car in handbrake and neutral, pray (optional) and go!
- When changing, oil must be drained from the variable gearbox housing! To do this, unscrew the required plug, place a container for the oil, wait for the drain to finish and screw the plug back.
- We remove the cap, if there is one, put a friend behind the wheel and ask him to press the brake hard.
- At this time we take a 30mm head and a larger knob. Using this tool, unscrew the hub nut, which is located in the middle of the wheel.
- The tightening force of the nut is large, therefore, the longer the knob, the easier it will be to unscrew it.
- After unscrewing the nut, the car should be raised with a jack. Raise the car and remove the wheel. Be sure to place a stand under the car in the form of, for example, hemp. Do not work on a vehicle that is on a jack!
- Unscrew the wheel bolts and remove the wheel from the car.
- We completely unscrew the hub nut, remove the metal washer and spray the splined connection of the hub with the outer grenade with WD-40 rust cleaner.
- In order to remove the axle shaft from the car, it is necessary to free the hub. Using the required wrench or socket, unscrew the two bolts securing the VAZ 2112 ball joint to the hub.
- After this, using a bronze or copper adapter, in order not to damage the thread on the outer grenade, we try to dislodge it (the grenade) from engagement with the hub, adding a rust preventative to make it easier.
- When the parts are disengaged, you can move the shock absorber strut to the side and remove the axle shaft (remember, you need to drain the oil, otherwise it will simply leak onto the floor).
We got the VAZ 2112 axle shaft, now let's start replacing the CV joint.
Removing and installing a new CV joint
So:
- The removed axle shaft must be clamped in a vice for convenience in further work.
- Using a screwdriver and pliers, you need to remove the boot. We unbend the two clamps securing the boot and tighten it onto the axle shaft.
- Now, using a head and a hammer, you should knock the grenade off the axle shaft. The attachment should be placed on the internal bearing housing of the grenade, and not on the body.
- After removing the grenade, you need to remove the old boot and put on a new one, if you plan. It is recommended to change the boot along with the grenade.
- The splined grooves on the axle shaft must be cleaned and preferably washed with gasoline. And then you should wipe it off.
- The required amount of new lubricant should be placed in the new grenade. The lubricant used is a special “CV joint”, and not lithol or others!
- The grease is stuffed inside the CV joint with your finger, rotating the bearing so that the grease is better distributed in the grenade body.
- After this, you can put the grenade on the axle shaft. The grenade is placed on the spline joint and simply snaps into place with a sharp movement of the hand.
Now the axle shaft with the new CV joint is ready for installation on the VAZ 2112.
Installing the drive on the car
Now we do everything in reverse order:
- We insert the axle shaft into the gearbox housing and get into the splined engagement in the box.
- We insert the splines into the hub.
- We fasten the two bolts securing the ball joint to the hub, thereby securing the hub.
- We put on the washer and screw the hub nut onto the outer grenade and tighten it as much as possible.
- We put on the wheel, tighten the wheel bolts and lower the car onto the wheels.
- Now you should tighten the wheel mounting bolts and also tighten the central nut using a 30mm socket.
- To do this, you will again need the help of a partner pressing the brake pedal.
- Don't forget to fill the gearbox with oil.
- After pouring oil into the gearbox housing, check for oil leaks at the junction of the inner CV joint with the gearbox.
If necessary, repair the second axle shaft in the same way, replacing the failed grenades. Keep an eye on the condition of your car and then it will be a pleasure to drive not only for you, but also for your passengers. And most importantly, even your life may depend on the technical condition of any component of the car! Good luck on the roads!
On cars with front-wheel drive, instead of a driveshaft with crosspieces, constant velocity joints (CV joints) with axle shafts are used. Both crosspieces and CV joints tend to fail. This article discusses in detail: replacing the external grenade of a VAZ 2112, visual photos for a better understanding of the process and practical advice from an auto repair specialist.
- Why does the CV joint fail? Principle and working conditions
- How to determine if a hinge is faulty? Diagnostics
- What will you need?
- Replacement
- Removing the axle shaft
- Grenade replacement
- Installing the axle shaft on the car