To begin with, it should be noted that on cars such as the VAZ-2107, the manufacturer can install starters of various types. Essentially, they perform the same function, but may differ slightly from each other in terms of design. Also note that the starter is a special mechanism that generates direct current, while creating the torque necessary for the crankshaft to start rotating.
Starter components
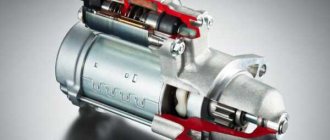
To repair a part of any device, you need to understand what it consists of. So, for example, the design of the starter is as follows:
- anchor;
- frame;
- drive unit;
- relay. Connection to it is made using contact bolts, which are considered structural elements. Each of them consists of parts that are fairly easy to replace if necessary.
Remember that it is quite easy to repair the starter on a VAZ-2107 with your own hands. To do this, you need to know what exactly it consists of, as well as what it is intended for.
Brush block
Let's delve deeper into the depths of the starter. Its electric motor only works when voltage from the battery is supplied to the primary winding through the brushes. The lifespan of brushes is very limited, since they are made of graphite composition and tend to wear out quickly.
This can be estimated by eye based on the total mileage of the car. Some models have a more complex electrical circuit, which is connected in such a way that when the brushes wear out, current is not supplied to the solenoid relay, and when the ignition is turned on, the starter may not click at all. This circuit is provided on new fuel-injected cars and on the VAZ 2110.
In this case, in order to eliminate the malfunction, you need to disassemble the starter, get to the brush block and visually assess the condition of the brushes. It is quite possible that they have served their purpose and require replacement.
troubleshooting
In order to correctly determine where to start, you should think about what could be the reason that the starter does not work:
- If, after you turn the key in the ignition, the engine stubbornly refuses to start, you should check the light bulbs located on the instrument panel. If they burn weakly or go out completely, most likely the reason lies in a non-functioning battery. Or it may simply be discharged. We pick up a tester and check the battery capacity and voltage;
- if the battery is fully operational, you need to check what position the speed switch is in and move it to the “P” position;
- The next thing to figure out is whether the power from the ignition switch is getting directly to the starter.
There are two ways to do the last step.
Method 1. A wire made of copper with a cross-section of 2.5 mm is inserted into the open connector. One end goes to the starter and the other to the battery terminal. Thanks to this method, it is possible to simulate ignition.
Method 2: This verification method will require two people. One of them will turn the key in the ignition switch, while the second will touch the tip of the wire that comes from the unloading relay with a control probe. If the warning light comes on during this procedure, this indicates that there are no problems in the ignition switch, as well as in the relay.
What to do first?
Disassembling the mechanism is not a priority task, since the starter’s power supply is connected to the battery, so you need to start with it. If the car is not too old, it is unlikely that the problems will lie in the design of the starter itself. It is enough to clean the contacts of the battery or the device itself for everything to work again in the desired mode.
Difficulties begin when the machine has worked for a long time and its operation has not been delicate. If, after a complete check of the electrical equipment of your VAZ 2107, the starter still does not start or continues to work intermittently, then the reason is inside the device and it is necessary to remove and disassemble the starter. On this model, both in carburetor and injection versions, it is installed rather inconveniently. To get to it normally, you will have to drive the car onto an overpass or inspection hole.
Disassembling the VAZ 2107 starter
After the ignition is turned off, you can begin the “operation”. It must be done in the following order:
- remove the ground terminal from the battery;
- if there is a protective mud casing at the bottom, then it must be dismantled;
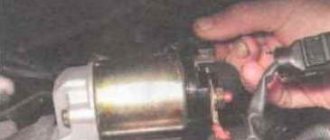
- remove the electrical wires from the solenoid relay;
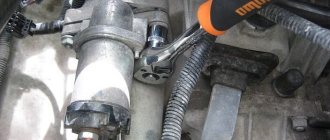
- unscrew the three mounting bolts (two upper, one lower);
- remove the starter.
As you can see, nothing complicated. The only thing is that in the case of an injection model, mechanics advise removing the inlet pipe extensions as well. Now we have to disassemble the device itself.
Starter repair
As you know, VAZ-2107 cars are equipped with both injectors and carburetors. In this regard, the sequence of actions and the repair work on the starter itself may differ slightly from each other. However, no matter what your car is, it is quite possible to solve this problem yourself.
First of all, it is necessary to dismantle the starter. To do this, the car is installed above the inspection hole or raised on a lift. But first you should disconnect the negative terminal from the battery. Next, the procedure depends on what is installed on your car: carburetor or injector.
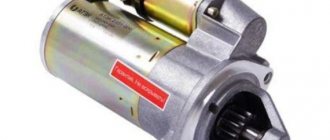
Purpose of the starter and its location
The “ten” has a small, but quite powerful 4-band electric motor, which is responsible for the primary rotation of the crankshaft. Without the participation of an electric motor, it is impossible to ensure the required crankshaft rotation speed. We replace this unit, since for a gasoline engine with an average cylinder capacity, 3 kW of energy is enough to start.
The starter supplies energy from the battery; it is a DC motor. Receiving voltage from the battery, the motor power is increased by four brushes. They are the main elements in any car starter. If necessary, the brushes can be replaced. If the starter meters are faulty, they can be purchased separately and replaced. But to do this, in any case, you will first need to remove the starter.
We repair the starter on a car with an injection engine
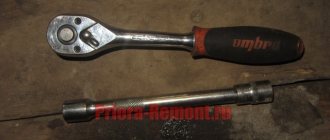
We remove the mudguards, both main and additional. This action is impossible if you do not have a socket wrench size 8. Using it, you need to unscrew 4 screws that are located on the main panel, or rather, on its side and front fastenings, as well as 2 bolts located on the additional one. There is also a lower screw, but it has a different diameter. To remove it you will need a 10 mm socket wrench.- Now, using a long 13mm socket wrench, unscrew the bolts that secure the clutch housing and starter. After this, unscrew the bolts with which the starter is attached directly to the bracket and the inlet pipe extension.
- We remove the stretch marks of the intake pipeline and very carefully, using the same wrench, unscrew the exhaust manifold nut, and then remove the shield.
- We disconnect the wire that we have left from the battery terminal and remove the tip located on the contact rod.
- The traction relay output must be freed from wire 50, and then the starter itself must be removed. Now it can be disassembled. Before doing this, try to thoroughly clean the part to remove any dirt stuck to it.
Once the starter is in your hands, the procedure is as follows (by the way, it is absolutely identical for any type of engine of the above car):
- check the solenoid relay. After connecting the 50th relay output to the “plus” terminal of the battery, we connect the starter housing directly to the “minus” terminal. This way, it will become clear whether the problem is in the relay itself or is it in something else. If it is in working condition, then a distinct click will be heard during this action;
- To check the integrity of the windings, you need to get rid of the starter cover and disconnect the brush assembly. Using an ohmmeter, check whether there is a short to the starter housing;
- if the results of our test showed that the relay still works, we take out the anchor. To do this, unscrew the bolts securing the starter casing, remove the lock washer, as well as the gaskets. Then unscrew the two nuts and completely remove the back cover. Thus, the starter winding housing is freed from the studs;
- unscrew the nut of the eccentric rotation axis and remove it from the body, disconnecting the armature.
At this point, the process of disassembling the starter can be considered complete. The anchor, by the way, cannot be repaired, but it can easily be replaced with a new one. Reassembling the starter is carried out in the reverse order.
Diagnostics of VAZ 2107 starter faults
The VAZ 2107 starter can fail for various reasons.
The starter hums, but the engine does not start
The reasons for the situation when the starter hums, but the engine does not start, may be the following points.
- Over time, the teeth of the starter gear stop engaging (or do not engage well) with the flywheel. This usually occurs when the wrong engine lubricant is used. If you pour thick oil into the engine in winter, the starter will have difficulty cranking the crankshaft.
- The gear that meshes with the flywheel may be misaligned. As a result, the teeth engage with the flywheel ring with only one edge. This is usually due to a failure of the Bendix damper system. Externally, this manifests itself in the form of a characteristic hum or grinding noise and results in broken flywheel or drive teeth.
- There have been disturbances in the power supply system to the starter (brushes are worn out, terminals are oxidized, etc.). Insufficient voltage does not allow the starter to accelerate the flywheel to the required speed. At the same time, the starter rotates unstably, a hum and buzzing appears.
- The pusher fork, which brings the starter teeth to the flywheel crown and removes them after the engine starts, has failed. If this fork is warped, the relay may operate but the drive gear will not engage. As a result, the starter hums, but the engine does not start.
The starter clicks but does not turn over
Sometimes the VAZ 2107 starter clicks, but does not spin. This may happen for the following reasons.
- There are problems with the power supply (the battery is discharged, the battery terminals are loose or the ground is disconnected). The battery should be recharged, the terminals should be tightened, demining should be carried out, etc.
- The fastening of the solenoid relay to the starter housing is loose. This usually happens when driving on bad roads or as a result of over-tightening the mounting bolts, which simply break while driving.
- A short circuit occurred in the traction relay and the contacts burned out.
- The positive cable going to the starter has burned out. It is also possible that this cable may become loose. In the latter case, it is enough to tighten the fastening nut.
- As a result of wear on the bushings, the starter armature became jammed. In such a situation, replacement of the bushings is necessary (removal and disassembly of the starter will be required). A short circuit or break in the armature windings can also lead to a similar result.
- Bendix is deformed. Most often, its teeth are damaged.
Bendix of the VAZ 2107 starter fails quite often
Video: VAZ 2107 starter clicks, but does not turn
Crackling sound when starting the starter
Sometimes when you turn the ignition key, a cracking and grinding sound is heard from the starter. This may occur as a result of the following faults.
- The nuts securing the starter to the body have become loose. Rotation of the starter causes strong vibration.
- The starter gears are worn. When starting, the overrunning clutch (Bendix) begins to make a cracking noise.
- Due to the lack or absence of lubrication, the bendix began to move along the shaft with difficulty. The assembly should be lubricated with any engine oil.
- Flywheel teeth damaged as a result of wear no longer engage with the starter gear.
- The timing drive pulley has come loose. In this case, a crackling noise is heard when the engine starts and disappears after warming up.
Starter won't start
If the starter does not respond at all to turning the ignition key, the following situations are possible:
- The starter is faulty.
- The starter relay has failed.
- The starter power supply circuit is faulty.
- The starter fuse has blown.
- The ignition switch is faulty.
It happened once to start the engine in winter, when the starter flatly refused to rotate through the ignition switch. I stopped the car at the lake where I went fishing. When I was putting it back together, the starting device was inactive. There's no one around. I did this: I found the control relay, removed the wire from it connecting the system to the ignition switch. Next, I took a long 40 cm screwdriver (I found one in my bag) and closed two starter bolts and one retractor bolt. The starter started working - it turned out that sometimes this happens with these devices due to cold and dirt. It is necessary to apply current directly to make the electric motor work.
Video
Details about the features of replacing the starter:
Hello, dear car enthusiasts! Especially hello, all owners of the VAZ “Seven”! Because this is exactly what we will be talking about – the VAZ 2107.
Although, the domestic auto industry has nothing special to boast about, given the model line and quality of cars produced, but still, there are examples of cars that should be paid attention to.
VAZ 2107 is a car that can deservedly be called a people's car. Thanks to its somewhat unusual design, this car stands out noticeably from the series of “classic” VAZ cars.
This fact, supplemented by minor design differences, was the reason why the model lasted quite a long time on the assembly line. At times it seemed that the “seven” would be produced forever, but time takes its toll.
Nevertheless, hundreds of thousands of cars of the seventh model are moving on the country’s roads, which will lead the popularity ratings among the “classics” for a very long time.
The design of the VAZ 2107 car is not fundamentally different from previous models. The biggest innovation in recent years has been the installation of an injection power system instead of the usual carburetor.
The rest is classic. This also applies to the starting system. That is why for every car enthusiast who bought a VAZ 2107, how to remove the starter remains a pressing question.
Removing the VAZ 2107 starter in the garage, do it yourself
As in most other cars, in the “seven” the starter is located at the bottom of the engine. In order to get to it, you need to have an inspection hole or overpass, since it cannot be removed through the top.
The inconvenient location is the only difficulty when dismantling the starter. Otherwise, everything is extremely simple; no special tools or special knowledge are required.
Removing the VAZ 2107 starter occurs only with the ignition off as follows:
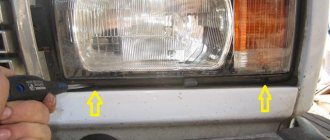
- First, remove the battery cover and disconnect the ground terminal;
- the mudguard is removed, if one was installed in the lower part of the engine compartment;
- For convenience, the battery and support can be removed;
- the clamp of the wiring harness leading to the starter is unscrewed;
- unscrew and remove the wires from the starter traction relay;
- the three starter mounting bolts are unscrewed (two at the top and one at the bottom), after which the starter is removed under the car.
At this stage, the starter is completely ready for repair or maintenance.
Self-replacement of VAZ 2107 starter
If you can find a good, knowledgeable assistant to repair the starter, then you will have to install it back into the car yourself. This activity is not at all inconvenient, but quite responsible, so it should be carried out very carefully in compliance with the order indicated below.
In order to replace the VAZ 2107 starter, or rather, install it in its original place, you must do the following:
- Before installation, carefully inspect the starter, its equipment, build quality, and the presence of a centering sleeve;
- the starter is installed in its regular place at the bottom of the car and screwed with the longest bolt, after which the other two mounting bolts are screwed in and tightened;
- the wire terminals are installed and the nuts are tightened;
- wire harness supports are installed and secured;
- the battery support is screwed on, the battery is put in place;
- the battery terminals are connected, the protective cover is closed;
- The functionality of the electrical system is checked and a dirt shield is installed.
Performing such manipulations is quite enough to install the starter, however, work on the starter can be made easier if you pay attention to some more details. So, on a carburetor engine, it would be useful to remove the air filter, and on an injector engine, remove the inlet pipe extensions.
Source