03/04/2022 1,968 VAZ 2107
Author: Ivan Baranov
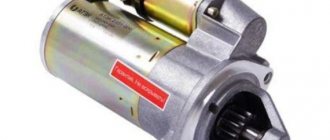
The starter on passenger cars of the Tolyatti Automobile Plant wears out quickly due to poor design of the unit. In case of damage, the owner of the vehicle will be able to remove the ignition switch on a VAZ 2107 independently with a minimum set of tools.
[Hide]
How to check the ignition switch elements for functionality?
To check functionality you need to perform the following steps:
- Check the operation of the locking element. To do this, you need to carry out a working cycle of the lock and make sure that the bolt extends when the key is installed at point “III”. When passing against it, the latch tongue should go inward. The rotation of the larva should occur without jamming.
- Try to remove the key in all positions. A working cylinder allows the key to be removed only at point “III”.
- Make a small stand that allows you to connect a constant 12 volt power supply to the lock. In fact, you need to connect the lock directly to a battery or other power source.
- Place the key in position “0” and check the presence of power at terminals 30 and 30/1. Testing is performed with a multimeter or test light.
- Turn the key to point “I”. Check the presence of voltage in sections of circuits 30/1NT, as well as 30/1-15.
- In the next position “II” the 30/50 chain is additionally ringed. The key must be held in this position as it returns under the force of the spring.
- At point “III” the power supply to circuits 30/1NT and 30/1 is controlled.
When is it necessary to replace the ignition switch in a car?
You have to change the lock on a VAZ 2107 in the following cases:
- Sticking of the key bit when installing into the cylinder or when turning. A number of owners delay the replacement by making a new key and washing the lock with WD-40.
- Anti-theft rod jamming in any position.
- If it is impossible to turn on the starter or other electrical circuits. The cause of the malfunction is a broken or burnt contact part of the wire.
Why is it needed?
Self-replacement of the ignition switch of a VAZ 2110
As soon as cars appeared, there was no ignition key, and the engine was started using a curved element for the engine, which was quite large and stuck in the front or back of the car. Thus, it turned out that the engine was started manually in the literal sense.
Now this function has been inherited by the starter, which turns the internal combustion engine by the flywheel - a large flat disk with teeth. This disc is located between the engine and the clutch.
This does not happen without the participation of battery power, of course.
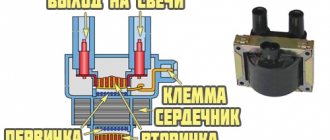
The ignition switch is a device that, when turned on, ensures the supply of electric current from the battery to the traction relay. This is a kind of first push to move the vehicle. Therefore, the ignition switch is an important element, and when it breaks, replacement cannot be avoided, and in order to install a new one, you need to remove the old one.
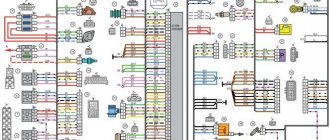
Wiring diagram for the ignition switch in a VAZ-2107 by wire color
The purpose of the wires in the carburetor lock is shown in the table:
| Wire color | Contact number | Function |
| Blue-black (double) | 15 | Serves to connect ignition system, heater and instrument circuits |
| Pink | 30 | Provides constant positive voltage |
| Double black | 1NT | Designed to turn on power for side lights and headlights |
| Red | 50 | Starter relay control |
| Brown | 30/1 | Positive power supply |
Wiring installation is shown in the photo:
Connection diagram for VAZ 2107 carburetor lock
On the injection VAZ 2107, pink and black insulation is used for the 1NT contact. Instead of separate wires, a plastic plug is used that fits onto the lock pins.
Wiring diagram for VAZ 2107 injector lock
Changing the contact group
Exploded view of the lock
Based on price considerations, replacing one contact group is less expensive:
- All our actions are repeated in principle, as in the case described above with removing the lock, you will have to remove the casing, and so on
- To avoid the widespread problem associated with mixing up contacts, it is recommended to number them before disconnecting (or mark them in some other way)
- This measure will save your nerves and time.
- Some models of locks have a locking ring in their contact group, and here we need an awl to pull it out
- It’s important not to forget to stick it in place later
- Then everything is put back together and screwed to the control column
That's all, all that remains is to finish watching the video and relax and change every part of the lock.
Schematic electrical diagrams, connecting devices and pinouts of connectors
The ignition switch in cars of the VAZ family fails from time to time due to weakening of the contact posts or burning of the contacts inside it. It also happens that the cams of a plastic roller are produced. You can disassemble the lock and clean it, but it’s better to just replace it with a new one, considering that it costs pennies compared to imported locks.
But if connecting the wires together did not result in the starter operating (or it did not turn on the first time), check the solenoid relay on the starter. The contact spots on it may also burn out, which will prevent the circuit from closing normally. Alternatively, you can use a screwdriver to short-circuit the two large terminals on the solenoid relay (before doing this, put the car in neutral and use the handbrake). When closed, the starter should begin to spin vigorously. If this happens, remove and change the solenoid relay. If the starter rotates “sluggishly” when it closes, you will have to remove it and check the condition of the brushes.
The ignition switch is designed not only to start the engine - it performs several functions at once:
- supplies voltage to the vehicle’s on-board network, closing the circuits of the ignition system, lighting, sound alarm, additional devices and instruments;
- at the driver’s command, turns on the starter to start the power plant and turns it off;
- turns off the power to the on-board circuit, preserving the battery charge;
- protects the car from theft by fixing the steering shaft.
How to replace the ignition switch on VAZ-2107 models with a carburetor and injector?
Replacing the ignition switch on a VAZ 2107 carburetor and injection car is identical.
The ignition switch diagram indicating the components is shown in the photo:
Node design
The ignition switch includes:
- Steering shaft blocking element.
- Case detail.
- Mating part for installing a leash from the larva.
- Contact group disk.
- Bushing of the contact part.
- External part with pins for connection. The letter “a” indicates a signal protrusion used for correct installation of the contact group.
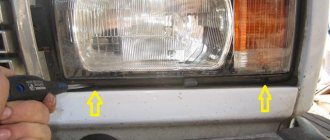
Removing the ignition switch
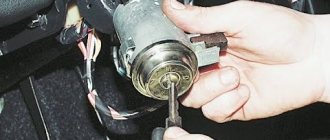
Removal is carried out in the following steps:
- Turn off the power supply to the vehicle's on-board network by removing the battery terminal.
- Place the key in the hole and turn it to position “0” (the head is horizontal).
- Unscrew the fixing points of the plastic steering column cover. The halves of the casing are connected to each other and the dashboard using five screws.
- Unscrew the two screws securing the lock body. The attachment points are located on the sides of the body.
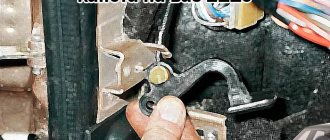
- Press the retainer through the hole in the housing. To do this, use a long thin awl or screwdriver. Having pressed the latch, pull the lock out from its normal place towards you.
- Disconnect the plug or individual wires from the lock. Next, you can begin installing a new part or further replacing contacts in the old lock.
Before removing the wiring from the ignition switch of the VAZ 2107, it is recommended to make sure that standard insulation is used. This must be done because wires can be replaced during electrical equipment repairs.
Photo gallery
Disconnecting wiring
Unscrewing the left screw
Unscrewing the right lock
Recessing the latch with a screwdriver
Checking and replacing the contact group
To change the contacts in the lock you need to:
- Remove the spring ring that secures the group in the lock body. The ring is pryed off with a thin screwdriver.
- Remove the contacts from the lock.
- Install a new group. When connecting, it is necessary to ensure that the groove made on the contact group coincides with the rotating rod on the secret part of the lock. The body of the contact part should fit into the slot of the body with its protrusion.
When replacing contacts, take into account the number of pins on the part. The spare parts supplied have six wiring connection points. Until 1986, a group with seven contacts was installed on VAZ 2107 cars. Instead of one pin 15, 15/1 and an additional 15/2 are used. To connect a new lock to such a car, you need to connect wires 15/1 and 15/2 into one branch.
Installation and connection of a new lock
Installation of a new or repaired lock is carried out in the following sequence:
- Insert the key into position “0”.
- Press in the locking latch and insert the part into the guide housing.
- Install the wires using connectors or a standard plug (the connection is made in accordance with the color of the insulation).
- Reinstall the mounting screws.
- Install the protective cover.
- Place the terminal on the battery and test the operation of the device.
When connecting the ignition switch to a VAZ 2107, you must strictly follow the electrical diagram. An incorrect connection will result in a short circuit and damage to the electrical equipment.
Installing the "Start" button
Some Kopek owners tune the ignition system of their cars by installing a “Start” button instead of the standard ignition switch.
But what does such tuning give? The essence of such modifications is to simplify the process of starting the engine. With a button instead of a lock, the driver does not need to poke the key into the lock, trying to get into the cylinder, especially without the habit and without lighting. In addition, you don’t need to carry the ignition key with you and worry about losing it. But this is not the main thing. The main thing is the opportunity to enjoy the process of starting the engine with one press of a button, and also to surprise the passenger with this.
Using this button, you can start the engine without the ignition switch and key.
In automobile stores you can purchase a kit for starting a power unit from a button for about 1,500–2,000 rubles.
A kit for starting an engine with a button can be purchased at auto stores.
But you can save money and assemble an analogue yourself. To do this, you only need a toggle switch with two positions and a button (not recessed), which will fit the size of the ignition switch housing. The simplest connection diagram is shown in the figure.
The toggle switch and button can be installed in any convenient place
Thus, by turning on the toggle switch, we supply voltage to all devices and to the ignition system. By pressing the button, we start the starter. The toggle switch and the button itself, in principle, can be placed anywhere, as long as it is convenient.
As you can see, there is nothing complicated either in the design of the VAZ 2101 ignition switch or in its repair. If it breaks, you can easily repair or replace it.
How to remove the ignition switch on a VAZ-2107 if it is locked?
There may be cases when the ignition switch jams and the cylinder cannot be turned either by hand or with a tool. It is possible for the key to break when part of the bit remains inside the well. In both cases, the owner needs to remove the device from the car.
First dismantling option:
- Remove the steering wheel from the shaft. The steering wheel is secured with a 24 mm wrench nut, which should not be unscrewed completely. Removing the steering wheel from the splines is done by supporting the legs and striking the forearms. After removing the part from the splined part of the shaft, the nut is completely unscrewed.
- Remove the protective plastic steering column cover secured with Phillips screws.
- Unscrew the screws securing the lock.
- Press the pressure plate with a thin tool, which will slightly unlock the part. The pressure is applied through the slot on the left side of the lock. Pressing the latch will allow you to slide the lock body towards you.
- Use a hammer to hit the plate on the right to rotate the lock around its axis. This will guarantee against the retainer coming back.
- Using a hammer and chisel, break the plate. Apply blows carefully so as not to damage the steering column switch block.
- After removing the plate, the locking rod installed in the two eyes will become visible. One of the eyes is easily visible through the hole.
- Break the eyelet with a chisel or flathead screwdriver.
- Press the plate again through the slot on the left and pull it up. It should move 10-12 mm.
- Using a hammer, strike the lock body (in the area where the plug is installed) and pull it off the shaft.
Second option:
- After the latch is recessed through the slot on the left side of the lock, you need to pull the lock out to the maximum distance.
- On the right side of the lock there is a platform with text and a number. A wedge (screwdriver) is inserted under it.
- After this, the area with the inscriptions is cut off with an impact screwdriver or chisel.
- Use a screwdriver to push the lock pin through the hole and remove the lock from the shaft.
The third method is to destroy the castle with a sharp jerk:
- One person sits in the driver's seat, the second in the passenger seat.
- It is necessary to sharply jerk the steering wheel at the same time, which will cause the destruction of the clamp.
- After this, the lock is removed using the usual method. It is worth noting that only late-release locks can be broken with a jerk; products from the USSR era are more difficult to break this way. In addition, there is a risk of damage to the steering components.
There are other methods for removing jammed ignition switches on a VAZ 2107 - cutting the body, turning or drilling the cylinder, and others. The final choice of dismantling method remains with the car owner.
The technique for removing a jammed device is demonstrated in a video from the Region 4253 channel.
Self-replacement
Checking the ignition switch on a VAZ 2108, 2109, 21099 car
If there is a specific problem with the lock, jamming or general breakdown, a complete replacement of the device assembly may be necessary. To do this, you need to remove the old one, then install the new one in the socket and correctly connect all the wires to the terminals.
The main condition is to do everything slowly and remember the actions taken. This is especially true for the correct connection of wires.
To replace the ignition switch, you must follow the following sequence of actions:
- Disconnect ground from the battery. If this is not done, a short circuit will occur when the device is removed.
- Set the lock to the “zero” position.
- Cover it with a special decorative plastic covering.
- After this, you should unscrew the fastenings of the device itself.
- Find the technological window. It is located where the lock is secured. You need to press the locking corkscrew that holds the element body and pull the lock out of the socket.
- The wires that are directed to the contact group of the device must be disconnected.
- If only the mechanical part of the device needs to be replaced, then use a screwdriver to remove the retaining ring, remove the group of contacts and install it in the new device.
- Install a new lock in the slot.
- Tighten the fasteners on it.
- Connect all cables to the ignition switch terminals. To do this, it is recommended to use a special scheme.
- After this, install the decorative cover on the steering column.
- Screw the fastenings of the cover.
- Connect the ground cable to the battery.
- Check the quality of the work performed, why try to start the car.
Ignition switch circuit
As can be seen from the description, you can remove the lock without any problems. If you only need to replace the contact connection point, then experts still recommend dismantling the entire device. This way the replacement task can be greatly simplified.
In addition, you need to have a good understanding of how to connect all the electrical wires. Usually the connection diagram itself is displayed on the device box:
- First, you need to use an awl or a screwdriver to remove the retaining ring that holds the contact group in the body of the device itself. In this case, only experience and skill will help, since the operation is quite problematic.
- Change the old contact group by installing a new one in its place.
- Install the retaining ring into the special groove on the body.
- Make all wire connections.
- Place the decorative cover in place and secure it.
- Next, connect the battery and ground.
- Check for normal operation.
How to replace the ignition switch without a key?
Replacing a lock without the original key follows these steps:
- Remove the plastic casing.
- Use a thin screwdriver to pry off the ring with the marked key positions.
- Remove the ring under which the larva will be located.
- Drive a screwdriver into the gap between the cylinder and the body to loosen the fastening pin.
- After the pin falls out, remove the cylinder.
- A movable element is installed under the cylinder, which is pressed out when the lock is turned with a key. It must be pressed to unlock the shaft.
- Remove the device from the steering column and replace it with a new one.
Color gradation
To correctly connect the contacts on the back side, you need to know the colors of the wires. Each of the chips comes with a cable with insulation of a personal shade. We recommend focusing on the diagram:
- pin 50 – contacts the red wire connected to the starter;
- pin 30 – pink contact;
- pin 30/1 – brown cable;
- pin 15 – blue with a dark stripe is in contact with the heater, ignition, etc.;
- INT pin – black cable, responsible for starting the head optics and operating the dimensions.
After all the wiring is connected, we can reconnect the battery terminals and check the functionality. We start the ignition in each position one by one, testing the performance of the devices.