04.03.2022 20 336 VAZ 2106
Author: Ivan Baranov
If the pressure in the lubrication system decreases or dull noises appear when the VAZ 2106 engine is running, the reason may be a faulty crankshaft. The article discusses the causes of malfunctions, as well as how to change the crankshaft of a VAZ 2106. In addition, a video is attached that demonstrates the partial assembly of a VAZ engine with the installation of the crankshaft.
[Hide]
Replacing the crankshaft oil seal
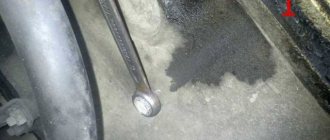
The main sign of the need to replace the oil seal is contamination of the engine compartment. A breakdown occurs when the seal of the unit is broken, causing lubricant mixed with oil to leak through the damaged oil seal. As a result, when it gets on the rotating parts, the mixture is sprayed throughout the engine compartment.
In particular, a signal that an urgent replacement of the front oil seal liners is necessary is the direct contact of oil on the pulley and its further splashing in the front part of the engine. If oil leaks in the rear oil seal, splashing occurs on the flywheel in the clutch housing. Reasons for replacement:
- natural wear and tear;
- skewed installation, which may cause cracks on the body;
- mechanical damage;
- damage to surface integrity as a result of severe engine overheating;
- marriage.
You can replace crankshaft oil seals yourself; this will not only significantly save time and money spent on repairs in the workshop, but also gain invaluable experience. Replacing the crankshaft oil seal is a standard procedure to ensure optimal engine performance.
Oil seals are a type of cuff that acts as seals on moving parts. It would be most correct to call the crankshaft oil seal a reinforced cuff. Its role in the functioning of the engine is very significant, and therefore any failures in the stable operation of the crankshaft oil seal will lead to undesirable consequences. Even if the degree of its displacement from the standard place is insignificant, oil will begin to leak in the car.
According to statistics, the installation of a new oil seal should be done at least once every 3 years. However, oil seal bearings may need to be replaced much sooner. It all depends on the general condition of the parts and the conditions under which the car is used.
General information
An oil seal is a type of cuff that serves to seal various rotating (moving) joints in various mechanisms and devices. It is necessary to clarify that the concept of an oil seal is now outdated and incorrect:
- The modern name of the spare part is reinforced rubber cuff
- The concept of an oil seal has remained since those time immemorial, when felt or felt seals, their ancient analogue, were lubricated with oil
- A reinforced cuff is a unified part that is produced in factories that specialize in the production of a variety of rubber products
- Modern cuffs are widely used in industrial units, in the motor transport sector, the national economy and agricultural machinery
- In other words, oil seals (cuffs) are used in our time in all types (types) of units, mechanisms and assemblies where it is necessary to seal moving parts
Functions and purpose of cuffs
The main purpose of reinforced rubber cuffs is to seal the moving joint. In addition, modern oil seals provide reliable protection of the assembly they seal from dust and dirt. So:
- For most cuffs, the working medium is air in direct contact with lubricants, fuel or water
- Temperature range required for stable operation of the engine oil seal ranging from -60C (in northern latitudes) to +100C (engine operating temperature with a small margin)
- The working pressure of the reinforced cuff is 0.05 MPa.
Today, reinforced cuffs are considered important elements:
- Since if the cuff is slightly displaced, an oil leak will certainly appear
- It is believed that replacement of crankshaft oil seals on the VAZ 2105 should be done approximately every three years.
- However, such frequency is not strictly necessary - since earlier, unscheduled repairs may be required
- For example, if the engine overheated
- An oil leak in this case signals you that the cuff should be urgently replaced.
Preparation for replacing bearings and direct installation of the crankshaft
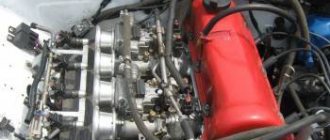
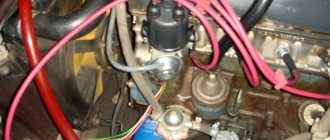
After the hood and battery are removed from the VAZ 2106, you need to carefully drain the oil and coolant. Then remove parts such as the radiator, thermostat, carburetor, fuel pump and ignition distributor. Be sure to note for yourself the order in which they are removed. Next, you need to remove all adjacent hoses and wires from the engine along with the cylinder head.
In addition, disconnect parts such as the generator, starter, coolant pump, upper nuts that secure the engine mount, and bolts that secure the clutch housing to the engine. The order in which disconnection is made must be strictly observed. During operation, the lifting device cables must be secured to the block and carefully lifted.
Then, placing a jack under the gearbox, begin to carefully rock the unit in order to gradually disconnect it from the clutch housing. It will be necessary to remove the cylinder block, clutch, pulley, camshaft wire cover, oil pump parts, accessory drive shaft, flywheel and rear crankshaft seal holder.
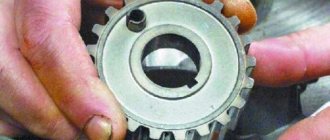
Using a 10mm wrench, you need to unscrew all the bolts that secure the oil pan to the cylinder block and remove it along with the seal gasket. Disconnect the oil pump. Using a 14mm socket, unscrew the nuts that secure the connecting rod cover, and then remove it. Then take a hammer, press the handle against the connecting rod, and push the pistons out of the cylinders. Next, take a 17mm socket and unscrew the bolts that attach the crankshaft to the cover. Counting from the crankshaft toe, according to the number marks, we disconnect all subsequent covers. Keep in mind that on cover 5 there are two marks on both sides.
Only now can you remove the crankshaft itself and remove the two half rings of the crankshaft thrust bearing. When working, you need to remember that the metal liners installed on the beds of all bearings, with the exception of the 3rd, are equipped with a groove.
Timing phases and when to set them according to marks
Valve timing refers to those moments at which the piston in the engine moves up and down over a certain interval. When irregularities in the valve timing occur, the pistons move incorrectly along the interval, resulting in uneven engine operation on the VAZ-2107.
If the driver notices that the car’s power decreases, fuel consumption increases, and engine interruptions occur, then it is necessary to resort to setting the valve timing according to marks. How to set marks on a VAZ 2107 carburetor and injector, we will learn from this material, since the design of the timing mechanism is identical.
How to set timing timing marks
The procedure involves performing the following manipulations:
- The VAZ 2107 needs to be placed on a hard surface, with chocks placed under the wheels and the hand brake pressed all the way. The gear shift lever must be set to neutral mode.
- The cover is removed from the cylinder head by first unscrewing all the fixing nuts to “10”. It is better to replace the gasket with a new one, even if the old one shows no signs of damage.
- Using a key set to “24”, you need to turn the crankshaft on a VAZ 2107 car. This is done in order to be able to align the marks on the moving and stationary parts of the mechanism. To carry out these actions, it is recommended to use good lighting or use a flashlight. The crankshaft rotates until the mark on the pump and generator drive belt pulley coincides with the long mark marked on the block.
- Combining these risks, the mark on the sprocket should eventually coincide with the ebb on the camshaft bed. If the mark ends up at the bottom, then you should rotate the crankshaft 360 degrees.
- If you can’t make sure the labels match, then proceed to the next steps, which are described below.
- The crankshaft is rotated until the marks on the star and the bed ebb align.
- Using the key at “13”, you need to loosen the tensioner. The 2 nuts securing the tensioner are unscrewed, after which this device is removed.
- The bolt that secures the sprocket to the camshaft is unscrewed. To do this you will need to use the key at “17”.
- The sprocket is removed, after which it must be rotated until the marks on the VAZ-2107 timing belt pulley coincide with the long mark on the block. The star fastening bolt does not need to be unscrewed, since after removing the tensioner the camshaft star rotates.
- We put a chain on the sprocket, if it was decided to unscrew it, and install it in place. Finally, the tensioner is installed, for which you should tighten it with 2 nuts to “10”. You can install the tensioner first, but later you will need to use a crowbar or pry bar to get the sprocket into place. Finally, screw the tensioner nut to “13”.
Read more: Bluetooth in the car for music
This relative arrangement of the parts allows the piston of the 4th cylinder to be positioned at top dead center TDC.
Features of servicing the timing mechanism
After the timing marks are installed on the VAZ-2107, you need to perform the following actions:
- The timing chain of the VAZ-2107 is being tensioned.
- Adjusting the valves, or more precisely, the thermal gap between the camshaft cams and the rocker arm.
- Setting up the ignition system.
The process of adjusting the valves on the VAZ-2107 is carried out according to the following scheme: initially 6 and 8 valves are adjusted, the report must be carried out from the radiator. After they are adjusted, you need to start adjusting valves 4 and 7, then valves 1 and 3, and finally valves 2 and 5.
How to adjust the valves on a VAZ-2107 car can be found out in more detail in the relevant material on this site. In conclusion, it is worth noting that VAZ-2107 cars are one of the most reliable vehicles, the production of which began back in the 90s.
The final stage
Check the quality of crankshaft rotation: there should not be the slightest braking or play. Be sure to install new metal liners at the bottom of the connecting rod heads and caps. Only then proceed to lubricate all rotating parts with engine oil. The rings themselves will need to be compressed and the piston rotated towards the crankshaft toe.
To secure, apply light blows with the handle of a hammer to the bottom of the piston, thereby pushing it into the cylinder. Screw on the second to fifth main bearing caps so as not to create a significant tightening. After this, purchase an odorless sealant from the store and apply a thin layer of it to the surface of the cylinder block in the place where it will come into contact with the first bearing cap.
To achieve maximum seal protection when installing the cover, attach several metal strips to the seal after lubricating them with engine oil. Now tighten all the fastening bolts and cut off the protruding ends of the seal.
After this, install a new sealing ring on the crankshaft and, after checking the location of the chain on the crankshaft sprocket, install the oil pump and pan. Also screw the removed cylinder head back into place, because only after this the structure can be completely assembled and the crankshaft considered replaced.
If the pressure in the lubrication system decreases or dull noises appear when the VAZ 2106 engine is running, the reason may be a faulty crankshaft. The article discusses the causes of malfunctions, as well as how to change the crankshaft of a VAZ 2106. In addition, a video is attached that demonstrates the partial assembly of a VAZ engine with the installation of the crankshaft.
Block head
We complete the finished head with a camshaft and a split gear. We set the camshaft to the overlap and tighten the star nuts well so that the camshaft phases do not “walk”. The camshaft bed is also well lubricated with oil. After installing the cylinder head gasket, we seat the head and use a torque wrench to properly tighten the head. After installation, we adjust the initial valve clearance. This procedure should be repeated on a warm engine. Now you can install attachments and place the motor on the beam. Before mounting the manifold to the cylinder head, check the evenness of their plane and place it on the sealant. Lubricate the manifold mounting studs with copper grease.
After installing the engine, we put the ignition kit in its place, and set everything to 1 mark, where the piston of the first cylinder is at TDC. Connect everything you need and fill in liquids
It is important that before screwing in the oil filter, it must be filled with oil.
Next, we start the engine, first of all we expel the air from the cooling system, and top it up if necessary. Then, with the engine warm, we check the oil level and adjust the valves.
After 1000 km, it is recommended to change the oil and re-press the head and check the connections. Run-in, as a rule, provided that the rings are of high quality, occurs at the first start. A full break-in will require no more than 1000 km. At this stage, the motor shows maximum power and torque. 85 horsepower can be achieved with high-quality repairs. If there is a need to increase power, then you can install a camshaft with a wider phase, a direct-flow exhaust system and a carburetor with increased capacity. As a result, you are guaranteed an honest 100 “horses” and a good resource. Do not forget that the compression ratio of the engine is increased, so fill only with 95-grade gasoline, which will allow you to use all the engine power and achieve minimal fuel consumption.
Symptoms of a problem
If you repair the crankshaft yourself, you can save a lot on car service costs. Therefore, it is worth understanding its diagnosis, repair and installation. If repairs are not carried out in a timely manner, the engine may seize, and this can lead to more serious repairs. The following are signs that serve to identify malfunctions:
- when the engine is running, the oil level control light does not go out, which indicates a decrease in oil pressure in the system;
- at medium and high speeds a metallic knock is heard in the engine, which increases with increasing speed;
- engine jams.
Valve lapping tool
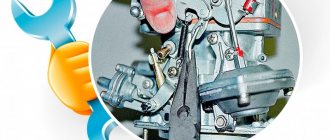
You all know why valves are needed in an engine. They serve for proper gas distribution. In other words, fuel must enter the combustion chamber in a timely manner, and the situation is similar with exhaust gases. But if there is no gap between the valve plate and the seat, or it is too large, then the gas distribution will be impaired. To get rid of this trouble, you need to grind in the valves. To do this, you will need two types of lapping paste: for rough and fine work. The tools you need are a drill with a reverse function, as well as an attachment for it. You can make the latter from an old valve; to do this, cut off its stem.
Crankshaft installation process
Before installing the crankshaft on the VAZ 2106, you need to wash, clean and dry the cylinder block. And only after that read the process.
Tools
To complete the installation you will need the following tools:
- a set of keys;
- Screwdriver Set;
- micrometer;
- consumables (liners, seals, half rings);
- torque wrench.
Set of repair tools
If defects in the form of scratches, burrs, or signs of wear are found on the surface of the liners, they must be replaced. The earbuds cannot be adjusted. When using the removed bearings further, you need to check the gap between them and the main and connecting rod journals of the crankshaft. For main shafts, the permissible size is 0.15 mm, for connecting rods - 0.10 mm. If the dimensions exceed the permissible limits, the liners are changed to a greater thickness after boring the necks. If the journals are properly ground and the appropriate bearings are selected, the crankshaft should rotate freely.
The oil seals that ensure the tightness of the crankshaft are replaced regardless of how long they have been standing. Half rings, like liners, cannot be adjusted. If burrs and scratches are found, the half rings are replaced. They are also changed if the axial clearance of the crankshaft is greater than the maximum permissible, which is 0.35 mm. The selection of new rings is carried out according to the nominal thickness or with a thickness increased by 0.127 so that the axial clearance is in the range of 0.06-0.26 mm.
Stages
Installation of the crankshaft on the VAZ 2106 is carried out in the following sequence:
- First, the support bearing of the input shaft is pressed in.
- Next you need to install new liners. The main liners are installed to the required repair size. The connecting rods are the same size, so they are interchangeable. When installing, you need to be careful not to mix up the bearings. The connecting rod bearings are smaller in diameter than the main bearings and do not have annular grooves.
- Then you need to install the thrust half rings into the bed of the 5th main bearing. In this case, the grooves should be directed towards the crankshaft. Half rings are selected according to tolerances.
Replacing worn parts
- The main and connecting rod journals must be lubricated with engine oil.
- Now the crankshaft should be placed in the block.
- The bearing caps are installed according to the marks. The surface of the bearings and journals should be wiped well with a clean rag. When installing the covers, you need to ensure that the arrows marked on them are directed forward along the power unit. The fastening bolts must be lubricated with engine oil and tightened to a torque of 68-84 Nm.
- Next, the connecting rod bearings are mounted and the connecting rods are attached. The tightening torque should not exceed 54 Nm.
- We check the rotation of the crankshaft; it should rotate freely, easily, without play or jamming.
- Next you need to install the rear crankshaft oil seal.
- Next, the engine sump is installed on the block.
- When grinding, in any case, it is necessary to replace the front oil seal. It must be installed on the block along with the cover.
- After tightening the front cover, you can install the crankshaft pulley.
- Then the intermediate shaft, timing parts and cylinder head are installed on the power unit.
- Then you need to adjust the chain tension.
- Next, marks are installed on the camshaft and crankshaft.
- Then the remaining engine parts and components are installed.
- After installing the alternator belt, it is necessary to adjust its tension.
- At the last stage, the ignition is installed and adjusted.
When installing gaskets, you should use a sealant to ensure reliable sealing and prevent leakage of working fluids during further operation of the vehicle.
After final assembly, you need to start the engine and check its performance.
Thus, even a driver with little experience in repair work can perform crankshaft repairs on a VAZ 2106, and you can significantly save on car service costs.
Removal instructions
With the clutch disengaged, the crankshaft can be easily turned with a wrench.
To carry out the removal procedure, it is necessary to secure the shaft from turning.
There are special devices that are bolted to the pulley into the technological holes, preventing the shaft from turning. If there is no such device, then you need to install supports under the wheels and place the car on the fourth. You can also secure the crankshaft flywheel by inserting a long screwdriver or pry bar between its teeth.
Removal and Installation
On a VAZ 2107, the injector crankshaft pulley is held in place by a fastening nut. Another name for it is ratchet. To remove the crankshaft pulley, you will need to unscrew this nut. It is better to carry out work on an inspection ditch or overpass. The tools you need to prepare are:
- set of keys and sockets;
- socket or socket wrench 38 (36);
If the threaded connection is difficult to unscrew, there are special products, after application of which you can easily unscrew the fasteners. These products include WD oil. You can also use vinegar essence or brake fluid.
Work on dismantling and installing the crankshaft pulley on a VAZ 2107 injector consists of the following steps:
- The car must be set to the handbrake.
- The crankshaft should be fixed by engaging 4th gear.
- After unscrewing the lock bolt and loosening the tension nut, you need to remove the generator belt.
- To get to the crankshaft you need to remove the front right wheel.
- In the upper part of the engine compartment, you need to dismantle the air filter and remove the engine mud shield.
- Next, you need to secure the crankshaft from turning using one of the methods described above.
- Before unscrewing, the nut should be tapped on all sides. Using a spanner, unscrew the crankshaft pulley mounting nut by turning it counterclockwise.
- If you cannot unscrew it manually, you can use another method. To do this, you need to put the car in neutral and remove the spark plugs. The wrench with the extension should be installed so that the end of the extension rests against the spar or floor in the direction of the shaft movement. At this time, you need to turn the ignition key to give a short impulse.
Video “Assembling the engine of a classic VAZ car”
This video demonstrates the procedure for assembling an engine on a VAZ classic, including installing the crankshaft.
If the pressure in the lubrication system decreases or dull noises appear when the VAZ 2106 engine is running, the reason may be a faulty crankshaft. The article discusses the causes of malfunctions, as well as how to change the crankshaft of a VAZ 2106. In addition, a video is attached that demonstrates the partial assembly of a VAZ engine with the installation of the crankshaft.
Symptoms of a problem
If you repair the crankshaft yourself, you can save a lot on car service costs. Therefore, it is worth understanding its diagnosis, repair and installation. If repairs are not carried out in a timely manner, the engine may seize, and this can lead to more serious repairs. The following are signs that serve to identify malfunctions:
The cause of the first two malfunctions is the wear of the main and connecting rod journals. In this case, the distance between the neck and the liner increases, which leads to a decrease in oil pressure. If the distance is too large, the shaft may run out, causing metallic sounds in the engine. If the engine jams, it is better to replace the crankshaft. To diagnose the serviceability of the crankshaft, it should be dismantled and cleaned. It is better to remove the part together with the engine.
After removal, you need to perform a visual inspection of the necks and cheeks, according to which a decision is made on the need for grinding or replacement. No special instruments are needed for inspection; you can tell by touch. If scratches and burrs are found on the journals, the part is sent for boring. Boring can be done 4 times. Each boring increases the dimensions of the liners by 0.25 mm. After dismantling the crankshaft, you need to evaluate the size of the liners and whether they will allow boring. If grinding has never been performed, then the liners have an icon without any numbers.
If cracks are found, the crankshaft must be replaced. You can send it for welding, but usually restored parts last no more than 50 thousand kilometers. After boring, you need to polish the journals. Then the journals and crankshaft need to be washed with gasoline. The oil passages should also be thoroughly cleaned to prevent contamination from entering the bearings. After washing with gasoline, you need to blow out the oil channels using compressed air.
Why does the connecting rod bearing rotate?
The bearings of the connecting rods and crankshaft of the internal combustion engine are plain bearings that must be generously lubricated in order to perform their functions. The crankshaft journals and connecting rod bores fit tightly without play or gaps, but thanks to lubrication, the friction force of the mating pairs is minimal.
Rotation of the connecting rod bearings and crankshaft requires immediate repair. You cannot operate a car with such damage to the engine, because further destruction of parts or components of the internal combustion engine may occur. This breakdown can be determined by ear; a knocking sound of the crankshaft and connecting rod can be heard.
Liners, also known as sliding bearings, are placed in places called bearing beds. The inserts must be fixed. If the liners have holes, they must be aligned with the holes in the mating part.
Did you know that the type of locking and overtension of the differential is responsible for the cross-country ability and controllability of the car?
The main reasons for rotation of the liners:
- The inserts were not fixed sufficiently;
- the inserts are stuck.
The crankshaft rotates relative to the liners, the surface of which is protected by antifriction (anti-rubbing) material. To prevent the liners from shifting and turning along with the engine crankshaft, they are held in place by special antennae. They are also installed in tension, which were calculated by the manufacturers.
The greater the load on the crankshaft, the less the oil film (layer, cushion) is created. And if there is still excessive vibration, then the oil protective layer is destroyed and the friction force increases sharply, which makes it more and more difficult for the liner to stay in bed; the antenna designed to protect against rotation cannot hold the liner.
As a rule, the reason for rotation of the bearings is the lack of lubrication. For lubrication, there are holes on the main bearings, and grooves on the connecting rod bearings. If these oil supply channels are clogged, the holes and channels are completely or partially clogged, the friction force of the rubbing parts increases, and the effect of oil starvation appears. Due to the lack of lubrication, the liner-crankshaft pair becomes very hot. During heating, the rubbing parts stick to each other. After such welding, the liners begin to rotate.
Crankshaft installation process
Before installing the crankshaft on the VAZ 2106, you need to wash, clean and dry the cylinder block. And only after that read the process.
Tools
To complete the installation you will need the following tools:
- a set of keys;
- Screwdriver Set;
- micrometer;
- consumables (liners, seals, half rings);
- torque wrench.
If defects in the form of scratches, burrs, or signs of wear are found on the surface of the liners, they must be replaced. The earbuds cannot be adjusted. When using the removed bearings further, you need to check the gap between them and the main and connecting rod journals of the crankshaft. For main shafts, the permissible size is 0.15 mm, for connecting rods - 0.10 mm. If the dimensions exceed the permissible limits, the liners are changed to a greater thickness after boring the necks. If the journals are properly ground and the appropriate bearings are selected, the crankshaft should rotate freely.
The oil seals that ensure the tightness of the crankshaft are replaced regardless of how long they have been standing. Half rings, like liners, cannot be adjusted. If burrs and scratches are found, the half rings are replaced. They are also changed if the axial clearance of the crankshaft is greater than the maximum permissible, which is 0.35 mm. The selection of new rings is carried out according to the nominal thickness or with a thickness increased by 0.127 so that the axial clearance is in the range of 0.06-0.26 mm.
Stages
Installation of the crankshaft on the VAZ 2106 is carried out in the following sequence:
- First, the support bearing of the input shaft is pressed in.
- Next you need to install new liners. The main liners are installed to the required repair size. The connecting rods are the same size, so they are interchangeable. When installing, you need to be careful not to mix up the bearings. The connecting rod bearings are smaller in diameter than the main bearings and do not have annular grooves.
- Then you need to install the thrust half rings into the bed of the 5th main bearing. In this case, the grooves should be directed towards the crankshaft. Half rings are selected according to tolerances.
When installing gaskets, you should use a sealant to ensure reliable sealing and prevent leakage of working fluids during further operation of the vehicle.
After final assembly, you need to start the engine and check its performance.
Thus, even a driver with little experience in repair work can perform crankshaft repairs on a VAZ 2106, and you can significantly save on car service costs.
Boring
All connecting rods are removed after sequentially checking the clearances, and the crankshaft is also dismantled and ground. Boring is possible only on special equipment - a centripetal, which is rarely found among ordinary car owners. Therefore, here you will need to contact specialists. After grinding, the crankshaft liners of the appropriate size are selected. Here you cannot do without a tool such as a micrometer and trying on selected elements. Next, all parts are installed in the reverse order and the caps on the main bearings are screwed on.
It is worth noting some features of the reverse installation of connecting rods and bearings. The latter are pre-lubricated with oil, and the lids must also be screwed on. Compared to the preparatory work carried out, installation takes much less time. At the same time, we should not forget about the operation of the crankshaft, which is characterized by high loads, as well as its high cost. Everything possible must be done to increase the period of operation. The main role here is played by grinding carried out at the appropriate time. This procedure ensures the smoothness of the necks and prepares them for further use.
Video “Assembling the engine of a classic VAZ car”
This video demonstrates the procedure for assembling an engine on a VAZ classic, including installing the crankshaft.
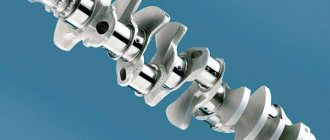
The crankshaft is the most important part of internal combustion engines with a crank mechanism. The health of the entire engine directly depends on its condition. A power unit with a worn crankshaft does not develop full power, and the oil pressure in such an engine is low even at rated speed, not to mention idle.
The VAZ 2106 crankshaft, the wear of which exceeds the permissible level, will not be able to operate reliably. Therefore, in order to prevent the engine from jamming, this part is removed and repaired.
Purpose
The main purpose of the crankshaft is to convert the rotational and translational movements of the pistons of an internal combustion engine into torque transmitted by the transmission to the wheels of the car.
The main function of the crankshaft is to convert translational motion into rotational motion. The main technical characteristic of the chain crankshaft is the crank radius. This is the distance from the axes of the main journals to the connecting rods. There are usually 4 root necks acting as supports, but sometimes there are three. In a 6-cylinder internal combustion engine there are as many as seven main journals.
Twice the radius is the length of movement of the piston, which determines the volume of the cylinders. When the crank radius changes and the cylinder diameter remains stable, the volume of the latter will change. Motorists often use this dependence to make adjustments when it is necessary to change the technical characteristics of the engine in any particular direction.
Structurally, the crankshaft connects the main and connecting rod journals thanks to the so-called “cheeks”. The connecting rod journals have a smaller diameter than the main ones. The cheek has an extension that acts as a counterweight. Thanks to it, the connecting rod and piston weights are in balance, and the power unit operates without jerking. Both ends of the mechanism are sealed to prevent loss of lubricant.
By establishing the ratio of the piston stroke length to the cylinder diameter, the motor can be made long-stroke or short-stroke. The latter option increases power due to an increase in speed. Long-stroke options are recognized as economical. They provide increased torque at low speeds.
Signs of a bad crankshaft
There are several signs that can directly or indirectly indicate a crankshaft malfunction:
- when the engine is running at low speeds, the oil pressure indicator light comes on;
- when operating at medium and high speeds, a metallic knock can be clearly heard, the frequency of which increases with increasing speed;
- engine jamming.
In the first two cases, the cause of the malfunction is the wear of the connecting rod or main journals of the crank. The increased gap between the surface of the journal and the liner is what causes a drop in oil pressure. With a critically large gap, the shaft may run out, which causes knocking (the engine “knocks”). The third case is the most difficult. Only a small portion of crankshafts from seized engines can be repaired. In most cases, the crankshaft will need to be replaced.
Installing the crankshaft
The crankshaft is installed on a pre-washed, dry and clean block. Assembly is carried out in the following sequence:
- Press in the support bearing of the input shaft.
- Install new crankshaft main bearings.
- Crankshaft half rings are selected according to the tolerance parameters.
- The connecting rod and main journals are lubricated with engine oil, after which the crankshaft is placed in the block.
- Place the bearing caps according to the marks and tighten the fastening bolts with a force of 68-84 Nm.
- Next, the connecting rod bearings are installed and the connecting rods are secured. The bolts must be tightened to a force of no more than 54 Nm.
- Install the rear crankshaft oil seal.
- The unit's oil pan is attached to the block.
- The front oil seal is installed on the block together with the cover (replacing the crankshaft oil seal is necessary after grinding in any case).
- The crankshaft pulley is installed after tightening the front cover.
- Next, the intermediate shaft is mounted on the engine, the cylinder head and gas distribution mechanism parts are installed.
- Adjust the chain tension.
- Place marks on the crankshaft and marks on the camshaft.
- The remaining parts and components are installed.
- Adjust the tension of the generator belt.
- Install and regulate the ignition.
During assembly, all gaskets must be sealed with automotive sealant. This way you can avoid oil leakage during operation of the unit.
You can't decide whether to repair or change the crankshaft? The price for a new one is currently at least 3,000 rubles. If you grind and repair an old VAZ 2106 crankshaft, the price of the work will be 5 times less than this amount, so the benefit is obvious.
The crankshaft and photos of the stages of its repair, reading specialized literature - all this will help you approach the work with confidence, breathe new life into the engine with your own hands, and grow in the eyes of friends and acquaintances.
The VAZ 2106 crankshaft is a part of the crank mechanism that plays a very significant role in the car. In order to install the crankshaft as efficiently as possible, you will need a wide variety of tools, most of which are sold at any specialized automotive store. Please note that when assembling the piston of VAZ 2106 connecting rod engines there are some peculiarities.
Possible breakdowns, causes
Breakdowns can happen for completely different reasons. It doesn't have to be a defect in one of the parts. It may also happen that the housing itself is cracked, which will require repair work. If you have been using the car for a long time without bothering yourself with preventive inspections, then there is a possibility of mechanical damage. Such a defect can also appear due to ruptures in internal mechanisms.
In this case, a major overhaul of the VAZ engine will also include work on the block. We must not forget about the fact that after overhauling the engine, it should be run in. This procedure helps the new parts “fall into place” correctly. This will require a mileage of 2-3 thousand km. If the car has been used for several years, then even by the color of the smoke from the exhaust pipe you can understand that the vehicle has problems.
- A blue tint indicates that oil fluid is entering the combustion chamber.
- Strong and constant smoke indicates that the cylinder-piston parts are already severely worn out.
- If smoke appears during braking or at idle, this is a sign that the valve caps need to be replaced.
- Black smoke indicates improper carburetor adjustment.
- A bluish tint of smoke with moisture means antifreeze has entered the combustion chamber. This happens when the cylinder head gasket is damaged.
- White smoke is normal, especially during the cold season.
Replacing the crankshaft oil seal
In particular, a signal that an urgent replacement of the front oil seal liners is necessary is the direct contact of oil on the pulley and its further splashing in the front part of the engine. If oil leaks in the rear oil seal, splashing occurs on the flywheel in the clutch housing. Reasons for replacement:
You can replace crankshaft oil seals yourself; this will not only significantly save time and money spent on repairs in the workshop, but also gain invaluable experience. Replacing the crankshaft oil seal is a standard procedure to ensure optimal engine performance.
According to statistics, the installation of a new oil seal should be done at least once every 3 years. However, oil seal bearings may need to be replaced much sooner. It all depends on the general condition of the parts and the conditions under which the car is used.
General information
An oil seal is a type of cuff that serves to seal various rotating (moving) joints in various mechanisms and devices. It is necessary to clarify that the concept of an oil seal is now outdated and incorrect:
- The modern name of the spare part is reinforced rubber cuff
- The concept of an oil seal has remained since those time immemorial, when felt or felt seals, their ancient analogue, were lubricated with oil
- A reinforced cuff is a unified part that is produced in factories that specialize in the production of a variety of rubber products
- Modern cuffs are widely used in industrial units, in the motor transport sector, the national economy and agricultural machinery
- In other words, oil seals (cuffs) are used in our time in all types (types) of units, mechanisms and assemblies where it is necessary to seal moving parts
Functions and purpose of cuffs
The main purpose of reinforced rubber cuffs is to seal the moving joint. In addition, modern oil seals provide reliable protection of the assembly they seal from dust and dirt. So:
- For most cuffs, the working medium is air in direct contact with lubricants, fuel or water
- Temperature range required for stable operation of the engine oil seal ranging from -60C (in northern latitudes) to +100C (engine operating temperature with a small margin)
- The working pressure of the reinforced cuff is 0.05 MPa.
Today, reinforced cuffs are considered important elements:
- Since if the cuff is slightly displaced, an oil leak will certainly appear
- It is believed that replacement of crankshaft oil seals on the VAZ 2105 should be done approximately every three years.
- However, such frequency is not strictly necessary - since earlier, unscheduled repairs may be required
- For example, if the engine overheated
- An oil leak in this case signals you that the cuff should be urgently replaced.
Preparation for replacing bearings and direct installation of the crankshaft
In addition, disconnect parts such as the generator, starter, coolant pump, upper nuts that secure the engine mount, and bolts that secure the clutch housing to the engine. The order in which disconnection is made must be strictly observed. During operation, the lifting device cables must be secured to the block and carefully lifted.
Using a 10mm wrench, you need to unscrew all the bolts that secure the oil pan to the cylinder block and remove it along with the seal gasket. Disconnect the oil pump. Using a 14mm socket, unscrew the nuts that secure the connecting rod cover, and then remove it. Then take a hammer, press the handle against the connecting rod, and push the pistons out of the cylinders. Next, take a 17mm socket and unscrew the bolts that attach the crankshaft to the cover. Counting from the crankshaft toe, according to the number marks, we disconnect all subsequent covers. Keep in mind that on cover 5 there are two marks on both sides.
The final stage
To secure, apply light blows with the handle of a hammer to the bottom of the piston, thereby pushing it into the cylinder. Screw on the second to fifth main bearing caps so as not to create a significant tightening. After this, purchase an odorless sealant from the store and apply a thin layer of it to the surface of the cylinder block in the place where it will come into contact with the first bearing cap.
After this, install a new sealing ring on the crankshaft and, after checking the location of the chain on the crankshaft sprocket, install the oil pump and pan. Also screw the removed cylinder head back into place, because only after this the structure can be completely assembled and the crankshaft considered replaced.