Replacing a headlight on a VAZ-2107
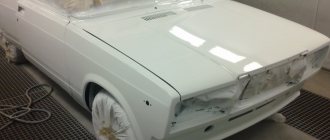
The domestically produced car of the Zhiguli VAZ-2107 family is equipped with strictly rectangular headlights. This allows for better illumination of the road surface at night. The VAZ-2107 headlight is equipped with a new function - adjusting the direction of the light flow depending on the vehicle load. This function is performed through a hydraulic corrector. Bad situations often arise when the headlight becomes damaged, becomes outdated, its elements fail, and this requires its replacement or repair.
Disassembly
After removing the device, it can be replaced with a new one, the old one can be repaired, or the optics can be tuned. Here the decision depends entirely on your needs and wishes.
Foggy
Disassembling the headlight unit is not a tricky task. But there are some peculiarities:
- Unscrew the two screws that are responsible for fastening;
- Disengage the two hooks located on the turn signals from the headlights;
- Thus, the optics is disassembled into two components.
What is required for the work
To replace a defective element on a VAZ 2022 with your own hands, you need to prepare the following tools:
- degreasing and cleaning agent,
- clean cloth
- a cord with a cross-section of 4-5 millimeters and a length of at least 5 meters,
- assistant, since some operations are performed only by two people,
- new rubber seal,
- molding.
You need to thoroughly wash and degrease the new product before starting work. This will prevent it from accidentally slipping out of your hands, and will also ensure a tight grip in the rubber groove.
All work should be carried out in a warm, windless place, observing safety precautions when using degreasing chemicals.
Glass replacement
It is known that headlights are covered with glass, and this is a rather fragile element. And the front part of the car is most susceptible to physical damage. Such actions occur, first of all, due to the fact that pebbles jumped out from under the wheels of the car, as well as when colliding with foreign objects. Replacing headlight glass on a VAZ-2107 is a pressing problem asked by Seven owners. After all, you don’t need to replace a complete headlight when replacing glass will cost 150-300 rubles. To replace glass, you will need this tool:
How to replace headlight glass
Now we’ll find out how to replace the glass itself. First, let’s find out the design of the lantern, what it consists of.
What does the headlight consist of?
As you know, the main link of any lantern is its reflector or reflector. It is a concave mirror component, which serves to form a light beam of the desired shape.
Types of lamps for flashlights
As for the light source, they are car lamps. They can also be different. Currently known:
- ordinary incandescent lamps;
- halogen lamps;
- xenon lamps.
A conventional incandescent lamp is a sealed bulb containing a vacuum or inert gas. Inside the lamp there is a tungsten spiral, which, under the influence of electric current, is heated to a temperature of 2600-3000 K, thus emitting light and heat. As for the efficiency of such lamps, it is about 3400 K.
A halogen incandescent lamp operates similarly to a conventional incandescent lamp. Such a lamp contains minor additions of halogens, such as bromine, chlorine, etc. With the help of these substances, the bulb and glass of the headlamp are darkened. According to experts, the use of halogen headlights on car headlights doubles their service life and prevents rapid failure of the bulb.
Finally, a xenon lamp is a gas-charging version that contains xenon. Such lamps are also called HID lamps and their emission spectrum is identical to that of daytime sunlight. This lamp consists of two bulbs and quartz glass. Such a lamp consumes only 35 W of electrical power, instead of 55 W for a halogen lamp.
Lantern glass
The headlight also consists of corrugated glass, which will be discussed in this article. The most popular types of glass are transparent.
Although tinting headlights is becoming more and more fashionable now.
Transparent glass headlights VAZ 2114
Although reflective options are also known, crystal, modular, lensed, etc.
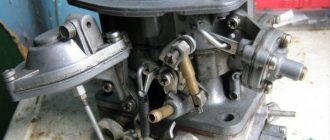
Replacing the hydraulic concealer
The purpose of the hydraulic concealer is known, but to replace it it is necessary to imagine its design. It consists of a master cylinder, which is a switch and a starting cylinder. The mechanisms are connected using special tubes with liquid. Any failure of one of the elements of the hydraulic corrector entails its complete replacement, since its design does not compress.
The hydraulic corrector is replaced in the following order:
- The hydraulic corrector mount is removed from the headlight and on the switch handle. To remove the handle, simply pull it towards you.
- The cylinder head nut is unscrewed and the inner part of the panel is removed.
- After the entire collection is deleted and the new one is reversed for deletion.
Knowing the sequence of removing and replacing headlights on a VAZ-2107, you can save not only money, but also the time required to travel to the station. Replacing headlights is as easy as changing a wheel, so good repair work!
Glass dismantling
To replace your windshield, you need to get rid of the old one. However, it is advisable to purchase a new one in advance and make sure that its dimensions fully correspond to your car.
For removal you only need a medium-wide flathead screwdriver. The latter is rested from the inside against the rubber seal of the VAZ-2107. The optimal place is the top edge of the glass (five millimeters below the edge of the elastic band, counting from the metal frame).
Push the seal out, and then move the screwdriver to the side another 4-6 cm and repeat the action.
When the entire upper edge of the lobovushka is freed, it is simply squeezed out. For this:
- cover the hood with a thick blanket;
- lower the seat back;
- kneel on it;
- press your palms against the glass;
- press firmly.
Next, the frame of the VAZ-2107 is studied. Make sure there is no rust or deformation. Otherwise, all defects will have to be eliminated.
VESKO-TRANS.RU
AutoNews / Reviews / Tests
How to Remove Glass from a VAZ 2106 Headlight
Change glass headlights
In VAZ cars, of course, without outside help, using hand tools. Development depends on why you do it. the glass is broken or solid and you need to save it. Optionally, you can change the headlamp bulb.
Replace VAZ glass with headlights
Process of changing glass headlights
VAZ like this.
1) Removing headlights and glass.
If you have a VAZ 2101, 2102, 2103, in other words 2106, then change the glass headlights
First turn off the headlight.
Then you need to take off
Plastic processing of headlights. attaches to clamps that simply grip a flat head screwdriver. You can now unscrew the headlight and remove it.
Then, if the glass is broken, you can simply remove the glass from the reflector (it is attached to the sealant). When you need to save old glass, this is the best way to do it. keep it warm with a blower while waiting for the sealant to soften and break it off with a screwdriver or knife. The process is naturally time-consuming, but the ability to break headlight glass is low. In the process of removing glass, in principle, do not allow water to enter the reflector and cause mechanical damage to it. The shiny coating is very sensitive. They probably suggest heating the headlight in the oven; unfortunately, this option risks darkening the reflector and overheating the glass.
Option if not next to a hairdryer. use solvent. In small portions, preferably from a syringe, moisten it with sealant and clean it with a knife. When using solvent, remember that it takes some time (up to a minute) for it to begin to corrode the sealant. This method is quite risky because the solvent can get inside the headlights, so you need to work very closely.
Replacement glass headlights short beam on weight 2106 1990 [© Igor Shurar 2018]
Find an unusual headlight
in other words
, the glass
on the Russian
VAZ 2106
or 2103 is very difficult, so I decided to change
the glass
.
Work order
Some headlight repair operations should be performed indoors to avoid water and debris getting into the bonding area. In general, replacing a damaged element includes the following steps:
- Disconnecting the unit from the on-board network of the VAZ 2107 by uncoupling the connectors of the turn signal and the headlight lamp.
- Removing the body from the body opening using a Phillips screwdriver.
- Removing shards of broken glass, in this part of the operation you should be careful not to cut yourself.
- From the junction of the parts, it is necessary to remove the remaining adhesive mass using a flat screwdriver.
- The next step is to clean the unit and degrease it with a solvent.
- Using a dispenser syringe, apply a small amount of glue along the contour evenly without gaps or breaks.
- We place the transparent element in its intended place, press it and fix it using disposable devices or tape.
As the glue dries, the headlight element of the VAZ 2107 is installed in place; it is recommended to change both parts at the same time; during operation they tend to become cloudy and this will become noticeable even with a cursory inspection. The new transparent glass on the headlight of a VAZ 2107 car, which was replaced on our own, is pleasing to the eye. At night, better road lighting is provided.
- Phillips and flat screwdriver,
- sharp knife (stationery),
- silicone or sealant.
Similar articles:
Replacing the headlight
Let's first consider the situation when the old headlamp has outlived its usefulness and needs to be replaced. Such cases occur when water gets inside and causes corrosion processes on the reflector or its darkening, as well as when the headlight is completely damaged. Replacement requires the presence of a basic tool and disconnecting the car from the battery. After this, we proceed to removing the unusable headlight:
- All power wires are disconnected by removing the plugs;
- Removing the hydraulic corrector. To do this, press the plastic lock, turn it clockwise 90 degrees and pull it towards you.
- From the outside, the headlight unit is attached to the body of the VAZ-2107 car using three bolts. One is located on top and in the middle, and the other two are located below - on the sides. There may be a problem with unscrewing the bottom bolt closest to the grille. On the other side of this mount there is a fixing nut, which must be held with a key “8”.
- The headlight can now be removed to the outside of the vehicle.
- The seat for installing a new headlight is cleaned, all fastening bolts are lubricated and installed in the reverse order of removal.
There is no difficulty at all, and the procedure for replacing one side will take no more than 15 minutes. The cost of a regular block headlight on a VAZ-2107 ranges from 1,500 to 2,500 rubles.
Glass replacement
It is known that the headlights have a glass coating, and it is a rather fragile element. And the front part of the car is the most susceptible to physical destructive actions. Such actions occur primarily due to a pebble jumping out from under the wheels of an oncoming car, as well as during collisions with foreign objects. Replacing the headlight glass on a VAZ-2107 is a pressing question that owners of “Sevens” ask themselves. After all, there is no need to replace a complete set of headlights when replacing glass will cost 150-300 rubles. To replace glass you will need the following tool:
- screwdriver;
- pliers;
- sealant;
- degreaser or acetone.
Sequence of glass removal and installation:
- There is no way to remove the glass without removing the headlight, so you need to follow the sequence of actions described in the previous section.
- When the headlight is removed, its surface must be cleaned and try to remove the glass yourself, always wearing gloves. Glass can be easily removed when it shows significant damage.
- If the glass is not damaged, then you can go in two ways: a) break it if it is no longer needed; b) warm it up with a hairdryer and carefully remove it, but this will take much longer. You can watch a video about this method on the Internet if anyone is interested in this type of withdrawal.
- Having decided that glass removal will be carried out according to method a), we proceed to its implementation. We break the glass with a hammer and all the fragments are removed.
- The glass seat is cleaned of old sealant and degreased.
- Once everything is ready to install the new glass, you need to apply sealant around the perimeter of the headlight. It is better to use a special transparent sealant so that its release is not visible.
- We apply the glass to an even layer of sealant and press it using tape or rope. Leave it to dry in this form for about a day. After drying, you can install it, which will take no more than 5 minutes.
Important! Before breaking the glass, you must remove all the light bulbs to avoid damaging them.
Replacing the hydraulic corrector
The purpose of the hydraulic corrector is known, but to replace it you need to understand its design. It consists of a main cylinder, which is a switch, and actuator cylinders. The mechanisms are connected using special tubes with liquid. Any breakdown of one of the elements of the hydraulic corrector entails its complete replacement, since its design is non-separable.
Replacing rear lights
The VAZ taillights have 4 bulbs inside (from side to number).
- Turn signal (closest to the side behind the orange glass).
- Reverse (in the center behind the white glass).
- Side lighting (under the reverse light behind the red glass).
- Stop sign (closest to the sign behind the red glass).
The networks to which these bulbs are connected are protected by fuses F1, F7, F8, F9 and F16. If the standard optics of the VAZ Classic do not suit you, then you can make a small tuning, namely, replace the standard taillights with LED lighting devices.
How to disassemble a headlight without a hair dryer
how to unsolder glass
separately from the reflector without a hair dryer. Be careful not to get burned...
We replace glass on a VAZ 2101 headlight.
If you broke glass
on the headlight, or the reflector has already become rusty, or you want
glass
with the inscription USSR, you can...
There are a huge number of ready-made LED lights on the market from various domestic manufacturers. To install them, it is enough to remove the standard headlights and replace them with tuned ones. Algorithm for removing rear lights.
- First, remove the negative terminal from the battery or remove the fuses mentioned above.
- Then we open the trunk and take out everything that might get in the way.
- Unscrew all the screws and remove the trunk trim.
- We take out the license plate light bulb socket.
- We unscrew the screws securing the plastic housing of the license plate lamp and remove it.
- We disconnect the wiring from the lamp, having previously remembered what is connected to what.
- Unscrew the 4 nuts securing the lamp to the body and remove it.
After dismantling the standard flashlight, it is necessary to install the tuned one in the reverse order. It is important not to forget when installing to connect the ground wires to the inner lower stud of the left lamp and to the inner lower, as well as the outer upper stud of the right lamp.
↑ The process of replacing windshields
If the glass is fixed with a rubber seal, then the work is carried out quite simply and quickly, since it does not require special tools, and unnecessary damage is unlikely.
The situation with glued windshields (which are now found on most modern cars) is completely different. Since they are fixed with adhesive compounds, all stages of the work must be carried out very efficiently and carefully. The process begins with removing the old glass, during which you need to avoid damaging the body, and after removal, carefully remove the old adhesive and degrease the surface.
Before installation, the base is primed with a quick compound, and a sealant is applied around the perimeter of the new glass, after which it is installed in place and lightly pressed so that they are firmly and evenly secured.
↑ Things to remember to avoid poor quality work:
- The driver should immediately refuse to save money, and this applies to the glass itself and the cost of its installation. The cheaper the procedure, the poorer the quality it will be, which will soon force you to contact the service again. Before agreeing to a replacement, you need to find out exactly what is included in the price, so that there is nothing superfluous or, on the contrary, something tedious is not removed.
- Before installing the glass itself (regardless of whether the driver bought it himself or the glass is provided during the replacement process), it must be checked for integrity, especially around the edges. There should be no chips, unevenness or other defects. Of course, after installation they will be closed with a seal, but when the machine moves, they can cause it to break or cause new defects, which is unsafe.
- The driver must make sure in advance that all the components necessary for attaching the glass are available. Moreover, its correct installation should not affect the operation of wipers, sensors and other elements that are close to the windshield or interact with it.
Algorithm for replacing the front headlight of a VAZ 2114
When we have decided on the timing and reasons for the replacement, and also know what to follow when choosing new optics, it’s time to move on to the question of how to change the headlight on a VAZ 2114.
REMEMBER! The vehicle's lighting system is part of its electrical network, therefore, we must not forget about the standard safety measures required to work with this part of the car. You need to at least remove the terminal from the battery, and if you have to work with the right handicap (in the direction of travel), you will have to completely remove the battery, otherwise it will be impossible to dismantle it.
So, let's remove the headlight:
- We remove the radiator trim - to do this you need to unscrew 4 screws.
- We remove the turn signal - to remove the turn signal you will have to look into the engine compartment on its back side:
A. remove the wires, they should be well fixed to each other, so disconnecting them will not be difficult. After removal, remove them and fix them on the car body so that they do not fall, because we do not need excess dirt and dust on the terminals; b. press out the spring that holds the indicator in the car body. V. We press out the plastic clamps of the turn signal and headlights with our fingers, and then pull on its front side.
IMPORTANT! If for one reason or another you cannot remove the turn signal separately, do not break the latches. Later, you can dismantle the entire lighting system in one block and separate them separately. This will be less convenient, but much better than a turn signal dangling from the housing.
- Remove the bumper mounting nuts in the headlight area. This is necessary in order to then move the bumper itself a little and get closer to the fastenings of the illuminator trim.
- Now we dismantle the headlight itself.
Do-it-yourself relighting of the VAZ 2107 tidy
The most effective and simplest way is to replace stock light bulbs with diode analogues. The driver can choose the color of the diodes at his discretion. The remodeling procedure usually looks like this.
- First you need to buy the necessary light bulbs.
- The device is disassembled, and the old illuminators are removed from their seats along with the cartridges.
- Now you need to replace the old lamps with new ones.
- The assembly of the structure is performed in the reverse order.
Tidy illumination circuit 2107
The following is a description of the panel lighting elements.
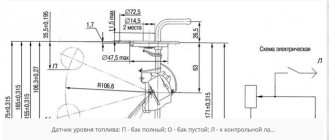
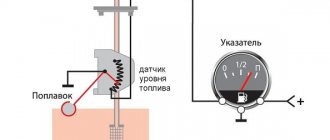
- Fuel level.
- Instrument lighting.
- Speed meter.
- Choke light.
- Direction indicators.
- Battery charge.
- Standard tachometer.
- Economizer (if available).
- Coolant temperature indicator.
- Checking the oil pressure in the power unit.
- Handbrake light.
- Turning on the main beam of the headlights.
- Outdoor lighting indicator.
- Standard voltmeter (if available).
If a description of the connection of indicators in the form of a diagram is required, the form can be seen below.
Replacing light bulbs with LEDs
To install LEDs, follow these steps.
- Select diode light bulbs of the appropriate size and color in the store.
- Disassemble the device and remove the standard light bulbs.
- Next, you need to install diode illuminators in their place and assemble the structure in the reverse order.
LED strip in panel
A special feature is the overexposure method, when the driver uses a diode strip.
Here the principle of action is similar to installing simple elements, but with its own nuances. The essence of the procedure is to place the tape in a solder between the main illuminators (diodes). It's done like this.
- Find the plus and minus of the diodes/strip and connect them into a single circuit, observing the polarity.
Using LEDs
Inexpensive tuning of VAZ 2107 optics involves using LEDs. This method will transform the optics and appearance of the equipment. To carry out the work, you should have the following materials on hand:
- LEDs;
- resistors;
- various wire designs;
- viscous composition based on polymers;
- drill and drill bit of the required diameter.
Tuned lighting fixtures will transform the car. They will look beautiful both from the front and from the back. The main advantage of this option is that the diodes have a long service life and do not have to be changed frequently. When installing these elements in the front light structures, even and diffuse lighting is obtained. This is a convenient way to tune the optics of a VAZ 2106. After installing the LEDs, you need to connect everything to the electrical circuit. At this stage, you should be careful about the polarity and not mix anything up.
To repair a headlight made of plexiglass or polycarbonate , you need to prepare the appropriate material from which the damaged optics were made.
It is impossible to combine materials of different quality; it will be impossible to weld them properly.
Plexiglas with a thickness of 6 mm is selected for the headlights, and 4-5 mm for the rear lights.
The procedure for restoring a headlight that has a crack, chip or scratch:
- first you need to prepare the glass (clean off dust, wash and dry the chipped area);
- then prepare a gun for the adhesive composition;
- carefully fill with glue ;
- dry ultraviolet lamp ;
- Apply hardener to the surface and allow it to harden well;
- sand the area of damaged plastic material;
- polish the glass until it shines.
Repair with dichloroethane
To eliminate defects, we can use dichloroethane (molecular glue). This multi-component substance helps to firmly connect headlight fragments; this mixture can fill all cracks and scratches. The procedure for repairing a headlight is described above. Please note that the glue is preheated using a soldering iron.
It is worth considering that dichloroethane is a toxic mixture; when working, one cannot ignore the risk of the substance getting on the skin; when gluing pieces of headlight glass, you must wear gloves and protect your eyes with goggles.
Repair with epoxy glue
The chipped area can be filled with epoxy. To use epoxy resin, you need to prepare a bandage in advance.
Epoxy is a two-component mixture consisting of a resin and a hardener. The components are mixed according to the instructions, a viscous consistency is obtained.
Before gluing plastic headlights, it is necessary to remove dirt, sand the joints, degrease and dry. Then the fragments of headlight glass need to be spread out and joined together, after applying epoxy glue to the joints. Afterwards, gauze or fiberglass is used: a second layer of epoxy is applied to the material, and excess glue is removed. The surfaces of the headlights are well dried.
Soldering damaged headlights
Soldering is another way to restore headlights with your own hands if the glass is cracked. All fragments of the damaged plastic case can be connected using a technical hair dryer. If parts are lost, you must first make patterns and cut them out of the material from which the body itself is made, for example, ABC plastic. We heat all the parts with a hairdryer and install them in their place.
Connection diagram for low and high beam headlights of a VAZ 2107
Low/high beam lamps are installed in the front headlights of a VAZ 2107 car.
Connection diagram for low and high beam headlights of a VAZ 2107
Description of the scheme
The voltage in the electrical circuit for turning on the low and high beam lamps of the headlights of the VAZ 2107 is supplied from terminal “30” of the generator through the mounting block and the ignition switch.
The low beam is turned on by the external lighting switch (third position), installed in the switch block (switches), in the lower part of the “beard” of the front panel. When the contacts inside the switch are closed, the voltage is supplied to the left steering column switch and then through the headlight low beam relay and fuses 17, 16, it enters the front headlights to the lamp, where it energizes the low beam filament (55 W).
When the high beam is turned on, the electric current from the steering column switch goes to the high beam headlight relay, fuses 12, 13 and then to the high beam filaments of the lamps (60 W) in the front headlights.
The 13th fuse also contains the high beam headlight lamp in the instrument panel.
Turning on the low or high beam headlights will only be available when the exterior lighting switch is on.
To briefly turn on the high beam headlights, both with the exterior lighting switch on and off, the driver moves the high-low beam switch lever towards himself and turns on the high beam. In this case, the current to the high beam filaments in the headlight lamps is supplied directly from the ignition switch (INT terminal), bypassing the exterior lighting switch.
Instructions for removing and installing the headlight of a VAZ 2107
I will demonstrate the entire procedure on the left headlight, but the right one is removed in the same way. The first step is to open the hood of the car and disconnect the power plugs from the low and high beam lamps, as well as the hydraulic corrector:
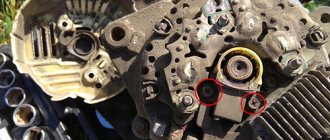
Then, from the outside, you need to unscrew the three bolts using a Phillips screwdriver. All these bolts are clearly shown in the photo below:
Two of them can be unscrewed without any problems, but the third one - the one on the far left (in the direction of travel of the car) is fixed with a nut, so you have to hold it with a size 8 wrench from the inside:
After which you can easily remove the VAZ 2107 headlight from the back side by lightly pulling it with your hand:
That's all the instructions, as you can see, everything is extremely simple and this repair will take no more than 10 minutes of time. Installation is carried out in reverse order. The price of a new headlight on a VAZ 2107 is about 1,600 rubles for the original, with a yellow turn signal.
A modern car is capable of driving at night and in conditions where visibility is limited for some reason. The glass on a fairly large headlight of a VAZ 2107 can be damaged by a pebble flying out from under the wheels of passing or oncoming traffic. Usually in such a situation, the internal parts of the assembly remain intact, and replacing the damaged element can solve the problem.
This operation is relatively simple to perform; you need to remove the damaged headlights from the car, remove the remains of the broken glass and glue a new one in its place. This kind of work can be done by almost every driver who knows how to hold a screwdriver. Replacement is carried out using the tools and materials indicated in the list:
- Phillips screwdriver;
- dispenser syringe for applying glue;
- disposable plastic clips for securing the cable;
- One-component universal adhesive-sealant.
If the latter is unavailable, you can use regular tape and place paper or plastic film underneath it.