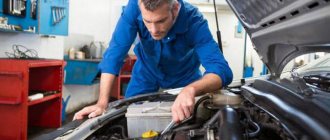
Automatic transmission Jatco
In August 2012, sales of LADA cars with Jatco automatic transmission began. To remove the handle, you must first lift the casing up and remove the two screws securing the mount to the rod. Then, on the bottom right side, disconnect the white wire that goes to the O/D button. By the way, the automatic transmission handle can be shortened.
How to remove the gear knob on LADA cars (manual transmission, AMT or robot, automatic transmission)
_x000D_
AvtoVAZ equips its cars with three types of transmissions: manual transmission (manual transmission), AMT or “robot” (automated transmission) and automatic transmission (automatic transmission). We'll tell you how to replace the gear knob on a LADA in detail.
1. Old manual transmission . On VAZ cars of the “tenth family”, and then on Lada Priora with “mechanics”, the handle was very difficult to remove. First, we lift the cover (we remove the clamps from engagement with the tunnel using a screwdriver). The handle on the metal lever sits very tightly, because... there is a groove inside it.
How to remove the manual transmission handle on a Priora and VAZ 2110 How to remove the manual transmission handle on a Priora and VAZ 2110 How to remove the manual transmission handle on a Priora and VAZ 2110
To remove the handle, you need to pull it upward with force; if necessary, heat the part with a hairdryer.
Similarly, we remove the gear knob on the Lada Largus:
Removing the gear shift lever rod on a LADA 4×4 car (Niva 2121 and 2131). We lift the handle up a little and use a flat screwdriver to snap off the petals of the plastic lock, removing them from the ring groove of the lever.
2. New manual transmission . Subsequently, Priors (after restyling), as well as Lada Granta, Kalina, Vesta cars received modified transmissions and gearshift knobs, respectively. Now it has become much easier to remove the gearshift knobs on a manual transmission: unscrew it counterclockwise.
To remove the manual transmission handle on the Lada XRAY, you need to forcefully pull it up.
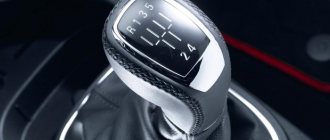
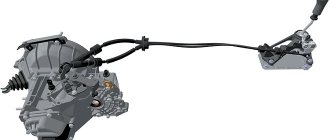
3. Jatco automatic transmission . In August 2012, sales of LADA cars with Jatco automatic transmission began. To remove the handle, you must first lift the casing up and remove the two screws securing the mount to the rod. Then, on the bottom right side, disconnect the white wire that goes to the O/D button. By the way, the automatic transmission handle can be shortened.
How to remove the automatic transmission handle on Lada Granta and Kalina 2 How to remove the automatic transmission handle on Lada Granta and Kalina 2
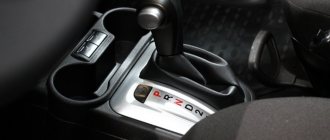
4. AMT or “robot” . In March 2015, AvtoVAZ began producing cars with robotic transmissions. Here the action scheme is the same as on the old “mechanics” - we pull the handle up strongly. By the way, the books also don’t write how to remove the tunnel lining near the AMT lever.
How to remove the AMT handle or robot on Lada Granta, Kalina 2, Priora, Vesta or XRAY
Characteristics of all types of Lada Granta gearboxes
The first manual transmission of this sedan and liftback class model received the index 2180. It was soon replaced by a modernized cable-driven gearbox, which is indexed as 2181. It is installed starting with the “standard” configuration.
Traction and cable gearbox Lada Granta
The difference between these two checkpoints is obvious. The first and most important thing is to use, instead of rigid rods that increase vibration on the body and rocker, more flexible cables from the Japanese manufacturer Atsumitec. In addition, gearbox 2180 differed from 2181 in other parameters.
- The 2181 has cone-shaped synchronizers, which reduces the impact on the gear lever when setting 1st or 2nd speed.
- The clutch disc has become larger in diameter (215 mm). Because of this, the clutch housing increased in size, and the starter began to be located along the internal combustion engine.
- The synchronizers received teeth with a reduced angle bevel (100 degrees), and the initial preload force was reduced to 70 Nm.
- A different mechanism for selecting speeds was developed by Schaeffler. In addition, it was moved upward, which made it possible to reduce the effort when switching in cold weather and eliminate oil smudges.
- The clarity of gear shifting is made possible, among other things, thanks to the selector plate.
- Instead of mineral gear oil, semi-synthetic oil was used from the factory, and the oil volume was reduced to 2.2 liters.
Structurally, the gearbox has become not only more reliable, but also more comfortable for the driver. Vibrations to the gearshift lever and the body as a whole have decreased significantly. The speeds began to turn on clearly and without delay. At the same time, the modernization of the gearbox on the Lada Granta and Kalina 2 entailed an average increase in price by 5,000 rubles. According to experts, the main difference between the updated transmission is not so much in reliability, but in the quality of gear selection.
What is characteristic is that the new editions of the Lada Priora did not receive a cable gearbox; this car is still equipped with an outdated VAZ 2180 with rigid rods.
Features of a robotic gearbox
In addition to the updated mechanics, the Lada Granta since 2015, starting with the “luxury” configuration, can be equipped with a robotic gearbox. The new transmission will be available in “standard” and “luxury” variations. According to the engineers, this device should completely eliminate the negative impact of the human factor, in which various errors are made.
Granta became the first car of the VAZ family to receive a robotic transmission option. The main manufacturer was the Japanese company Jatco, known in its field for the development and production of robotic, automatic transmissions and CVTs. They began installing a 4-speed gearbox, proven over the years, on the Grant. Not the most modern, but reliable.
Features of automatic transmission
The period of adaptation of the robot and the release of the first pilot versions of Granta on the machine lasted quite a long time. During this time, the symbiosis of domestic and Japanese developments was subjected to numerous calibrations. The modernization included about 30 modifications, and engineers from Austria were involved in the process. Only after this did the automatic transmission go into production.
Experts even took into account ergonomic issues: the hand fits comfortably on the gear shift lever. The selection of the appropriate modes is indicated on the selector; the specified mode is also duplicated on the BC screen. The only drawback revealed during operation is the unreliable fixation of the lever in the selected mode.
The gearbox operates in several modes. First and second gears are fixed. There is an overdrive button, thanks to which the automatic transmission will not switch to fourth speed. This mode is relevant when overtaking on the highway. Fixed first two gears are used for off-road driving or long uphill climbs. In winter, the transmission will not engage in higher 3rd and 4th gears until the oil warms up to 15 and 60 degrees, respectively.
Unlike the manual transmission of the Lada Grant, the automatic transmission does not have a flywheel. A drive disk is used instead.
Features of the automatic transmission scheme led to a decrease in the vehicle's ground clearance. The electronics that control the device are located behind, on the left side below the headlight. Many believe that such a location will lead to uncontrollability of the car in an accident. But engineers think differently. Automation will reliably control the work. Judging by the reviews, the system really functions flawlessly, and this is good news.
Material selection
The choice of material for covering is a serious and responsible matter: the driver will touch it during operation for several years. Therefore, the material should be pleasant to the touch, comfortable, wear-resistant, and breathable. The choice largely depends on the financial capabilities of the car owner and his tastes. People have different tastes: some like bright colors, others want to use almost snakeskin. Many people strive to stand out with interior decoration, to show individuality and originality.
The gear shift knob is made from different materials. Reupholstering the gear knob with leather is the best option in terms of price and quality ratio. The most popular is genuine automotive leather. It has qualities that are in many ways superior to furniture and haberdashery leather: more moisture-resistant, wear-resistant and strong. Analogs can withstand operating conditions (temperature changes, frequent contact) for no more than 2 months, automotive leather will last 5-7 years.
Perforated leather
Leather for cars has a special polymer coating that protects it from mechanical damage. In addition, thanks to the polymer layer, car leather is resistant to ultraviolet rays, chemical exposure from alcohol, gasoline, oil, endures frequent stretching longer, and the paint is highly resistant to abrasion.
An alternative to genuine leather are artificial materials: eco-leather and artificial leather. For the production of eco-leather, polyurethane is used; its composition contains 70% of the substance. Leatherette is made from polyvinyl chloride (PVC). The use of polyurethane allows eco-leather to “breathe”, which distinguishes it from artificial leather. The cost of artificial materials is much lower than natural leather, so eco-leather is gaining popularity.
The covering material can be faux suede such as Alcantara. It is a material with a rough surface, pleasant to the touch. The roughness prevents the hand from slipping. The Alcantara-covered handle looks very aesthetically pleasing. In winter, when touching the material, a feeling of warmth is created, and in summer, on the contrary, suede gives the effect of coolness.
It is possible to reupholster with rubber material with an adhesive backing. They are easy to finish and are inexpensive.
Perforated leather is most convenient, as it is softer and more elastic than smooth leather. True, the pores should be small so that dirt does not clog. Smooth leather is more resistant to wear. The thickness of the material should be from 1.2 to 1.4 mm. The color can be any - it must match the overall color scheme of the interior. The classic option is black.
Design and differences of a cable-driven gearbox
Unlike a conventional gearbox, the cable-driven gearbox has received some improvements and upgrades.
In order to understand how everything works, let’s compare a standard gearbox labeled VAZ-2180 and the new VAZ-2181:
- To reduce the vibration generated by the traction drive gearbox, cables from the manufacturer Atsumitec were installed.
- To reduce the effort for shifting 1st and 2nd gears, the manufacturer installed multi-cone synchronizers.
- The clutch size has increased to 215 mm.
- Due to changes in the transmission design, the starter had to be positioned along the engine rather than the gearbox.
- To facilitate gear shifting, it was necessary to reduce the bevel angle of the synchronizer teeth from 125 degrees to 100.
- To eliminate oil leaks, the designers moved the gear selection mechanism to the top. But this nuance gave impetus to the development of a new switching scheme and design changes.
- The volume of lubricant poured has decreased from 3.3 liters to 2.2 liters.
- A selector plate is installed, which allows you to change gears more clearly.
- The transition from mineral oil to semi-synthetic oil has been completed.
- To prevent accidental reverse gear, a special lock was developed.
The main elements and components that go into the design of the new gearbox can be seen in the figures below:
- main drive drive gear;
- secondary shaft;
- input shaft;
- fifth gear shift fork;
- third and fourth gear shift fork;
- reverse light switch;
- clutch housing;
- gear shift mechanism;
- central lock.
1 – first gear gear; 2 – intermediate rings; 3 – blocking ring; 4 – synchronizer clutch; 5 – synchronizer clutch hub; 6 – clamp; 7 – second gear gear.
1 – gear selector levers; 2 – selector grid pin; 3 – selector grid; 4 – reverse locking mechanism; 5 – central three-dimensional plate.
Thus, the manufacturer decided to improve and modernize the gearbox, which was unreliable and had a lot of problems. Due to the new improved system, vibration in the body and gear knob has been reduced. The gears switched on, started more clearly, and the huge backlashes disappeared.
Catalog numbers and production
As you know, analogues of gearboxes are rarely produced, and even more so for domestic cars.
Therefore, for the Lada Granta cable-driven gearbox there is one catalog number - 21810-1700012-00.
Clutch, gearbox, transmission Lada Vesta
Products from the Dustershop77 range on the topic of the article:
| Name | Manufacturer | Price | Availability | Add to cart |
| DC709 | Gas pedal cover for Duster 2015 / Captur / Logan / Terrano / Vesta / Isk-Ray | Duster-Guard | 1000 / 800 rub. Discount: 700 rub. | >10 |
| DC952-7703062062 | Gasket for gearbox drain plug, transfer case Renault Duster / Terrano / Captur original 7703062062 | Original | 200 / 100 rub. Discount: 50 rub. | 3 |
| DC590-V053-1500403 | Carpet covers (6 pcs) Lada X-Ray | Pt GROUP | 2500 / 1900 rub. Discount: 1500 rub. | >10 |
| V021-01400404 / LVE111703 | Tunnel pads for carpet (2 pcs) | Pt GROUP | 1500 / 1300 rub. Discount: 950 rub. | 3 |
| V046 | Passenger carpet cover for Lada Vesta from 2022 | 1200 / 900 rub. Discount: 900 rub. | 2 | |
| DC589-V054-1500404 | Tunnel pads for carpet (2 pcs) Lada X-Ray | Pt GROUP | 1900 / 1500 rub. Discount: 1000 rub. | >10 |
| V086 | Rear seat carpet covers | ArmAuto | 1000 / 900 rub. Discount: 900 rub. | 1 |
| DC524-302054100R | Clutch kit for 1.6 (H4M) 4×2 gearbox JR5 (5-speed) original art. 302054100R | Original | 7500 / 6900 rub. Discount: 6500 rub. | 1 |
| DC1560-8200884113 | Drive oil seal original Renault 8200884113 left | Original | 1000 / 800 rub. Discount: 700 rub. | 2 |
| DC422-510009710 | Release bearing H4M 4×2 JR5/JH3 5-speed. LUK 510009710 306200650R 7701478631 8200046103 8200764613 8200990502 306205482R 306205482R 306206219R 306201586R | Analogue | 4500 / 3900 rub. Discount: 3500 rub. | 1 |
| DC383-ASAM-30799 | Gear shift lever bushing ASAM-SA 30799 original art. 7700732903 | Analogue | 400 / 150 rub. Discount: 100 rub. | 2 |
| DC440-8200410813 | Drive shaft retaining ring original art. 8200410813 | Original | 500 / 300 rub. Discount: 250 rub. | 2 |
| DC956-7700102458 | Automatic transmission filter DP2 original 7700102458 | Original | 900 / 600 rub. Discount: 500 rub. | 1 |
| DC1667 | Clutch kit Vesta (1.6l 21129 + manual transmission VAZ / AMT) LUK | Analogue | 5500 / 4500 rub. Discount: 4200 rub. | 1 |
| DC882 | Carpet door sill covers Sandero 2014/Stepway 2014/ X-Ray | Duster-Guard | 2600 / 2000 rub. Discount: 1700 rub. | 4 |
| DC950-321031MG0B | Rear gearbox filler plug Renault Duster / Captur / Nissan Terrano 4x4 321031MG0B | Original | 1000 / 800 rub. Discount: 700 rub. | 1 |
| DC1316-8201630012 | Guide (tool) for centering the clutch and release (H4M-JR5/JH3) original 8201630012 | Original | 2000 / 1800 rub. Discount: 1600 rub. | 1 |
| DC1630-7703075180 | Filler plug for gearbox / transfer case original 7703075180 | Original | 200 / 150 rub. Discount: 100 rub. | 1 |
| DC1631-8200201381 | Transmission/transfer case filler plug gaskets original 8200201381 | Original | 500 / 350 rub. Discount: 300 rub. | 1 |
| DC1818-7701209239 | Outer CV joint boot Renault Duster, Terrano, Captur Renault Duster 1.6 4WD/1.5DCi 7701209239 original | Original | 3200 / 2500 rub. Discount: 1900 rub. | 1 |
| DC1708 | Tunnel linings for carpet Lada X-Ray 2015- | Duster-Guard | 2500 / 1700 rub. Discount: 1400 rub. | 2 |
| V045 | Driver's carpet trim for Lada Vesta from 2022 | 900 / 650 rub. Discount: 650 rub. | ||
| V047 | Tunnel carpet overlay for Lada Vesta from 2022 | 900 / 650 rub. Discount: 650 rub. | ||
| DC1956-21820160121100 | Clutch fork boot Grant, Vesta, X-Ray 21820160121100 | Original | 150 / 100 rub. Discount: 70 rub. | |
| DC1963-21102301035 | Left drive oil seal Vesta, Largus, X-Ray article 21102301035 (red 35x57x9) | Original | 200 / 120 rub. Discount: 80 rub. | |
| DC1964-21102301034 | Right drive oil seal Vesta, Largus, X-Ray article 21102301034 (black 35x57x9) | Original | 200 / 120 rub. Discount: 80 rub. |
Material selection
Every driver wants the material with which the interior elements of his car are covered to be not only strong and durable, but also pleasant to the touch. In addition, it must meet the tastes of the owner and be combined with the interior design. The financial issue is also important. So how do you choose a coating that will meet all these characteristics? The following materials are most often used to cover the gearshift knob:
All of them have good performance. The coating will not tear at the most unexpected moment, and with proper care it will last a long time. But each of these materials has features that distinguish it from the rest. This could be price, softness, or even the ability to cause allergies. To make the right choice, let’s look at the characteristics of each of them.
Genuine leather for upholstery
Genuine automobile leather is the highest quality, but at the same time the most expensive material that can be used in upholstery. Leather seats, ceiling, control panel - it all looks solid and stylish. Having covered the gearshift knob with leather, you will not only enjoy its appearance, but also experience a pleasant sensation when touching it to change gears.
the use of genuine leather in the decoration of the car gives it a stylish and solid look
Leather is highly wear-resistant. Thanks to special processing, it is less susceptible to mechanical and chemical damage. In addition, this material is resistant to ultraviolet radiation, which means it will practically not fade in the bright sun. Another advantage is moisture resistance.
The optimal leather thickness for covering the gearshift knob is 1.3 mm. Thicker material will not be flexible enough to follow the shape of the part.
On sale you can find a special type - perforated genuine leather. It differs from the usual one in the large number of barely noticeable through holes throughout the entire area of the material. In addition to all the above positive properties, it has increased elasticity, softness and vapor permeability. You need to choose perforated leather carefully: if the holes have too large a diameter, a lot of dust will accumulate in them. This means you will have to clean it much more often and more thoroughly.
perforated leather has many small through holes, which increases its performance properties
It is not surprising that the cost of leather is much higher than any other material. But despite this, its use will be much more favorable in terms of price and quality ratio, because its service life without loss of properties can reach 7 years. But, besides the price, genuine leather has one significant drawback: the chemicals involved in the leather tanning process can cause a severe allergic reaction in some people. If you are one of them, pay attention to eco-leather.
Removing and disassembling the gearbox control mechanism
Removing and disassembling the gearbox control mechanism
We remove and disassemble the gearbox control mechanism to replace the plastic washers of the gear lever shaft and ball joint. We carry out the work on an inspection ditch or overpass. Remove the middle mudguard (see “Removing the engine compartment mudguards”). Inside the car...
...overcoming the resistance of the clamps, we remove the frame for fastening the gear lever cover from the hole in the floor tunnel.
We slide the cover along with the frame along the gear shift lever.
Turning the cover inside out, unwind or cut the insulating tape covering the lever cover (during subsequent assembly, the insulating tape can be replaced with a plastic clamp).
We pull the cover together with the frame from the gear shift lever and from the lever handle. Below the car...
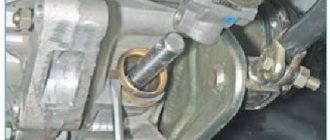
...with a marker we mark the positions of the gear selector rod hinge shank relative to the control rod (this will help with the subsequent assembly of parts).
Using a 13mm spanner, loosen the nut of the coupling bolt of the clamp securing the control rod to the shank, holding the bolt from turning with a wrench of the same size.
Using a slotted screwdriver, we open the clamp and move it along the rod.
Remove the control rod from the shank of the gear selector rod hinge. To remove jet thrust...
...using a 13mm spanner, loosen the tightening of the coupling bolt nut of the clamp securing the reaction rod to the tip... ...and remove the rod from the tip.
Using a 13mm socket, unscrew the three nuts securing the base of the gear shift lever (there is an installation bolt in the front of the base, shown by the arrow).
Remove the gearbox control mechanism downwards.
Using the “13” socket, unscrew the nut securing the gear shift lever axis (which is also the stop for locking the reverse gear).
We take out the gear shift lever shaft.
Pull the gear shift lever out of the control rod.
We remove two inner plastic and two outer metal washers, as well as a metal spacer sleeve.
Recommendations for covering
First of all, you need to remove the handle from the main long gearshift lever. It is the handle that we will tighten. If you wish, you can also replace the cover of the lever itself, which hides the metal pipe in the tunnel. But more on that another time.
The task is to obtain blanks. Here is an option:
But there is another option. It is suitable for those who like the old case's shape and seam placement, but the product is simply worn out. To do this, carefully remove the old trim from the gearshift knob.
It will be used as a template for a new case. Cut out blanks from the new material in the shape of the old cover, and sew them together in the same way. The convenience of this option is that you do not need to measure anything, make markings, etc.
IMPORTANT! The cover should be sewn from the wrong side so that the seams are not on the outside. Then the comfort of gripping the gearbox will deteriorate significantly.
I think we can end here. If you have personal experience with gearshift knob trim, be sure to write in the comments, share your secrets and highlight the important points of the procedure.
Thanks to everyone who reads us! Subscribe, ask your questions and invite your friends to join us!
( 1 ratings, average: 5.00 out of 5)
Subscribe to updates and receive articles by email!
We guarantee: no spam, only new articles once a week!
How to eliminate the rattling of the VAZ 2114 gearbox handle
Often, the VAZ 2114 gear knob resonates with the operation of the engine and makes an unpleasant rattling sound due to the following problems with the bushing:
- wear of plastic bushing inserts;
- discrepancy between the length of the sleeve and the dimensions of the fork.
In the first case, you will have to change the plastic inserts or the bushing assembly. In the second, you will have to bring the dimensions into line. To do this you will need a file, electrical tape and a vice. Often the manufacturer installs a bushing, which with its edges touches the traction fork (stage) and knocks on it when it vibrates. To get rid of noise, you need to do the following:
- unscrew the bushing fastening;
- remove the bushing;
- clean (wash with kerosene) the bushing from any remaining lubricant;
- make preliminary markings by drawing a line 1-3 millimeters from the edge of the sleeve;
- wrap the sleeve with electrical tape along the marking line, leaving the edge open;
- Clamp the bushing in a vice and use a file to file off the edge protruding from the electrical tape.
After such an operation, all that remains is to put on the plastic inserts and put the gearshift knob in place. The edges of the bushing will no longer touch the metal fork and the VAZ 2114 gear knob will stop rattling.
AvtoVAZ equips its cars with three types of transmissions: manual transmission (manual transmission), AMT or “robot” (automated transmission) and automatic transmission (automatic transmission). We'll tell you how to replace the gear knob on a LADA in detail.
Make or buy
Let's start with the main thing. Namely, from the idea of modernization. The gearshift lever is usually located inside the case, and the top handle itself, which the driver grabs when changing gears, can be plastic, silicone, leather, etc.
The leather option is usually found on more expensive models. And in Soviet or old domestic cars, glass knobs with flowers, roses and other once-fashionable handle decor options are not so rare. Now some people appreciate rare solutions, trying to decorate the interior of their own car with something similar. Making a complete lever attachment from glass, plastic or silicone is quite problematic. It's much easier to buy it. But you can sew the cover yourself if you have certain skills and desire.
Source
How to remove the gear shift lever?
Sometimes car owners are faced with the problem of removing the gear shift lever. This procedure must be carried out when replacing the silent blocks of the lever or extension, as well as when replacing the lever itself. The extension is removed to replace the silent blocks on it or to completely disassemble the front suspension. Since these repair procedures are not very difficult, you can remove the lever yourself rather than contact a service station for help.
Advice: it is advisable to carry out the work in the presence of an inspection hole or a lift.