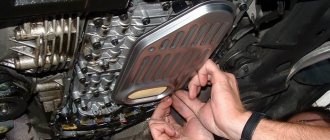
Replacing the exhaust manifold gasket on a VAZ-2114 is a very complex procedure and requires certain knowledge and experience. So, not all experienced car enthusiasts are able to do this correctly. In addition to the fact that exhaust gases exit through the exhaust manifold, it is also responsible for the normal operation of the engine, since a lambda probe is installed on it.
Video about replacing the exhaust manifold gasket on a VAZ-2114
The video will tell you how to properly replace the exhaust manifold gasket, and also tell you about some of the subtleties and nuances of this process.
Replacing pants
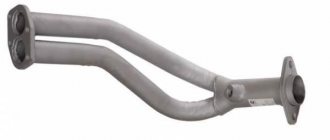
The exhaust pipe, also called pants (due to its appearance), is attached to the manifold using studs and nuts. Its fixation with the neutralizer is carried out by a spring-loaded connection.
Remove the exhaust pipe, paying special attention to its attachment to the manifold. Studs are used here, not bolts. They are screwed into the manifold, and connecting nuts are screwed onto them. If the stud is damaged, it will be extremely difficult to replace it
Therefore, it is important to try to keep the old one intact and safe. Treat the nuts with WD40, a product we all know. This will allow you to avoid applying excessive force and keep the studs intact.
If that doesn't work, the studs are drilled out. The process is complex, lengthy, and requires experience and skill. There is a gasket between the manifold and the pants that needs to be replaced. Also install a new converter o-ring. Now firmly press the exhaust pipe using the nuts. To do this you will need to compress the gasket. Then tighten the bolts of the spring-loaded connection with the neutralizer of your VAZ 2110.
As you noticed, there is nothing complicated in this work. Each element is quite easily dismantled and a new one is installed in its place.
Just be careful, act carefully and consistently. Plus, of course, do not forget about the importance of the quality of new parts
Buy only good spare parts that will ensure long-term and efficient service of the exhaust system on your VAZ 2110.
I foresee a lot of negativity for talking about this work. But the work was done and I see no reason to hide it. Moreover, the customer was both pleased and satisfied with the quality of the work and the price. To begin with, a young man approached us with a request to install an exhaust system on a 2110 .His friends gave him such an original gift for his birthday. He may not need it, but since it was given, he needs to install it. The system consists of a manifold, a resonator, a bypass pipe above the rear beam and a muffler with a nozzle. Everything except the rear part is made of stainless steel.
old and new
At first glance, everything should be simple and predictable... we remove the standard system and install a new one. But this is only on the floor and outside the car. In fact, it turns out that the exhaust manifold mounting flange is thicker than the intake manifold. And since both of them are fixed with one nut on a stud , then it is almost impossible to press them without modification.
Adding to the complexity is the limited access through the non-removable spider of the new pipes. Poorly tightened manifolds not only leak air, but also prevent the engine from starting. Thus, our craftsmen had to modify the stainless steel mounting flange to the required size. After this titanic work on a limited budget, the entire remaining system was installed in 600 seconds. Strangely enough, the sound turned out to be quite pleasant and bassy.
If your car hummed like an airplane during a trip, then most likely you are either in need of a major muffler repair, or you will need to replace the VAZ 2110 muffler. Stop and look: if the pipe has fallen off the muffler, then you will definitely have to change the muffler. The reason for this may be either burnt metal or a rusted connection.
When you come to a car store or market, be careful when purchasing a muffler. They exist, depending on the car model 2110, 11, 12. They all differ slightly in size and mounting locations, so make sure you don’t miss the purchase.
Replacing the muffler on a VAZ 2110 itself is not difficult, but, as with everything, there are some nuances.
I do not recommend trying to replace a muffler without a hole. You can, of course, try to remove the rear left wheel - you can reach the muffler there, but the bolts, as a rule, are rusted and you are unlikely to be able to remove them in this position.
FakeHeader
Comments 34
So today it fell off at the welding site, in BB 1900r, tomorrow I’ll buy it, install it and fuck with the studs! Tough!
Take any! For what there is money! Everything will die at the welding site! This is the weakest point of any node!
Bet on the grant, it's stainless steel. I've been riding for five years, like new if I wash it)
Auto analysis! I bought it there from a new car, the donor muffler had 500 km of mileage and the price was 500 rubles...
How much do you expect to pay for the item and when do you plan to sell the car?
I'm not thinking about selling yet. There is a money crisis. And I try to buy consumables that are reliable, even if they are more expensive. That's why I'm asking here.
What is the specific amount? will you travel for two years? or more?
My big 21-year-old son also drives it. He will get it and let him learn how to repair it.
if you learn how to repair, fret image, excellent geometry, price is about 1 tr per element, service life is about 2 years.
if there was anything to get, then an avtovazagregat, about 3 tr per element
I think I'll buy a stainless steel Datsun.
this is the autovaza unit, the recommended retail price is 5500 for a resonator, for example. aluminized 3, Chernyaga 1500, but the supplier is different
if you learn how to repair, fret image, excellent geometry, price is about 1 tr per element, service life is about 2 years.
if there was anything to get, then an avtovazagregat, about 3 tr per element
AVTOVAZAGREGAT no longer produces mufflers. The last remnants are on sale. The original ones - "Eberspächer" - go to the assembly line.
Eberspächer is also an avtovasagregat
The supplier for the assembly line and Lada-Image is Eberspächer-AvtoVAZagregat Exhaust Systems LLC
budget range of exhaust for spare parts (Lada Image) - robola LLC
I mean that AVTOVAZAGREGAT, as an independent production, will most likely close completely in August, and will not produce any products itself. The joint venture you wrote about does not produce mufflers under the AVTOVAZAGREGAT brand.
And there are a lot of budget muffler lines, and Robola produces mid-range mufflers, like many non-conveyor manufacturers.
Eberspächer-AvtoVAZagregat Exhaust systems works at the Ava site with the same employees who worked at Ava, with the corresponding quality of the output product. It is quite logical to put an equal sign between the products of Eberspächer-AvtoVAZagregat Exhaust systems and AvtoVAZagregat, these are the same pieces of hardware from the same place and from the same ones as before.
Well, firstly, the line of Ebersper mufflers for the same models is quite different in appearance. Secondly, the “ava platform” is no longer the same. Without water and sewerage, with empty workshops (ava) due to almost completely sold out equipment and laid off/fired people. According to information from a month ago, Eberspächer has already found where to move. That's it.
For consumers, they will remain an autovaza unit for another twenty years, even if they move to the gas site in Nizhny Novgorod. because then
The Ava trademark is not applied to Eberspächer. So that)))
Is the ava trademark widely known to consumers? no one will see this point blank
That is, what the seller called “ava” is “ava”? Don’t tell me))) There are fools and people who don’t care, but not so many of them...
Source
Replacing the exhaust manifold gasket: “Niva”
Replacing the gasket on a Niva will also not be particularly difficult. The order of work is as follows:
- To get started, follow the first nine points from the section for the VAZ 2110.
- Remove the bolts securing the front and rear support brackets to the exhaust pipe. Remove the front bracket, move the rear one to the side so that it does not interfere.
- Remove the fuel rail with injectors.
- Unscrew the nut securing the front eye bolt and remove it.
- Unscrew the nuts securing the heat shield of the intake pipe and remove it.
- Unscrew the two outermost and then the two upper nuts securing the intake manifold to the cylinder head.
- Using the wrench handle extension, remove the remaining two (bottom) nuts.
- Remove the intake manifold.
- Remove the starter heat shield.
- Unscrew the nut securing the ground wire to the cylinder head. Remove the conductor tip.
- Unscrew the three nuts securing the VK and dismantle it.
- Remove the seal, clean the mating surfaces and install a new gasket.
- Reinstall the removed parts in reverse order and fill with coolant.
Auspuff Reparatur by Liqui Moly
Autochemical compositions of this brand rightfully occupy leading positions in various categories. In this case, the company offers a comprehensive solution for protecting the exhaust pipe, eliminating the risk of the formation and development of existing cracks with small holes on the surfaces of the structure. The sealing paste is resistant to elevated temperatures, does not require complex installation operations such as welding, and does not contain harmful chemical ingredients. In particular, the applied coating retains its performance at 700 °C. Treatment with Liqui Moly car exhaust system sealant can be carried out in typical garage conditions without connecting special equipment, which is also an attractive advantage when choosing.
Replacing the gasket between the exhaust manifold and the exhaust pipe of the Renault Logan muffler master class
The new gasket, the most successful one, is manufactured by Bosal. Tighten the nuts all the way, but do not overtighten, otherwise you can strip the threads and squeeze out the new gasket. The only important nuance is the choice of a new high-quality muffler. They will not serve for very long, but they are inexpensive - from 2 to 3 thousand.
The criteria for selecting a muffler for a Renault car depend only on the financial capabilities of the owner: Preparing tools for work In order to replace the muffler as quickly as possible, you need to prepare a simple set of tools in advance.
The set includes two 10-mm open-end wrenches and a flat-head screwdriver with a thin blade.
You will need wrenches to unscrew the nuts, and a screwdriver can be useful if it is difficult to remove the muffler from the rubber bands with your hands. Any work on the exhaust system elements is carried out only after the pipes and engine have completely cooled. It is recommended to adhere to the following rules to safely remove the muffler: Unscrew the four bolts that secure the muffler pants to the exhaust manifold.
Replacing the Middle Part of the Renault Logan Muffler
After this, disconnect the oxygen sensor connector - you can move it to the side so that it does not interfere. Heat shields are installed above the two mufflers and the converter, and a metal sealing gasket is placed between the cylinder head and the exhaust manifold. The catalytic converter and the middle part of the muffler are one-piece, non-separable machine components. If they become unusable, they must be replaced with new parts.
An accurate diagnosis can be made after a detailed examination of the machine assembly. If it is completely covered with corrosion, then repairing its individual parts cannot be done; a complete replacement must be carried out.
Selecting a new part is extremely simple. It is recommended to buy only original parts - this guarantees the durability of the unit and the entire machine.
You can buy its individual parts and assemble it yourself. The advantage of the car brand is that you can do this yourself, without resorting to the services of specialists. Before replacement Before looking under the car and removing the exhaust system, you should check its tightness and try to determine the nature of the breakdown.
Tags: configurations, Logan, Renault, prices
« Previous entry
Why do you need to wrap?
There are several theories here, and all of them appeal to tuning enthusiasts.
- Exhaust sound. If you are redoing an exhaust pipe, then you often install homemade systems (for example, the same SPIDERS or resonators). If you do something not according to the rules (it’s trivial not to calculate it), then the exhaust sound, instead of deep bass, will be “ringing”. To remove this effect, they often wrap the pipe with thermal tape, then the ringing actually decreases, often turning into bass. It’s like if you throw a ball into a metal basin, there will be a ringing sound, but if you lay a rubber mat (or fabric) the sound will be absorbed
- Adding power. As we already know, the exhaust system inhibits exhaust gases (diameter, catalyst, resonators). And if we move them faster and easier, then the motor will not need any effort to push them through the entire pipe. Exhaust gases exit and collide with the cold pipe of the exhaust manifold, thereby cooling and compressing them - their ability to pass through decreases. And as we know from the 8th grade physics course, at high temperatures, the volume of gas is greater for the same mass. It follows from this that heated (not cooled) gas will move faster through the exhaust system. And the faster it is retracted, the power increases slightly.
Engine compartment temperature. Another “killed hare” by thermal tape is the low temperature in the engine compartment. A really big plus for many plastic parts in the summer, also for the battery.
BUT it should be noted that TUNERS are mainly concerned with the FAST REMOVEMENT of the exhaust gas flow in order to increase power, that’s all.
Preliminary work
Replacing the VAZ 2109 intake manifold gasket with your own hands is not very difficult and does not require specific knowledge or expensive tools - the required set of keys is usually present in the trunk of every car enthusiast.
But before replacing, you should try to tighten the fastening of the intake unit - if the gasket is not burned out, it is the loose fastening that may cause exhaust gases to get under the hood. If tightening the fastening does not help, it means that the gasket is completely burned out and needs to be replaced. Replacing the VAZ 2109 manifold gasket will require preliminary work to dismantle the air filter, remove the carburetor and the manifold itself. All of the above work is carried out exclusively on a cold engine.
Removing the air filter with housing
On the injection engine of a VAZ 2109 car, to remove the air filter, it is enough to unscrew the four self-tapping screws securing the cover of the filter element housing - for this, use a 10mm wrench or a ratchet. There will be a filter element under the cover. If the cover is difficult to lift, you can disconnect the mass air flow sensor from the plug.
On a carbureted engine, there are three latches under the hood that can be easily opened. There is a screw in the middle of the metal cover, which can also be unscrewed by hand, after which the cover is removed. Under the cover there is a filter element that must be carefully removed. Subsequently, during reassembly, the filter element can be replaced - if the time has come or if the filter element is very dirty.
Removing the carburetor
After the air filter has been removed, you can begin to remove the carburetor. To remove the carburetor on a VAZ 2109, you will need the following tools:
- two screwdrivers - flat and Phillips;
- 13 open-end wrench;
- head at 8;
- ratchet.
Instructions for dismantling the carburetor will be as follows:
- The coolant supply hose to the carburetor starter is disconnected from the fitting by unscrewing the fastening clamps. The coolant itself is drained into a previously prepared container.
- The exhaust pipe coming from the exhaust manifold and from the cylinder block bracket is disconnected.
- Then the throttle cable bracket is disconnected. To do this, first remove one end of the spring from the throttle control rod, and then remove the entire spring, then loosen the nut on the bracket and remove the cable from its engagement.
- The EPHH screw sensor is disconnected from the power plug.
- Two hoses and a vacuum tube are disconnected from the carburetor heating unit.
- The crankcase ventilation hose is removed.
- Unscrew the 4 nuts securing the carburetor to the intake manifold.
- The carburetor is removed carefully and without jerking - by lifting it from the studs.
The work of removing the carburetor is completed. The presented photos and videos will help you clearly follow the process of removing the carburetor.
Removing the intake manifold
After the work of removing the air filter and dismantling the carburetor is completed, you can begin to remove the intake unit. To do this you will need the following set of tools:
- open-end wrench 13;
- head 13 - regular and deep;
- ratchet and crank;
- ratchet with 10mm head.
The work order will be as follows:
- The platform located under the carburetor is bent back - to do this, two fastening nuts are unscrewed.
- All hoses leading to the manifold are disconnected.
- Six mounting nuts are unscrewed from the intake manifold.
- The intake manifold is removed from the studs - to do this, it should be slightly rocked from side to side, as it can burn to the gasket.
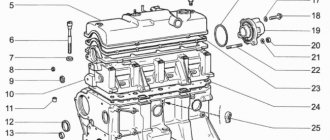
Removing the exhaust manifold
Removing the VAZ 2109 exhaust manifold will require the following tools:
- wrenches 13 - open-end and cap;
- deep head at 13;
- ratchet.
Work order:
- The four nuts securing the exhaust pipe are unscrewed from the manifold.
- The “pants” are pulled off the studs and moved to the side, then the remaining three nuts securing the manifold are unscrewed.
- The exhaust manifold is carefully and without jerking removed from the studs.
When removing the collectors, a problem may arise such as sticking of the studs and nuts - since the metal is constantly heating and cooling, a souring process occurs.
To make work easier, the fastening studs can be filled with WD 40 liquid in advance, about a day before starting work. This will make it much easier to remove the manifold for subsequent gasket replacement. \
If the pin breaks off when unscrewing, you just have to drill it out, and then cut a new thread and screw on a new pin.
Causes of malfunctions
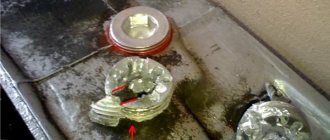
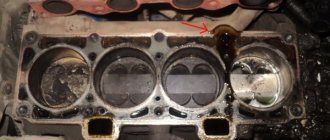
The gasket is placed between the exhaust manifold and the cylinder head. The stamped asbestos gasket is resistant to high temperatures, can be compressed (creating the necessary impermeability) and has increased strength. To enhance the latter quality, the exhaust manifold gaskets are additionally reinforced with steel.
IMPORTANT! The main task of the gasket is to prevent exhaust gases from penetrating under the hood, where they can cause ignition of parts/assemblies of the engine compartment.
The gasket is recognized as the most vulnerable point of the exhaust manifold, which operates under extreme loads in both temperature and pressure. It is not surprising that gaskets have to be changed not only on cars with significant mileage, but also on almost new cars.
Replacing the intake manifold gasket VAZ-2114 injector: video
Replacing the intake manifold gasket on a VAZ-2114 car, as well as replacing the exhaust manifold gasket, is a very complex procedure and requires certain knowledge and experience. Of course, you will have to do a colossal amount of work and spend a lot of time, but this will save 4-5 thousand rubles on replacement at a car service center.
Below he will talk about replacing the receiver and manifold. During the replacement process, the intake manifold gasket is also changed:
The material will tell you how to properly replace the intake manifold gasket, and will also tell you about some of the subtleties and nuances of the process.
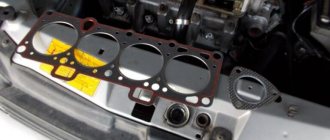
Gasket replacement process
Design diagram of the intake and exhaust manifolds
Since the gasket is located on the manifold studs, to replace it the unit will have to be completely dismantled. Of course, this operation will take a lot of time and effort.
Before the car enthusiast proceeds directly to the replacement process, it is necessary to collect the tools that will be needed. So, the tools without which replacement is impossible: ratchet and sockets for 17, 19; screwdrivers with flat and Phillips tips; a set of keys and the gasket itself.
The tools are assembled, now you can go directly to performing all kinds of operations. Before removing the manifold, you need to spray the bolts with WD-40, which will remove corrosion and allow you to remove the part without any problems.
Step-by-step instructions for replacing the intake manifold gasket (with photo)
Let's look at step-by-step instructions for replacing the gasket:
- Remove the negative terminal from the battery.
- We remove the throttle cable.
- We are dismantling the fuel pipes. More precisely, they need to be disconnected and taken to the side. Remove the fuel pipes shown in the photo
- Disconnect the throttle position sensor connector.
- Disconnect the idle air control wire connector.
- Unscrew the crankcase ventilation pipes and brake booster. Unscrew the pipes shown in the photo
- We are dismantling the receiver.
- Remove the wires of the injection control unit (injectors).
- We dismantle the fuel rail without dismantling the injectors.
- Remove the thermal shield from the manifold.
- Disconnect the exhaust pipe. This is the quality of nuts installed at the factory. We dismantle the exhaust pipe.
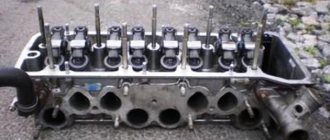
- Remove the exhaust manifold. Unscrew the fastening nuts and remove the exhaust manifold Removing the exhaust manifold
- After unscrewing the fastening nuts, remove the intake manifold. Removing the intake manifold
- We are replacing the gasket. We are replacing the gasket
- We carry out the assembly in the reverse order.
As you can see, the replacement of the intake and exhaust manifold gaskets takes place simultaneously and, by and large, is the same gasket material.
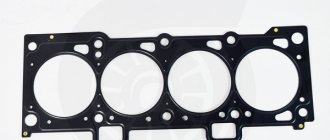
Part selection
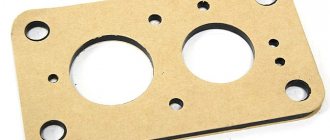
21083-1008081 – original catalog number of the gasket for the intake and exhaust manifold. It consists of two parts or, on newer models, one. This part is produced at the AvtoVAZ plant. The average cost is 250 rubles per piece (if there are two of them) or 450 rubles (for a whole one).
One-piece manifold gasket A gasket that consists of two parts A one-piece gasket and one that consists of two parts together
In addition to the fact that there is an original part, you can also find a number of analogues that are recommended for installation. Let's consider which gaskets can be installed under the VAZ-2114 manifolds:
- Trialli GZ 102 0013 is a well-known Russian manufacturer that produces a wide range of analog parts for domestically produced cars. The cost of the gasket is 200 rubles per piece.
- AJUSA 13065200 is another domestic manufacturer that has won consumers over the quality of its products. The cost of the product is 450 rubles.
- Ukrainian also produces and supplies this gasket. But, if you look at it, the quality of the product leaves much to be desired, since the resource is designed for only 20,000 km.
Causes of malfunction
After we have considered the process of replacing and selecting a part, it is necessary to consider the main reasons for the failure of the spare part:
Wear
During operation, the car emits hot gases that destroy the surface of the gasket, as a result of which it can tear or delaminate. Since there is only one gasket for the intake and exhaust manifolds, gasoline entering through the first channel can get on the gasket, which also affects the integrity and structure of the material from which it is made.
The quality of the part is not always high, even original, so when choosing, you should pay special attention to this. Bent valves due to irregular valve timing do not threaten the 8-valve valve
How much does a repair at a service station cost?
How much will it cost to replace the exhaust manifold gasket? The price for this type of work depends on the type of engine (carburetor, injection, 8-valve, 16-valve), the model of the seal itself, as well as the prices of the service station where you plan to repair your car.
On average, the work itself, together with the seal, costs somewhere around 1,500 rubles.
But you don’t have to spend money on work. Replacing the VAZ exhaust manifold gasket can be done on your own without much difficulty. Especially if you have a set of hand tools and you have even the slightest idea about the design of your car’s engine.
VAZ 2110: replacing the muffler with your own hands - instructions | MasteraVAZa
Exhaust system VAZ 2110
Replacing a muffler for a VAZ 2110 or its parts is not work that needs to be done systematically. It is not necessary to change parts of the exhaust system often, in cases where the muffler begins to make noise, its elements burn out, or in the event of a break in the connecting pipes. You can change any part of the muffler with your own hands. The VAZ 2110 exhaust system consists of a reception pipe (another name for pants), a neutralizer, a resonator (additional muffler), and a main muffler.
How to replace a muffler on a VAZ 2110
We are changing the muffler of the VAZ 2110, the replacement is made in the inspection hole:
- The muffler is connected to the resonator through an o-ring, which is installed in the pipe flare and compressed with a clamp that folds in two halves
- We remove the clamp, then the ring, it is graphite and does not stick to the metal.
Attaching the muffler to the resonator
- Removing the old muffler
- We check the condition of the suspension rubber bands located on the sides of the muffler body. If they have cracks or are stretched, they should be replaced.
VAZ 2110 muffler suspension rubber band
We install a new muffler, first on the rubber bands, then insert a graphite ring (preferably a new one) between the flares and compress it with a clamp.
So we replaced the muffler on the VAZ 2110, replacing the resonator is the next step.
Replacing the resonator
Resonator VAZ 2110
- The resonator is attached to the muffler using a crimp clamp with an O-ring;
- It is attached to the neutralizer by means of a floating flange (two bolts) and flaring;
- On the opposite side of the neutralizer there is a “fist”;
- It is often problematic to unscrew the knuckle mounting bolts; they are simply cut off with a grinder and replaced with new ones;
- If suddenly you don’t have a tool at hand, we clean the places where the bolts are attached and treat them with a “liquid wrench” (WD-40 or its equivalent);
- Unscrew the bolts and remove the muffler clamp;
- We remove the resonator from the suspension rubber bands, change the rubber bands if necessary;
- Then we hook a new resonator onto rubber bands and attach it to the muffler so that the pipe running from the resonator to the muffler is parallel to the ground;
- When there is wear on the neutralizer fist or there are burrs, grooves or rust on it, it is necessary to lubricate the connection with a special high-temperature sealant;
- Using new bolts and nuts, tighten the flanges of the catalyst and resonator;
- The neutralizer is attached to the resonator by means of a flange connection (two bolts), to the receiving pipe (pants) by means of a spring-loaded connection and a pair of flares, between which there is a graphite or metal-asbestos ring.
DoneDeal High Temperature Sealants
Thermostal 1400 (DD6799)
Designed for repair of steel or cast iron products operating at temperatures up to +1400°C: exhaust manifolds, cylinder heads, mufflers, catalytic converters, as well as water heaters, cast iron and steel furnaces, pipes, etc.
Forms a compound with diffusion into steel or cast iron. It sets in 3-4 hours, hardens and completely polymerizes after heating to operating temperature. Withstands temperature changes, vibration and shock loads.
Ceramic sealant for repair and installation of exhaust systems (DD6785)
Withstands high temperatures (up to +1400°C) and vibration.
To repair large burnt holes, use a steel patch 0.8-1 mm thick.
Symptoms that the exhaust manifold gasket has burnt out. Full list and action plan »
Symptoms that the exhaust manifold gasket has burnt out. Complete list and action plan
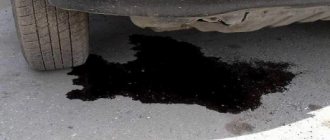
If the manifold seal is not replaced in a timely manner, the safety conditions for operating the vehicle are greatly reduced.
In general, a manifold is a device designed to remove exhaust gases from a car engine. The second function of the collector is to improve the filling of the working chambers and enhance the ventilation of the working space. All operation of the exhaust device is carried out at elevated temperatures and high gas pressure.
This element is attached directly to the head ( cylinder head
) and the other side is in contact with the exhaust pipe or converter. The most important task of the exhaust manifold gasket is to prevent exhaust gases from entering the valve space. These gases, in turn, can cause fire of parts or elements of the power unit.
Symptoms of a blown exhaust manifold gasket
The following can be distinguished: exhaust gases begin to flow into the car interior or their smell is felt; the car engine begins to start poorly; Strange sounds appear in the engine compartment. If these ailments are detected, you should begin to inspect the exhaust system. The collector itself is made of high-strength austenitic steel.
In this regard, burnout and replacement of the collector is quite rare. The main reason for the breakdown of the collector itself is drops of water falling on its hot surface, which leads to the formation of cracks in it.
The weak link of this durable and reliable element is the gaskets. Wear of the manifold gasket occurs mainly due to: poor quality of the material or very long operation under increased loads.
Manifold gaskets are now made from steel-reinforced, durable asbestos. However, even such a durable material is susceptible to destruction. The process of replacing the exhaust manifold gasket is not at all difficult.
Experts even recommend replacing the gasket after some time, without waiting for it to fail.
We carry out the following procedures:
- 1. Open the hood of the car;
2. Remove the air intake. Then remove the carburetor. Under these engine elements is the exhaust manifold;
3. Remove the thermal shield. It covers the collector;
4. Unscrew two nuts on each cylinder that secure the manifold;
5. Unscrew a couple of bolts from the exhaust pipe;
6. Remove the manifold;
7. There should be an old gasket or remains of it on the cylinder head;
8. We clear all the space for a new gasket;
9. Clean everything until it shines;
10. After cleaning, apply a graphite-based lubricant to the area;
11. Now install a new gasket;
12. Reassemble everything in reverse order.
Source
What is needed for repairs
Replacing the exhaust manifold gasket involves using the following means:
- set of spanners;
- slotted and Phillips screwdrivers;
- sharp knife or spatula (to remove old gasket);
- a container with a wide neck with a volume of at least 5 liters (for draining coolant);
- rust preventative (WD-40 or similar);
- dry rags.
Important: replacing the exhaust manifold gasket 2114, like other VAZ models, requires preliminary draining of the coolant. Otherwise, you risk flooding the engine intake windows with it.
Advantages and disadvantages of installing a spider on a VAZ 2170
After installing the “spider” on the VAZ 2170, Priora owners note the following positive changes in its operation:
- the car accelerates faster;
- the maneuverability of the car on the road improves;
- the engine sound is reminiscent of a sports car engine;
- the engine becomes more powerful up to 10 hp;
However, often a change in the design of the exhaust system associated with the installation of a spider can also have negative consequences:
- engine noise often becomes higher and is transmitted into the car interior;
- there is a need to reflash the electronic engine control unit after installing the spider.
The nuts securing the catalytic collector to the Priora cylinder head are difficult to access. In addition, the collector flange is sealed with a metal-reinforced gasket. The sealing gasket must be replaced every time the connection is disassembled. Before removing the catalytic converter, it is necessary to remove the intake manifold - this will facilitate access to its mounting.
- 1. Remove the decorative engine cover (see “Removing and installing the decorative engine cover for the VAZ 2171”).
- 2. Remove the wire from the negative terminal of the battery.
- 3. Disconnect the exhaust pipe of the additional muffler from the catalytic collector by unscrewing the nuts securing the exhaust pipe flange to the catalytic collector flange and remove the exhaust pipe flange from the studs of the VAZ 2170 catalytic collector flange (see “Replacing the additional muffler”).
- 4. Remove the air filter (see “Removing and installing the air filter”).
5. Remove the air supply hose and three hoses of the crankcase ventilation system of the VAZ 2170 (see “Cleaning the crankcase ventilation system”).
6. Disconnect the four connectors of the ignition module wiring harness and move the harness to the side. Remove the ignition modules (see “Removing and installing ignition coils”).
7. Remove the throttle assembly.
8. Remove the intake manifold of the VAZ 2172 (see “Replacing the cylinder head cover gasket of the Lada Priora”).
9. Disconnect the wiring harness blocks of the control and diagnostic oxygen concentration sensors from the engine harness...
10. ...and disconnect the holders of the wiring harnesses of the control and diagnostic oxygen concentration sensors from the heat-insulating shield of the steering mechanism
11. Unscrew the three nuts securing the thermal insulation shield of the Lada Priora steering mechanism to the engine shield and remove the shield.
- 12. Unscrew the two nuts securing the water pump supply pipe bracket, unscrew the bolts securing the catalytic collector to its mounting bracket, unscrew the eight nuts securing the catalytic collector to the Priora cylinder head and remove the catalytic collector. Disconnecting the catenary collector from the cylinder head and troubleshooting it is described in detail in the subsection “Replacing the catenary collector gasket”.
- 13. Remove the sealing gasket of the catenary collector from the cylinder head studs.
- Be sure to replace the sealing gasket of the catalytic collector and inlet pipe with a new one every time you disassemble the connection.
- 14. Clean the flanges of the block head and catalytic collector from the remains of the old gasket and carbon deposits.
Choosing a resonator for VAZ 2107
Four types of resonators are installed on the VAZ 2107:
- Long section with one tank. Installed on all classic carburetor VAZ 2101-2107 with an engine capacity of no more than 1.3 liters. Catalog number - 2101–1202005.
- Long section with two tanks. Installed on carburetor and injection VAZ 2106-07, complying with Euro 0 standards, with an engine capacity of 1.5-1.6 liters. Catalog number - 2103–1202005.
- A shortened pipe with one tank and a front mounting flange with two mounting bolts. Installed on injection VAZ 2106-07, meeting Euro 2 requirements. Catalog number - 21073-1200020.
- Short section with one barrel and a front flange with three mounting bolts. Installed on injection VAZ 2106-07, meeting Euro 3 requirements. Catalog number - 21074-1200020.
The choice of resonator depends on the specific modification of the VAZ 2107. When purchasing, you need to keep in mind the following recommendations:
- On the carburetor version with a 1.3 liter engine, you can easily install a long section with one (VAZ 2101-07) or two (VAZ 2106-07) tanks. In the second case, the sound of the running engine will become quieter, but the power will drop by about 3-5 hp. With. Shortened resonators will not work.
- Both long resonators are suitable for carburetor and injection VAZ 2107, corresponding to Euro 0. When installing a part with one tank, the exhaust noise will increase and the engine power will increase slightly. Short pipes cannot be installed.
- The exhaust system for Euro 2 is equipped not only with a catalyst, but also with an oxygen sensor (lambda probe) mounted in the exhaust pipe. For such cars, the original shortened resonator with a two-bolt flange or any long section is suitable. However, such a resonator is not suitable for the VAZ 2107 Euro - it is connected to another catalyst and differs in length.
- The exhaust system of the VAZ 2107, manufactured in accordance with Euro 3 standards, has two oxygen sensors. On the VAZ 21074 you can install the original short resonator or a long one, but with some modifications.
Once it was possible to modernize a 1.3 liter engine by increasing the displacement to 1.7 liters by replacing the crankshaft and boring the cylinders to size 82 mm. After which it was necessary to replace the “native” resonator with one barrel, because with an increase in engine power, the exhaust pipe began to roar more strongly, especially at speeds above 2500 rpm.
Installing long sections on the VAZ 2101-07 that comply with Euro 2 and 3 standards is advisable in cases where it is necessary to discard a failed catalyst. The latter is quite expensive, and not every car owner is ready to make a full replacement. In this case, after installing a long resonator pipe, you will have to install a snag instead of the second lambda probe or reprogram (reflash) the engine control controller.