Print this article Font size 16
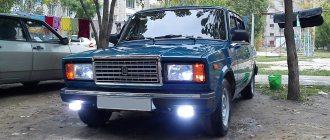
Fog lights or simply PTF are an important element of the lighting system for a car. Alas, not all manufacturers equip their cars with these devices. AvtoVAZ with its model 2114 is no exception. PTFs for the fourteenth are available only for an additional fee and in the most expensive configuration.
Not everyone sees the point in buying the most complete version just to get PTF. An excellent solution is to install foglights yourself.
Beautiful and effective
What are fog lamps for?
The main task of the PTF is to illuminate the space in front of the car. Correctly adjusted “fog lights” can illuminate a section of road 10–15 meters long. This distance is quite enough for safe movement by car in poor visibility conditions. The switching on and off of such lighting devices must be fully controlled by the driver.
Adjustment of fog lights is carried out during their installation. The procedure does not take much time, but requires care and precision. You can install the rear and front PTFs yourself.
The process of connecting fog lights on a VAZ 2114
When you have prepared everything, you can proceed to the stage of installing and connecting the fog lights. It is best to perform installation according to the instructions presented below, following the sequence of actions:
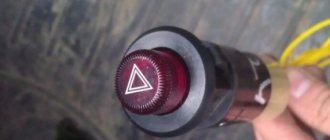
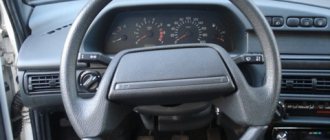
- Connecting fog lights on a VAZ 2114 begins with determining the location of the button on the dashboard. You can choose any one, but it is best to install it in the standard version by removing the plug.
- Remove the grille from the front panel. Behind it there will be two blocks used to turn on the headlights, indicate the operation of the fog lights and illuminate the button. The PTF connector is installed from the factory, regardless of the vehicle configuration.
- Having placed the button in the chosen location, we connect it, and then put the panel back together.
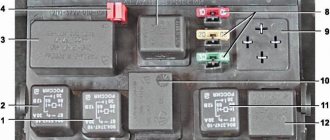
- We need to unscrew the fuse block, lift it and find two blocks numbered 7 and 8.
- We lay a harness of 4 wires with contacts that should be included in the kit to the block from the relay installation location.
- Afterwards we connect the relay. We will need a diagram for connecting fog lights on a VAZ 2114. We connect the wire from the 30th contact of the relay to block No. 8 of the mounting block to terminal 8. Contact 87 goes to terminal 1 of the same block. 85 is connected to block No. 7 at terminal 17, and 86 is supplied to ground.
- Voltage to the fog lights is supplied from the 2nd and 3rd contacts of the block at No. 8, and the ground is mainly secured to the nut of the headlights.
- From the 1st block from the 6th contact there is a wire to the 1st contact of the external lighting switch, and from the 4th block of the mounting block from the 4th contact to the 2nd contact.
- Then you need to connect the control button. Pins 5 and 19 of pin 4 of the block are involved here (you can see more details in the diagram described above).
Remember that the connection must be made through a button and a relay!
- Next, you should install the fog lights in the right place. If you already have a standard bumper that has holes for fog lights, then just install them in the stock place.
- If not, prepare the holes. To do this, it is better to use GOST, which states that PTFs must be installed at a height of at least 250 mm above the ground, and no more than 400 mm from the overall width.
- Before cutting, it is better to find the owner of a VAZ 2114 with PTF already installed, measure the bumper and prepare a stencil for the holes.
- Afterwards we transfer all the dimensions to our bumper. We trace along the stencil and start cutting. Once the hole is cut, it is worth finishing it with a file to even out the edge.
- If everything is done correctly, you can install “glasses” in the bumper, and if everything fits, it will not differ from stock.
Installation diagram of fog lights
The connection of fog lights is carried out according to certain rules. They, first of all, relate to the placement of PTF on the car. The locations for installing headlights are strictly defined.
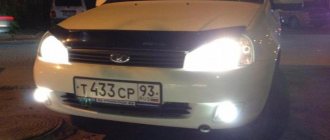
Layout of daytime running lights
Manufacturers of modern car models pre-mark the PTF installation locations on the bumpers. As a rule, such lighting elements are most often available in the luxury version of the car. If the headlights themselves are missing, then their installation sites are closed with special plugs.
Distance at which fog lights can be placed
Required parts and tools
If you decide to install fog lights on a VAZ 2114 yourself, in addition to the kit of the element itself, you need to have a suitable tool for the job on hand:
- Drill and drill bits;
- File;
- Electric jigsaw;
- Tape measure and marker.
Don't forget that additional wiring will be required, so you will need:
- Set of wires;
- Electromagnetic relay;
- PTF power button;
- Ties and clips for fixing wires.
Perhaps everything will come as a set when purchasing fog lights, but it is best to purchase according to the list and not be distracted during the work by unnecessary trips to the auto store.
Useful : 7 reasons why foglights do not light up
The fog lights must be connected via a button and a relay, since the system has high battery consumption. If you neglect this advice, you may later encounter problems with rapid current consumption while parked. A kit for connecting fog lights can be found in car stores, the price is about 500 rubles. And light elements from a good company Bosch will cost about 1000 rubles.
Checking the functionality of the PTF
After the work has been carried out to connect the fog lights on the VAZ 2114, it is worth checking their functionality. If everything is done correctly, then when you turn on the side lights and press the button, voltage will begin to flow to the relay, after which the lights should light up. If you turn off the headlights, the fog lights should also go off, regardless of the position of the button. If everything is done correctly, then the next step is to adjust the light beam so as not to blind oncoming drivers. Having done this by eye, the light from the fog lights should be 10-15 meters ahead of the car, but no more. It is best to contact a service station with special equipment to adjust the headlights, or read more detailed instructions on how to do it yourself. Useful: How to adjust headlights and PTF on a VAZ 2114? Correct adjustment is the key to safety on the road, not only for you, but also for other road users. By installing fog lights, car enthusiasts want to get not only direct functionality, but also improve the appearance of the car. Since public roads require driving with the optics always on, fog lights can take over this function. Thus, you can install high-quality lamps in them and spend less on constantly replacing burnt-out light elements in the headlights. As described earlier, at the most unexpected moment, PTF can help you out when visibility deteriorates when driving along the highway during fog.
Car electrical equipment
1 — lighthouse block; 2 — gear motors for headlight washer*; 3 — fog lights*; 4 - room temperature sensor; 5 — sound signals; 6 — engine compartment lamp switch; 7 — electric motor of the cooling system fan; 8 — VAZ 2114 generator; 9 — low oil level indicator sensor; 10 — washer fluid level sensor; 11 — front brake pad wear sensor; 12 — cable lugs connected to the common windshield washer pump**; 13 — windshield washer pump; 14 — headlight washer pump*; 15 — end of the cable for connecting to the rear washer pump on VAZ 2113 and VAZ 2114 cars; 16 — low oil pressure indicator sensor; 17 — engine compartment lighting lamp; 18 — wire tip for connection to the engine control system harness or to the ignition system harness on carburetor vehicles; 19 — electric motor of the windshield wiper; 20 — VAZ-2114 starter; 22 — pressure gauge for coolant temperature indicator; 23 — reversing light switch; 24 — sensor for insufficient brake fluid level indicator; 25 - battery; 26 — sensor for insufficient refrigerant level indicator; 27 — relay for turning on fog lights; 28 — mounting block; 29 — brake light switch; 30 — socket for a portable lamp; 31 — illumination lamp for the beacon’s hydrocorrecting scale; 32 — parking brake warning lamp switch; 33 — block for connecting the backlight; 34 — switch for instrument lighting lamps; 35 — switch on the steering column; 36 — alarm switch; 37 — front seat heating element relay; 38 — ignition switch VAZ 2114; 39 — rear fog lamp circuit fuse; 40 — fuse for the heating element circuit of the front seats; 41 - locking circuit fuse; 42 — front ashtray lighting lamp; 43 — ignition relay VAZ-2114; 44 — cigarette lighter; 45 — glove compartment lighting lamp; 46 — glove compartment lighting switch; 47 — heater fan electric motor; 48 — additional resistance of the heater electric motor; 49 — heater fan switch; 50 — heater switch backlight; 51 — lamp for illuminating the heater levers; 52 — Gear motors for electric windows of the front doors; 53 — right front door power window switch (located in the right door); 54 — gear motors for front door locks; 55 — cables for connecting to the front right speaker; 56 — gear motors for locking the rear doors; 57 — cables for connecting to the rear right speaker; 58 — control unit for locking doors; 59 — cables for connecting to radio equipment; 60 — wiper switch; 61 — rear window resistance switch; 62 — relay for turning on rear fog lights; 63 — connection block to the resistance of the right front seat; 64 — rear fog light switch: 65 — right front seat heating element switch; 66 — fog lamp switch; 67 — switch for external lighting lamps; 68 — left front seat heating element switch; 69 — connection block to the resistance of the left front seat; 70 — cables for connecting to the front left speaker; 71 — left front door power window switch; 72 — front right door window switch; 73 — cables for connecting to the rear left speaker; 74 — side direction indicators: 75 — light switch on the shelves of the front doors; 76 — light switch on the rear luggage racks; 77 - ceiling; 78 - ceiling of individual internal lighting; 79 — block for connecting to the wiring of the electric fuel pump VAZ 2114; 80 — trunk light switch; 81 — instrument panel: 82 — trunk lighting lamp; 83 — display unit of the on-board monitoring system; 84 — on-board computer (not in all models); 85 — block for connecting the wiring of the engine control system; 86 — external rear lights VAZ-2114; 87 — interior rear lights; 88 — connection block to the rear window heating element; 89 — license plate illumination; 90 - additional brake signal located in the spoiler.
In the dashboard wiring, the second ends of the white wires are brought together into one point, which is connected to the instrument lighting switch (except for the white wire, from plug “4” of block “X2” of mounting block 28 to the connector of the display unit 83 of the on-board control system). The other ends of the black wires are also connected at the grounding points. The second ends of the yellow wires with the blue stripe are connected at a point connected to the "4" plug of the "X1" mounting block. The second ends of the white wires with a red stripe are connected at the connection point to the “10” plug of the “X4” mounting block. And also the second ends of the orange wires are connected at the point connected to plug “3” of the “X4” block.
see also
Comments 29
I'll tell you which ones later
I connected the wires and they also get hot
Hello I have a VAZ 2112, I want to change the instrument panel From Priora I can’t find the exact connection diagram Please send the diagram Thank you in advance
It’s easier to take it to an electrician)) and it’s a molorik))!
I connected everything according to your diagram. But my front PTFs don’t work. I don’t know why. And when I rearranged the main wires (Fig. 1), I was left with green wire 56. It went along the old block to the front PTF. But on the new PTF button there is no longer room for this wire. Where did you connect it?
Having connected according to your diagram (low and side) I got this - when you turn on the side, the ignition and side turn on, there is no front... maybe I mixed something up... I can’t figure it out ((((
Look at contacts 58,X X-ignition is on 58-gabor 30-constant plus When the button is turned on, the ignition goes from 30 to 58 and the side light is ON When power comes to X, you can turn on the low beam and the power goes to 56, the low beam turns on
Having connected according to your diagram (low and side) I got this - when you turn on the side, the ignition and side turn on, there is no front... maybe I mixed something up... I can’t figure it out ((((
the problem was in contacts 5 and 6, I swapped them and everything worked
very useful information, I will try your scheme and connect over the weekend)
Guys, thank you very much for the information, the diagrams really saved me! I'm replacing the 2112 panel with a Euro one, using viburnum as the donor. The tidy is already connected, button crap with 10 is difficult to redo without pads
The circuits are real, I developed them myself for two weeks, by mistake and error, everything was connected in my previous car, everything worked like stock.
And were the button lighting illuminated when the dimensions and low/high beams were on?
Yeees! The backlight did not turn off after turning on the dimensions until the dimensions were turned off =)
Do your double button lights come on after ignition?
no, when you press the taillights button, all the interior lights and the parking lights in the front and rear come on.
Well, there’s a feature of these buttons - you turn on the ignition and the button icons of the double button are highlighted, that’s what pin 4 is there for
haha, what a feature in a Russian car)) it’s illumination of the buttons, as well as the instrument panel, heater and cigarette lighter flaps, as well as the inclusion of side lights in the front and rear headlights. And after turning the key, you turn on the ACC function - this is the fuel pump, there is a backlight on the route computer or computer, a light in the driver's compartment, the ability to lower and raise the windows.
There is no trick in a Russian car, just like in foreign cars, after turning the size button on the turn signal brush, we turn on the backlight.
But if everything suits you, then let it remain that way. It won’t make it any worse, you just won’t be able to turn on the backlight, for example, without a key, and you won’t be able to turn on the light in the trunk without a key.
And what’s even worse is that you feed all the elements, at night, in order to look at the instrument panel and illuminate it, you’ll be idling the gasoline, pumping it in and then sucking it out. and this can lead to the rapid death of the fuel pump)
In general, good luck to you, think for yourself.
Do your double button lights come on after ignition?
The white and black wire that came to the light bulb before, look at the black one, this is ground. and white comes from fuse F1, and to fuse F1 a plus comes from Relay K1 - a relay for monitoring the health of the lamps, but to K1 a constant plus comes from the battery