Modern domestically produced cars have moved away from the classics. Standard clutch adjustment of the VAZ 2114 and other vehicles of the family is performed by tightening the cable rather than by adjusting the hydraulic mechanism, which increases the reliability of the unit. This mechanism requires periodic adjustment - the steel cable tends to stretch under load, which disrupts the original characteristics.
The drive must be tightened in such cases.
- Violation of the accuracy of gear shifting - squeaks, crackles or other extraneous sounds emanating during manipulations with the gearbox.
- There is a dissonance between the increase in engine speed and the acceleration of the car. This is a clear sign that the clutch disc is slipping under load. A secondary symptom is a burning smell after sudden acceleration or dynamic acceleration.
- The pedal fails or spontaneously rises or falls relative to the reference value.
- The clutch engages early or late, which leads to the car jerking while shifting into gear.
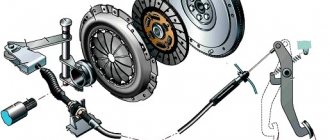
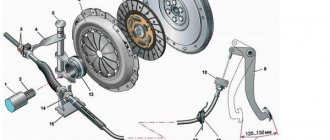
Clutch device VAZ 2114
Similar to tenth generation machines.
Mechanical traction is used here, where a steel cable is installed as a working element.
Clutch diagram
Sequence of elements in the clutch chain.
- Pedal.
- The hinge connecting the lever and the cable rod.
- Directly to the highway.
- Adjustment coupling.
- The coupling joint of the cable and the release fork.
- Friction mechanism.
Briefly about the design of a friction clutch and its purpose
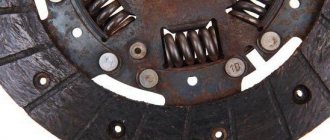
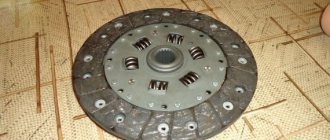
Consists of a basket, clutch disc, release bearing, friction linings.
A simple mechanism is designed to disconnect the gearbox from the engine to allow gear changes.
Clutch operating principle
Conventionally, the principle of operation can be described as follows.
- The driver presses the pedal.
- The cable is tensioned and drives the release device through the fork.
- The springs in the basket are compressed, and the driving part is disconnected from the driven part.
- The motor is disconnected from the gearbox.
Symptoms of a problem
When visiting a service station, users most often describe the following symptoms:
- presence of extraneous noise when shifting gears;
- the lever does not stick into position;
- at the start or during acceleration there are jerks and twitches;
- dynamics are lost;
- fuel consumption increases.
How the clutch works (briefly)
The clutch is controlled by a pedal located inside the car. Connection to the plug is made using a cable located in a protective casing. Let's imagine that the gearbox lever is set in the neutral position, and after the engine starts, the crankshaft begins to rotate. The basket presses the disc tightly against the flywheel. By pressing the pedal, we release the mechanism and torque is not transmitted from the engine to the gearbox; at this time, we engage first gear if we need to get underway, and smoothly release the clutch. The disk again begins to press against the flywheel, transferring torque from the engine to the gearbox and the car moves off.
If the force from the engine is suddenly transferred to the gearbox, the car will stall due to the load. The smooth operation of the mechanism allows you to extend the life of components.
Replacing the clutch mechanism
A complete replacement of the mechanism is required only if the friction device is critically worn or seriously damaged.
To remove the clutch you will need:
- drive the car onto a lift or inspection hole;
- remove the front left wheel, air filter and battery;
- unscrew the wires and cables coming from the gearbox;
- remove the gearbox and engine mount;
- next you will need to unscrew all visible bolts holding the box in place;
- carefully pulling out the gearbox, remove it and place it on previously prepared boards;
- On the dismantled unit, unscrew the clutch basket and all additional parts.
The new basket should be installed with a special guide, which will allow it to be secured evenly.
Symptoms of a problem
Over time, the element, like many others, wears out. Because of this, the following symptoms appear:
- Slipping. This happens due to wear of the clutch disc, it loses its properties and can no longer provide a reliable connection between the engine and gearbox. This is felt when you press the gas pedal, the speed begins to rise, but the car does not accelerate.
- The clutch drives. The opposite situation is the previous one, when the disc is not released, which is why the gearbox is not completely disconnected from the car’s engine. Switching the box is accompanied by sharp sounds. This happens due to overheating of the disk, which changes its shape, making it a figure eight.
- The free play of the clutch pedal has increased. This happens due to the stretching of the cable. During operation, it begins to stretch, so the mechanism may also not fully unclench.
In all cases, you can try to eliminate the malfunction by adjusting the clutch.
Repair tool
You will need the following tools and accessories:
- Clutch kit - disc, release bearing, basket, bolts. It is imperative to change the driven disk. The leader (basket) is changed less often and has a much higher resource.
- A set of open-end wrenches, spanners, and sockets.
- Screwdrivers, pliers, chisels.
- Container for draining oil from the box. It will be necessary in any case, regardless of the substitution method you choose.
- Better than two jacks. The second one, when removing the box, should be installed under its crankcase to keep it at the same level and prevent it from falling.
- Supports for the car and wheel chocks.
- The presence of an overpass, pit or lift is welcome.
Having all these devices, you can begin the repair. If you have experience, then the whole procedure should take an hour or two. But if you are doing this for the first time, it will take more time.
Replacing the Release Bearing VAZ 2115 ~ AUTORUSERVIS.RU
VAZ 2114 clutch release bearing - do-it-yourself replacement
The VAZ 2114 release bearing is a clutch element that is located in the clutch. The assembled clutch mechanism is designed to transmit axial force to the pressure plate, which removes the driven flange from engagement, as a result of which the torque of the motor is not transmitted to the gearbox.
Replacing the release bearing of a VAZ 2114 is a repair that is distinguished by the complexity of the process of dismantling the unit, since in order to change the part, the gearbox is first removed. Note that it is also possible to change the bearing without removing the gearbox, but at the same time, the complexity of the repair and the risk of incorrect replacement increase.
A clutch with a release bearing (VP) is a mechanism specifically involved in the operation of the clutch, therefore a malfunction of this unit is unacceptable. If you hear a hum or noise when the clutch operates, the bearing or sometimes the clutch assembly will need to be replaced.
A detailed summary is accompanied by 50 photos with several videos. First of all, the article is intended to help you correctly and correctly remove the speed unit, check the condition of the gearbox with the clutch, and change parts as needed.
Specific diagnostics consist of checking the functionality and presence of the following signs of failure.
Signs of a malfunction of the VAZ 2114 clutch release bearing, if detected, will require its replacement:
- When you press the clutch pedal, you hear noise, rumble or knocking (rolling, internal vibrations occur due to damage to the tracks with rolling elements, deformation of the separator or the clutch itself).
- A whistle when the clutch is engaged makes you realize that the quantity or quality of the lubricant is not enough;
- The speed does not change or the pedal moves hard (occurs when the clutch has fallen apart, as well as if the ear of the release bearing is broken).
- Watch a video example of how the release bearing of a VAZ 2114 makes noise and hums, as well as how the check is carried out. You can also hear the noise of the bearing after disassembling the box after removing the VP.
Video: “How to check a release bearing”
Video: “How a faulty release bearing makes noise”
Adjustment process
How to adjust the clutch on a VAZ 2114? The process occurs according to the following points:
- We install the vehicle at the work site. It is not necessary to use a room with a pit or an overpass, since the work is carried out in the engine compartment of the car, and it can be done on a regular flat area.
- To gain access to the cable connection point, you must remove the air filter housing.
- The process of adjusting the clutch pedal begins with measuring the pedal travel distance. It is necessary to take measurements several times with high precision down to millimeters.
- Ideal performance for the VAZ 2114 would be 12.5 -13.5 mm. In other cases, the cable needs to be adjusted. Turning it counterclockwise will lower the pedal closer to the floor; turning it clockwise will raise it.
- We carry out the procedure until we achieve a result that falls within the norm of indicators. After that, tighten the nuts and squeeze the clutch a few more times to make sure the tightening is correct.
The video demonstrates clutch adjustment on a VAZ 2114:
While performing work, inspect the condition of the cable for breaks, corrosion or fractures. If there are such defects, it is better to immediately replace it with a new one.
After assembly and completion of all work, you should check the operation of the mechanism in motion. A good indicator of a correctly adjusted clutch will be activation already in the middle of squeezing, that is, 6-7 cm of the pedal from the floor.
In what cases will the mechanism need to be repaired?
When the clutch cable adjustment is done correctly, you need to find out if the clutch drive is working correctly. To do this, place the car on a level surface and put on the handbrake. We start the engine and engage first gear. Afterwards, you should start to smoothly release the clutch and try to drive the car. If the mechanism is adjusted correctly, the car will sit slightly on the rear and then stall. When the clutch pedal on a VAZ 2114 is completely released, the car remains standing still, this means that the disc is slipping. This occurs due to insufficient pressing force of the disc against the basket and flywheel. If this happens after adjustment, then the clutch requires repair.
In the opposite case, when you try to engage a gear, but it happens with great difficulty, this means that the clutch is driving. The disk has changed its shape so much that even with the clutch fully adjusted and the pedal pressed all the way, it is not released from the load and continues to keep the mechanism in tension. Before purchasing a new element, it is worth disassembling the mechanism and assessing the condition of the parts. If a complete replacement is required, except for the flywheel, such a kit costs about 3,000 rubles. Remember that when replacing the mechanism, it will also be necessary to properly tighten the cable so that the element works correctly.
The clutch often fails among motorists with an aggressive type of driving. To extend the operating time of the mechanism, it is enough to follow several rules:
- Drive smoothly;
- Do not keep the pedal half-pressed;
- Do not skid the car;
- Do not engage or disengage gear under load;
- Do not tow heavy trailers or vehicles;
- Do not over-switch.
It is also worth making adjustments in time, since in case of incorrect operation the circuit changes. There may be an increased load on the disk, it will start to burn and after that more serious problems appear. Try to feel your car, react in time to incorrect clutch operation and service it. Then it will serve you longer.
Noise when disengaging or engaging the clutch
A noise similar to rustling, grinding, a slight hum, or howling appears when the unit is turned off. When turned on, it disappears. With almost one hundred percent probability we can say that the release bearing has worn out. Replacing it does not require removing the entire component. However, its untimely replacement leads to failure of the entire mechanism. A squelching, whistling sound when you press the pedal is associated with wear on the master or slave cylinders. There is pressure, the broken part does not hold it - the liquid breaks through further, making noise. The noise in the box disappears only when the clutch is disengaged.
The second type of sound is constant, disappears only when the gear is disengaged, and is located in the area of the gearbox. The nature of the “tinkling” of Lada Vesta is a weakened connection between the three main nodes.
The worn driven circle loses its volume and begins to dangle inside the housing. Worn dampers are not able to press the circle tightly. The box is not tightly connected to the engine. Replacing the clutch on a manual gearbox
The procedure is very complicated. The main difficulty is not even that the gearbox needs to be completely removed, but that during assembly it needs to be centered in weight with the flywheel. Repairs can be done with your own hands. But if you do not have the proper experience, saving is not worth it, because we are talking about direct contact with the most important “organs” of the Lada. In general, the process looks like this:
- We de-energize Vesta, remove all attachments that block access to the gearbox mounting bolts (air filter, pipes);
- To prevent the loose internal combustion engine of the Lada from falling, we will hold it with a small diamond-shaped, barrel jack;
- We unscrew the power fasteners so as not to drain the oil, dismantle the box assembly with drives;
- We loosen one by one, then unscrew the fastening elements of the engaging mechanism housing (the bolts here are strong, but small in diameter, you need a good 8mm wrench). We remove the part and find the defect;
- We install the new product, adjust the position of the driven circle inside with a special tool;
- We change the release bearing in the box housing;
- Smoothly, without tilting, the input shaft of the gearbox hits the flywheel splines;
- We check the operation of the drive.
Not all operations are described here. For example, in order to remove the gearbox with drives, it is necessary to dismantle the suspension arms and so on.
The connection mechanism between the box and the engine is a “vitally” important element. Like any detail, it loves careful handling and timely service. The mechanism is directly connected to the internal combustion engine and gearbox; prolonged use of a faulty part can damage these two components. Do not neglect any suspicions that a unit is malfunctioning. May the car serve you for a long time.
How to properly adjust the clutch pedal
- There is a nut under the clutch pedal. This nut must be unscrewed for further work with the pedal.
- Below this nut is a lock nut. Tighten the locknut until it stops.
- There is a fastener under the clutch pedal that needs to be tightened.
- The rubber washer must be screwed all the way so that the washer and fork are located tightly to each other.
- Next you need to screw the fastener onto the tip. This is done in order to increase the pedal stroke. Accordingly, in order to reduce the pedal stroke, it is necessary to unscrew this fastener. It is recommended to unscrew or tighten the fasteners on the VAZ 2114 to 12-13 mm. This distance is the most favorable for use.
- After all the work you have done, you need to check whether everything is functioning correctly. To do this, you need to depress the clutch pedal three times. Measure the pedal stroke length. If the distance does not correspond to the required one, this means that the pedal needs to be adjusted further. This work must be done until the desired result is obtained.
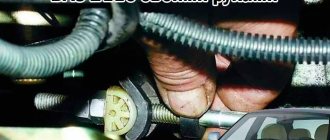
There are several reasons why your car's clutch may fail and fail. One of them may be incorrect or insufficient adjustment of the clutch cable. To begin adjusting the clutch cable, you need to find the adjusting nut. The adjusting nut is located in the engine compartment of the car on the drive cable sheath, which is inserted into a special bracket. The bracket, in turn, is fixed to the gearbox housing.
To adjust the clutch cable, perform the following steps:
- Use one 17 mm wrench to hold the adjusting nut.
- Using another similar wrench, unscrew the locknut several turns.
- Holding the locknut, rotate the adjusting nut to the desired result. To increase the pedal stroke, turn the nut clockwise, and to decrease it, turn it counterclockwise.
After you have adjusted the adjusting nut, lightly tighten the locknut. To check, press the clutch pedal several times. If you are not satisfied with the result and the resulting distance does not correspond to the norm, tighten the nut until you achieve the required result. When the resulting figure reaches the required standard, then we can consider that the adjustment has come to an end. After all work is completed, tighten the locknut.
Photo gallery
Photos of the procedure for changing the cable and adjusting the pedal position are shown below.
1. Unscrew the nuts securing the cable in the engine compartment
2. Disconnect the end of the product from the clamp
3. Install the new product and securely fix it in the installation location
4. Adjust the cable position
Video “Setup Guide”
User Sergey Serge published a video that clearly demonstrated the procedure for changing the position of the pedal, indicating all the nuances of this task.
Do you have any questions? Specialists and readers of the AUTODVIG website will help you ask a question
Was this article helpful?
Thank you for your opinion!
The article was useful. Please share the information with your friends.
Yes (100.00%)
No
X
Please write what is wrong and leave recommendations on the article
Cancel reply
Rate this article: ( 7 votes, average: 4.57 out of 5)
Discuss the article: