The design and principle of operation of the ignition on a VAZ
The engines produced for these VAZ models differ only in volume, but have no structural differences. They are equipped with both contact and non-contact ignition systems.
The first case is when the contacts are opened mechanically, and in the second case a Hall sensor is used, with the help of which the moment a spark is supplied to the combustion chamber is determined.
Checking and adjusting the marks on the eight-valve injection valve
To adjust the ignition you will need the following tools:
- jack;
- wheel wrench;
- key (head) 10;
- key to 13;
- key to 17;
- key to 19;
- large slotted screwdriver;
- flashlight.
It is also advisable to involve an assistant.
Work order:
- We install the car on a horizontally flat surface. We block the rear wheels.
- Using a wheel wrench, unscrew the bolts securing the right wheel and jack it up. Unscrew the bolts completely and remove the wheel.
- Open the hood, use a 10 mm socket to unscrew the three bolts securing the front protective cover of the timing drive. Let's take it off.
- Using a 13mm wrench, loosen the generator belt tensioner nut and remove the belt.
- Using a 19mm wrench, unscrew the nut securing the generator pulley. To do this, you will need an assistant, whose task is to hold the brake pedal in the cabin when fifth gear is engaged. When all this is done, you will have the opportunity to see all the ignition marks of the VAZ-2110.
- We rotate the front wheel so that the lug on the camshaft gear clearly coincides with the protrusion on the rear timing drive cover. When they are aligned, take a flashlight and look at the position of the mark on the crankshaft pulley. It should point to the test point located on the oil pump cover. If they coincide, without letting go of the flashlight, we move to the engine compartment and compare the position of the marks on the flywheel crown. When the ignition is set correctly, it should also be aligned with the mark on the gearbox housing. In this case, everything is in order with the valve timing. The ignition marks are in their places. If, although the marks on the camshaft and the rear cover coincide, the tide on the crankshaft gear does not coincide with the point on the oil pump cover, it is necessary to make an adjustment.
- Using a 17 key, unscrew the timing belt tensioner pulley. We remove the belt.
- Without touching the timing shaft gears, rotate the wheel until the mark on the crankshaft pulley coincides with the marked point.
- We insert a slotted screwdriver into the inspection window so as to immobilize the flywheel.
- Carefully, so as not to change the settings, put the belt on the camshaft gear and crankshaft pulley. We tighten the tensioner pulley and fix it. Check to see if the marks have gone astray. If necessary, repeat the procedure.
Contact ignition
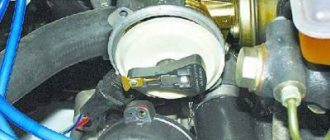
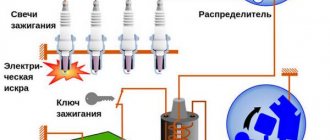
The system consists of: high voltage coil, contact group, distributor, distributor cover, vacuum and centrifugal regulators, resistance, spark plugs and wires.
- The system works as follows. When the piston is at TDC, the coil windings open.
- At this time, high voltage is directed from the distributor cover through the wires to the spark plugs, with the help of which a spark appears in the combustion chamber and, accordingly, the working mixture ignites.
As the engine speed increases, the advance angle undergoes changes, and the centrifugal regulator changes it to the required level.
In turn, the vacuum regulator changes the angle in proportion to the vacuum in the intake manifold. Thanks to this, the engine operates with the required power at any crankshaft speed.
What is ignition timing
Optimal ignition timing is achieved by adjusting its timing. This value is characterized by the angle of rotation of the crankshaft at which voltage is applied to the spark plug before the piston reaches top dead center. Naturally, it cannot be permanent.
In order to determine the required advance angle, it is necessary to take into account the quality of the fuel, since the combustion time of the mixture, as well as the number of engine revolutions, depends on it.
Signs of incorrect ignition on VAZ cars
Setting the ignition timing on a vehicle is necessary if the internal combustion engine is being repaired or the distributor is being dismantled. Also, during operation, it undergoes wear and tear, like any other engine systems, and accordingly the following signs of malfunction may appear:
- The motor does not start or has interruptions in operation. Provided that the combustible mixture is supplied correctly, the malfunction may be an incorrect setting of the advance angle, slipping or stretching of the timing chain.
- Poor acceleration and inelasticity of the engine. This means that the combustible mixture is not ignited at the required piston stroke position, which leads to a deterioration in the efficiency of the internal combustion engine.
- High gas consumption. This effect occurs under conditions of late ignition. Part of the combustible mixture does not have time to burn and flies out into the exhaust manifold. In such cases, you can hear characteristic popping noises in the exhaust while the engine is running.
Hard work of the internal combustion engine. This occurs under conditions of early ignition, when the working mixture ignites when the piston position has not reached top dead center.
In such cases, you can hear a characteristic ringing sound in the engine. Such symptoms can lead to burnt out exhaust valves.
When is it necessary to set the ignition by marks?
Setting the ignition by marks is necessary when replacing:
- timing belt (scheduled or after a break);
- camshaft gears, pump, tension roller;
- crankshaft pulley;
- flywheel.
In addition, the ignition is checked and adjusted if problems arise with the timely ignition of the mixture. Most often, such problems are caused by the timing belt stretching or “licking” its teeth. If the belt “jumps” even one tooth relative to the mark, the engine will operate in emergency mode.
Instructions
There are several popular methods for setting the ignition angle on VAZ cars.
Installation with strobe
In this option, you do not need to remove the distributor and valve cover, and the installation time will not exceed five minutes.
- Loosen the distributor nut, noting its initial placement in advance.
- We connect the negative wire of the strobe to the ground of the car, and the “plus” wire to the coil and a special clamp to the wire of the first cylinder.
- The light beam, strictly directed at the pulley, will accurately show the optimal location of the distributor.
By gradually turning the distributor, it is necessary to correctly align the marks on the crankshaft pulley and the marks on the front timing cover. We fix the distributor nut.
Installation by marks
The mark on the pulley number 4 is combined with the mark on the front cover. The values of the marks are as follows: 1-100 degrees, 2-50, 3-00. When installing the ignition. when the engine is running on 92 gasoline, the mark for 0 degrees is selected.
We set the ignition to the light bulb
Before starting the installation, you need to take a 12-volt light bulb and solder two wires to it. Then, using a wrench, turn the crankshaft to the TDC position of the piston of the 1st cylinder.
- We place the marks opposite each other on the crankshaft pulley and the front cover.
- Remove the distributor cover so that the distributor is in the position of the first cylinder.
- We attach one of the wires from the light bulb to the ground of the car, and the second to the low-voltage wire inside the distributor.
- Turn on the ignition. If the ignition is installed correctly, the light will not light up.
- Otherwise, we install the distributor in such a position that the light does not light (i.e., the contacts are open).
When using this installation method, the light bulb can be replaced with a multimeter.
Installation by ear
Warm up the engine to operating temperature. Then loosen the nut securing the distributor. Slowly turn the distributor to the right and left until the engine operates optimally at idle without unnecessary knocking or detonation. Tighten the distributor fastening nut.
How is the advance angle adjusted?
In injection VAZ-2110 cars, ignition adjustment is carried out by an electronic control unit. It receives the necessary information from the crankshaft position sensor and, based on it, determines the moment when it needs to fire a spark. But this only happens when the valve timing is set correctly. Otherwise, everything can happen exactly the opposite.
The advance angle in carburetor engines is also adjusted automatically. A vacuum corrector is used for this. The principle of its operation is to change the advance angle depending on the number of engine revolutions. This happens due to the difference in pressure arising under the throttle valve of the carburetor, to which the corrector is connected by a tube.
In addition, the advance angle is also manually adjusted by rotating the ignition distributor cap in one direction or another. This is a kind of rough tuning that allows you to adjust the engine to the quality of the fuel.
Contactless ignition system for VAZ
When installing such an ignition, the engine starts better when cold, there is no need to adjust the gap on the contacts, the spark will be more powerful, the service life of the spark plugs will increase and, moreover, it is more reliable in contrast to the contact one.
- As in the case of contact ignition, we align the marks and the piston of the first cylinder to the TDC position.
- We remove the old contact distributor, having first removed the negative terminal of the battery. We install contactless.
- Next, using a strobe light, we set the required ignition timing.
What are tags and why are they needed?
For the convenience of adjusting the gas distribution phases, each car engine has corresponding ignition marks. They are applied to the drive elements of the gas distribution mechanism.
Installing the ignition according to the marks consists of aligning them correctly. You may ask why is this necessary? The essence of combining the marks is to correctly set the valve timing. If this is not done, the camshaft and crankshaft will rotate asynchronously, which will lead not only to failures in the process of ignition of the mixture, but also to the destruction of the engine itself.
Photo instructions on how to set the ignition on a VAZ
How to make adjustments
This process involves setting the ignition angle to the initial state. At VAZ this should be done as follows:
- The crankshaft pulley is installed.
- The distributor is installed.
- We start and warm up at a temperature that must be considered working.
- We try to start with a hot engine. If you perform this procedure at an early stage, the starter will not turn as it should.
After the VAZ 2107 contactless ignition has been installed, you should perform a test drive. In this case, it is recommended to pick up a speed of 30-40 kilometers per hour, and then engage the “fourth” gear. As soon as the gear has been engaged, it is necessary to give as much gas as possible. If the contactless ignition kit has been installed correctly, the driver will hear a small ringing sound after a few seconds. After this, the engine will begin to work as necessary, gradually gaining momentum. In the same case, if the ringing continues for more than three seconds, then you need to advance the ignition by turning the distributor. If there is no sound, this can be done a little earlier by turning the distributor.
Why is a strobe not used?
Most people who study the issue of installing electronic ignition on a “classic” think about why a strobe is not used when performing the action algorithm. In fact, the answer in this case is very simple. The fact is that the practical experience of service center specialists performing similar work does not imply the use of a strobe due to the regular stretching of the chain on the engine. Even if we are talking about a new target, after tightening it with the help of a tensioner, it is stretched in such a way that the points on the engine cannot coincide. As a result, it becomes impossible to achieve the most accurate alignment using a device such as a strobe.
Note that the process of replacing contact ignition with non-contact ignition in the VAZ-2107, which has an injection engine, is impossible. If a wiring harness from a newer car model was installed in the vehicle and the vehicle refuses to start, this indicates that the connectors for the EPHH and the switch were mixed up during the work. The fact is that in their design they are completely identical. As a result, in order to identify the problem, it is necessary to swap them.
Ignition installation for VAZ 2106, 2101,2104, 2107, 2105, 2103
- first of all, it is necessary to set TDC - 4 cylinders (we look at the position of the slider), this must be done by turning the crankshaft ratchet to the mark on the pulley, combining marks 4 and 3 in the figure);
- dismantle the distributor, spark plugs and coil (remembering the color of the wires suitable for the ignition coil);
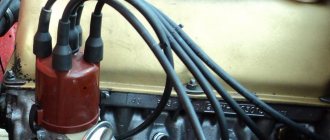
- install new wiring;
- install a new high-voltage ignition coil;
- We install the distributor exactly as the old one was (the installation of electronic ignition for VAZ 2106, 2103, 2107 with 1.5 and 1.6 liter engines is slightly different from other models. These engines have different heights of the cylinder block and, accordingly, different lengths of the distributor drive shaft);
- we attach the switch (it is advisable to find a place on the engine compartment panel);
- screw in the spark plugs and put on the high voltage wires (working order 1-3-4-2);
- connect the wiring as in the diagram:
Checking the ignition angle while the vehicle is moving
It is best to check the functionality of the ignition system after any adjustment while driving. This is due to the design features of the distributor and the octane number of the gasoline used. It happens that the ignition angles set according to the marks do not provide sufficient dynamics and throttle response. Adjusting by ear according to the beginning of detonation will help:
- We accelerate the car to a speed of 45-50 km/h on a flat section of the road;
- We turn on direct transmission (fourth on the VAZ 2106) and press the gas pedal all the way;
- A characteristic ringing sound (detonation) should appear, which will disappear after 2-3 seconds, and the acceleration will be smooth and powerful without failures;
- If detonation does not disappear throughout the entire acceleration, then the ignition angle is “early”;
- The complete absence of ringing and sluggish dynamics indicate a delayed spark in the cylinders;
- We adjust the position of the distributor in place, turning it by 3-5 degrees;
- When the adjustment is completed, the position of the distributor body relative to the block is marked with a mark or paint.
Ignition adjustment work should be carried out regularly. The service interval for a simple contact ignition system is 15,000 km, for an electronic one - twice as long. The condition of the spark plugs and high-voltage wires is also regularly checked. All setup operations can be easily done independently; a garage is not needed for this. The skill of independently repairing the ignition of a VAZ 2106 will always come in handy on a long journey or in winter, when problems arise with starting.
It should immediately be noted that the installation of electronic (contactless) ignition on the VAZ “classic”, despite some investments, is economically justified. As a result of the replacement, some savings in fuel consumption are achieved due to good starting in the cold season, more stable operation in idle mode and more accurate control of the ignition timing.
Although BSZ (non-contact ignition system) kits are now sold, it is still worth listing the parts required to install electronic ignition on VAZ 2106, 2101,2104, 2107, 2105, 2103:
- ignition coil (027.3705 or equivalent 27.3705);
- distributor with Hall sensor (38.3706);
- switch VAZ 2108 (036.3734);
- set of candles (A 17DV-10);
- wiring harness (ignition bundle for VAZ 2108).
