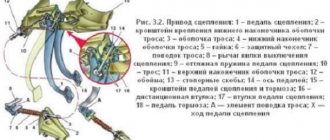
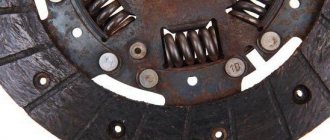
During the operation of the car, a situation may arise in which the owner of a VAZ 2110 will need to adjust the clutch. It must be said that this procedure is not difficult to perform and even a beginner can handle it. Such a need may arise in a situation when the clutch drive begins to malfunction. This can occur when the friction disc is severely worn. Before performing work, you need to have an idea of how the clutch operates on this particular car model. If you study this thoroughly, then it is quite possible to adjust the VAZ 2110 clutch with your own hands. In this case, there is no need to visit a car service center.
VAZ 2110 clutch problems and where they come from
The design has a number of disadvantages. The drive cable tends to stretch, and the friction linings wear out. Inevitable processes lead to breakdowns and failures, which provokes the need to adjust the device.
Clutch slipping
Disc slippage often occurs due to wear. Fine tuning of the drive prevents the parts from closing tightly, which causes slipping. A clear sign of this is difficulty shifting gears and a decrease in vehicle dynamics.
Jerks at start
The next obvious sign of a breakdown is jerking during sudden acceleration. Here, the root of the problem may be hidden in wear of the clutch, loose release, or stretching of the cable.
There is increased noise
Typically, driving a car is accompanied by increased noise for a number of reasons.
- Releaser wear. The device may make a lot of noise when changing gears.
- Crunching sound when trying to put the gearbox in position. Here the reason is incomplete opening of the disk with the basket. The mechanism is not disconnected and the load is partially transferred to the gearbox. If you try to drive the lever in this position, you can damage the gears.
Clutch not fully disengaging
A standard problem that makes it difficult to shift gears. The friction disc does not disengage, which causes difficulties during operation. In this case, the gearshift lever may refuse to enter the position.
What to do if cable adjustment does not help
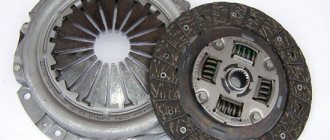
If the cause of the problem is a worn cable, then it simply needs to be replaced.
If the cable is faulty, then the clutch may simply fail during a trip. Then the possibility of an accident increases sharply. You can change it by doing the following:
- the nut that secures the torso to the bracket must be loosened with an open-end wrench;
- After this, the cable can be removed. They do this very carefully;
- then it is disconnected from the clutch fork;
- then the cable is disconnected from the pedal. To do this, remove the protective cover and lock nut. After this, the pedal can be removed;
- Assembly should be done in reverse order. During this process, it is advisable to lubricate the parts with lithol.
The clutch in a car works under constant intense load when traveling. Therefore, it is not surprising that it wears out over time. Therefore, it may be necessary to compensate for its wear. For this purpose, adjustments are made. It is not difficult to perform such actions. Any beginner can handle this task. Therefore, there is no need to send the car to a technical service. The exception, perhaps, is cases of acute lack of time. A car enthusiast simply has no time to do this.
Sometimes adjustment can correct the deficiency by compensating for clutch wear. But in some cases it is so large that the cable has to be completely replaced. If any signs of wear are detected, it is better not to rely on the Russian “maybe”, but rather to immediately change the clutch elements. This will prevent the risk of emergency situations, because the clutch may simply fail while driving. Then trouble cannot be avoided.
Diagnosis of clutch faults
You can check that the clutch is working properly like this.
- Put the car on the handbrake.
- Move the gearshift lever to the neutral position.
- Start the engine.
- Engage the gear and slowly release the clutch.
As a result, the car should stall. If this does not happen, the clutch needs to be adjusted.
Proper Debugging
In fact, it is not so difficult to look into the integral part of the VAZ 2110 - the Bible and the Kama Sutra - the instruction manual. Everything is described there quite clearly. But we will try and explain in an accessible, understandable, step-by-step manner how the adjustment is carried out.
Stage 1:
Checking the pedal travel. This is where you need to start. According to the factory settings, its stroke on a VAZ 2110 is considered normal if it is about 13 centimeters. But it becomes larger as the driven disc lining wears out, since in this situation the pedal rises. Measuring its progress will not be difficult. All you need is a ruler.
Measuring the clutch pedal travel
So, open the door on the driver’s side and lean towards the pedal. Even those who do not understand car repair at all know its location - the far left of the three available there. We rest the ruler against the mat, perpendicular to the pedal, and carefully look at what distance it is from the floor. If we see 16 cm or more on the scale, urgent adjustment is needed.
When is clutch adjustment necessary?
Adjusting the VAZ 2110 clutch is necessary if such symptoms are detected.
- Unpredictable behavior of the clutch pedal - when pressed, there is sagging and jerking.
- During acceleration or driving under load, vibrations of the body, engine and extraneous sounds appeared.
- The car accelerates jerkily or when the engine speeds up, the car lags in acceleration.
- When switching on the gear, great efforts must be made, which is accompanied by extraneous sounds, squeaking or crackling.
Pedal travel
This is where the whole process begins. The factory manual states that normal travel is about 13 centimeters.
Nut and locknut
But over time, the parameter increases as the driven disc lining wears out. This leads to the fact that the pedal rises slightly. Measuring the indicator is not difficult.
- Open the door leading to the driver's seat in the cabin.
- Squat down so you are close to the pedals.
- Place a regular ruler on the mat under the pedal, positioning it perpendicular to the clutch pedal.
- Measure the distance from the mat to the extreme point of the pedal, that is, the maximum distance.
- If the indicator is 16 centimeters or more, this indicates an urgent need for adjustment.
How to finally adjust the clutch on a VAZ 2110
You can check that the settings are correct as follows.
- Warm up the engine to operating temperature.
- Engage the rear position of the gearbox. If the transmission “sticks” without difficulty, you can start moving.
- When accelerating the car, the acceleration proceeds smoothly, parallel to the increase in speed of the power plant.
- All gears work the same when reset to the bottom and top without any extraneous noise, squeaks or knocks.
If all conditions are met, the setup is complete.
Reasoning about alternative regulation
Before adjusting the clutch on a VAZ 2110 in the traditional way, let’s think about how justified it is, and whether there is any point in using an alternative option. According to reviews from many owners of “ten” cars, and not only them, the clutch control pedal is quite high from the floor. The inconvenience that most drivers get used to is actually quite significant.
The driver gets tired during the trip, he wants to change gears less and less, each time lifting a heavy boot. This affects not only the speed of movement, but also the condition of the transmission. Experienced drivers assure: when the clutch pedal is released, it should be positioned so that it can be depressed without lifting the heel from the floor. It’s not without reason that on UAZs and Gazelles, where adjustment is impossible, experienced drivers place a piece of board under the mat.
The classic adjustment order indicates data that ensures the clutch disengages with a large margin. As a result, by fully depressing the pedal, the driver forces the bearing to bend the diaphragm spring much more than is technically necessary. As a result, it loses its characteristic properties, and at critical moments it simply breaks
And it doesn’t matter that you chose a branded clutch kit to replace - everything is subject to the laws of physics
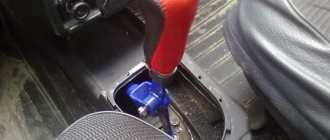
Method for alternative clutch drive tuning
Experienced car enthusiasts prefer to make adjustments individually for each set of coupling parts. The event does not require an assistant or special equipment:
- Start the engine, depress the clutch and engage reverse gear. On almost all VAZ models it does not have a synchronizer, so the disks are completely disconnected.
- Slowly release the pedal and simultaneously engage and disengage reverse gear.
- The moment the speed is switched on is manifested by vibration on the shift knob. If the setting was made according to the official factory instructions, then the start of activation will correspond to a distance of the pedal from the floor of 75-100 mm.
- Set the cable length so that the “grasping” moment corresponds to 20 mm from the floor to the top edge of the pedal.
After we adjusted the clutch on a VAZ 2110 in this way, the clutch pedal in the initial position is much lower than the brake pedal. This allows you to instantly switch the toe of the boot without raising your foot to the handlebars. Early activation greatly simplifies the process of driving a car; gears are engaged smoothly and without jerking.
In conclusion, it should be noted that there are some “homemade” ones who specifically move the release bearing away from the basket, explaining their actions by the fact that in this way they will be able to extend its service life. However, they will have to be disappointed - the bearing is unlikely to become more durable, but the petals of the diaphragm spring will gradually be milled by the untwisted bearing race. And, please note, we are not discussing the discomfort from increased pedal travel, which can result in much greater expenses than purchasing clutch elements.
Replacing the clutch cable of a VAZ 2110
The simple procedure goes like this.
- Disconnect the release fork fastening.
- Using a 10mm wrench, unscrew the adjusting nut mounting bracket.
- Using “dancing with a tambourine”, unscrew the screw connecting the cable to the pedal inside the cabin. The second way is to dismantle the frill and wipers to gain access to the inspection hatch. From here the entire line can be easily removed.
- The next step is to remove the entire line through the interior.
- Installing a new cable is performed in the reverse order.
Let's get started
So, we drive the car into the pit and block the rear wheels by holding the parking brake lever. We reset the box itself to “neutral”. Next, we tear off the wheel bolts and raise the front left part of the car. After removing the wheel, you will need to unscrew the bolts securing the lower ball joint. You should also remove the mass air flow sensor and the clamp securing its pipe. We also take out the air filter. Next, remove the clutch cable from the fork. To do this, loosen the two nuts that attach the cable to the bracket on the transmission. After this, remove the negative terminal from the battery and unscrew the starter mounting bolt. Nearby, unscrew the gearbox mounting bolt using a 19 mm wrench with an extension. Remove the upper starter mount and remove the chip from the speed sensor. We also unscrew the speedometer cable, which is installed in the box.
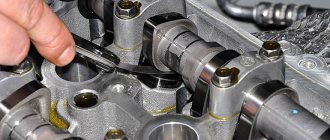
8 valve engine
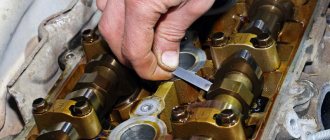
As you can see from the picture, the 8-valve engine has only one camshaft, which controls both the intake and exhaust systems.
In more detail, there are 2 valves for each cylinder, one opens when the air-fuel mixture is supplied to the cylinder, and the second when it is necessary to get rid of exhaust gases after combustion of the mixture.
The camshaft has tapered projections called cams. When the engine is running, the camshaft rotates and presses on the valves with cams in a certain order. Thus, in each cylinder it opens either an intake valve or an exhaust valve.
Since the engines mostly have 4 cylinders, we get a 4 x 2 = 8 valve engine. Of course, there are cars with 6 and 8 cylinders, but also with 2 valves per cylinder, but such engines are extremely rare.
pros
Simplicity.
8-valve engines are much simpler in design than 16-valve engines. This simplicity (roughly speaking) lies in the fact that in such an engine there are 2 times fewer parts, and, accordingly, repairs and spare parts. parts (such as camshafts, valves, and everything connected with it) will be 2 times cheaper.
- There are no hydraulic compensators.
Another simplifying feature of the “octlop”. Accordingly, the mechanism and adjustment of valve movement will be just as simpler and cheaper than the 16-valve analogue. - “Stickless” pistons.
Most 8-valve engines have “stickless” pistons. This means that if your timing belt breaks, you will not get into trouble and nothing will be bent. You just install a new belt, set the marks, and you can safely drive on. - Unpretentiousness.
8-valve engines are less demanding on the quality of oil and fuel. Yes, you can fill in semi-synthetic and 92 gasoline, but as they say, this is not for everyone, or if your conscience allows
- Dimensions.
Since there is only one camshaft, there is more free space under the hood.
Minuses
- Power.
The octagon has 2 valves per cylinder, so the engine has to work harder to carry out the intake and exhaust processes. - Fuel consumption.
Everything is the same, due to the smaller number of valves compared to the “gear” one, it is more difficult for the engine to push exhaust gases. After all, it is more difficult to push them out through one valve than through two. - Noisy.
If you put the “gear” and “octagon” side by side, then you will hardly hear the “gear” against the background of the 8-valve engine. This is due to the fact that due to mechanical pushers and the absence of hydraulic compensators, the valves and clearances need to be regularly adjusted, since wear occurs on the pushers.