As a vehicle ages, all its main components and mechanisms also wear out. For this reason, it is extremely important to periodically inspect the machine - this will allow you to identify the problem in time and fix it before it leads to a more serious breakdown.
Timely adjustment and inspection of the clutch on the VAZ-2115 will avoid failure of this unit and eliminate the need to replace it. In a car service, as you know, this procedure is not cheap, and it takes a lot of time.
At the same time, an improperly adjusted clutch makes driving uncomfortable for the driver.
In this material we will tell you in detail exactly how to correctly perform this operation and the sequence in which to perform all the necessary actions.
Self-adjustment of clutch VAZ-2115
As a vehicle ages, all its main components and mechanisms also wear out.
For this reason, it is extremely important to periodically inspect the machine - this will allow you to identify the problem in time and fix it before it leads to a more serious breakdown. Timely adjustment and inspection of the clutch on the VAZ-2115 will avoid failure of this unit and eliminate the need to replace it. In a car service, as you know, this procedure is not cheap, and it takes a lot of time. At the same time, an improperly adjusted clutch makes driving uncomfortable for the driver.
In this material we will tell you in detail exactly how to correctly perform this operation and the sequence in which to perform all the necessary actions.
Most popular manufacturers
There is no shortage of spare parts on the market. Concerned drivers leave opinions about products on the pages of thematic forums.
Based on user reviews, a rating of the best clutch manufacturers for VAZ cars has been compiled:
- VIS. The main supplier of clutches to the AvtoVAZ conveyor has been operating since 1991. The price of trouble-free units is low, the service life is 70 thousand km.
- The quality of the company's spare parts is known throughout the world. Soft and comfortable French parts are standardly installed by automakers Ssang Young, Kia, Hyundai.
- The factories of the German company are scattered on all continents. Clutches dampen vibrations from the engine and are installed on the latest VAZ models.
- The production sites of the young German company (20 years on the market) are located in Europe and Asia. For Russia, the brand's high-tech auto components are produced in Turkey.
Other popular manufacturing companies: German SACHS and FINWHALE, Dutch HOLA, Italian PILENGA.
When adjustment is necessary
The clutch drive, as a rule, if it is not adjusted properly, is located either slightly above the brake pedal or slightly below. As a result, it becomes completely inconvenient to use, which ultimately significantly increases the risk of creating an emergency situation on the road.
The problem arises primarily due to the fact that the position of the pedal changes as the spacers installed on the driven disk wear out. The longer the vehicle is in operation, the more noticeable this defect is.
For VAZ-2115 cars, the manufacturer has established the standard travel of the clutch control pedal - a minimum of 12.5, a maximum of 13.5 centimeters. The maximum permissible deviation in this case cannot be more than 16 centimeters.
Among other things, it is necessary to carry out adjustments in a situation where the unit in question has stopped completely shutting down or is slipping. The procedure itself involves debugging by shortening or lengthening the clutch cable, as well as its sheath.
How to adjust?
An out-of-control drive is located several centimeters higher or lower relative to the brake. This makes the drive inconvenient to use and can cause accidents.
The drive position changes as a result of wear on the driven disk linings during prolonged driving of the vehicle. For VAZ 2115 cars, pedal travel is considered normal to be 125-135 mm. The maximum safe stroke does not exceed 160 mm. Adjustment is also necessary if the unit does not turn off completely or is slipping. Debugging is carried out by changing the length of the clutch cable and its sheath.
Tools
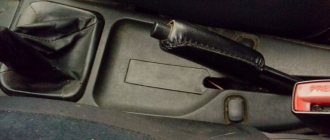
2 keys for 17. On the VAZ 2115, the lower end of the cable “jacket” is held on by two fasteners, which are loosened using these keys.
17 keys - the main tools for adjusting the clutch cable
Determining the pedal stroke
First of all, you will need to determine how much the clutch pedal has deviated from the standard values. To take a measurement, you need to do the following:
- the pedal is lowered by hand to the highest possible level;
- then she is released;
- In parallel, you will need to determine the stroke length of the drive using a ruler or tape measure.
First, find out what the distance is from the center point of the pedal to the floor of the cabin in the lowered position, and then take a measurement in the raised position. If it turns out that the deviation from normal permissible values exceeds the maximum, you will need to adjust the clutch.
There is also an option to check without exact measurements. In this situation:
- the machine is installed where there is a completely flat area;
- first gear is engaged;
- The drive is smoothly released, after which forward movement begins.
Debugging will be needed if the vehicle moves only when the pedal has reached the lowest point.
Adjustment
The essence of the adjustment is to change the length of the cable, or rather its sheath. This is done using the above-mentioned keys - they loosen or, conversely, tighten the existing 2 nuts that secure it directly to the bracket.
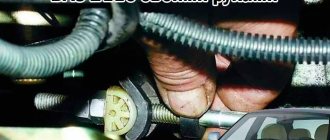
- raise the hood;
- dismantle the air filter;
- underneath it, near the generator, is the cable itself;
- The nuts we need are located below.
Unfortunately, VAZ designers did not care too much about the convenience of the person servicing the car, for this reason you will have to suffer quite a bit during the adjustment process.
As the nuts rotate, the length of the cable changes, as previously reported. To reduce the amplitude of movement of the drive, it is necessary to loosen the fastening element located directly inside the bracket. At the same time, you will also need to tighten the nut located from the outside.
If you need to lengthen the stroke, everything is done exactly the opposite - the inner nut is tightened, and the outer one is loosened. Under no circumstances should the cable sheath be over-tightened or left slack. In the first case, it will break very soon, in the latter, it will be impossible to completely disengage the clutch.
Sometimes it happens that the threads on the nuts have oxidized - in this situation a special compound will help or, at worst, a little:
- gasoline;
- brake fluid;
- machine oil.
Upon completion of the adjustment, it is imperative to check the operation of the unit and compliance with standards. This is done in exactly the same way as described above. If you have not made any mistakes, the clutch pedal travel as a whole will not be more than 13.5 centimeters.
If your efforts lead to nothing, you will most likely need to completely replace the entire assembly.
To get a more complete picture of the adjustment process, you should watch the video below:
Source
Instructions for adjusting the clutch on a VAZ 2115
When using a vehicle for a long time, the clutch system is subject to wear and mechanical damage. A drive that is not properly adjusted is inconvenient for the driver. In addition, untimely adjustment can lead to clutch failure, which entails a time-consuming and expensive replacement procedure. In this article we will look in detail at how to adjust the clutch on a VAZ 2115 - a video of this process will help you further understand it.
Clutch failure is a common occurrence in cars made by domestic manufacturers. Therefore, the VAZ 2115 also suffers from this problem. But few Lada owners will want to pay sky-high sums to have their clutch replaced at a service station. In this regard, we will tell you how you can do this yourself.
Replacement
a set of serviceable clutch parts for VAZ 2114; sets of spanner and socket wrenches; mandrel; jack.
First of all, you need to jack up the car. An inspection hole and overpass are ideal for this purpose.
Disconnect the ground wire, drive and speedometer cables from the gearbox. It is not necessary to disconnect the cables, but it is worth doing for convenience.
We also disconnect the gear shift drive and the support from the gearbox side.
Clutch replacement process
Well, the time has come to change the clutches on my car, it started to slip a little and also ring,
Well, I started by driving into the garage and the first thing I did was unscrew the hub nuts on both sides, it was not difficult, since everything there was new.
I bought all sorts of seals since everything was leaking from the box and from the engine for a long time, in the photo the whole set cost me 500 rubles
Next, I began to unscrew the box from the engine, this pin is located on the inner right CV joint, unscrewing it is quite inconvenient since I did not pull out the CV joint.
I removed the front left wheel, unscrewed the ball joint and pulled out the inner CV joint from this side. Before doing this, of course, I did not forget to pour the oil out of the box, I also unscrewed the crab from this side and loosened the tension on it so that it fell down.
Next, I continued to unscrew the bolts connecting the box to the engine, this one is located at the bottom of the box, one might say at the ignition module.
There are two more bolts on top of the box, next to one bolt the ignition module is attached, and from the ignition module itself you also need to unscrew the side bolt, since it also holds the box, I didn’t take a photo, and the second bolt is located under the thermostat, which is also quite inconvenient to unscrew.
Next, I opened the rear box mount, unscrewed it from the bottom, and jacked up the engine
Next, I completely unscrewed this pad from the box and from the body itself, since it interferes when you put the box back.
Then I unscrewed the cardan, and then it fell apart into two parts, it only lasted a year, and it all fell apart, there was a viburnum cardan, I still shortened it.
I bought a new cardan, they are already sold straight away, very convenient.
I removed the box alone, put a bunch of jackets under the car so that the box would fall gently, when I removed it there was this picture, the oil seal was leaking very badly, I replaced it, I suffered for quite a long time pulling it out of its place.
I also changed the oil seal where the cardan shaft is located, everything was leaking there too, I changed it in about 5 minutes, quickly came out, degreased it just as well and inserted a new one.
Next, I unscrewed the clutch and unscrewed the flywheel, since behind it there is a crankshaft oil seal,
When I removed the flywheel, I saw the crankshaft oil seal and removed it; it is held on by 8 bolts, 6 in a circle and two from below, as you can see in the photo, the oil seal was simply leaking from all sides.
On the right, the old basket on the left is new, they are different, I didn’t take a proper photo, I didn’t have much time, but the old basket was already tattered and the petals were not scattered, some were at the top, some had gone down.
Next, I removed the pan, since the gasket had been leaking there for a long time, when I removed it, it simply fell apart in my hands, it was so hard and oak that it didn’t even bend, after I changed everything and installed the clutch, I began to assemble everything in the reverse order, all the work took two days, on the first day I sat in the garage for 6 hours, the next day my father and I assembled the box, it took 3 hours, the clutch is very soft and responsive, I installed the VIS clutch if anyone is interested, in general that’s all, everyone Good luck.
How to change and adjust the cable yourself?
We figured out why the pedal creaks, now let's talk about adjusting the clutch on the VAZ 2114.
Correct adjustment and tension of the clutch pedal cable on a VAZ 2114 8 valve is carried out exclusively on the working mechanism.
When there are problems in the functioning of the system, they must be eliminated. One of the most common problems is a broken cable. Therefore, if the pedal fails, then before properly adjusting and tightening the cable, it must be changed.
If you are experiencing problems with your pedal squeaking, check out the video that demonstrates the procedure for lubricating the device. Filmed by VikiNow.
Required Tools
To adjust the tension and replace the cable, you will need the following devices and tools:
- the cable itself;
- Litol lubricant;
- set of open-end wrenches;
- ruler;
- pliers.
How to replace it correctly?
To repair the cable, you need an assistant:
- Open the hood of the car and remove the bolts securing the battery terminals.
- You need to disconnect the connected cable from the pedal itself. Using a 17mm wrench, unscrew the nuts securing the bottom of the product. Then remove it from the retainer and remove it from the plug installed in the engine compartment.
- Further steps are carried out in the car interior. Move the carpet away from the driver's seat. There is carpet under the pedals, it needs to be removed. This will allow you to find the place where the cable is attached to the pedal; the clamp must be disconnected from it. There will be no problems, since this element is simply removed from the hook.
- After which the cable itself is removed from the seat. To do this, the device must be pushed away from you towards the engine compartment. When the product is difficult to push out, most likely its fastening has soured. Then lubricate the retainer with WD-40 and work it out a little, moving it in different directions. If you have an assistant, while you are developing the cable, he can pull it from the side of the engine compartment, this will speed up the procedure.
- After dismantling the product, a new one is installed. Before this, the bushing that secures the cable is removed from the clutch pedal. If its condition is poor, it is worn out, it is advisable to replace the bushing. The retainer itself is lubricated with Litol before installation.
Channel Sdelaj Sam! Pljus interesting! A video has been released showing the procedure for replacing a product with your own hands.
How to adjust free play?
After repairs, the cable is adjusted in height. If you do not adjust the stroke adjustment and adjust it, you will have difficulty changing gears. Before tensioning and adjusting the cable, it is recommended to test drive the machine. It will allow you to figure out how to properly tighten the pedal - raise or lower it.
- If the car begins to move at the end of the pedal stroke, open the hood and locate the cable attachment location. There are two nuts here that can be unscrewed with a 17mm wrench. To reduce the free play of the pedal, that is, lower it, the bolt located inside the bracket is unscrewed. The outer screw must be tightened with a wrench.
- If, when starting to move, you realized that the free play should be increased, that is, raise the pedal, then the inner screw on the metal clamp should be tightened, and the outer one should be loosened. If there is rust on the free play adjustment nuts, it must be removed using WD-40. If there is no fluid, motor oil or brake fluid is used.
- If the adjustment is successful, check the free play with a ruler. If the actions are performed correctly, its length will be from 12.5 to 13.5 cm. This distance will be directly from the pedal itself in the car to the floor.
VAZ 2114 how to adjust the clutch
Design, malfunctions and work on replacing the VAZ 2114 clutch
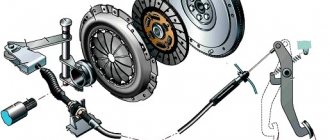
A clutch is a mechanism in a car that transmits the rotational motion received by the engine crankshaft, the gearbox and then to the wheels of the car. Its main task is to ensure that the car starts off without jerking and shifts gears without noise.
ABOUT THE CLUTCH DEVICE
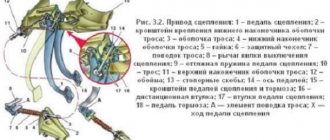
Its design on this car is similar to mechanisms 2113 and 2115. It is made of a dry, single-disc mechanism. It is produced with a device that dampens torsional vibrations, and also has a pressure spring. The VAZ 2114 clutch device is shown in the figure.
The VAZ 2114 clutch consists of (see picture):
- Cable with a casing;
- Cable tip (lower);
- Adjusting nut;
- Housing for attaching the shell to the gearbox;
- Separating washers;
- Nut for adjustments;
- Rubber protective shell;
- Cable lead;
- Shutdown plug;
- Basket;
- Bolts securing the basket to the flywheel;
- Pressure disk;
- Flywheel;
- Driven disk;
- Gearbox input shaft;
- Shield;
- casing;
- Spring (pressure);
- "Squeeze";
- Pad;
- Release housing;
- Cable end;
- Cable thrust washer;
- Cable fastening unit;
- Pedal axle;
- Release spring;
- Off pedal.
As can be seen from the mechanism diagram, there are two working units, one of them will be the master, and the second will be the slave. The second includes a disk with linings riveted on both sides and damper springs installed. It is installed and moves along the splines that are present on all gearbox input shafts. When the pedal is pressed, the driven disk is pressed against the flywheel by the pressure disk.
The drive unit includes a pressure disc with a clutch housing, which is attached to the flywheel with six bolts. To center it, there are pins on the flywheel and guide holes in the housing. The clutch has a backlash-free design and is operated by a cable.
To turn it off, a clutch drive is installed, which operates by pressing the pedal. The cable is hingedly attached to it with its upper tip. The lower end of the cable also has a hinged connection with the shutdown fork. With its movement, the “cable” turns it, and it moves the “releaser”.
HOW IT IS CHANGED
It is safe to say that repairs or adjustments to the clutch are carried out in case of wear of the linings; problems with the pressure plate or flywheel are less likely to occur.
WHAT ARE THE SIGNS OF A MALFUNCTION?
The culprits of breakdowns ahead of time are almost always the vehicle owners, and more specifically, their driving style. A sudden start of movement with “slipping”, or holding the foot on the pedal for a long time, have a negative impact on this mechanism.
The following facts indicate the presence of problems in the mechanism:
- The presence of jerks and vibrations during movement;
- Noise when shifting gearbox;
- Inability to engage or disengage the clutch mechanism.
Sometimes, unfortunately, spare parts of poor workmanship fail.
WHAT TO DO IF THIS UNIT IS "JAMBLING": ADJUSTMENT, REPLACEMENT OF THE CABLE AND CLUTCH
The first thing you need to do is try to adjust the VAZ 2114 clutch. The purpose of this adjustment is to change the length of the cable, its sheath, relative to its fasteners on the gearbox. These adjustments can be used to increase or decrease the pedal stroke. This operation is quite simple, any driver can perform it.
To adjust correctly, the procedure will be as follows:
- Place the car on a level surface and start the engine;
- They turn on first gear and try to move away. It is necessary to note the moment the car begins to move.
- When this happens at the end of the pedal stroke, it needs to be adjusted;
- Using a measuring ruler, the working pedal run-out is measured. To do this, squeeze it out completely and place a ruler next to it. You need to make a mark on it and release the pedal. At the end of the move, a mark is made again. The distance between the marks should be within 125 - 135 mm. If the dimensions are different, adjustments need to be made;
- Open the hood of the car and find the cable attachment point on the gearbox;
- There are two adjusting nuts on this assembly. They achieve the desired working stroke for the pedal.
Sometimes rust appears on the threaded part of the cable end. To remove it, treat this area with a “wedge”, brake fluid or oil. This will facilitate the process of carrying out adjustment work. At the same time, check the movement of the cable in the sheath and its condition. If broken wires are found, the cable is replaced with a new one.
Let's look at how to replace the clutch cable. The procedure for replacing the cable is simple. To do this, you need to prepare the tools:
- Wrenches set to “17”;
- Clutch cable;
- Tool for loosening rusty nuts;
- Litol 24 grease.
When everything is ready, they begin to work. You can invite someone to help, but this is not necessary. Get started in this order:
- Open the hood and find the cable attachment point on the gearbox;
- Using the keys “17”, release the cable in the fastening and remove it;
- Remove the cable tip from the clutch fork;
- Further work is carried out inside the car. Remove the carpet and upholstery in the area of the pedal assembly;
- Find the cable eye and disconnect it from the pedal;
- After this, he is pulled out into the engine compartment;
- If the cable is removed, then a new spare part can be installed. This is done in reverse order. This will complete the replacement of the clutch cable. Before installing a new cable, remove and inspect the bushing from the pedal on which it rotates. If there are signs of severe wear, it must be replaced with a new one.
You need to start the engine again and check the operation of the clutch mechanism. If the problems have disappeared and it works as expected, continue driving. If they remain, then you need to replace the worn parts. As a rule, the driven disk linings wear out. In this case, only replacing the clutch disc will help.
To replace the clutch disc on a VAZ 2114, or so it is called replacing the clutch on a VAZ 2114, you need to disconnect the gearbox from the engine. To do this you need to prepare:
- Socket wrench and head for “8”, “19”;
- Beard with a small flat sting;
- L-shaped knob;
- Head "32";
- Mount, preferably with a bend;
- Key and head at “15”;
- Flat screwdriver;
- Mandrel for centering the clutch disc;
- Jack.
In the future, proceed as follows:
- Disconnect and remove the battery, the housing together with the air filter and the mass air flow sensor. It is necessary to remove the starter and speed sensor from the gearbox;
- Place the chocks under the rear wheels and tighten the handbrake. Raise the left side with a jack and remove the left wheel, and then remove the right one in the same way;
- Next, unscrew the locknuts on the hub and remove the lever. If there are mudguards and crankcase protection, they are also removed;
- It is necessary to place a support under the engine and fix the engine in such a suspended state;
- Remove the jet rod and the link from the gearbox;
- The next step is to drain the oil from the gearbox housing, disconnect the connector from the reverse speed switch;
- The key at “19” is intended for unscrewing the box from the engine block; When the bolts are removed, lower the engine slightly and move the box away from the block.
- An assistant will be required to perform this operation;
- They pull out both drives and put plugs in their place. They are needed to fix the main gear. You can remove the gearbox;
- Using an “8” wrench or a socket, unscrew the bolts securing the basket with the flywheel and remove it.
The gearbox must be installed in the reverse order. Only the slave disk needs alignment. It is made using a special mandrel. Once it is centered, you can tighten the bolts securing the basket.
Adjusting the clutch of a VAZ 2114 step by step instructions
An external inspection and testing of the entire drive should be carried out: in motion; with the engine turned off, under the hood, inside the car.
Place the car on a level area. Apply the handbrake.
Stock up on a ruler and tape measure. Take three to five measurements of the distance from the middle of the pedal pad to the rubber mat. Determine the average value.
Press the pedal all the way down with your hand. Repeat measurements. The working stroke is the difference between the first and second measurements. For the VAZ 2114, a range of 125 - 135 millimeters is considered acceptable. A number greater than 160mm should raise alarm bells. There is a suspicion that the linings have failed. Immediate adjustment of the clutch on the VAZ 2114 is necessary.
At the same time, an external inspection checks the technical condition of the bracket assembly. Plan to replace faulty axles, springs, rubber bands.
Raise the hood. Prepare a working set of wrenches, pliers, screwdrivers, and protective gloves. Working in the engine compartment is associated with the possibility of getting burns and cuts.
To be able to reach the adjustment point, you have to remove the air filter.
- Release the clamp and remove the negative terminal of the battery.
- Disconnect the block with wires.
- Use a socket wrench to loosen the three mounting bolts.
- Using a screwdriver, loosen and tighten the air duct clamp.
- Use a screwdriver to pry off the rubber stop.
- Remove the filter element from the engine compartment.
- Use two open-end wrenches to adjust the cable tension.
- Periodically carry out control measurements in the cabin. The main goal is to ensure that the interval under the pedal falls within acceptable limits and that the foot is in a comfortable position with the edge of the heel resting on the floor.
- Restore the filter. Connect the terminals.
- Test it on the spot, on the move. Adjustment of the VAZ 2114 clutch pedal is completed.
When is it necessary to adjust the Lada Samara clutch drive?
As practice shows, the culprits of clutch failures are most often the car owners themselves. A sharp start with “slipping”, as well as prolonged holding of the pedal in a depressed state, negatively affects the performance of the mechanism. The presence of noise or vibration when shifting gears indicates a problem in the transmission line. Below are a few signs that may require adjustment:
- Loss of power due to “slipping”, i.e. unreliable connection between the disk and the flywheel.
- Difficulty changing gears.
- Changing the travel distance of the clutch pedal (the norm is from 125 to 135 mm ).
- Jerking or sticking when pressing the pedal.
Motorists who know which clutch to choose for the Lada 2114 will most likely install it together with a cable. Replacing any element of the clutch should end with adjusting the drive, as well as changing the pedal stroke.
The pedal stroke is measured with a ruler, which is pressed against the floor. The distance between the lower and upper points of the pedal position should be within 125-135 mm. The maximum permissible value is 160 mm. If the pedal stroke goes beyond these parameters, then we can talk about wear of the friction linings of the driven disk.
DataLife Engine – Softnews Media Group
WELCOME TO OUR SITE!
Here you will find a lot of useful information about the VAZ gearbox , you will be able to get qualified advice on the rules of operating the gearbox, fault diagnosis, repairs, tuning the gearbox, and if necessary, sign up and carry out repairs in our service. We are located: Moscow, Severyaninsky proezd, property 9. tel;. Opening hours from 8-20.00 seven days a week.
How to replace the clutch disc on the inspection hole yourself?
Author: admin from 03/17/2013, 21:40, views: 13244
How to replace the clutch disc?
There are a large number of methods for replacing the clutch on forums online, but they all involve a large amount of unnecessary work. I'll give you mine, which I've been using for decades. This method is fast, rational, and does not require draining the oil, dismantling CV joints, and so on. Judge for yourself! For example, let's take the injection VAZ 2115.
The procedure for replacing the clutch on the inspection pit (overpass):
How to adjust the clutch cable on a VAZ 2110 yourself.
Author: admin from 06/21/2012, 09:53, views: 33538
Adjustment of the clutch cable must be done when: replacing clutch discs, replacing the clutch cable and wear of the friction linings of the driven disc.
The clutch pedal travel (all the way to the mat) should be 125mm (+-5mm). The maximum permissible pedal travel is 160mm. To adjust the clutch, you need to unscrew or tighten the nut, and after completing the adjustment, tighten the locknut. Tighten the rubber washer as much as possible to the fork... Everything seems simple and clear, but many have mats of different thicknesses, and the thermal and noise insulation is laid differently. How to adjust the clutch if the carpets are removed, say, drying after heavy rains?
How to adjust the clutch cable on a VAZ 2108-2115
Author: admin from 06/13/2012, 19:10, views: 40909
A short overview of clutches.
Author: z25 from 09/29/2011, 23:33, views: 4943
The KRAFT tech clutch is manufactured in Turkey under a German license. If you want to forget about the clutch for a long time, then you can't go wrong with this clutch. It’s hard to find fault with this product: it has a soft squeeze, is not afraid of overheating in traffic jams, and practically does not wear out the flywheel. The only negative is the fragility of the release bearing. Although it has already been modified more than once, it runs on average 35-50 thousand km. The basket and disk itself last at least 120 thousand km. Of the cars we have observed that have a KRAFT clutch installed, so far only a durability record has been recorded - 130 thousand km. And then we could not observe this car further, because... it was sold. How much it actually runs will remain a mystery. PS My VAZ 21102 has this clutch installed and at the moment it has covered 200 thousand km. And thus breaking the previous record. And I don’t drive like an angel at all.
All about clutches
Author: admin from 09/29/2011, 22:38, views: 4401
If you think that serious car tuning ends with a powerful engine, large “fashionable” wheels and a pair of spoilers, then you are deeply mistaken. This is just the beginning. After all, the increased potential of the engine must still be transferred to the wheels. And the clutch takes the hit first. The clutch consists of a large number of parts. But we will be interested only in the actuators, which include: the driven clutch disc (in everyday life – just a clutch disc), the pressure clutch disc (the so-called “basket”) and the clutch release clutch with a bearing (or “throwout bearing”).
Design
The mechanical drive on the VAZ-2114, despite the fact that it has the least simple design, is in no way inferior in reliability to its hydraulic counterpart. Its system consists of a cable adjustable in length, sealed in a special anti-corrosion sheath, and the clutch pedal itself located in the car's interior, which, through free movement, is designed to transmit the pressing force to the clutch fork.
Despite the fact that such a scheme is simple, in general it is quite reliable.
Clutch diagram
A new product in the form of a clutch cable for VAZ-2114 cars helped to avoid all the problems that all owners of classics encounter. First of all, this refers to the leakage of hydraulic fluid from the system, and as a result, loss of control over the car. It would also require work to remove air from the clutch system after repair.
At the same time, periodic checking and adjustment of the clutch pedal has remained the same.
Why is it necessary to adjust the cable travel?
This procedure is necessary so that when the pedal, and with it the clutch cable, reaches certain values, the most squat pressing of the flywheel with the basket to the driven disk is made, at the moment when its operation is necessary. At the same time, thanks to the precise adjustment of this drive, the clutch is released at the moment the clutch pedal is released.
Note! During operation of this system, when the lever is in the neutral position, or when it is turned on, no extraneous sounds or crackles should come from the gearbox housing.
You can monitor the condition of the clutch, preventing such a situation from occurring, visually by positioning the clutch pedal relative to the floor of the car, using only a ruler.
The clutch pedal has failed, reasons, what to do
A car clutch failure is always unpleasant. In such a situation, you have to think about how to repair the car, what parts to buy for replacement, and where to get the money.
The clutch pedal has failed
In this case, the worst thing is if the malfunction manifests itself on the road. What to do if the clutch pedal fails? How to get to a garage or service station when the device refuses to work? Let's consider the solution using the example of a VAZ car. You need to know that the VAZ 2101-07 has a hydraulic clutch, and the VAZ 2108-2110, Lada Kalina and others use a cable.
Causes of failure
Clutch problems are a common problem with cars, caused primarily by improper use and wear of parts. Be that as it may, to troubleshoot the problem, it is important to know the reasons why the clutch pedal fails.
Clutch mechanism
The clutch acts as a link between the transmission and the engine and is designed to disconnect and connect the gearbox input shaft from the crankshaft flywheel. Changing gears in a vehicle with a manual transmission is only possible with the clutch pedal fully depressed. At this moment, no torque transmission is observed, since there is no connection between the gearbox and the flywheel. As for the structure of the node in question, it is represented by the following components:
- A flywheel that takes on torque and transfers it to the gearbox through the basket. The basket, in turn, is attached to the flywheel.
- The pressure and driven disks are closely connected to each other. Their contact is affected by the position of the clutch pedal, which is located inside the car.
- The shutdown fork ensures that the disks are disconnected.
- The primary shaft of the gearbox, to which torque is transmitted.
- Additional elements include a casing, damper springs designed to soften vibration, a clutch release bearing, and friction linings. The latter are put on the driven disk and provide mitigation of friction between the basket and the flywheel.
The flywheel is directly connected to the pressure plate and rotates with it. A splined clutch with a gearbox input shaft located inside ensures transmission of rotation to the driven disk. The gear shift mechanism looks like this:
- transmitting pressure to the release fork through the drive system;
- displacement of the release bearing together with the clutch by means of a fork towards the release springs of the pressure plate;
- temporary disconnection of the basket from the flywheel under the influence of bearing pressure;
- lowering the pedal after changing gears, ceasing pressure on the springs from the bearing, and resuming contact between the flywheel and the basket.
When is it necessary to adjust the Lada Samara clutch drive?
As practice shows, the culprits of clutch failures are most often the car owners themselves. A sharp start with “slipping”, as well as prolonged holding of the pedal in a depressed state, negatively affects the performance of the mechanism. The presence of noise or vibration when shifting gears indicates a problem in the transmission line. Below are a few signs that may require adjustment:
- Loss of power due to “slipping”, i.e. unreliable connection between the disk and the flywheel.
- Difficulty changing gears.
- Changing the travel distance of the clutch pedal (the norm is from 125 to 135 mm ).
- Jerking or sticking when pressing the pedal.
Motorists who know which clutch to choose for the Lada 2114 will most likely install it together with a cable. Replacing any element of the clutch should end with adjusting the drive, as well as changing the pedal stroke.
The pedal stroke is measured with a ruler, which is pressed against the floor. The distance between the lower and upper points of the pedal position should be within 125-135 mm. The maximum permissible value is 160 mm. If the pedal stroke goes beyond these parameters, then we can talk about wear of the friction linings of the driven disk.
Diagnosing the need for clutch adjustment
Active use of the vehicle leads to the fact that over time the shutdown does not occur completely due to an increase in pedal travel. The shafts do not turn off completely when the pedal is depressed as much as possible, and contact with the engine remains, which negatively affects the service life of the unit and increases the load on the teeth.
If the pedal stroke is not sufficiently consolidated, the driven disk is not fully engaged, therefore, not all torque is transmitted during movement and the vehicle’s power is reduced. Also, smoothly releasing the clutch pedal in this case can lead to abrupt engagement of the disc, which is accompanied by jerking of the car and noise in the transmission. The following signs will allow you to reliably determine the need for adjustment:
- clutch pedal sticking;
- bumps or jerks when trying to move;
- extraneous noise when changing gear;
- fluid leakage from the drive system;
- Insufficient free play of the clutch pedal.
Reasons why the clutch slips
The answer to the question “why does the clutch slip on a car?” lies in the design features of this mechanism. It consists of several disks adjacent to each other that transmit torque from the engine to the gearbox. Normally, there is a large friction force between them, which is removed when the pedal is pressed. When these discs are worn out, dirty, or the pressure adjustment is off, friction becomes insufficient even with the pedal released, and the clutch discs slip relative to each other.
Overheating is a common cause of clutch slipping.
The reasons why the clutch slips are not always due to its wear. Sometimes slippage occurs due to contamination of the surface of the disks, which reduce the friction force, as well as when the clutch drive is misconfigured. The answer to the question “why does the clutch stink when you slip?” often involves overheating. If you try to get out of the mud or snow in a stuck car, repeatedly starting and changing gears, the discs are subjected to increased load, overheat, and the friction force decreases. Therefore, if the clutch begins to slip, the reason is either its malfunction or extreme operating conditions.
Why does the new clutch slip? The most likely cause is incorrect assembly or adjustment of the unit (for example, the driven disk is installed on the wrong side)
What could be the consequences of a slipping clutch disc?
Regardless of the reasons for the malfunction, the consequences of a slipping clutch do not bode well and are fraught with the following problems:
- increased fuel consumption;
- overheating of the gearbox (especially in the case of a “robot”);
- accelerated wear of gearbox oil;
- wear of the gearbox input shaft and its bearings;
- uneven surface wear and deformation of the flywheel;
- complete clutch failure.
When the friction linings wear down to the rivets, at a certain point they are torn off the disk. Because of this, not only is the ability to move lost (the connection between the engine and the gearbox completely disappears), but the transmission bell becomes contaminated with reinforcing fiberglass from the collapsed linings. And cleaning it out is an unpleasant and troublesome procedure.