Examination
To make sure that the clutch really needs to be replaced with a clutch releaser on a VAZ 2114, it is first recommended to check it thoroughly for malfunctions. This will allow you to determine whether this device is really the cause of the problem.
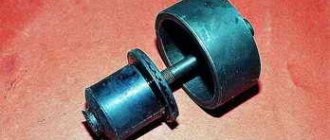
The bearing allows the disc to disengage from the basket, plus it additionally ensures that the clutch is engaged and disengaged.
There are two types of squeezers:
- Roller. They work on the basis of a rigid bunch of rods.
- Hydraulic. The hydraulic system ensures power transmission.
Even an inexperienced car owner can detect a faulty release bearing. The failure of this element manifests itself as follows:
- When moving, extraneous sounds and noises arise;
- Gear shifting is difficult;
- When overtaking, the clutch may completely disappear;
- Slippage occurs during acceleration, etc.
If the squeezer turns out to be truly faulty, it is the responsibility of every car owner to replace it immediately. This can be done with the help of service station technicians, or with your own hands.
Installing a new element
When you have completed the entire range of dismantling work, you can move on to the final stage - installing a new component.
- The first thing to do is check the condition of the new clutch release bearing. For some reason, many car owners forget to make sure that the bearing that replaced the old one is actually in good working order. This is easy to check. Rotate the bearing, pull it in different directions. If there is no jamming during rotation, and there is also no play, then you bought a really serviceable, good release bearing.
- Insert the new part into the coupling. This must be done so that the protruding part of the inner ring is directed towards the coupling.
- After inserting the element, secure it using the holders.
- Before inserting the new release bearing onto the bushing (guide), do not forget to lubricate it with a grease. The layer of lubricant should be thin, do not overdo it.
- Secure the coupling and bearing using a spring lock.
- Place the gearbox and other dismantled elements in their rightful places.
- The entire repair process is completed by adjusting the clutch.
Replacing the release bearing yourself is not very difficult. The main problem is removing the gearbox. All other events cannot be called difficult
However, you will need to be careful, consistent and careful
Do not ignore the most useful thing that you can need when repairing your favorite VAZ 2110 - the instruction manual. Literally everything a car owner needs to know is described in detail there. With its help, you can even perform complex repairs, the cost of which at a specialized service station would be prohibitive.
Replacing the clutch on a VAZ 2114 with your own hands
It's no secret that all components and assemblies on the VAZ 2114 wear out over time. But with the clutch, this can happen very quickly, especially if the car is driven by a novice driver who has the bad habit of keeping his foot on the pedal for a long time. We will tell you how to replace the clutch on a VAZ 2114 yourself in this article.
- When you press the clutch pedal, you hear a characteristic low hum, which, if the discs are heavily worn, may be accompanied by clicking sounds.
- The clutch drives or slips, that is, the car engine is disconnected from the transmission not immediately after pressing the pedal, but with some delay.
- The car starts moving jerkily, even if the clutch pedal is released very smoothly.
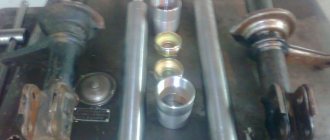
- New set of clutch discs.
- Set of socket heads with a wrench.
- Set of open-end wrenches.
- Large flat blade screwdriver.
- Special puller for ball joints.
- 2 jacks.
- Anti-recoil shoes.
- Wooden beam for hanging the gearbox.
- Rope.
- Medium sized scrap.
- Mandrel for centering the clutch driven disc.
- The car is installed on the inspection hole. Wheel chocks are placed under the rear wheels. The front wheels are jacked up and removed.
- The hood opens and both terminals are removed from the battery.
- Using open-end wrenches, the air filter and the sensor next to it are removed.
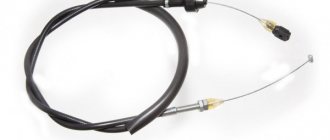
- Access to the clutch cable is provided. This cable is disconnected with a 10mm spanner. The clutch cable that needs to be disconnected
- Now the starter is removed and the bolts on the upper part of the clutch housing are unscrewed (there are 4 of them).
- The gear shift drive and the support located to the right of the gearbox are unscrewed. After this, use a 10-mm open-end wrench to unscrew the flywheel protective cover.
- Using a spanner, unscrew the fastening bolts of the ball joints. Next, the drive shafts are disconnected from the gearbox and the oil is drained. The mounting bolts of the ball joints are unscrewed
- Removing the box begins with unscrewing the bolts holding the box to the cylinders. The bolts are unscrewed using a socket head 8. A wooden beam tied to a rope is placed under the box, on which it is hung next to the engine. Next, using the same 8mm wrench, unscrew the bolts that secure the pressure plate to the flywheel. The pressure plate is unscrewed with an 8 key
- The clutch pressure and driven discs are removed. Clutch discs ready for removal
- Using a screwdriver, pry up the release spring holding the release bearing, after which the bearing is removed. The gearbox input shaft is cleaned of dirt
- Access to the gearbox input shaft is provided. It is thoroughly cleaned of residual grease and contaminants. The release bearing and spring are installed in place (replaced with new ones if necessary), then the shaft is centered using a mandrel. Only after this are the clutch driven and pressure plates installed on it. Then all components of the car are reassembled.
https://youtube.com/watch?v=N01w0H8aYOc
Important points
When replacing the clutch, it is necessary to pay close attention not only to the condition of the discs, but also to the condition of the release bearing, which was mentioned above. After removing it, you need to turn it several times by hand.
If rotation is difficult or a creaking or crackling sound is heard during scrolling, then the bearing needs to be replaced. If this is not done, all the work on replacing the clutch discs will be useless, since they will again become unusable. The gearbox shaft and adjacent parts should be cleaned of dirt very carefully; it is best to wash everything with kerosene and wipe dry with a clean rag. The above is a method for replacing the clutch with complete removal of the gearbox. But sometimes car enthusiasts do without removal. To do this, the bolts that secure the box to the engine are carefully unscrewed (one at a time). In their place, studs are installed, which are slightly thinner and at least three times longer than the mounting bolts. These pins serve as guides along which the box can be moved slightly to the side. This creates a gap between the engine and the gearbox, through which the clutch discs are removed. This method is less labor-intensive, but it has its drawbacks: it will be impossible to get to the release bearing and it will not be possible to thoroughly clean the gearbox shaft from dirt.
As you can see from this article, replacing a clutch is a very labor-intensive operation. Therefore, it is necessary to follow the proposed instructions exactly. You should also not forget about safety precautions, especially when it comes to removing the gearbox. This is a very heavy unit and you should be extremely careful when handling it.
What is this?
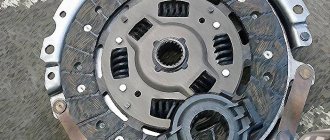
The clutch is a device that transmits torque from the engine to the gearbox and ensures smooth disconnection and connection of the engine and transmission. Without such a mechanism, the operation of a multi-stage gearbox is impossible. The main task of the clutch is to protect the engine parts and transmission system of the car from overloads and mechanical damage during sudden braking.
The VAZ 2115 clutch consists of the following components:
- Push clutch.
- Flywheel.
- Shutdown plug.
- Pedal.
- Pressure disk.
- Settings.
- Primary shaft.
- Driven disk.
- Springs.
- Pedal shaft.
- Switch lever.
- Thrust bearing.
Any of these parts may fail. When most of the clutch components are worn out, then auto repairmen recommend replacing the entire set.
It’s easy to suspect that something is wrong with the VAZ 2115 clutch based on the following signs:
- Incomplete inclusion.
- Incomplete shutdown.
- There are jerks during operation.
- There is vibration when turned on.
- There is a noise when turning off.
Changing the clutch cable on a VAZ 2109-2115
Many owners of VAZ 2108-099 cars were faced with the need to replace the clutch cable. The cable may break during use, and this is not uncommon. Over time, the cable also stretches so much that it becomes impossible to adjust it. In such a situation, the only solution to the problem is to replace it.
What is required to replace the cable?
To dismantle the old and install a new cable, the driver will need:
- Two wrenches (at “17”).
- Slotted screwdriver.
- Pliers.
- Adjustment device (you can use a regular ruler for this).
- New cable.
It should be added that in many stores, car enthusiasts are offered to purchase a cable from a VAZ 110 model instead of a “nine”. It is better to refuse this offer. The fact is that the tens cable is longer than the original spare part, and it will not fit in terms of fastening. This will negatively affect the operation of the entire clutch.
Replacement procedure
The replacement should begin with preparing the car. The car should be set to the parking brake. To eliminate the possibility of the car rolling away, you need to put stops under the wheels (you can use ordinary stones). You can remove the battery. Without it, changing the part will be easier. Now, the replacement process itself:
- Using wrenches, you need to loosen the nuts that secure the cable casing (there are 2 such nuts in total).
- The cable is raised and removed from the socket.
- The clutch guide is disconnected from the fork. This work must be approached as carefully as possible.
- Having completed this stage, you need to go to the car interior, in the future all actions will be carried out there.
- Using a slotted screwdriver, disconnect the bracket that holds the pedal pin. The end of the cable is disconnected from the pedal itself.
- Next you need to go back under the hood of the car, because now you need to pull out the cable.
After removing the faulty cable, you can begin installing a new one.
We install the new cable in the reverse order of removal. After installing the cable, you need to attach it to the pedal, fork and bracket.
Once installation is complete, it is recommended that you adjust the clutch by tightening or unscrewing the adjusting nuts until the clutch is fully depressed. It is usually sufficient to adjust the position of the cable so that the clutch pedal is approximately level with the brake pedal. Thanks to this, you can extend the service life of the basket and make driving more comfortable.
Lada Kalina: do-it-yourself repair
The driver can fix many Lada Kalina faults by doing the repairs himself. For example, it's easy to fix:
- get rid of air jams;
- eliminate rattling gear lever;
- dismantle and install a new engine air filter;
- dismantle and install a new pump;
- dismantle and install a new rectifier unit in the generator;
- replace the external constant velocity joint of the steering drive;
- dismantle and install the outer tie rod end;
- dismantle and install a new ignition module.
Lada Kalina-1 is a reliable, unpretentious car, suitable for self-repair. For successful repairs, you must have experience in carrying out repairs on similar models, strictly adhere to safety instructions, technology for performing repair work, use good quality tools, perform work using special pullers and special equipment.
Dismantling and Installation of outer CV joint Lada Kalina
To dismantle and install the outer CV joint of the Lada Kalina-1, you must have 17 and 30 socket heads, a wrench (ratchet), an extension for the wrench, a jack, wheel chocks, a hammer, and a vice.
Disassembly work should be carried out in the following sequence:
- remove the mounting bolts from the wheel and the hub nut (using a ratchet);
- place wheel chocks under the rear wheels;
- place the car on a jack and hang the wheel;
- remove the wheel and place it under the car for stability next to the jack;
- unscrew the two bolts securing the ball joint to the steering knuckle (using an extension for the ratchet);
- turn the steering wheel as far as possible to the side and slightly pull the steering knuckle with the stand, while removing the outer part of the hub along with the CV joint (using weak blows of a hammer);
- remove old boots and clamps (replace with new ones in the future);
- remove the CV joint (using a removable device or a hammer, moreover, blows with a hammer on the CV joint should be carried out, rotating it along the axle shaft).
Dismantling work should be considered completed with the axle shaft “bare”.
Assembly order:
- lubricate the axle shaft with special lubricant;
- put the boot on the axle shaft;
- add new lubricant to the CV joint;
- install the CV joint on the axle shaft, in its original place (using a hammer and a block, lightly hitting with a hammer);
- remove air from the boot and secure the grenade with clamps;
- put on the steering knuckle;
- fix the new hub nut;
- put on the wheel;
- tighten the nuts;
- remove the car from the jack.
At the end of the process, the correctness of the repair should be checked. When testing with wheels turned to the sides, there should be no squeaking or noise.
Dismantling and installation of the outer tie rod end of Lada Kalina
Dismantling and installation of the outer tie rod end of Lada Kalina-1 can be done on a regular flat area. It is enough for this operation to have pliers 13, 19,27. Recommended:
- remove the required front wheel. To prevent arbitrary rollback of the car, special stops are installed, 2 pcs. (under the rear wheels and under the threshold - 1 piece), under the threshold - a special support;
- Clean the nut securing the steering linkage of the lever and apply WD-40 to the area of the threaded connection (to facilitate the process of unscrewing the nut);
- loosen the tie rod end bolt;
- the cotter pin should be compressed and removed;
- loosen the nut and use a special puller to press out the puller hinge;
- Unscrew the tie rod mounting nut and remove the rod from the hole;
- unscrew the tip from the steering rod;
- if necessary, replace the steering linkage rod and unscrew it;
- remove the sealing ring of the protective ring of the cover;
- remove the spring ring;
- remove the protective cover;
- the top layer of lubricant should be cleaned (if dirt gets under the boot from the inside, only the hinge is replaced). If there is no dirt, apply new grease under the boot;
- install the spring and sealing ring;
- Be sure to check the correct installation of the rings and the tight fit of the edges of the cover;
- Install the tip in the reverse order. During the installation process, the parallelism of the hinge to the reference plane of the turning lever should be checked;
- screw the nut on the hinge to the nearest slot and insert the pin.
Instructions for adjusting the clutch with your own hands on a VAZ 2114
The procedure for adjusting the VAZ 2114 8-valve cable is not complicated. All repairs can be done yourself. To carry out repairs, you will first need to prepare the following tool:
- Phillips screwdriver or No. 8 head;
- set of open-end wrenches for 13 and 17;
- WD 40 or similar product;
- ruler/construction tape measure/other measuring instrument.
You can see how this is done in the video:
How to adjust the clutch cable
To properly tighten the cable, it is necessary to carry out this procedure.
- Drive the car onto a level surface and put the handbrake on.
- For safety's sake, disconnect the terminals from the battery.
- In the cabin, near the corresponding pedal, place a ruler parallel to its movement. Ideally, the lever pad should be within 13 cm. An error of up to 5 mm is allowed. In case of large deviation, adjustment is required.
The hood opens. An air filter is located near the battery. You can remove it by releasing the air duct clamp (with a screwdriver or a No. 8 socket).
Under the dismantled can you need to find the clutch cable itself. The part is located near the gearbox housing. There is a tensioner clamp on it (it looks like several nuts threaded onto the casing and pressing the mounting plate on both sides).
Clutch adjustment on a VAZ-2107 - detailed instructions for a beginner
Use wrench No. 17 to loosen the locknuts. If necessary, you can treat the fastening with WD-40 or its equivalent. Then, using a 13-inch horn, loosen the thrust nuts (1 and 2). Next, adjust the tension of the jacket. Nuts No. 1, 2 rotate counterclockwise. Thus, the pedal settles closer to the floor; to raise the lever, you need to do the opposite.
After calibration, the mechanism is assembled in the reverse order. Next, you need to press the corresponding pedal 5-6 times all the way and repeat the procedure with the ruler. If there is no position failure, everything is fine.
Adjusting the clutch pedal free play
Adjusting the free play of the clutch pedal correctly is an important measure to prevent wear of the release bearing and unforeseen situations on the road.
The pedal position is set using the same clutch cable. It is considered ideal when the mechanism operates in the middle of the lever stroke. If engagement is observed closer to the floor, it is necessary to tighten the cable.
Correct clutch setting
An important factor in correct tuning is the safe, correct operation of the mechanism. You can check the accuracy of the calibrations in this way.
- Put the car on the handbrake.
- Start the engine in neutral gear.
- Turn on the first one and try to move off without removing the car from the handbrake. If the internal combustion engine jerks and stalls, everything is done correctly. If the movement does not start, but the engine is running, the clutch disc slips, you need to loosen the cable tension.
You also need to drive the car, sequentially engaging all gears. During manipulations, the presence of extraneous sounds, vibrations or dissonance between the set of engine speeds and the acceleration of the machine is strictly unacceptable.
First stage
The first question is: is it possible to replace the clutch on a VAZ 2109 without removing the gearbox? You can look through so many materials, videos and photos, but nowhere will you find a specific answer to this question. As a result, of course, you will come across some review in which the person directly points out that it is quite possible to do such a thing. And it will even give the basic requirements for carrying out such repairs. Then it will become clear that it’s enough to climb around in search of theory, it’s time to start practicing and repair or replace the clutch on a VAZ 2109 with your own hands. To do this, find two massive stumps, the height of which should be about 40 cm, as well as several bars. Of course, it’s scary that the car will fall during the repair process. Therefore, install two wheels nearby under the bottom for insurance.
Clutch disc VAZ 2109Until the last moment, you can doubt whether it is possible to replace the clutch without completely removing the box, because you don’t want the massive gearbox to fall to the ground. But lifting it is problematic, since it is impossible to crawl under the car with it. First, disconnect the battery by de-energizing the system. So the whole story begins - start preparing the car for repairs, removing all unnecessary elements. Namely:
- Twist the wheels and move them to the side so they don't get in the way.
- Remove the tie rod ends to free up the struts.
- Remove the two bolts that secure the ball joint.
- Remove the engine protection.
- Drain the oil from the box.
- Loosen the nut on the rocker and remove it.
- Remove all nuts from the bolts on the two pads.
- Place a support or jack under the engine.
- Disable the reverse sensor.
- Disconnect the wires from the starter and remove it by unscrewing the three nuts.
- Unscrew the nuts from the flywheel protection.
- Remove the inner CV joint on the right side, do not touch the left one.
- Unscrew the three bolts securing the gearbox to the block.
- Unscrew the nut above the right CV joint.
How to adjust the clutch after replacement
After replacement, it is worth adjusting the operation of the mechanism. Here you will also need an assistant. The adjustment instructions look like this:
- While installing the clutch cable, you may notice that the pedal rises. In this case, it is necessary to adjust its stroke by turning the lock nut and the adjusting nut. It should be 12-13 centimeters.
- To set the exact value, you need to use a ruler. Place it perpendicular to the floor, and then lock the pedal pad to the desired value. It is best to give an assistant a ruler and adjust the locknut yourself.
It will be difficult to replace the clutch without the help of another person, so arrange in advance with someone who will do this work with you.
Acceleration
A clear sign of clutch wear is when the vehicle accelerates. If the car does not accelerate in proportion to pressing the throttle, that is, the engine begins to oil, but the car does not move, especially uphill, then this is exactly one of the following reasons:
- The clutch drive is poorly adjusted (the cable is too tight or the hydraulic cylinder rod is too protruded, depending on the type of drive)
- Clutch disc wear
- Oil got on the clutch
- Someone pushed hard from the start and burned the disk. One start is enough to get a good burn.
So, the clutch drive is tightened for a reason, mainly when the basket is already tired and does not work within factory limits, that is, it has lost a little rigidity and in order for it to move away from the disc when pressed, you have to press deeper on it. Definitely a replacement. Another reason may be a cable with less rigidity than necessary; it stretches more than it should and does not press much. In order for it to work at least somehow, it has to be clamped more than required. We need to check, otherwise the basket will turn out to be working, I had this happen.
When the friction linings of the clutch disc wear out, the friction between the basket and the flywheel disappears. The same thing happens when oil gets on the disk - a common situation when the rear oil seal of the engine leaks. Here you need to remove the box and change the oil seal, because it won’t work like that. At the same time, you can change the disk, you can leave the basket, and look at the situation.
Worn “slightly burnt” clutch
But the clutch disc also becomes unusable if you press too hard at the start (street racers, hello!), the disc burns out immediately and loses its frictional properties, with the bonus of a burnt smell.
In general, if it smells burnt when driving, then this clutch stinks, especially when it is not pressed in enough and the disc is rubbing.
Replacing the clutch cable of VAZ 2113, 2114 and 2115
Another repair and restoration operation to restore the clutch’s functionality can be done with your own hands - replacing the cable. It is less labor intensive. Replacing the VAZ 2114 clutch cable is carried out in the following order:
- de-energizing the machine by removing the minus terminal;
- We begin dismantling with the cable fastening nuts; for this you will need a 17 mm wrench;
- Next, the cable must be removed from the fork and bracket;
- subsequent work is carried out from the interior, where it is necessary to remove the floor coverings and provide access to the mechanism;
- continue: unhook the cable eye from the pedal, here you will have to tinker with the locking bracket for a while;
- now the cable needs to be pushed out of the cabin and pulled out from under the hood;
- the old cable is removed from the housing and a new one is installed in its place;
- the housing is mounted in place, the remaining operations are performed in the reverse order;
- After completing installation, do not forget to adjust the cable tension.
You can watch the replacement of the VAZ 2114 clutch cable in the video.
Practice shows that for work you can use not only the original part (article 2109-1602210-10), but also analogues that are not inferior to it in quality. For example, Italian cable Adriauto 0101 or German spare parts TRW GCC 3123. Replacing this part takes about an hour.
Types of spare parts
Clutches are classified according to different criteria. So, according to the control method, the details are distinguished:
- Hydraulic.
- Mechanical.
- Electrical.
- Combined.
By type of friction there are:
- Dry (work in air).
- Wet options (oil is used).
According to the number of discs there are clutches:
- Single-disc.
- Multi-disc.
According to the switching mode, the part is classified into:
- Constantly closed.
- Not constantly closed.
According to the novelty, the spare part is:
- New.
- Restored old.
- Used, which has not been repaired.
By originality there are products:
- Non-original (produced for different brands of cars by any plant except VAZ).
- Original (made specifically for this AvtoVAZ brand).
By manufacturer you can buy non-original products from the following companies:
- Finwhale.
- LUK.
- PILENGA.
- KRAFTTECH.
- VALEO.
- SACHS.
Prevention of clutch failures
To prevent such breakdowns from occurring, you need to adjust the clutch in a timely manner, do not make frequent and sudden movements at the beginning of the movement, lower the pedal completely if you make high speeds, try to purchase high-quality spare parts.
In any passenger car, the most important element is the basket, also called the drive disk, which is installed on the internal combustion flywheel. One of the clutch elements is another part called the release bearing, with the help of which the amplifier is transferred from the fork installed to the petals of the basket. It is located inside the disk and is connected to the input shaft using splines.
Important! The replacement sequence is generally not complicated, and if you carefully review the instructions, any driver can do it. A replacement that occurs for the first time, it is better to do it with someone who already knows how to do it
With such an installation, the work will be accelerated and its correctness will be guaranteed.
It is better to carry out such work in places designated for this purpose, mainly garages with special pits and overpasses, or take them to a service station. Even if this opportunity is not provided, you can do it yourself by lifting the hood of the car with blocks of bricks or any other materials.
Gearbox Maintenance
To maintain normal operation of the gearbox, it is necessary to systematically monitor the oil level. The procedures should be performed on a cold box. The desired oil level indicator is located between two control marks marked on the indicator.
Using the dipstick you can determine how much fluid needs to be added. It is better to pour the substance in small doses through the hole closed with the dipstick.
The Kalina operating manual defines the filling volume of the box as 3.1 liters. But practical advice on how much to fill with transmission fluid differs slightly from the normative ones. It is more often said that a complete fluid change requires 3.3 liters.
For the Kalina gearbox, clear parameters have been defined according to which the planned replacement of the transmission substance is carried out. High-quality oil lasts 75,000 km or 5 years of vehicle operation. Depending on what comes first, the transmission substance is replaced.
Analogs
Clutch cable
In addition to the original part, you can find analogs that are recommended for installation on the VAZ-2114. So, what non-original parts can be found on the spare parts market:
- Adriauto 0101 is an Italian manufacturer that offers high-quality clutch cables. The average cost is 1000 rubles.
- ABS K22120 – part made in the Netherlands. High quality and not expensive. The average cost is 1200 rubles.
- TRW GCC 3123 – German spare part. The company is known for its wide range of products for domestic cars, as well as the excellent quality of parts. The price will be 1500 rubles.
What does the price depend on?
The price range of clutches for the VAZ 2115 is very wide. This fact is confirmed by drivers who decided to start looking for spare parts. The price gap is explained by the fact that a number of factors are taken into account when forming them.
Affect the cost:
- New details.
- Originality.
- Place of purchase.
- Quality.
- Product type.
- Manufacturing organization.
- The need to deliver goods to the customer’s address.
Signs of bearing failure
The release bearing comes into operation only when changing gears, the rest of the time it is at rest. Its malfunction makes it impossible to further move the car. Therefore, at the first sign of failure, the part should be replaced.
This part can deteriorate due to uneven loads on it: when the clutch is depressed, it moves back along with the driven disk. Therefore, manufacturers do not recommend holding the clutch pedal depressed when the gear is engaged, as this will increase wear and accelerate the failure of the part. The product is quite durable, reliable, and rarely fails; most often this happens on the cars of novice car enthusiasts.
Signs of a malfunction are the appearance of a knocking or crackling sound when the driver depresses the clutch pedal. This increases the free play of the pedal. The appearance of sound in the summer clearly indicates a breakdown; in winter it can be caused by a change in the size of the bearing cup when the air temperature drops.
Thanks to the large safety margin, even if a knock occurs, you can drive for a while to make sure that the part is faulty if the sound increases. Other signs are the appearance of a burning smell when the car slips, engine overheating, and increased fuel consumption.
Approximate prices
The cost of a new clutch for a VAZ 2115 varies from 2200 to 4200 rubles . An old spare part can be purchased for 1000-2000 rubles .
Prices largely depend on the manufacturing company. Below is the estimated cost of clutches from different companies:
- Finwhale - about 3000 rubles .
- LUK – 4000 rubles .
- PILENGA – from 2200 .
- KRAFTTECH – 2300-2800.
- AvtoVAZ – from 4100 .
- SACHS - about 3800 rubles .
- VALEO – 3200 rubles
If one clutch part fails, then it will be more profitable to replace only the broken element. For example, a pressure plate will cost about 260 rubles , a release clutch - 560 , a driven disk - 887 rubles .
Specifics
The release bearing is activated exclusively at those moments when the driver changes gears. At other times it remains unloaded.
A breakdown of the element in question in a VAZ, or even just significant wear, is the cause of failure of the entire clutch. Thus, it is not advisable to postpone the repair of the unit - the key part should be changed at the first opportunity.
The service life of the release bearing is exhausted relatively quickly, not so much because of the load as such, but because of its unevenness. That is why the manufacturer of the VAZ-2110 advises not to hold the clutch pedal in the lower position when the gear is engaged unless absolutely necessary.
Required Tools
Owning a domestically produced car is convenient because to repair it, it is enough to have a set of keys, screwdrivers and a pair of special pullers. In the case of replacing the clutch disc, this kit will also come in handy. Full list of tools required for work:
- Set of wrenches or sockets with ratchet;
- Wheelbrace wrench for wheel removal;
- A jack and a small beam for raising the engine above the gearbox;
- Mount;
- Rope and screwdrivers.
The presence of tools from this list makes it possible to carry out the work independently. Note that for those who want to replace the disk quickly, it is better to contact the service. This especially applies to inexperienced car owners. Before starting work, you can call the services and find out how much it costs to replace the clutch on a VAZ 2114. If you decide to improve your repair skills, read the replacement instructions.