One of the most common vehicle breakdowns is knocking of the steering shaft. Regardless of whether the vehicle is purchased new or used, after a certain period the steering wheel will begin to tap even with very careful handling and careful maintenance. There may be a number of reasons for the breakdown of the steering rack or column. This article will focus on bearings.
Installation procedure
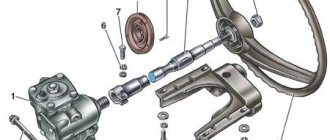
- We put the coupling flange on the drive gear shaft in a position where the slot of the coupling tip coincides with the central longitudinal line of the flat.
- We tighten the coupling flange bolt without tightening it completely.
- We put the steering column on the studs and tighten the nuts securing the bracket.
- We tighten special bolts with tear-off heads together with the fixing plates. Let's not delay them.
- Tighten the coupling flange coupling bolt, two bolts (until the heads break off) and two nuts securing the steering column bracket.
- Connect the ignition switch wires.
- We install steering column switches.
- Installing the steering wheel
- Reinstall the covers.
- We check the functionality of all mechanisms on the steering column.
Video on replacing the steering shaft coupling:
Source
To watch online, click on the video ⤵
How to replace the steering column bearing of the nine (VAZ-2109, 2108-21099) and eliminate the steering play yourselfRead more
REPAIR OF STEERING COLUMN VAZ 2114More details
Replacement of VAZ 2112 steering shaft bearingsMore details
Replacing the VAZ 2114 steering shaft bearing is very quick.Read more
Replacing the bearing on the steering wheel of a VAZ 2109, etc. Read more
How to remove the steering column on a VAZ 2114 and 2115
The steering column on VAZ 2113, 2114 and 2115 cars is completely identical and the removal or installation procedure will not be any different. Of course, this design already provides for height adjustment of the steering wheel. It is for this reason that many owners of old Samara, VAZ 2109, 2109, 21099 want to install the shaft assembly from the new models.
In order to remove the steering shaft assembly on the VAZ 2114 and 2115, we will need the following tool:
- chisel
- hammer
- 13 mm head
- ratchet and extension
Preliminary assessment of the situation
It is advisable to first independently check the car for the presence of a faulty steering column or rack, rather than immediately rushing to a service station. After all, even for diagnosing the rack, the car owner will be asked to pay a significant monetary fee. You can certainly diagnose play in the rack and bearing wear by lifting the front wheels of the car, for example, using a jack. If you detect play when turning the wheels by hand or when turning the steering wheel, this is already a signal for repair. Also, if you hear the characteristic sounds of a worn bearing when turning the steering wheel, then the bearing probably needs to be replaced.
How to properly change steering shaft bearings? To do this, you can carry out all the necessary work yourself, if the car owner understands the structure of the rack and column. Or you can turn to car service specialists for assistance, who can quickly fix the steering shaft fault. But it must be taken into account that such repair work to replace rack bearings will cost significant finances. Moreover, in the repair of columns and racks there is nothing very difficult to contact specialists. Therefore, it will be much better and faster to do everything yourself, you just need to be patient and stock up on the necessary tools.
Removing and installing the steering column on VAZ 2114 and 2115
So, first of all you need to do the following:
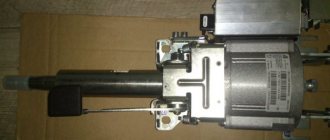
After all this, we get something like the following picture:
The column is secured with two studs and nuts in the front, and two bolts with breakaway caps in the rear. Of course, round caps are unscrewed using a chisel and hammer:
When the bolt rotates without much effort, you can finally unscrew it by hand.
Before unscrewing the front fastenings, you can immediately unscrew the pinch bolt securing the cardan shank to the steering rack.
Now you can proceed to the front column mountings. Using a 13 mm deep socket and a ratchet handle, unscrew the fastening nuts, as is clearly shown in the photo below.
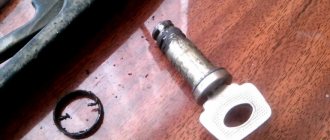
Now the shaft assembly is attached only with splines to the steering rack. To pull it off, you need to use a chisel to widen the edge a little, and then try to rip the column towards you. To experience fewer problems, you can put the steering wheel on the shaft, tighten it lightly with a nut, and sharply pull it towards you. Usually, in this case, removing the column is much easier.
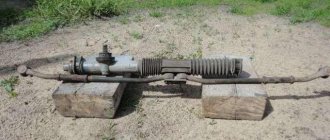
The result of the work done is shown clearly below.
Installation occurs strictly in reverse order. The price of a new speaker starts from 3,000 rubles.
Source
Work order
Replacing steering bearings on a vehicle such as a VAZ-2110 consists of a number of stages that must be carried out in the order in which they are listed below.
The whole process can be seen in the video:
First, you need to disconnect the battery on the car to prevent an electrical short circuit. It is enough just to remove one terminal where the “-” sign is indicated.
Then you need to remove the steering wheel. To do this, you will need to turn the car's ignition key, and also turn the steering wheel 90° in either direction. You will see a whole row of nuts, thanks to which the steering wheel is attached to the shaft
Using a special wrench, unscrew the nuts, and then carefully proceed to the recess to remove the steering wheel. This is done due to the fact that in some cars there is a system in the steering wheel that allows the steering wheel to be spring-loaded
If you do not take this into account, you may even get injured.
Using a special wrench, you need to unscrew the nuts where the steering column switch mechanisms are secured. Next, their bases must be moved towards the driver’s seat.
Having found the wire connected to the oil pressure sensor, you need to remove it.
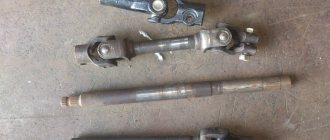
Replacing the universal joint on a VAZ 2110, VAZ 2111, VAZ 2112
Welcome! The backstage cardan is what people usually call it, but in reality it is called the “Gearbox control drive rod joint”, something like this, thanks to it, gear shifting is carried out, or rather, not thanks to it, but thanks to your hands, that is, in that the moment when you grab the gearshift knob and shift it, by means of a rod that goes from the rocker itself to the box and the next gear is engaged, and the cardan is an intermediary in this matter and an assistant in shifting gears, if the cardan is severely deformed, then you simply cannot change gear You can, or you can shift, but with great effort, and it’s not a fact that that particular gear will turn on and not any other.
Note! In order to change this hinge (in the future it will be called that), you will need to stock up on tools, which will include: Wrenches and spanners (Whichever is more convenient for you), and you will also need a screwdriver and a rubber hammer (If you have this one, if not, then take the regular one)!
How to replace the universal joint on a VAZ 2110-VAZ 2112?
Note! It is possible to remove this hinge only on an overpass, inspection hole, or if you raise the car, because this hinge is located under the bottom and you will need to crawl under it to unscrew both bolts that secure it!
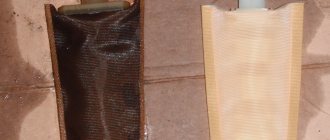
Removal: 1) At the beginning, as you already understood, you will need to crawl under the car, after that, look for the boot (Indicated by the arrow) and the hinge itself, which is located under this boot, so after that, take two keys in your hands and hold the bolt with one to prevent it from turning , loosen the nut of this bolt a little as shown in the figure, and after the clamp nut is loosened, grab the rod with your hand and remove it from the hinge as shown in the small figure.
Note! Before you start unscrewing the nut of the tie rod bolt, drag the boot towards the box so that it does not interfere, and after you disconnect the link, drag the boot towards it and thereby completely remove it from the car!
2) Now you will need to unscrew another bolt that secures the hinge in the front part to the gear selector rod, so after this bolt is unscrewed, you can pull the hinge and calmly remove it from the place where it is installed.
Note! When you install the new joint, you will need to get these bolts into the hole in the gear selector rod, so remember approximately where this bolt is located after installing the new joint in the same place and screw it in so that it fits into the hole in the gear selector rod!
Installation: Installation of a new hinge is carried out in the reverse order of removal, but only when you install the hinge, the link will definitely need to be adjusted, otherwise the gears will not engage clearly and instead of, for example, first gear as mentioned earlier, the reverse gear may easily engage. (For information on how to adjust the rocker, see the article entitled: “Replacing the rocker on a VAZ”)
Additional video: If you want to learn in more detail how the hinge is removed and installed, then watch the video below that clearly shows everything:
- Electrical equipment
- Engine
- Brake system
- Other
- Steering
- Transmission
- Suspension
- Tuning
- VAZ 2110 Other
- Engine
- Steering
- Electrical equipment
- Transmission
- Brake system
- Suspension
- Tuning
- Electrical equipment
- Steering
- Video publications
- VAZ tuning photo stream
- Operation and repair manuals
Replacement
Many people turn to a service station to replace this bearing. It is noteworthy that car services often refuse to perform such work. It’s understandable, because the procedure is painstaking, and you can’t get a lot of money for it.
To do the job yourself, follow the instructions.
- You can often find advice about the need to completely disassemble the gearbox to replace the bearing. But this is optional. You can do without such complex manipulations.
- In any case, you will have to remove the box, so familiarize yourself with this procedure.
- Before removing the gearbox, remove the negative terminal from the car battery.
- All the chips are removed from the box, the wire from the speedometer is unscrewed.
- Next, the trousers of the vehicle exhaust system are dismantled.
- After this, you can completely remove the gearbox.
- At the next stage, the bell is dismantled. You can try to do without it, but then it will definitely constantly interfere with your work.
- Thoroughly clean the box from accumulated dirt.
- The bearing is secured using retaining rings. To remove them you will need a flathead screwdriver.
- The rings are pryed off and loosened a little, after which there will be no more problems with removal.
Replacing a short-stroke rocker on a VAZ 2114
VAZ models received one unpleasant feature: with age, backlashes appear in some parts of the car. We are talking about the transmission, engine, and gearbox. There is no need to wait until all the parts of the unit wear out, since a complete replacement will cost more than modernization. In this article we will talk about tuning the gearbox, or more precisely, about installing a short-stroke shifter (SC) instead of the standard one. Here, VAZ 2114 owners have three options: installing a freelance rocker, making the part with their own hands, and also adjusting the standard unit.
Important! Defects in the operation of the gearbox may appear due to the oil seal, the “symptoms” of which are similar to the rocker. A visual inspection is enough to determine whether the seal is working or not. The analysis can be performed according to the scheme from this article.
The short-throw rocker reduces gear shifting time, which is why this part was originally only found in sports cars. Subsequently, almost all automakers included a short-throw rocker in the design of their cars. AvtoVAZ lagged behind foreign cars a little, so the first model of the company with this part was the Lada Kalina, so if you install a freelance element, then it’s from the Kalina.
Pros and cons of a short-throw rocker
There is a stereotype among drivers that installing KK leads to the fact that when changing gears you can easily miss the right one. There is a problem, but it arises due to the wrong approach to modernizing the car. In addition to the rocker, it is necessary to install a new gearbox driveshaft. The best solution would be a part from the Lada Kalina, since the cardan in new models is not subject to play. Even if the CC is made by hand, the cardan must be installed from the factory.
The next stereotype is that such modernization quickly destroys the gearbox. We are talking about the second gear, which wears out equally with both a regular part and a short-throw one. This problem has been present in Samara since the VAZ 2109. The third stereotype is this: when installing the rocker in the gearbox, you need to file down the plastic in the dashboard. If a high-quality homemade CC or a part from Kalina is installed, then no manipulations with the plastic are necessary. It is also recommended to install sports synchronizers along with the CC, since the load on them increases after such tuning.
What could be causing the problem?
Let's look at each of the signs and what can cause them to appear. It should be noted that some problems, for example knocking, may not be related to the mechanism itself.
1. So, the free play on the steering wheel has increased, that is, it dangles more; the increased travel can additionally manifest itself in the appearance of a beating in the steering wheel when braking.
This problem may be associated with loosening of the ball pins to the stabilizer strut, increased clearance in the ball joints, or increased clearance between the rack and pinion.
- If play is detected in the steering wheel, first of all you should inspect the steering ball joints. It rarely happens, but it is possible that the nuts securing the tips have become loose and the pin has begun to come out of the seat, causing a significant gap to form at the mounting point. Fixing such a malfunction is simple, just tighten the nuts.
- Ball end wear is much more common, resulting in a gap between the pin and the body. This problem can be eliminated by changing the tips.
- Play in the steering wheel can be formed due to an increase in the gap between the rack and pinion. During the operation of this mechanism, these elements gradually wear out, and the gap between them increases. Repairing this problem comes down to an adjustment that just requires tightening the adjusting stop nut correctly.
Installation of CC and cardan from Lada Kalina
The best solution would be to buy parts from Kalina, but some drivers prefer to take KK from a VAZ 2114, that is, a “native” part. In addition to the standard set of tools, you will also need a grinder. Replacement is carried out as follows:
- Inside the car, it is necessary to remove the platform, which blocks access to the transmission and gearbox parts. The platform is held in place by 5 bolts;
- From the bottom of the car, loosen the clamp that presses the cardan and the rocker;
Unscrew the 5 bolts holding the backstage platform
- You need to remove the boot from the gearbox hinge and remove the mount;
- Further, the installation depends on which rocker was chosen as a replacement - the standard one from the VAZ 2109-2114 or from Kalina. After installing the standard CC and cardan from the Kulisa, the part may not fit into the seat. This can be corrected with the help of an angle grinder;
- The size of the cardan is best determined by the standard element. After the adjustment, you need to check whether the short-stroke linkage is hitting the body. If everything is installed correctly, then you need to tighten the clamp;
- The next step is to adjust the new part, which is done in reverse speed. It is necessary to switch the gearbox to reverse gear and set the lever to the R gear position. It is best to place the lever closer to the driver's seat. Done, the replacement is complete, now the tuning can be checked on the road.
Now you can safely remove the remaining two bolts in the lower linkage mount
Short-throw rocker for VAZ 2114, do-it-yourself adjustment
Over time, almost everywhere possible, backlash begins to appear on cars produced by AvtoVAZ. The gearbox is no exception. It is not surprising that replacing the rocker on a VAZ 2114 has become a routine procedure familiar to all owners of this model.
Determining the malfunction is quite easy:
- Gear shifts with problems, indistinctly;
- The gearbox is loose.
If such a malfunction occurs, a complete replacement of the element may be required. Moreover, many are switching to a short-throw rocker, which gives the car a more sporty character. This technology was borrowed from motorsports. By the way, a simple adjustment can turn it into a short-stroke one.
Some masters argue that it is not always wise to completely change. It is more profitable from a financial point of view to purchase a repair kit. But in fact, such repairs do not give the desired result, and after a while the link will still have to be changed.
What to do
All work with the steering mechanism can be done with your own hands; there is nothing particularly difficult about it. But after work, especially on the steering tips, the toe angles will need to be adjusted, which is best left to specialists.
If a malfunction occurs, you will first need to diagnose the mechanism to identify the unit that caused it. First, the condition of the tips is checked. To do this, they are removed from the support and checked manually. With a working tip, the finger moves in its body with effort, but it should not get wedged to any position; such a tip can be put in place and continue to look for faults. If it moves freely and there is some play, then it is replaced.
Next, the gap between the rack and gear is adjusted. For this, a special 6-sided key is used. With its help, the thrust nut is tightened until it stops, and then loosened by ¼ turn. After this, the nut is fixed using punching. If the adjustment is made correctly, and the condition of the rack is still satisfactory, then the knocking should disappear.
If the adjustment does not help, then most likely the wear of the main components is quite severe and a major overhaul of the mechanism is required with the replacement of the rack, which can also be done with your own hands.
Replacement instructions
Before starting work, we advise you not only to purchase a new spare part, but also to watch training videos on replacing the slide. The procedure is not very complicated, but a visual aid will never be superfluous. Especially if you do not have much experience in repairing a car and transmission in particular.
The process involves performing several sequential steps.
- Remove the housing from your gear shift knob.
- Raise the car using a jack. In some cases, an inspection hole will do, if you have one in your garage.
- Now you should dismantle the console, which will give you access to the backstage.
- The element is held in place by six bolts, which can be removed using a regular 13 mm wrench.
- But it's not that simple. You won’t be able to unscrew the top two bolts with a wrench, so don’t even try. They are specially planted as tightly as possible, so to dismantle them you simply need to cut them down with a grinder.
- Now you can safely remove the remaining two bolts in the lower fastening of the rocker, for which your effort and a 13 key will definitely be enough.
- The next step is to remove the clamp and move the boot. You will need to remove the hinge. At the same time as replacing the link, we recommend changing the hinge. It would be a good idea to replace the oil seal and cardan shaft. These elements have a limited service life, and since you decide to change the slide itself, there are objective reasons to do everything as efficiently as possible.
- After this, install the new unit in place of the old one. Act carefully so that the rubber bands of the slides fall on the welded bolts, which you previously sawed off using a grinder.
- The assembly is now reassembled, operating in the opposite sequence to disassembly. It is not necessary to seat the top mounting bolts tightly, but try to tighten them firmly.
Signs of failure
All bearings, of which there are quite a few in a car, have approximately the same signs of failure. But since you know the location of the input shaft bearing, it will not be so difficult to determine that the problem arose with it.
There are several characteristic signs of its breakdown.
Peculiarities
Howling when the clutch is released in a parking lot
The element has failed and needs to be replaced. The howling is usually caused by the formation of chips, cracks, or the destruction of 1-2 rollers
Whistle when driving
The bearing is partially damaged or there is no lubrication. The problem in the absence of lubrication can only be determined by dismantling and visual inspection. To solve the problem, sometimes it is enough to simply lubricate the element and return it to its place
Clutch won't engage or disengage
Most likely the bearing is stuck. If the damage is serious, the input shaft may need to be replaced.
Knock in the area where the element is located
The bearing knocks only when the part is completely destroyed. If you do not replace it in time, the bearing will be welded to the shaft, so you will also have to replace the shaft itself
If you notice the first signs of a malfunction of the input shaft bearing on your gearbox, you should immediately check the condition of the element and, if necessary, replace it.
Price issue
If you decide to replace the rocker seal at the same time as installing the rocker itself, this can be considered absolutely the right thing to do. Additionally, replacing the driveshaft will not cost much, but the efficiency of such a comprehensive repair will be much higher.
Actions on your own, you only have to purchase the necessary parts and ordinary consumables. If you contact a car service, the minimum cost of the service will be 800-1000 rubles. That is, the savings are obvious.
The curtain itself costs about 400 rubles. From here it becomes clear why we did not advise buying a repair kit, but rather completely replacing the part. There will be no savings as such, but the difference as a result of the repair will be significant.
Sports
We noted that for the VAZ 2114 you can install a sports short-throw rocker . Outwardly they are quite similar, but the difference in work is felt immediately. On a sports unit, gears shift faster and smoother. It's all about the design of the backstage itself. Unfortunately, it is precisely because of this that the process of independent replacement becomes almost impossible.
If you decide to install a short-throw rocker on your VAZ 2114, contact trusted car services, or even better, a studio that specializes in tuning. Such events are classified as technical improvement, which is why no one understands this better than tuning specialists. Even official AvtoVAZ car services.
Source