On a Renault Duster, removing the radiator grill can be done using the “quick method”. The bumper will remain in place, but such a maneuver is officially prohibited. There is another way, when the assembly is removed. This “assembly” includes a bumper with a grille at the bottom, and a “top” grille is attached to the bumper. This method is standard. It is discussed at the end of the review, and now let's talk about a faster and riskier method.
An example in the video below: dismantling does not take place without WD-40.
Removing the grille separately from the bumper
The difficulty is that the grille will have to be folded back. And this risks breaking the “plastic horns”. If you're willing to take the risk, read on.
We will need a flexible Torx screwdriver with a T20 tip. Using a Torx T30 wrench, unscrew the four screws on top. Everything is simple here, but the grille will need to be bent forward.
Operation not according to regulations
Use a flexible screwdriver to get to the screws on the side. They are fixed at the same level with the central point of the emblem.
When the screws are unscrewed, try to remove the grille from the grooves (see figure). Each “horn” ends in a groove in which the lattice protrusion is placed.
Plastic fasteners
If you have dealt with the side fastenings, then with the “central spur” everything will work out quickly. It is necessary to move the plastic protrusion upward, then tilt the grille forward. The fastener should snap off immediately.
The bumper and grille are “sewn” together with plastic tabs. They go in one row, 5 on each side. And you can remove the Renault Duster radiator grille, and not break it, only by snapping off all 10 tabs.
The main reasons for changing the grille
Another design option
Tuning and grille removal are necessary to give the car an original appearance. Car owners should know how to replace a part if cracks appear on it. It should be noted that this design has:
- resistance to large temperature changes;
- individuality;
- low price.
Tuning the Priora se involves installing an “aggressive” grille. This model will give the vehicle a sporty look by increasing radiator cooling. Some Lada owners prefer to tune the factory model. For this you can use chrome strips and moldings. They stick easily to the ribs.
Tools you will need:
The radiator grille of the Priora se can be easily tuned with your own hands. To do this, you will need to cut out the VAZ badge using a hacksaw. Then you will need 2 moldings, which are first placed on the plane, marked and cut to size. This element is attached to the grille with tape. Moldings must be wrapped with masking tape in advance. This will prevent damage to the main element.
The next step is to dilute the epoxy glue in a container. Moldings and radiator grille are coated with it. Then the strips are applied, pressed down and held for some time. After the glue has dried, the edges are trimmed. A file is used for this.
The bottom grill can also be removed
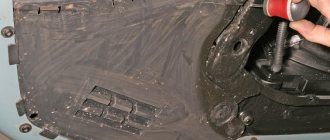
You cannot get to the bottom grate from the outside. Therefore, you will have to remove the bumper. The entire assembly is placed on a flat surface, and then the plastic tabs are snapped off with a screwdriver. First, of course, you need to remove the shields (see figure).
Access to the grille is blocked by a shield
No self-tapping screws or screws are used in the design - only plastic fasteners. We list them here:
- Each shield is secured with 5 separate tabs;
- 9 tongues hold the grille itself (4 at the bottom and 5 at the top).
When dismantling is not necessary
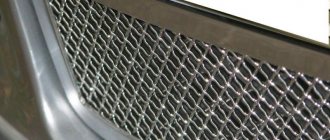
If you slightly bend the upper grille by unscrewing the four Torx screws, you can install the protective grille immediately. The mesh pitch is usually 5-7 mm.
We put the grid into the “envelope”
The standard size “370 by 250 mm” is suitable. Moreover, two identical parts are needed. They are installed on both sides, adjusting the shape during installation.
Each sheet of mesh is inserted into a groove. No additional fasteners are needed. The sheets will be pressed against the radiator grille. And that will be enough.
Tuning "Lada Priora" using moldings
A very interesting radiator grille (Lada Priora) is obtained if you use a couple of moldings. This tuning allows you to radically change the appearance of the front of the car.
The work is quite simple - you do not need any special skills.
- remove the radiator grille;
- cut off the VAZ icon located in the middle;
- We mark 2 chrome moldings along the length and cut them to the required size with a hacksaw;
- Using epoxy resin, we glue the moldings to our base and wait for it to dry;
- use a file to smooth out any unevenness if necessary;
- We install the resulting product on the car - and the tuning is successfully completed.
In the photo you can see what the radiator grille (Lada Priora) will look like after you do this tuning.
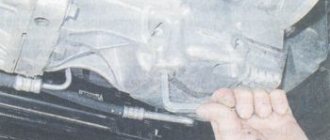
Removing the assembly
There is no need to bend or snap anything off. However, unscrewing the screws won’t solve the problem either.
So, with a Torx T30 key you need to unscrew 9 screws: 4 on top, 5 on bottom. Fastening points are marked with arrows.
Torx T30 screws, 9 pcs.
The main thing is not to unscrew the screws that hold the subframe (red arrow).
T20 screws are screwed inside the fender liner. Two of them connect to the bumper. One is installed closer to the edge of the wing, the second is at the very bottom (see photo).
Self-tapping screws T20, 2 + 2 pcs.
It is better to unscrew the bottom screw from the hole. The design does not contain any other screw fastenings.
Latches
Plastic latches connect the side of the bumper to the fender (see figure). Starting from the corner, the bumper is simply moved to the side. The grooves will come out of the fastenings themselves.
Each latch holds one slot
You can unfasten the latches by reaching for them with a screwdriver. But this is optional. When the bumper is not held in place by anything, the entire assembly can be easily removed. The main thing is not to carry it over a long distance! This advice applies to those who have PTF optics.
We looked at how to remove the Renault Duster radiator grill, following the standard instructions.
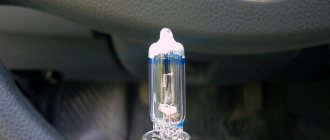
Disabling PTF
Let’s assume that the dismantling has been completed, that is, the bumper and grille have already been removed. The last step remains - turn off the fog lights.
Before disconnecting
We will act like this:
- Carefully lay the entire structure at a distance of 10-20 cm from the car;
- Disconnect the connector attached to the left wing.
The same is provided for by the regulations. It would not be possible to disconnect the connector before removing the bumper.
How to remove the radiator grille
How to remove the radiator grille (and saber) - dorestayl.
Due to the fact that the saber on the radiator grille began to look like this after the first trip out of the warm garage into the cold (photo 1), I decided to paint it to match the grille. (2 Uncle Vova - it’s absolutely impossible to “wash” here!)
The paint pickers are demanding the part, no one wants to pick it up on the street, so I had to remove the grille.
first - take out the two clips in the center and unscrew the two screws along the edges (photo 2, 3, 4)
since DORESTYLE, i.e. all this is not new, I recommend immediately stocking up on clips so that when assembling you can stick the new one in
Our part number is 52161-0K040, analogue (it seems) 52161-16010, according to Exist it gives a price tag of 40 rubles, I just came with a broken clip to the nearest store and took a dozen for 10 rubles
a dozen because, in the process of tearing out the grille, I completely gouged three clips securing the bumper under the grille, to which there was absolutely no need to climb
all these little noises are visible in the diagram (picture 5), plus the self-tapping screws of the saber are also indicated there, but more on that below...
second - we put our hand behind the grille to its lower edge and find the latch tongues there, with which the grille is attached to the bumper through the holes in the bumper (photo 6)
I got a photo of the holes, but I can’t say the same for the photos of the latches (photos 7, 8, 9, 10)
There are 4 of these latches (I broke two of them to hell!)
you need to pull the tabs up (carefully!) while simultaneously pulling the grille forward, i.e. It’s better to start from one edge and move towards the other, pulling out the latches one by one
pull without fanaticism, fanaticism is fraught with breaking off such a valuable part
if during the process of pressing there was a disgusting crack and the tongue broke off, then it’s too early to give in to despair, maybe the tongue itself broke off, but the protrusion-latch still remained in place (this happened to me, but I broke the protrusions later)
this protrusion can be felt with a finger despite the absence of a tongue
along the edges, near the headlights, the grille somehow still snaps into place, and on the right and left there are clearly visible tabs sticking out, long, but one broke off along with the corner of the lower edge of the grille, I didn’t take a photo of the second today, I’ll try tomorrow
judging by the fact that the unbroken edge can be easily removed after unsnapping the lower latches - it doesn’t hold very tightly there, there shouldn’t be a problem, I broke this corner solely due to my own stupidity
removing the saber - the saber is attached to the grill using seven self-tapping screws, which, accordingly, need to be unscrewed
in the diagram (picture 5) this is 93560-54014, 7 pieces, all screwed in horizontally
if the task is to remove only the saber, then you can throw it off without removing the grille, not very convenient, but not difficult either
The difficulty here lies in something else - those structures inside the saber into which the screws are screwed are so flimsy that I broke 4 of these figs out of 7 in the process of unscrewing the screws
in photos 11, 12, 13 (photo from the inside of the grille) both screws and holes for screws are visible)
I broke it successfully (if I may say so), the central and outer ones remain, but I still need to come up with something, 3M or sealant, we’ll see
I’ll try to post a photo of the saber from the inside and the notorious structures tomorrow (if I don’t break the structures)
Articles
List from the Renault catalog:
- 620220025R – bumper without PTF
- 620220030R – bumper with PTF
- 622231300R – mounting bracket to the body, left side
- 622220011R – the same, right side
- 620931777R – plastic adsorber (amplifier)
- 752102945R – additional amplifier
- 623825665R – external grille (chrome)
- 623100260R – internal grille (black plastic)
- 6001549321 or 8200597650 – right PTF holder
- 6001549322 or 8200597649 – left PTF holder
- 622540008R – lower grille
- 214998574R – shield (air duct), left side
- 214949303R – the same, right side
We hope no questions arise here.
All items refer to cars of the 2010 model year. The details for the restyled version are different: 620226895R is the bumper, etc.
Selection of analogues
High-quality plastic is produced by Breckner and NPA. The Taiwanese brand Api also looks good. And the company Asam SA (Romania) produces fasteners.
- Bumper without PTF – Breckner BK71303; NPA NP513-07211; Api DC6000000-0000;
- Bumper with PTF – NPA NP513-07212; Api DC6000000-1000;
- Left bracket – NPA NP513-07235; ASAM 80133;
- Right bracket – NPA NP513-07236; ASAM 80132;
- And so on.
Features of the Priora bumper
Car enthusiasts immediately fell in love with the car, and after some time, in 2013, when the next car showroom opened in Togliatti, the company presented a new car, the Lada Priora. Again, new details appeared:
- headlights with daytime running lights that light up when the key is turned in the ignition;
- rear side lights;
- brake light equipped with LEDs for sedan, hatchback.
But what is especially noticeable is the rear bumper of the Priora. The model has been transformed thanks to a unique bumper with a new design. It has energy-absorbing inserts and is distinguished by the fact that the radiator grille is lined with a mesh structure.
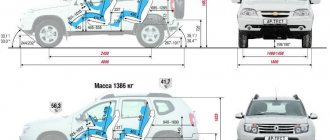
The rest of the details were not changed, and Priora as a whole remained the same. This model comes in 4 standard body styles: station wagon, coupe, sedan, hatchback.
Bumpers are hinged units the same as the hood, fenders, and side doors. Both the front bumper on the Priora and the rear are made of plastic and are attached to the base using self-tapping screws. At the front there is an energy-absorbing beam. The radiator trim cannot be removed, as it belongs to an entire part of the bumper. The color of the bumper is the same as the color of the entire body.
Thanks to such innovations, the aerodynamics of the Lada Priora have improved significantly, since the designers took care to eliminate the shortcomings of previous releases, and the car acquired a completely individual look and became much more attractive.
Pattern of the bottom mesh
Without dismantling the bumper, you cannot remove the lower radiator grille on a Renault Duster. This is the law. It can be bypassed by securing the mesh to the outside. We have a suitable pattern.
Dimensions and radii are entered without errors
Make a template from paper. Glue this template to the grid. All that remains is to cut out the part along the contour, and everything will be ready.
A part called the “radiator mesh” is installed on top of the grille. Let the fastening elements be the ties. The color of the ties is black, the material is plastic.
Types of parts
In spare parts stores you can purchase different options for radiator grilles for the Skoda Octavia A7:
- matte;
- black glossy;
- with mesh;
- with a recess for the cruise control system.
You can diversify the appearance of your car by replacing the cladding - from standard chrome to black. Many car enthusiasts believe that in this case the Octavia A7 grille looks more expensive and more presentable.
In this video, the owner of the Skoda Octavia A7 will talk about methods of protecting the radiator: