We know that it is time to replace the rear crankshaft oil seal by the leakage of engine oil from the gap between the clutch housing and the protective shield. Loss of tightness of the sealing lip threatens engine contamination and the need to replenish the lubricant level. Once on the flywheel, engine oil splashes to the sides and coats both the inner surface of the clutch housing and the driven disc lining. A strong leak can cause it to slip, which is why the transmission begins to “slip.” At the same time, the dynamic characteristics of the car are reduced - it picks up speed worse and stops pulling uphill. There is no pleasure in driving a car, and in addition, there is a risk of wear on the clutch and gearbox parts.
The cause of damage to the working edge of the oil seal can be either natural wear or manufacturing defects, or other factors - engine overheating, the use of low-quality oil, or initially careless installation. At the same time, leaks through the crankshaft sealing elements are also possible due to increased crankcase gas pressure, so you should check the engine ventilation system and the cleanliness of the breather.
When starting to replace the crankshaft rear oil seal, disconnect the driveshaft, remove the gearbox, clutch and flywheel. For this reason, it is better to perform the work in a pit or overpass. Read this article for details of disassembling and replacing the front crankshaft oil seal.
Detailed instructions for replacing the crankshaft oil seal on a VAZ 2107
The oil seal or cuff of the crankshaft plays the role of a plug and the functionality of this unit largely depends on its condition. According to the instructions, replacing the crankshaft oil seal on a VAZ 2107 must be carried out every 150,000 kilometers.
If you decide to replace the front or rear oil seal yourself, then check the crankcase ventilation system in the engine. If it is clogged, be sure to clean it, otherwise all your efforts may be in vain.
In what cases should the pulley be removed?
Most often, it is necessary to dismantle the crankshaft pulley when changing oil seals. The role of the O-rings is to prevent oil from the crankcase from reaching engine components. Over time, the seals wear out, crack, and as a result, oil leaks appear. To fix this, you need to change the seals. During this procedure, you have to remove the crankshaft pulley.
Also, the need to dismantle the crankshaft disk arises when replacing the timing belt on a VAZ 2107 injector. It is changed according to the regulations specified in the operating instructions for the VAZ 2107 injector, as it wears out after a visual inspection or if it breaks. During a technical inspection, the pulley must be inspected to identify any defects. If chips or scratches are found, the part should be replaced.
Damaged part with broken part
The procedure for removing the product itself is not difficult, but some problems arise.
Firstly, with access. The pulley we are interested in is located in the lower part of the engine compartment behind the generator. It is difficult to get to because other engine components are in the way. Before removing the pulley, you need to remove the alternator and power steering belt.
Secondly, the crankshaft pulley mounting nut is very difficult to unscrew. When it is put in place, it is screwed with great effort. This is necessary so that it does not unscrew accidentally while the car is moving, as this can lead to expensive repairs. While the engine is running, the nut is tightened even more. In addition, the process is aggravated by high operating temperatures, at which oil coking and metal corrosion occur under the influence of the external environment.
Where is?
The oil seals are located in small holes on the camshaft drive covers. Being at the ends of the shafts, they perform two roles, the first is to prevent oil from leaking out and the second is to protect the components from dust and dirt entering the system. The camshaft cover is circled in red in the photo. The blue arrow shows where the crankshaft pulley is located, behind which the cuff is located.
What is an oil seal
An oil seal is a rubber-metal cuff that serves as a seal in various units and mechanisms with moving parts; For your information:
- The term “oil seal” has long been outdated, dating back to the times when the first models used a felt seal lubricated with grease (in common parlance with lard), it is more correct to call it a reinforced cuff or a radial cuff
- The cuff, thanks to its specific design, creates a seal and prevents lubricant from leaking; any malfunctions of its operation (misalignment, tears, abrasions, cracks) lead to oil leakage and the engine running dry, the consequences of such work are expensive and time-consuming major repairs
- Any slight displacement of the cuff from the standard location will certainly lead to oil leakage
- It is considered normal to change the cuffs approximately once every three years, but replacement may be required earlier, it all depends on the conditions of its use and various side problems
Where is the front crankshaft oil seal of the VAZ 2107
The sealing element on the VAZ 2107 engine is located in the front cover of the cylinder block in a special hole. Even without having an idea where the front crankshaft oil seal is located on the “seven”, its location can be determined without much difficulty. To do this, you will need to open the hood and look at the front of the engine: the part in question is located behind the crankshaft pulley.
Oil seal size
In order to carry out high-quality repairs without causing any unpleasant situations, you need to know what size cuff is installed in the front part of the crankshaft. On the VAZ 2107, as on the rest of the “classics”, the seal has a dimension of 40*56*7 mm, which means the following:
When choosing manufacturers, preference should be given to Corteco, Elring.
Signs of damage to the front oil seal
How can you determine that the front oil seal on a VAZ 2107 has become unusable and needs to be replaced? This can be judged by a characteristic sign - an oily front part of the engine and flying splashes throughout the engine compartment. This happens as a result of engine lubricant penetrating through the working edge of the oil seal onto the crankshaft pulley and further spreading throughout the engine compartment. In addition to this symptom, you need to know the reasons why the sealing element is damaged:
- Great mileage. As a rule, with a mileage of over 100 thousand km. The seal wears out and begins to leak lubricant. As a result of exposure to vibrations from the crankshaft, the inner part of the cuff becomes unusable and cannot provide a tight fit to the working surface.
- Long downtime. If the car has not been used for a long time, especially in winter, the rubber gasket may simply harden. This will lead to the seal being unable to perform its functions.
- Leaking from under the new element. This phenomenon may be due to the installation of a low-quality product. Therefore, you should choose products only from trusted manufacturers.
- Incorrect installation. A leak can occur when the oil seal is skewed, i.e., if the part does not fit evenly.
- Power unit problems. Oil leakage may be due to problems with the engine itself. If for some reason the pressure of crankcase gases increases, they can squeeze out the cuff and a gap will appear, which will lead to a lubricant leak.
- Leaking from under the oil filter. A situation often arises when oil seeps out from under the filter element and the front part of the engine also ends up covered in lubricant.
Replacing the oil seal
If the oil seal fails, it must be replaced, since such a part cannot be restored. This is due to the fact that rubber loses its properties and wears out. To replace the front seal on a VAZ 2107, you will first need to prepare the necessary list of tools:
- a set of keys;
- beard;
- hammer;
- screwdriver;
- mounting blade.
When the preparatory activities are completed, the tools and new parts are at hand, you can begin the repair procedure.
Removing the Front Cover
To dismantle the front engine cover on a VAZ 2107, place the car on a pit or overpass, engage the gear and put it on the handbrake, after which the following steps are performed:
- We remove the crankcase protection by unscrewing the corresponding fasteners.
Some owners of "sevens" avoid the described procedure and manage to replace the oil seal without dismantling the cover. If you do not have sufficient experience in such repairs, then it is better to remove the camshaft drive cover from the engine.
Removing the oil seal
With the front cover removed, it will be easy to remove the sealing element. To do this, you will need to use a hammer and a bit.
By applying gentle blows, the oil seal is easily removed from its seat, and this procedure is performed from the inside of the cover. Otherwise, removing the old seal will be problematic.
Video: replacing the front crankshaft oil seal on a “classic”
Installing a new oil seal
Before installing a new part, it is necessary to degrease the seat and lubricate the working edge with engine oil. Next, we perform the following steps:
- We install the new cuff into the cover with the working edge inward.
- Using a hammer and a suitable sized adapter, press the part into place.
Installing the cover and gasket
After installing the oil seal, all that remains is to prepare the cover and install it:
- If the old gasket has become unusable, replace it with a new one, and apply sealant on both sides for better sealing.
- We install the cover together with the gasket in place, attaching all fasteners (bolts and nuts).
- We center the lid with a special mandrel.
- We do not fully tighten the cover fastening, and then tighten the bolts and nuts crosswise.
- We tighten the bolts securing the oil pan in the cover.
At the end of the described procedures, the crankshaft pulley and the generator belt are installed, after which it is tensioned.
Video: how to install the front cover on a VAZ 2101/2107 engine
Replacement process
As a rule, when the time comes, you need to change the front and back cuffs at once.
There are some nuances here. If the front one is easy to change, then when changing the rear one you need to dismantle several bulky units. But this is not as difficult as it might seem at first glance, and even a car enthusiast with little experience can do it on his own.
Tools
- a set of keys;
- beard;
- hammer;
- screwdriver;
- mounting blade.
Assembly spatula
Stages
First we change the front oil seal.
- Regardless of which cuff we are changing, the back or front, we need to do a little preparatory work:
- Place the car on an overpass or pit;
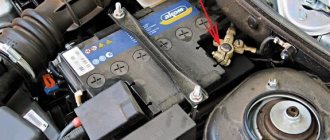
- Disconnect the negative terminal of the battery;
- To fix the crankshaft, turn on first speed;
- Apply the handbrake.
- Now you can proceed to replacing the cuff.
- After unscrewing the screws, remove the engine protection.
- To gain access to the pulley, remove the alternator belt.
- Having unscrewed the nut that secures the crankshaft pulley, remove it and gain access to the oil seal.
- Using a screwdriver or other tools, remove it.
Extraction method using a hammer and bit
- We degrease the place where the new one will be placed with gasoline and lubricate it with machine oil.
- We place the new one in its seat and, using the old oil seal, bearing or other object, carefully press it into place.
Pressing in a new one
This video demonstrates how to change the front oil seal on VAZ cars.
Now we move on to replacing the rear cuff.
To replace the rear cuff, the work preceding replacing the front cuff is carried out in the same order, with the exception of speed. It needs to be put in neutral.
The rear cuff is changed in the pit.
- Using a jack, raise the rear wheels.
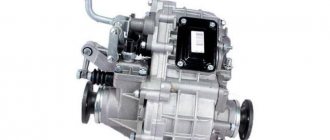
- Now you need to dismantle two large gearbox units and the clutch.
- We screw one bolt back into the socket.
This bolt must be screwed back in
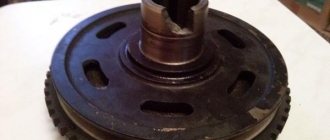
- Using a mounting spatula, fix the flywheel so that it does not turn.
- Unscrew the bolts that secure the flywheel.
Unscrew all six
- Now you need to remove the washer.
This washer must be removed
- Remove the flywheel from the shaft.
Removing the flywheel
- Unscrew the nuts that secure the clutch housing shield.
Unscrewing the nuts
- Let's take it off.
Removing the shield
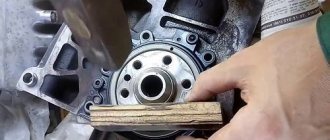
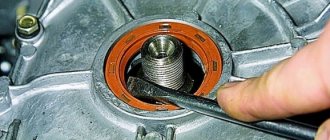
- Now you can use a screwdriver to remove the old oil seal.
Removing the old
- Next, unscrew the bolts that secure the oil pan to the holder.
Unscrew using a wrench
- We unscrew the bolts with which the holder is screwed to the BC.
Unscrew the holder bolts
- Using a screwdriver, press it out and remove it along with the gasket.
- We install and press in the new cuff.
- We check the condition of the gasket and, if necessary, change it.
It is advisable to change this gasket
- We put the holder in place.
- We begin assembly in the reverse order of removal.
If you have questions, watch the video to better understand the replacement process.
Sorry, there are no surveys available at this time.
Changing the front oil seal yourself
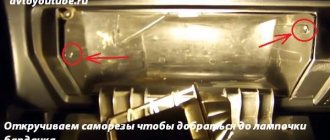
The first step is to disconnect the protection from the motor. We take an eight millimeter key. It is necessary to unscrew the front, rear and side screws. We remove the protection. If the car is fuel-injected, then removing the additional shield will not be too difficult.
Next, you need to remove the generator, which would make it easier to get to the pulley.
We unscrew the generator nut, then move the generator, the belt will relax and it will be easy to remove it.
Using a special wrench, unscrew the nut that secures the crankshaft and carefully remove the pulley.
This is where the seal itself is visible. It may have cuts or tears. Carefully remove it with a screwdriver and wipe the area. Lubricate the new oil seal with oil and place it in place. Using a hammer, carefully press the part into the lid.
The work of installing the new oil seal is completed. Then you need to install the pulley and belt. Next, we install the protection back.
Why does the oil seal wear out prematurely?
- use of counterfeit spare parts;
- pouring low quality gasoline into the vehicle, constantly running the engine at high speeds;
- motor overheating;
- dirty filter and untimely oil change in the car.
The front oil seal is the easiest to change. The rear one needs to spend much more time.
To replace the oil seal you need to perform a number of simple manipulations:
- The vehicle is driven into a pit;
- The battery is de-energized;
- We start the first gear to fix the crankshaft;
- Fixing the vehicle
Selecting a new drive oil seal to replace
Many manufacturers make good, high-quality parts. Three points are important in the oil seal, which can be checked when purchasing:
- Like all oil seals with a metal fit, the metal cage must be made of good material, soft enough, but at the same time, with a high class of processing, otherwise the oil seal will not fit tightly into its seat;
- The quality of the rubber, including the absence of nicks, casting seams, and other visible defects;
- The quality of the articulation of metal and rubber. The thin edge of the transition between the rubber part and the metal part.
All these parameters are very indirect, but still speak about the manufacturing technology of this important part. It is clear that it is difficult to determine the hardness of rubber and its performance properties by eye, but sometimes indirect parameters allow you to compare two parts and choose the best one. Therefore, it is better to look at it carefully before installing it in your car.
| Attention Bearing Buyers Dear customers, send your questions and requests for the purchase of bearings and components by email or call now: Delivery of bearings throughout the Russian Federation and abroad. Bearing catalog on the website |
Attention Bearing Buyers
Dear customers, send your questions and requests for the purchase of bearings and components by email or call now: +7 [email protected] Delivery of bearings in the Russian Federation and abroad. Bearing catalog on the website
themechanic.ru