To ensure complete control over the operation of all systems, the engine is equipped with a variety of sensors. Some of them carry an informative and emergency load, others transmit information necessary for the proper operation of the power plant. The latter includes the crankshaft sensor of the LADA Priora car.
There is another gradation of car sensors:
- sensors, the failure of which leads to unstable operation of systems;
- devices on which safety depends;
- sensors, without which engine operation is impossible.
Where is the Lada Priora crankshaft sensor located and faulty?
The crankshaft sensor is responsible for uniform fuel injection and supplying an impulse to ignite the combustible mixture. In other words, we can say that with its help the controller determines when and into which cylinder fuel needs to be supplied.
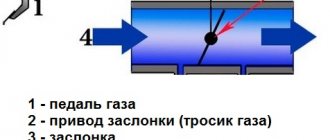
Where is DPKV located?
The engine crankshaft has a toothed drive disk; it is combined with the generator drive. At a distance of approximately 1 mm from the top of its tooth, on the oil pump cover, a Lada Priora crankshaft sensor is attached.
Where is the fuse box on the Lada Priora
The master disk has only 58 teeth, with an indent of 6 degrees, as well as a gap of two missing teeth - this is how synchronization is done. In order to place the crankshaft at a point of 114 degrees to the uppermost point of cylinders 1 and 4, combine the middle of the first tooth after the gap with the DPKV axis.
The crankshaft wiring is protected from outside interference by a kind of screen that is connected to the vehicle's ground.
Incorrect operation of the circuit can cause the motor to stop, error codes to be recorded in the controller’s memory and the alarm to be activated.
The crankshaft sensor circuits are checked after the ignition is turned off and the pads are disconnected from the controller and the sensor itself. If the DPKV circuit is in good working order, the installation is high-quality, but the error code remains, which indicates incorrect operation of the part, the DPKV needs to be changed.
Where is the Lada Priora oil pressure sensor located and faulty?
Replacing the crankshaft sensor
Let's take a closer look at the process of removing a part:
- the ignition must be turned off;
- the wire block must be disconnected;
- Using a 10mm wrench, unscrew the bolt that secures the sensor to the oil supply cover;
- we take out the faulty sensor.
After the faulty part is removed, install a new one:
- install a new sensor;
- we wrap the bolt and tighten it until it is completely secured;
- connect the wiring to the part itself.
We identify signs of malfunction
If the crankshaft position sensor is completely out of order, it will not allow the car to start normally. In other cases, incorrect operation of the part is detected by the following actions:
- The engine starts intermittently and is not stable.
- Engine operation will be unstable.
- Motor power is significantly reduced.
- If the load is increased, detonation appears.
You can check the crankshaft sensor using the insulation resistance test. If the numbers on the ohmmeter differ from the readings of 550-570 Ohms, it means that the DPKV has failed. In the case where the DPKV error has not been cancelled, therefore, it is necessary to clean the part from dirt and check the integrity of the wiring and connections. It is not possible to repair the DPKV, it can only be replaced.
For Soviet car models, getting the necessary part to replace it is not too difficult. For example, Priora DPKV can be purchased at your nearest auto store, and instructions for replacing it can be easily found on the Internet. If you don’t dare to do this work yourself, then the nearest service station will do it for you in the shortest possible time and for little money.
Required Tools
If the car owner decides to change the crankshaft sensor himself, then he will need the tools from the table below.
Table - Tools that should be prepared to replace the crankshaft sensor
| Tool name | Note and Features |
| Socket wrench or open-end wrench | "at 13" |
| Kardanchik | For easier access to the sensor mount |
| Vorotok | With ratchet |
| Head | "on 10" |
| Penetrating lubricant | For example, WD-40 |
| Rags | To clean dirt |
Replacement nuances
Replacing the sensor is quite simple. It is removed from its habitat, and a new device is installed in its place.
However, it is important to take into account some nuances
- Choose high-quality auto parts, which should be purchased in specialized stores. It is advisable to check their performance on site.
- When installing a new regulator, maintain the original position. To remember it, mark it with a marker or chalk.
- Be sure to maintain the required distance between the sensor and the timing dial. We have already told you the normal clearance indicator.
- The bolts must be tightened with a torque not exceeding 8-12 nm.
- Test the new sensor before it is used in the fuel system. An incorrectly selected device can lead to a number of other malfunctions and failure of the power unit.
Just don’t relax under any circumstances, act carefully, consistently, follow all the labels and rules for replacing the device.
Diagnostics
Before taking steps to dismantle and diagnose the DPKV, you need to make sure that the device is securely fastened and clean the place of its attachment and the contact connector from dirt. After this, the performance of the internal combustion engine is checked again. If symptoms of sensor failure persist, it is dismantled.
Removing the sensor:
After removing the sensor, you need to understand whether it is the cause of the engine malfunction. Before diagnosing DPKV, check the integrity of the connectors and cable. The performance of the device is checked using a multimeter:
- The meter is set to ohmmeter mode.
- The multimeter probes are connected to the DPKV contacts - the normal resistance will be in the range of 550–750 Ohms.
- The meter is switched to voltmeter mode, and a metal object is brought to the tip of the sensor. The multimeter should detect voltage surges.
If such measurement results are not observed, then the DPKV must be replaced.
When buying a new Lada Granta crankshaft position sensor, first of all you need to pay attention to branded products. Such a DPKV will cost much more than its analogues from unknown manufacturers, but it will not bring unexpected troubles on the road
Checking the sensor using available means
You can control the voltage directly on the engine when you turn on the ignition (we do not start the engine). In DC measurement mode, the voltage at the contacts should be 2.5 V. Next, you need to switch the multimeter to AC mode and bring a metal object to the sensor: for example, a flat-head screwdriver. A working sensor will show a change in voltage.
With the sensor removed, you can measure the resistance. A serviceable Hall element winding has a resistance of 550–750 Ohms.
If the measurement results do not correspond to the norm, the sensor will need to be replaced. To do this, you need to disconnect the connector and unscrew one mounting bolt.
Vehicles with automatic engine management systems generally operate with an installed and important crankshaft position sensor (CPS) to ensure that the mechanical movement of the pistons is synchronized with the ignition and fuel delivery system.
Let's take an example of how the VAZ 2110 crankshaft sensor works, as well as 2105, 2107, 2108, 2109, 21099, 2111, 2117, 2112, 2113, Priora, Niva, Chevrolet Niva, Kalina 1117, 2114, 2115.
Where is the knock and fuel level sensor on Lada Priora: signs of malfunction and replacement
The Lada Priora engine is controlled by an electronic engine control system (ECM), which includes a controller and a large number of reading and monitoring devices. The article discusses the Priora fuel sensor and knock sensor, their purpose, location, diagnostics and replacement.
Purpose and location of the knock sensor
During explosive self-ignition in the combustion chamber of the fuel assembly, engine detonation appears. To monitor the occurrence of engine vibrations, a knock sensor (DS) is designed (video author – StarsAutoCom).
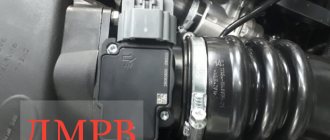
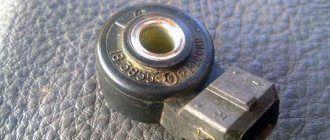
The DD is a plastic case, inside of which there is a sensitive piezoceramic disk element that generates an electrical impulse under mechanical influence from the resulting vibrations, and transmits information to the ECU controller. The detonation device is located on the front side of the cylinder block under the intake module.
Typical faults
If the Lada Priora DD is faulty, the computer will display an error code - 0327. This error is the main reason why the device is changed.
- broken wires;
- damage to the connector with wires;
- failure of the device itself.
The reasons why the power unit detonates may be different. Therefore, to make sure that the cause of detonation is the DD, it must be removed and checked.
How to check and change?
To provide access to the knock sensor, the car should be placed on a lift.
To remove the device, you need to do the following:
- Turn off the power to the car by disconnecting the negative terminal from the battery.
- Next you need to remove the engine protection.
- Having found the DD, you need to press the metal clamp, thanks to which the connector with wires from the controller is held, and disconnect the connector.
- Using a key set to “13”, you need to loosen the bolt securing the device and you can remove the DD.
Photo gallery “Replacing the knock regulator on a Lada Priora”
The knock sensor is checked using a multimeter, setting it to voltage measurement mode. Accurate diagnostics can only be carried out on a special stand.
If the device is faulty, it cannot be repaired; it must be replaced. Installation of a new device is carried out in the reverse order of dismantling.
Purpose and location of FLS
The FLS is located in the fuel module, which also includes a fuel pump and fuel filter.
Its main purpose is to monitor the fuel level in the gas tank.
The design of the device includes:
- float;
- dielectric plate with a located rheostat;
- the rod on which the contact slider is located.
Typical faults
If the instrument panel displays incorrect information about the amount of fuel remaining, the reason may be:
- mechanical damage to the gas tank housing;
- float failure;
- electrical faults;
- disruption in the power supply chain;
- FLS malfunction.
To determine the cause, you need to conduct a diagnosis.
How to check and change?
To change the FLS on a Priora, you need to remove the fuel module.
To do this you need to do the following:
- First we remove the rear seat.
- Then unscrew the two screws and remove the hatch cover.
- At the top of the module, disconnect the connector with wires.
- Next, by pressing the latches, the tubes through which gasoline is supplied and the tips of the tee are disconnected.
- Then we unscrew the fastening nuts, remove the wire that goes to ground, and the spring washers.
- The next step is to remove the pressure plate and module.
- After dismantling the module, the wire connector is disconnected from the FLS.
- After installing the new device, assembly is carried out in the reverse order.
When installing a new sensor, you should pay attention to ensure that the rubber seal and plastic ring spacer are installed correctly
Causes of failure
There are not a large number of signs of failure of the DPKV on the Priora, but they still exist. Failure can be caused by the following factors:
- Mechanical impact;
- Sensor aging;
- Failure of the sensitive element;
- Electrical wiring fault;
Let's take a closer look at each of the factors.
- Mechanical impact. Under mechanical stress, such as repairs or other reasons where mechanical pressure or shock may be applied to the sensor, the sensor housing may be damaged, causing the sensing element to fail or give incorrect readings.
- Aging can also be caused by damage or corrosion of the sensor itself or its sensitive element, which will consequently lead to incorrect readings.
- Failure of the sensor's sensitive element completely stops the internal combustion engine and makes it impossible to start the engine.
- Wiring , as described above, must be shielded and securely fixed in the sensor connector. It happens that it is the DPKV wire that gets damaged due to the closely located exhaust manifold, which affects the operation of the internal combustion engine.
Camshaft and crankshaft sensors for Lada Kalina 8 valves description and replacement nuances
The camshaft sensor Kalina 8 valves becomes unusable from time to time. This can happen for various reasons, but the result is the same - the part needs to be replaced. The situation is similar with the crankshaft position sensor. You will learn in the article how to dismantle old and install new elements of a car of this type.
Phase sensor (camshaft position)
You will find this part on the cylinder head on the left side. The operating principle is quite simple. There is a special pin on the camshaft itself. When it passes by the sensor, but sends a signal to it. This moment corresponds to compression of the piston of the first cylinder.
The controller determines the camshaft angle. This is important information for machine systems and sensor failure has certain consequences. The information is sent to the vehicle's ECU, which uses it to control the ignition and fuel supply to each cylinder.
In what situations is replacement required?
If this part fails, you will see a “Check” indicator on the vehicle’s instrument panel. This is how the ECU signals the driver that the engine needs to be checked. At the same time, the fuel supply pattern changes - it goes to all cylinders simultaneously and, as a result, consumption increases.
The cause of the breakdown may be mechanical damage, as well as other things. There is no point in trying to repair the old unit itself - it costs little and you will waste more nerves and time.
In the video below you will find instructions for replacing this part (the author of the video is Alexandr V).
Replacement instructions
To replace the camshaft sensor, you only need a "10" key. It is better to use a socket with a collar or a ratchet. It will be inconvenient to work with a regular key, although it is still quite possible.
The dismantling and installation procedure is as follows:
- First, disconnect the block with wires by pressing the latch and slightly pulling it up;
- now, using the key, unscrew the part itself;
- it can be pulled out by slightly pulling towards the windshield;
- installation is carried out in the reverse order of steps.
There are no difficulties in this process, but be careful not to damage both the block with wires and the connector for the controller itself on the cylinder block.
Crankshaft position sensor
Although this controller rarely fails, its failure can lead to the most unpleasant consequences. You may simply end up in the middle of the road with no way to continue driving.
This element is installed on the oil pump cover. The DPKV transmits information to the ECU so that it can synchronize the fuel supply. Inductive type sensor. As mentioned above, it rarely fails, but this becomes a big problem.
In what situations is replacement required?
If this DPKV is completely out of order, you will not be able to start the engine at all.
But even if it just works intermittently, this can be recognized by a number of signs:
- poor engine starting;
- unstable work;
- power reduction;
- detonation with increasing load.
If you notice such signs and there are no other reasons for them, change the sensor. You can check it by testing the resistance of the windings. If the ohmmeter readings differ from 550-570, then the part is faulty. Fortunately, it costs little and replacement can be done very quickly.
Replacement instructions
To replace this part, you will again need a "10" key and nothing else.
- Turn off the ignition. Then disconnect the wire block by pressing the latch.
- Now, using a wrench, unscrew the fastening bolt.
- All that remains is to remove the old DPKV and install the new one in the reverse order.
DPKV - what kind of sensor is it, why is it needed on Priora and why the engine does not start
From the brief introduction it is clear that the crankshaft sensor is the most important structural element on a car, without which the engine cannot operate. The main purpose of the device is to transmit a signal to the computer about the position of the crankshaft at an appropriate period of time. Reading information about the position of the crankshaft allows the control unit to decide on sending signals for fuel injection and ignition in the corresponding engine cylinders.
In addition to information about the position of the crankshaft, the sensor also informs the control unit about its rotation speed. The frequency at which the crankshaft rotates is displayed on the car's control panel, for which a tachometer is provided. The electronic method of measuring the crankshaft rotation speed is highly accurate. Based on the readings of this sensor, the following actions occur:
- The fuel injection time is set through the injectors in the corresponding cylinders.
- The ignition timing is determined, which allows fuel assemblies to be burned more efficiently and effectively.
- The efficiency of the internal combustion engine operation is assessed.
- Information about the crankshaft rotation speed is transmitted to the instrument panel, which is necessary for the driver.
By means of DPKV, the moment of passage of the pistons at the top and bottom dead centers is determined. Based on this information, engine operation is adjusted. Without such a device, not a single ECU works, so if it malfunctions, you will need to immediately resort to finding out the causes of the failure and eliminating them.
Replacing the crankshaft position sensor
The crankshaft position sensor on Priora and other VAZ vehicles is one of those parts that, if it fails, the engine refuses to work. No, in fact, nothing will happen to the engine at all, but there may not be a spark. Or it can be variable, that is, appear or disappear.
Many owners who first encounter a similar problem with DPKV on a Priora first of all begin to look for the cause in the ignition coils, spark plugs, and often it even comes to the engine control unit. But in fact, the reason is simple, first of all, with the symptoms described above, you need to check the crankshaft sensor.
In order to replace it, you will need a 10 mm wrench, or better yet, a 10 mm socket with a wrench or ratchet handle.
How the sensor works
On 16-valve engines, it is important to synchronize the operation of the intake and exhaust systems with the ignition operation. The electronic control unit (ECU) of the VAZ engine must receive real-time information about the position of the pistons in the cylinder liners.
Only in this case, the fuel mixture will enter the combustion chamber of the cylinder in time, and the ignition spark will fire at the right moment. Installing cylinder position sensors is irrational and expensive, since this part of the engine operates at extreme temperatures. One sensor is enough, which is located in a place convenient for maintenance and obtaining information.
Let's look at the operating principle:
- The crankshaft position sensor on the Priora is located at a fairly convenient point: outside the engine crankcase, in close proximity to the timing disk of the timing system.
- This disk (more precisely, a toothed pulley) is rigidly connected to the crankshaft and rotates with it. There is a gear calibrated wheel on it.
- Inside the device there are: a Hall element with a permanent magnet and an electrical circuit that generates an information signal for the ECU.
- Every time a wheel tooth passes the sensing element of the DPKV, an electrical impulse is generated.
- The engine control unit "knows" where each cylinder is at any given time and sets the correct intake cycle and spark timing.
It is important not only to understand the principle of operation, but also to know where the crankshaft sensor is located and how to check it.
Symptoms of a Priora DPKV malfunction
If the sensor is faulty, the sign of a breakdown is sad: you simply will not be able to start the engine with normal starter operation. Of course, there are other reasons for the engine not starting. However, if you know for sure that the fuel system is working properly and the spark plugs are in order, then first of all we check the crankshaft position sensor.
Incorrect information may be provided due to metal filings or shavings adhering to the sensitive magnetic element. In addition, there is a loss of contact in the connector due to oxidation or ingress of liquids. In this case, the engine starts, but runs unevenly and intermittently.
To check the sensor, first carry out diagnostics in any way, even using the on-board computer. DPKV malfunction shows error code 0335.
Description of DPKV
The crankshaft position sensor (CPS), like many others, uses the Hall effect. The current flows to a rod with a semiconductor, whose teeth change the magnetic field when the crankshaft rotates. In relation to the regulator, the pulley always occupies a position that corresponds to TDC of the 1st cylinder of the engine. Data from the DPKV is used by the ECU to open the injectors and supply a spark to the cylinders.
DPKV for Priora
Common faults and solutions
Signs of regulator malfunction:
- jerky movement;
- poor engine performance at idle;
- excessive fuel consumption;
- loss of power;
- strong smoke in the exhaust.
Before changing the device, it should be removed and checked for serviceability. To do this, the DPKV pins are connected to a multimeter. The resistance should be between 500 and 700 ohms. If the readings are less, this indicates an interturn short circuit; if it is more (the resistance tends to infinity), then the contact is broken or the coil has broken. In both cases, the sensor needs to be changed (the author of the video is IZO)))LENTA).
Malfunction of the Priora crankshaft sensor (DC)
Since 2004, the Russian manufacturer VAZ has completely abandoned the production of cars with engines operating with a carburetor system. A switch was made to an electronic engine control system, or ECM (Electronic Engine Control System).
In common parlance, drivers call this option a car with an injector. Although this is not entirely true. The injector, to be precise, in this system is a fuel injection nozzle, and the basis of control here is the ECU (Electronic Control Unit).
Simply put, a computer and sensors, including the crankshaft.
About how the esud system works, details
So, the modern “Priora” is no longer a “penny” of the 70s, or even a “nine” of the 90s. This is a completely modern car, most of the functions and malfunctions of which are controlled and monitored by a computer. Under the control of various ECUs are:
- engine control;
- power steering;
- anti-theft system;
- anti-lock wheels;
- electrical package;
- climate control.
Repair of the Priora clutch sensor
Often, sensor malfunctions can be easily resolved without replacing it.
First you need to check whether the sensor end reaches the clutch pedal pusher. If the pusher does not press on the limit switch, it is necessary to adjust the position of the sensor relative to the pedal.
Another common failure is a break in the wires going to the sensor contacts. This malfunction can be easily detected by checking that the wires are securely fixed with your fingers. To fix this problem, you need a soldering iron, solder and rosin. When the sensor is removed from the car, soldering wires to its contacts is not difficult.
If the sensor wires are not broken and the limit switch reaches the pusher, the problem may be a faulty sensor contact or a broken limit switch. They may oxidize, become deformed or break. The functionality of the contacts can be checked using a multimeter. To do this, you need to connect the device to the sensor terminals and check the change in resistance between them when you press the limit switch.
Oxidized contacts can be cleaned, restoring the functionality of the sensor. If this does not work, it should be replaced. The price of this part is low, and you can buy it at most auto stores.
https://youtube.com/watch?v=2doB7DrqyGM
How to check the VAZ-2114 DPKV for serviceability
To check the crankshaft position sensor, it must be removed and inspected for mechanical damage. If dirt is found on the sensor, the part should be thoroughly cleaned.
You can check the DPKV using an ohmmeter. A working sensor has a coil resistance of 550-750 Ohms. A multimeter is used to check the inductance of the winding, but you cannot be sure that the DPKV is working properly, even if all the readings coincide with the permissible parameters. In this case, the state of the magnetic core is not taken into account in any way, so an oscilloscope is best suited for diagnostics.
You can check the DPKV in any way, but it would be more logical to simply replace it immediately with a new one. If the cause is not in the sensor, you need to look further for the cause of the malfunction. The old DPKV can be put into storage; it will come in handy. The crankshaft sensor on a VAZ is quite inexpensive, so is it worth the hassle of measuring resistance and inductance? The price of DPKV ranges from 250-350 rubles, and on the road a spare sensor can be very helpful.
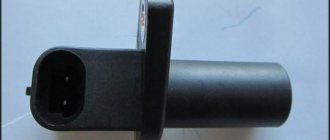
It's no secret that if the crankshaft position sensor fails, the car will only go further on a tow truck or in tow. The engine will simply be impossible to start, and the sensor cannot be repaired, only replacement. The sensor is not cheap, so before buying a new one, I recommend making sure that the cause of the malfunction is the DPKV, and not something else, or just a jamb in the wiring and connection chip of the sensor. If the diagnostics show that it is he who is to blame, we go to the nearest auto parts store and purchase a sensor, it looks like this:
To replace the DPKV on VAZ-2110, 2111 and 2112 we will need the following tool:
Socket wrench at "10".
A set of feeler gauges to set the gap.
Well, the new crankshaft sensor itself.
The sensor is located in close proximity to the crankshaft pulley. So, remove the block from the sensor by prying it with a screwdriver or any other handy tool. (you can just use your hands).
Then we take the prepared 10mm socket or open-end wrench and use it to unscrew the bolt that secures the DPKV to the engine.
Then we put the removed sensor aside, take a new one and install it in place of the old one, it is impossible to make a mistake during installation, it is installed in only one position. We screw back the sensor mounting bolt and take our set of probes. We will use them to adjust or simply check whether we have the required gap for the new sensor. The correct distance from the crankshaft pulley teeth to the sensor is 1 mm. plus or minus 0.41 mm.
If everything is correct, put the chip back in place and try to start the engine. If the distance is greater, we look where the jamb is and what got under the sensor, maybe just dirt. I have not yet encountered problems with the fact that the distance is less. Usually everything becomes normal right away.
Reference information: The CRANKSHAFT POSITION SENSOR (CPSE) supplies the controller with a signal of the rotation speed and position of the crankshaft. This signal is a series of repeating electrical voltage pulses generated by the sensor as the crankshaft rotates. Based on these pulses, the controller controls the injectors and the ignition system. The DPKV is installed on the oil pump cover at a distance of about 1+0.4 mm from the crankshaft drive disk (pulley). The crankshaft pulley has 58 teeth arranged around its circumference. The teeth are equidistant and spaced at 6° intervals. To generate a “synchronization pulse,” two teeth on the pulley are missing. As the crankshaft rotates, the teeth of the disc change the magnetic field of the sensor, creating induced voltage pulses. Based on the synchronization pulse from the crankshaft position sensor, the controller determines the position and speed of the crankshaft and calculates the moment of activation of the injectors and the ignition module. The DPKV wire is protected from interference by a screen connected to ground through the controller. DPKV is the most important of all sensors; if it is faulty, the engine will not work. It is recommended to always carry this sensor with you. Diagnosis of DPKV is described here. The PCV sensor is a polar device; if the wiring is broken, it should be connected observing the polarity. In reverse mode, the engine will not start.
Instructions for replacing the regulator
The crankshaft DP is located on the oil pump cover near the camshaft drive. To replace it, you need to buy a new device according to the markings on the old product.
The replacement procedure is simple:
- Remove the negative terminal from the battery.
- We disconnect the block with wires from the DPKV by bending the lock.
- After this, use a “10” key to unscrew the fastening bolt.
- Now it is fashionable to remove the regulator.
- The installation site should be cleaned of dirt and a new product can be installed.
- Next, the fastening bolt is screwed in and the wires are connected.