Replacing the ignition coil on a Lada Kalina with an 8-valve engine yourself will take you no more than half an hour, without contacting a car service center or other workshops. To perform this work you will need a minimum of tools, namely:
- Hexagon 5 with a wrench or ratchet - the best option
- Or a regular L-shaped hexagon for 5
- 10mm wrench to disconnect the terminal from the battery
Diagnostics of Lada Kalina wires
Before connecting high-voltage wires on Kalina purchased at a car dealership, you need to assess the current state of the car's wiring. For diagnostics, the car owner will need an analog or digital multimeter.
Before connecting the device, you need to inspect the wires for external defects. These include:
If no external damage is observed, you need to connect a multimeter. You need to check the resistance of the armor wire, so you need to switch the device to ohmmeter mode. After this, the armored wire is disconnected from the spark plug and ignition coil. The ends of the wire are connected to the contacts of the multimeter, after which the device will show the current resistance level.
Data on normal resistance values are applied to the insulating layer. For passenger cars, normal values are in the range of 4-10 kOhm. In this case, on one specific car, the data values for individual wires should not differ by more than 2.5-3 kOhm. If this threshold is exceeded, then there is a problem in the ignition system.
There are several ways to check the functionality of the wiring without using measuring instruments:
- Use of additional insulated wire. You need to strip both ends of the additional wire. Short one end to ground, and run the other bare end along the caps, joints and the entire contour of the wire being tested. If there is a defect, the tester wire will give a spark;
- You need to drive the car into an unlit box, open the hood, and start the engine. If there is a breakdown in the VP insulation, the damaged area will spark.
The easiest way is to take a working high-voltage wire and test it on each cylinder by elimination.
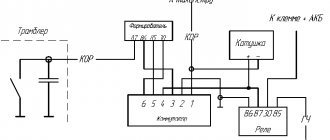
Procedure for removing and installing the ignition module
- The first thing you need to do is open the hood of the car and disconnect the negative terminal from the battery; for this you will just need a 10 key, as was written above.
- After this, you need to disconnect all the high-voltage wires from the spark plugs; just pull them with force.
- Immediately after this, we remove the wires from the ignition module itself, this is done with a simple movement of the hand, just with a little effort, pull them towards you, all four pieces one at a time.
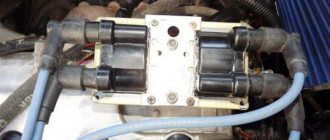
- And then, we move all the wires to the side so that they do not interfere with us. And immediately remove the power plug from the module body, as shown in the photo below, by slightly pressing the latch and pulling it towards you
Replacement and connection of high-voltage wires on Kalina
This type of repair work is one of the simplest during car operation. Apart from a set of new wiring, the car owner will not need anything (it is better to buy silicone-based wires - they remain elastic at low temperatures). Before repairing the wiring, you need to “de-energize” the car by disconnecting the battery terminals. There is no need to start work if you are not confident in your own qualifications. It is better to pay experienced servicemen than to spend money on a new ignition system later.
The most important thing: do not disrupt the order of connecting high-voltage wires on Kalina . Each wire in the set is connected strictly to a specific cylinder. Wires usually vary in length. The sockets in the ignition unit also contain matching numbers.
The spark enters the cylinders in a certain order. The wires must be connected accordingly. The order is:
- First cylinder;
- Third cylinder;
- Fourth cylinder;
- Second cylinder.
It is better to check the location of the cylinders before starting work according to the vehicle’s operating manual. Cylinder numbers are read from left to right. The first one is closest to the timing belt.
It is recommended to remove and connect the wires one at a time to minimize the risk of incorrect connection order. During installation, you need to check that the new VPs do not rub against nearby structural elements, get pinched or break.
After completing the replacement, you need to “power” the car and start the engine. If the problems persist: the engine stalls or stalls, then the order in which the new wiring was connected was violated.
Causes of malfunction
If translated literally, “Check Engine” is an engine error, which, according to the developers, should indicate to the driver that it is worth checking this particular system. So, there are several malfunctions associated with the activation of such an alarm. Let's look at the main problems that cause a "CHECK" in the engine.
Bad fuel
Low-quality gasoline, or as it is popularly called, “bad gas,” can cause the engine warning light to appear on the dashboard. So, troubleshooting can take a lot of time and labor. In order to get rid of the effect, you will have to clean the fuel system. To do this you need to do the following:
- Remove and clean the fuel tank.
- Remove the fuel rail and wash the injectors using a special stand.
- Replace the fuel filter, because as practice shows, after low-quality fuel it becomes clogged and completely loses its service life.
Spark plug
If one of the spark plugs is damaged, Check Engine appears on the dashboard. To fix the problem, you will have to dismantle all the elements and check them for resistance, as well as visually inspect their condition. Thus, if necessary, it is worth replacing the spark plug. As practice shows, it is best to install a completely new kit, which should be pre-adjusted, check the gaps, as well as the resistance. We have already talked about the choice of candles here.
Low fuel level
When the fuel level is low, the Check Engine sign appears on the instrument panel, which may also indicate that the fuel tank cap is not closed completely and the seal is broken.
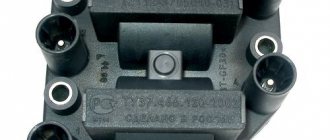
Ignition coil
The absence of a spark in the cylinders immediately signals the electronic unit, which displays the inscription “check”. This may primarily be due to the fact that the ignition coil has failed. As a rule, it cannot be repaired and must be replaced.
Oxygen sensor
A clogged lambda probe is immediately visible from the inscription on the dashboard. Here, there can only be one way out - replacement. Of course, some car enthusiasts try to clean the oxygen sensor and are quite successful, but in practice it doesn’t last long and it quickly breaks down. Therefore, it is recommended to replace it immediately.
Catalyst
The catalyst may be another reason why the Check Engine message appears on the dashboard. Usually, this is due to the high mileage of the car, so when the car starts to take oil, you should prepare for the fact that this particular part will fail. But this is not the only reason. So, bad fuel or mechanical damage will lead to the replacement of this unit.
Wiring
Cases have been repeatedly noticed that when there are problems with the explosive wire, the message Check Engine pops up. Of course, the reason should be looked for in this system and, if necessary, it is worth replacing.
ECU
The electronic engine control unit can cause a “check” to appear. Thus, accumulated errors that have not been reset for a long time may cause the dashboard to display Check Engine.
This can be treated quite simply by resetting all accumulated errors. But, as experience shows, things can get to the point where you have to change the software and flash the ECU.
DMVR
The mass air flow sensor repeatedly causes the Check Engine to appear on the dashboard. In order to determine serviceability, diagnostics should be carried out. If necessary, replace this unit.
conclusions
The appearance of Check Engine on the dashboard indicates a malfunction or error in engine operation. The article discussed the main causes and methods of eliminating this phenomenon. Of course, not all motorists are able to check, much less repair, the Lada Kalina, so in such cases it is recommended to contact a car service center, where they will do everything efficiently and quickly, although not very cheaply.
Almost every Lada Kalina car owner has encountered the problem that the engine idles intermittently. But not everyone knows the reasons for this effect. In this article we will look at the problems that cause a malfunction, as well as methods of elimination.
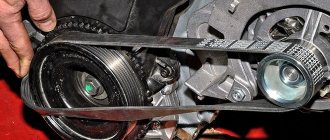
Which belt to buy
The efficiency of the car engine depends on the quality of the parts used in the timing mechanism drive (tensioner roller, belt). When repairing or servicing a car, it is advisable to use original parts, but in some cases, non-original spare parts for automobile components have worked well.
The article number of the original timing belt is 21126–1006040 , which is produced by the RTI plant in Balakovo. Experts recommend confidently using parts from Gates, Bosch, Contitech, Optibelt, Dayco. When choosing, you should be especially careful, since under the brand name of well-known manufacturers you can buy a fake.
Let's sum it up
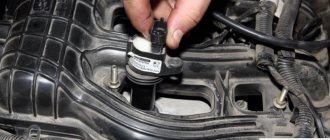
If the results of the diagnostic actions of the LADA Kalina car reveal that the ignition coil is faulty, then replacing this unit is a very simple undertaking. To implement the process, you will need a hex wrench. Before dismantling, we recommend that you remember the location of the high-voltage cables at the corresponding coil terminals. This will eliminate switching errors when installing the device.
still quite good Lada-Image. Novosibirsk. On March 17 I bought it in Voronezh - 720 rubles! This is on the engine, I just buy them, the mileage is more than 100 thousand km on one of them, the second coil has also covered almost 100! This reel is the “thickest”, largest and heaviest.
Operational Aspects
Frequent cases when owners call for service are when the coil fails or does not function correctly. You can also diagnose the ignition module yourself. To do this you will need to acquire the appropriate equipment. One such diagnostic tool is a multimeter. It is used to measure the actual resistance value at the coil terminals in the 8-valve versions of the Lada Kalina, as well as in the 16-valve version. In order for the results of measuring actions to have maximum correctness, the procedure should be followed at least twice.
Damage to the ignition system can occur in any part of the circuit. This circumstance requires maximum care and attention during diagnostic procedures. The check begins with making sure that the winding is connected correctly to ground. Now let's diagnose the central terminal of the coil. We apply the positive contact of the device to it, and connect the negative contact with the vehicle ground. We look at the screen. If there is a symbol of infinity resistance, then this indicates the absence of a short circuit on this section of the circuit. From this information, the owner must conclude that the ignition module is working.
Now we connect the device with the terminals of the module located at the edges. A specific parameter on the screen indicates the presence of a malfunction inside the LADA Kalina ignition switch. If a defect is not found here either, then the next step will be to diagnose the secondary winding of the coil. We place the ignition module in front of us so that both contacts are facing us. We connect the diagnostic device with the terminals for the 4th and 1st cylinders. Having made sure that there is no malfunction (short circuit), we proceed to checking the circuit for the 2nd and 3rd cylinders. There should also be no short circuit here.