Crankshaft oil seals
It is known that replacing the crankshaft oil seal on VAZ 2101 and 2103 is a topical and popular topic among motorists. Of course, there are parts and elements that work properly for quite a long time, but still, there is a limit to everything. As for oil seals, these are types of parts that generally require regular intervals. In this article, look at how to replace the crankshaft oil seal on a VAZ.
Why do you need to replace cuffs?
First, let's figure out why you need to change the cuffs. It will probably be superfluous to say that oil seals are a very important part of the car. If any cuff wears out or moves slightly out of place, a gap will appear through which oil will flow - a lubricant, without which not a single part of the car will function normally. It is for this reason that most experts insist on replacing the part at least once every three years, or even more often. In addition, in the case of cuffs, you should never exclude the possibility of unscheduled repairs. For example, if the engine overheats, then the probability of replacing the seals is reduced to 100%. Replacing crankshaft oil seals on a VAZ 2103 or another model requires having a set of certain tools and materials on hand. There is no need to have specific equipment here and therefore you can handle this matter yourself. It will be enough to find cuffs of the appropriate size. But let's not forget that they are different.
Types of oil seals
Let's find out what types of cuffs are presented on Russian car markets today. Basically, these are reinforced components with and without anther. The former prevent leakage of the sealing medium and provide good protection against the penetration of dirt and moisture.
Reinforced oil seals
As for the second type of seals, they simply prevent oil from leaking out.
Note. Do not forget that the seals can also be single-lip.
Cuffs, as they are also called, are ideal and indispensable for sealing gaps between stationary or even rotating car parts. They prevent lubricant leakage very well and, in fact, this is why they were invented by man. Replacing the oil seals on the crankshaft of a vase, as was said, can be done by yourself. It is only beginners who believe that it is supposedly difficult to do this and only qualified specialists are capable of it. This opinion is erroneous, since today there are a million examples of how a driver who is not very well versed in details, but who received the correct information, does everything correctly.
Typical malfunctions of crankshaft seal units
A modern oil seal is a resource part. There are models that can operate up to 1 million kilometers. A standard oil seal will “live” approximately 100,000 km. When the structure of the seals is damaged, oil begins to leak. A leaking oil seal may not affect engine performance, but you should not delay replacing it.
The formation of oil stains or build-ups in the area where the crankshaft exits the engine is a sure sign that the oil seal assembly is leaking.
Leaking rear crankshaft oil seal
In case of critical wear, the oil seal may not withstand internal pressure and may move from its seat. If the seal is pushed out, the engine will likely lose a significant amount of oil, which can lead to unplanned repairs.
This is interesting: Technical characteristics of 4G18 1.6 l/98 - 122 l. With.
If the crankshaft oil seal on your car repeatedly squeezes out, or the leak does not stop after replacing the oil seal, it means that a wear has formed on the surface of the shaft, and the size of the oil seal is larger than necessary for sealing. A shaft with such defects must be restored or replaced.
Crankshaft wear from contact with oil seal
Changing the front oil seal
Replacing the front crankshaft oil seal of a VAZ 2101 is sometimes necessary when the driver discovers the front part of the engine contaminated with oil. This indicates that the oil seal has become unusable and is leaking oil.
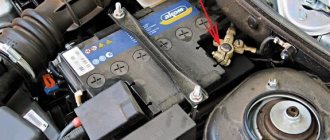
Don't forget to check the engine oil level. If something is wrong, top up and, if necessary, change the oil. The replacement process is again simple and will not cause any difficulties. Begin:
- Again, we lift the car onto an overpass or inspection hole.
Note. Due to the fact that the distance between the engine and the radiator is close and does not allow the oil seal to be installed without distortion, it is recommended to remove the camshaft chain cover.
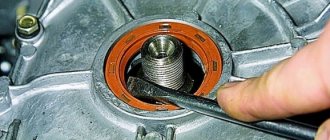
- take a suitable metal rod with a diameter of 7 mm and a length of 10 cm;
- We place it on the inside of the cover and hit the rod with a hammer, trying to knock out the oil seal.
Replacing the front crankshaft oil seal on a VAZ 2101
Note. Actually, it should come out without difficulty. But there are also times when you need to be a little patient.
Before installing a new cuff, you need to carefully inspect it for defects. So, it should not be too hard or, on the contrary, soft. Also, there should be no external damage on it, and there should be a spring on the working edge. On a VAZ 2101, replacing the front crankshaft oil seal requires lubrication of the new cuff. Only after this is the oil seal installed with the working edge facing inward, where the centering protrusions point.
Right oil seal
EXECUTION ORDER
1. Apply the handbrake, jack up the car front and rear and install it on the axle stands (refer to the Section Jacking, Towing and Changing Wheels). Remove the right front wheel.
2. Remove the front fender plastic molding and then the wheel arch locker.
3. Where available (early models with a separate wired air conditioning compressor belt), remove the air conditioning compressor drive belt (see Chapter Cooling and heating systems).
4. Remove the auxiliary drive belt (see Chapter Routine Maintenance).
5. Unscrew and remove the central bolt of the crankshaft pulley. In this case, the crankshaft must be kept from rotating by one of the following methods. On models with a manual transmission, the assistant must depress the brake pedal and place the transmission in the 4th gear position. Alternatively, a wide blade screwdriver can be threaded through the distributor hole (where provided) at the top of the transmission and wedged into the teeth of the starter ring gear. On models with automatic transmission, only the latter method is used. If the distribution hole is plugged, then the starter should be removed, as described in the Chapter Starting and Charging Systems, to provide access to the starter ring gear.
6. Remove the crankshaft pulley and bushing from the crankshaft. If they are tight on the crankshaft, carefully lever them in two places.
7. Please note that the oil seal is set deep, so to remove it from the oil pump housing, carefully pry it with a screwdriver. Otherwise, drill (punch) 2 small holes on opposite sides of the oil seal. Screw a pair of self-tapping screws into the holes and remove the oil seal using pliers, grasping the screws. Another way is to remove the oil pump cover (refer to Section Removing, Inspecting and Reinstalling the Oil Pump), and then remove the oil seal on a bench.
8. Clean the seat in the oil pump housing, then lubricate the lips of the new oil seal with clean engine oil and install it perpendicular to the oil pump housing. Please note that the seal must be installed with the closed side facing out. Using a suitable tubular wrench or a replacement socket that can only rest against the outer hard edge of the seal, gently knock the seal into place at the same depth inside the casing as it was installed before removal.
9. Install the crankshaft pulley and bushing onto the crankshaft journal. Insert the center bolt and tighten it to the required torque, keeping the crankshaft from rotating using one of the methods described in §5.
10. Reinstall the auxiliary drive belt (see Chapter Routine Maintenance).
11. Where present, reinstall the air conditioning compressor drive belt.
12. Reinstall the front wheel arch locker section and molding and tighten the screws.
13. Reinstall the right front wheel and lower the vehicle to the ground.
Left oil seal
EXECUTION ORDER
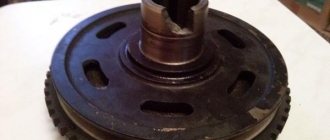
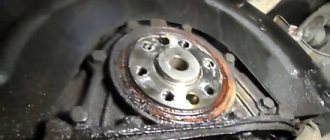
1. Remove the flywheel/drive disk (refer to Section Removal, inspection and reinstallation of the flywheel/drive disk).
2. Note that the oil seal is inserted deep inside the casing. Punch or drill 2 small holes on opposite sides of the seal. Screw a couple of screws into the holes and remove the oil seal with pliers, grasping the screws. Or use a screwdriver to remove the seal.
3. Clean the oil seal housing, then lubricate the lips of the new oil seal with clean engine oil and carefully install the oil seal onto the end of the crankshaft.
4. Using a suitable replacement socket or tubular wrench resting only on the outer, hard edge of the seal, push the seal into place to the same depth as before removal.
5. Wipe the oil seal clean, then install the flywheel/drive disk (see Section Removal, inspection and reinstallation of the flywheel/drive disk).
Some nuances that are important to know
So:
- In addition, it is important to know that the cuff should be hammered all the way. To do this, you will have to use a hammer, which you need to strike lightly. As for the mandrel, you can even use a suitable wooden block instead.
- In addition, you need to carefully inspect the gasket and if there are tears or any defects on it, then it must be replaced with a new one. It must be remembered that before installing the gasket, it should be lubricated on both sides with silicone-based sealant.
- You also need to know how to install the cover. So, you cannot immediately tighten the bolts, but only tighten them. Then use a special mandrel to center it and then tighten the cover.
- The remaining parts and assemblies are assembled in reverse order.
This video describes everything in detail. After watching it, you can learn how to change oil seals much faster.
- In addition, when changing the seals on the crankshaft, you should not ignore photos and pictures that depict various processes of dismantling and installing a new oil seal. It is useful to study the diagrams, design and generally necessary information stored on paper publications.
Replacing oil seals with your own hands is not difficult. Just be sure to carry out all operations as the instructions advise. And the price for services of this type in car repair shops and garages is quite high. So, by doing the replacement yourself, you can kill two birds with one stone - learn a lot and save a lot of money.
Oil seals VAZ-2106: types
KM "Credo" offers its customers the following oil seals for the VAZ 2106:
- steering shaft;
- gearbox input shaft;
- gearbox secondary shaft;
- front for crankshaft;
- rear for crankshaft;
- rear axle gearbox;
- bipod control shaft;
- axle shafts;
- pumps;
- hubs;
- valve
Thanks to our own production, VAZ 2106 car owners no longer need to spend a long time searching for a suitable reinforced cuff. We comply with all requirements of GOST 8752-79 and AvtoVAZ. Therefore, our oil seals and other spare parts are ideal for Zhiguli cars of the VAZ 2101-07 models, which are also called “classics” among car enthusiasts.
Any oil seal (VAZ 2106) from our company is manufactured exactly in the size required by the customer. And the use of only high-quality rubber guarantees a reliable and relatively long service life.
Very often, the rear axle oil seal (VAZ 2106) and other rubber parts from the Internet do not meet the established quality requirements. It is not uncommon to find cracks, delamination of material, or high roughness of the seal edge. These and other shortcomings not only cause a quick replacement of the part, but also increase the risk of failure of the engine itself.
Advantages of cooperation with MP CREDO
To avoid all the difficulties associated with spare parts for VAZ cars, it is necessary to order oil seals only from those that have been tested in St. Petersburg and the Leningrad region, offering favorable terms of cooperation. The client just needs to call and name the car model, as well as the required quantity of rubber goods. All orders are processed as quickly as possible, and each buyer receives a guarantee.
LLC "mp credo"
195279, St. Petersburg, Revolution Highway, 88
A leaking oil seal on the engine does not bode well for the driver, as this means that the engine is rapidly losing lubrication and it is only a matter of time before it seizes. This rule applies to all cars. It also applies to the VAZ 2106. The oil seals on the “six” have never been particularly reliable. However, there is good news: you can change them yourself. You just need to know how it's done.
Consequences
Now, let’s take a look at the consequences that can arise when oil regularly leaks from under the crankshaft oil seal. Located next to the front oil seal: if engine fluid gets on it, the belt may break faster during operation.
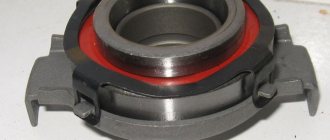
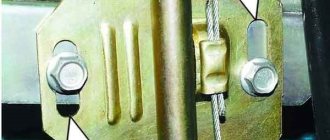
Installation of the front SCV
The clutch mechanism is located next to the rear oil seal, and if consumables get on it, the system will lose its friction characteristics. One way or another, in both the first and second cases, fluid leaks and engine contamination are inevitable,
There was a leak from under the front oil seal
It should be noted that a leak from under the oil pump gasket can also be confused with a leaking oil seal. These elements are located next to each other and the motor fluid in both cases will flow from one side. It is also worth adding that in this case the crankcase will be dirty, since any dirt that remains there will stick to the lubricant.
A broken timing belt is the worst outcome if the crankshaft oil seal leaks. Moreover, on many engine models, cases where engine valves were bent were recorded. In this case, the motorist will need:
- replace the timing belt;
- replace the cylinder head gasket;
- replace the valves, and grind them in;
- grind the engine cylinder head, since in 98% of cases it will be uneven and, accordingly, will not fit tightly to the engine, which will negatively affect the reliability of the power unit.
In addition, if the vehicle is regularly used, the pistons may be damaged by a leaking oil seal, since these are the elements that rub against the valves and can be damaged by them. Experienced car enthusiasts know that minor defects and irregularities on the piston surfaces will not in any way affect the operation of the power unit as a whole.
Installation of a new SCV
But in practice, there have been cases when the piston was simply pierced by the valve itself: in this case, the car owner will have to fork out for expensive repairs, almost a major one. After all, you will have to replace:
- directly failed piston;
- broken shaft valve;
- all liners around the circle will also need to be replaced;
- and change the crankcase gasket.
So, let’s summarize the total costs that a driver may experience in the event of a leak of engine fluid from under the oil seal:
- replacing the timing belt;
- changing valves, grinding them in;
- grinding the surface of the cylinder head;
- replacing the head gasket;
- adding lubricant to the engine, as well as antifreeze to the cooling system;
- It is also advisable to replace the cylinder head mounting screws;
- replacing the piston (if it fails);
- it may also be necessary to replace the piston rings;
- replacing the pan gasket.
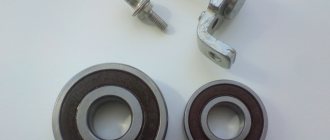
This is what the new front SCV looks like
A motorist who operates his vehicle with a leaking oil seal may face such consequences.
Rear oil seal leaking
Now let’s look at the consequences that the owner of a car with a leaking rear oil seal may face. As in the case of the front oil seal, the car owner will not have such catastrophic problems, but a leak in itself is already a significant problem. To solve it you will have to:
- dismantle the gearbox;
- remove the clutch mechanism along with the disc;
- remove the flywheel.
All this is needed in order to simply get to the oil seal. As for the consequences, if the rear element leaks, motor fluid can flood the clutch mechanism, as a result of which the device will lose its frictional characteristics. In this case, the vehicle:
- will significantly lose power;
- fuel consumption will increase (the driver gives gas, and the car also drives, respectively, gasoline consumption increases);
- you will have to add a lot of lubricant to the engine (all of it, of course, will not leak out, but you will have to add enough).
Fluid leak through rear SCV