Description and purpose of VAZ 2106 thresholds
Some novice car enthusiasts believe that the thresholds on a VAZ 2106 or any other car play only a cosmetic role and act as tuning. This is not true - car thresholds are important, namely:
- provide an attractive and beautiful appearance;
- serve to protect the body from mechanical damage, as well as from the negative effects of chemical reagents and external natural factors;
- provide ease of boarding and disembarking of passengers.
Thresholds perform a cosmetic and protective function
Load-bearing body element
If you look at the design of the VAZ 2106 thresholds, they consist of the following elements:
- outer panel - is in plain sight and is called a threshold;
- internal part - it can be seen from inside the car;
- amplifier - located inside the box;
- connector - visible if you look at the threshold from below.
A car threshold consists of several parts: an external and internal element, a connector and an amplifier
The rigidity of the car body is achieved by connecting the outer and inner parts of the threshold, the amplifier and the connector. Spot welding is used for this. The result is a box-shaped structure, which provides the necessary rigidity.
Read how to adjust wheel alignment on a VAZ 2106: https://bumper.guru/klassicheskie-modeli-vaz/hodovaya-chast/razval-shozhdenie-svoimi-rukami-vaz-2106.html
Jack sockets
The jack sockets are welded to the car body. If it is necessary to replace a wheel or other elements, you must raise the car. To do this, use a jack, which is inserted into a special hole on the jack socket.
The jack socket is used to install a jack and raise one side of the car.
To make it easier to install the jack in winter or slush, home craftsmen close the hole on the socket using a regular champagne cork. This way the nest always remains dry and clean. This not only allows you to quickly and easily insert the jack into it, but also extends the life of the entire jack socket.
Threshold decoration
In order to make the appearance of their car more attractive, many owners install special plastic trims and moldings on the sills.
Door sills
Threshold covers for the VAZ 2106 are plastic elements that are attached to the outer part of the threshold. The main advantages of installing decorative overlays:
- protection of thresholds from the negative effects of moisture, sand and dirt;
- prevention of premature corrosion;
- protection of paintwork from mechanical damage;
- the ability to hide minor defects;
- improving the appearance of the car.
Plastic door sills improve the appearance of the car
Moldings
Threshold moldings are rubber-plastic products that are attached to the standard places of the VAZ 2106. They are mounted with double-sided tape. The presence of hollow sections inside allows you to absorb minor mechanical shocks. Such elements also decorate the appearance of the car.
Threshold moldings can be chrome or black
Step-by-step instructions for replacing the VAZ 2106 threshold
First of all, you need to take care of the tool; I will list only some of the most important of them:
- Welding machine;
- Electric drill;
- Bulgarian;
- New thresholds;
- Primer;
- Dye.
A few words about the welding machine. The fact is that it is advisable for you to cook the thresholds semi-automatically in a carbon dioxide environment.
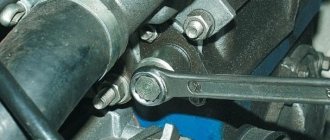
- I started by repairing the door hinges, I won’t describe how to do this, because the article is about how to replace thresholds, especially since yours may be in perfect order. Someone will ask what does the door hinge have to do with the threshold? The fact is that for proper operation you need to constantly monitor how the door will fit and what the gap between the door and the threshold will be. Sagging doors can be misleading.
- After repairing the doors, you can remove them and begin cutting out the unnecessary rotten part of the threshold. In my case, replacing the thresholds requires the mandatory dismantling of the wings, since I decided to replace them at the same time.
- If the car body is “decrepit” or rotten, install stretch marks in the interior.
- Now you need to cut off the outer part of the threshold; to do this, use a grinder or a metal file; a chisel is also an option.
- Having removed the outer part, proceed to remove the threshold amplifier (a wide metal plate with round holes around the entire perimeter).
6. In my case, there was no amplifier inside the threshold; most likely it was removed by the previous owner of my car.
- When all the rotten parts of the threshold have been removed, all that remains is to remove their remains that remain on the seams.
- After this, you need to properly clean the surface for subsequent welding work.
- Try on the new threshold amplifier and trim it if necessary.
- The holes drilled for welding are clearly visible in the photo.
- Weld the threshold reinforcement into place using the holes in the threshold reinforcement itself. You can make such holes using a 4-6 mm drill, approximately every 5-7 cm.
- For convenience, you can use clamps; with their help you can quickly and firmly secure the amplifier. Before installing the amplifier and starting welding work, you need to carefully prepare the surface of the body and all other irregularities that may interfere with a good connection.
13. Check again that the threshold is set correctly. When you decide that it is in its place, start welding the threshold amplifier. Personally, I used the parallel welding method, that is, simultaneously tack both the bottom and the top, starting from the central post. When the amplifier is welded, it is necessary to clean up the weld marks. You should get a perfectly smooth and even surface. Remember that the sill reinforcement must be welded to: B-pillar, A-pillar, etc.
14. When the amplifier is welded, you need to try on the outer part of the threshold. Is that all here too? Any excess is cut off or folded.
15. Now prepare the outer part of the threshold for installation. Your task is to remove transport primer, paint, etc. from the surface as thoroughly as possible.
16. Using self-tapping screws, you need to secure the outer part of the threshold. After this, you need to hang the doors and “figure out” whether everything fits together. Pay attention to the gap, it should be even and the same everywhere. Also pay special attention to the gap between the threshold and the door; nothing should protrude or stick out.
17. Welding is done from the middle post. You need to slowly move in both directions, that is, boil the bottom and top, going towards the front fender, as well as the bottom and top towards the rear fender. It should be remembered that the outer part of the threshold also needs to be welded to the middle A-pillar. Pay special attention to these two places, as they form the rigidity of the VAZ 2101 body.
When everything is installed and welded, start cleaning the surface, then everything needs to be primed and painted.
As they say, that's all for me! The replacement of the VAZ 2101 thresholds has been completed; if necessary, this work can be repeated in another place that needs repair.
DIY replacement
When replacing the thresholds yourself, you will need a gas welding machine, a set of parts and the necessary tools for cutting or cutting out the element:
- power screwdriver;
- chisel;
- spot welder, spotter or MIG welding;
- electric drill;
- metal brush.
To clean and align the element after welding you will need:
- automotive putty;
- primer;
- sandpaper R-80;
- anti-corrosion mastic;
- enamel.
The procedure for replacing thresholds using welding is step by step:
- Place the car on a flat surface.
If the body is old, then in order to avoid distortions and to maintain the required size of the gaps, install braces in the doorways.
- For ease of operation, dismantle the doors, having previously marked the position of the hinges on the body.
- Use a chisel or grinder to cut off the outer panel of the part.
- Remove the amplifier.
- Clean the seat from corrosion with a chisel, drill with an attachment or grinder.
- Try on the amplifier, modern replicas can be several centimeters longer than necessary, cut off the excess part.
- Weld the amplifier, first securing it with welding clamps or pliers.
- Try on the outer part of the threshold, remove the shipping primer from the factory part.
- Treat the panel with an anti-corrosion compound, install the outer part with screws or secure with clamps.
- Install the doors, check the gaps and the length of the part, which should not exceed the length of the door.
- Weld the outer part, start welding from the place of the central pillar, then work the seam left and right.
- Weld the connecting strip at the bottom of the threshold.
- Clean the welds with a grinder and sandpaper.
- Prime, treat uneven areas with putty, and paint at the final stage.
Costs for replacing VAZ 2110 thresholds
The work of replacing thresholds involves the use of both welding and abrasive tools. Carrying out painting, puttying and other work. In other words, this is an enterprise that should last at least several days with fairly good labor productivity. The easiest way to work is with a semi-automatic welding machine, with which anyone can learn how to weld.
If you don’t have it, then you probably shouldn’t run to the store. You can always contact your friends or a specialized workshop. After all, the unit costs approximately more than 15 thousand rubles. For a full repair of a VAZ 2110 at a service station, you will be asked for approximately 3 thousand rubles. And, as you understand, it will last for ten years. Let's estimate how much all the necessary materials cost to carry out the repairs yourself.
From the tool you will need:
- welding unit (the most convenient and simplest option would be semi-automatic welding);
- Bulgarian;
- grinding tool;
- electric drill;
- locksmith tool.
By the way, we do not specifically indicate the prices for the tool, since buying it solely to repair the thresholds of a VAZ 2110 is truly pointless. Now let's similarly determine the necessary materials:
- carriage for an angle grinder, about 300 rubles;
- several cutting discs for the grinder, because you will have to cut a lot of metal (about 300 rubles);
- cleaning wheels, we also buy several pieces and give 150 rubles;
- thresholds for the right and left parts of the car with amplifiers. Only 2000 rubles.
- associated costs (for example, a VAZ repair kit for a rotten bottom or rear wing), approximately 1000 rubles;
- jar of mastic, 200 rubles;
- soil, 200 rubles;
- other expenses for small materials and spare parts (brushes, solvent, drills, etc.), 300 rubles.
Having carried out a simple calculation, let's determine the material benefits of self-repair. Let's put aside the cost of the sills, wings and bottom. It turns out that you, one way or another, spend about 1,500 rubles on materials. Thus, the savings, taking into account the cost of repairing VAZ 2110 thresholds at a service station, will be about 1,500 rubles. In terms of time costs - several days (at least two or even three).
Body restoration
Replacing thresholds for Lada 2106 (VAZ 2106)
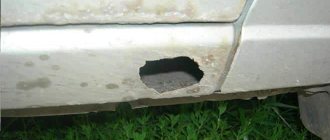
Thresholds need to be replaced only after an accident or only after they are simply tired, i.e. Corrosion developed on them and they simply collapsed. The threshold on a VAZ 2106 car is a simple structure that consists of an outer panel, a connector and an amplifier, which are all spot welded to the body. To carry out all work reliably and for convenience, it is best to remove the front and rear doors. You also need to remove the aluminum trim on the threshold and lift the mat a little.
It is best to remove the old thresholds on the VAZ 2106 in parts; work should start from the front door, then gradually move to the rear, and at the end you need to remove the threshold from the B pillar. Thresholds must be removed correctly, because problems may arise when installing new thresholds. You need to use a marker to place the spots for spot welding, after which you need to drill them out with a drill. All this needs to be done in the garage. If the threshold is so badly damaged, it is best to purchase new ones and install them in place of the old ones.
There is an even more crude method - we cut out the fastenings of the thresholds with a grinder. We thoroughly remove corrosion from the surface, but heavily damaged areas need to be removed. Now we need to install new thresholds. First you need to carefully adjust the connector. Then you need to do some welding, cut off part of the amplifier, and make a small cutout near the middle pillar. The lower part of the amplifier needs to be leveled and welded to the connector location. The outer panel needs to be adjusted as accurately as possible, and then the threshold needs to be adjusted into place, all gaps should be minimal. You need to carefully remove the shipping soil from the welding site and make holes for future welding. We secure the outer panel with clamps or self-tapping screws. Through pre-prepared holes you need to weld the bottom of the panel to the amplifier, and the connector needs to be welded to the VAZ 2106 amplifier. Metal needs to be fixed on top of the threshold, and patches need to be welded under the bottom. The last stage is ahead - clean the surface, apply putty, and seal the welds on the outer panel. Then comes the priming and painting of the surface. We install the doors in their original place.
In order for the thresholds to serve faithfully for several more years, they must be treated with an anti-corrosion agent. The easiest way is to apply a special varnish, mastic or impregnation to metal parts. You must always remember that real high-quality products cannot be very cheap, especially since all these products must be applied in a very thick layer. You can apply a cheap mixture, but there is a chance that it will not accept the metal surface of the thresholds.
The next treatment option is electrochemical protection. There is still no definite correct answer to such work, so this should be carried out in specialized service centers, taking into account all rules, standards and providing a guarantee. The principle of operation of electrochemical protection is that special electrodes are placed on the surface and then a normal current is passed through it. Electrodes, which are made of a special alloy, take on all rust. Such protection will last for about three years and after that the process of similar work will need to be carried out again. A large number of car owners want to save on repairs and simply install ordinary plastic protection on the thresholds. In this case, the problem is not solved, it is only masked.
Replacement of thresholds on a VAZ 2106 car is carried out in the event of either their complete failure due to corrosion, or in case of various damage that is difficult to repair. Most often, thresholds are changed due to corrosion. And so, if you decide to replace the thresholds and do not know how to do it correctly, we recommend that you read the following instructions, which will certainly help you complete the work correctly and, most importantly, at a high-quality level.
For work we will need the following tools: a hammer, a flat screwdriver, a sharp chisel, gas welding, spot welding for attaching new thresholds, if there is no spot welding, MIG welding will come to the rescue, a drill is possible, and that’s all in principle. Well, plus in the compartment you can prepare various devices for cleaning the internal cavities from corrosion, which we will see after dismantling the thresholds.
- First of all, we need to prepare a base for the work. The doors can be removed at your discretion, but if you are sure that they will not interfere with you, then we leave them. Of course it's best if you take them off. Clean the work area from dirt, if any.
- We will dismantle it using a drill with a drill, which we will use to drill out the welding points located on top under the door seals, as well as below along the entire length of the thresholds. In principle, you can cut through the bottom with a grinder with a cutting disc, and then, after removing the threshold, the remaining metal can be blown off with a gas torch or cut off with a hacksaw, or maybe you won’t have to cut anything down at all if everything is rotten there.
- Near the central pillar you will have to cut the metal a little using a sharp chisel.
- After the threshold is removed, you will probably see a not very pleasant picture, due to the fact that everything will be covered in dirt and rust, it doesn’t matter, you will see a threshold amplifier, which is an ordinary rectangular sheet of iron with stamped rigidity holes in the center and along the entire length. This amplifier also needs to be removed, since most likely it is no less rusty than your threshold. We carry out dismantling using the same methods; we will not invent anything new.
- Now that everything has been removed and nothing is bothering us, it is necessary to carry out anti-corrosion treatment of the cavity.
- After anti-corrosion treatment, you can begin adjusting and installing the threshold amplifier and the threshold itself. After the parts are adjusted to their seat, they must be fixed with clamps and only then welded along the edges. Of course, it is best to use spot welding for these purposes, but not everyone has it, so MIG welding can be used as an alternative. A particularly extreme option is to use gas welding; when working with it, do not forget that it heats up the metal greatly and may distort the surface.
After installing the thresholds, we carry out the final work on smoothing the weld seams, if required, and begin preparatory work before painting, puttying, priming and painting. At this point, the work on replacing the thresholds of the VAZ 2106 is completed.
Purpose, protection, repair and replacement of thresholds on the VAZ 2106
The first copies of the VAZ 2106 rolled off the assembly line more than 40 years ago. Despite this, many of them continue to be used today. It is clear that over time, on any, even the highest quality, car, problems appear not only with the paintwork, but also with some parts of the body. One of the parts that most often corrode is the sills. Having the necessary tools and basic skills, you can protect, repair or replace the thresholds on a VAZ 2106 with your own hands.
Repair without welding
Thresholds 2106 are very rarely repaired without welding. This is due to the fact that the “youngest” car is 13 years old, such a service life for metal is critical. If necessary, you can patch corrosion holes with metal patch or use epoxy resin, putty or fiberglass. Necessary tools that will be needed for repair:
- sandpaper R-80;
- fiberglass cover;
- epoxy resin;
- rubber spatula, roller (optional);
- solvent;
- rust remover;
- automotive putty;
- aluminum powder;
- primer;
- enamel.
On our website you will find:
- current information about Lada, new products in production and news related to the brand;
- statistical data on sales and the place of the Russian automobile industry in both the local and international markets;
- useful tips on operation, repair and maintenance of VAZ cars;
- all the most important information that will help you when repairing VAZ cars;
- reviews of the most common problems faced by machines.
If you have any questions regarding the repair of your car, materials and spare parts for it, you can get advice from a specialist. To do this, go to the CONTACTS section and send your question. You will find this and much more about the features of domestic cars on our portal OLADE.RU
Anti-corrosion treatment of thresholds
In order to delay the repair or replacement of thresholds on the VAZ 2106 as much as possible, it is enough to carry out their anti-corrosion treatment correctly and on time. Experts recommend anti-corrosion treatment of thresholds once every two years. This will be enough to prevent corrosion from damaging the specified element. It is advisable that the first treatment be done by specialists, and only then can you maintain the threshold in a normal state on your own.
To treat the thresholds yourself, you need to buy an anti-corrosion agent, it can be Car System, Novol, Rand or similar. You will also need anti-rust liquid, a metal brush, and sandpaper. The following work is carried out wearing personal protective equipment:
- The car must be washed and dried well.
- Use a brush and sandpaper to remove rust from the threshold.
- Coat the surface with rust preventative and allow it to dry completely.
- Treat the thresholds from the inside with an anti-corrosion compound. It can be either liquid or in the form of an aerosol.
The anti-corrosion compound completely covers the inner surface of the thresholds
From the outside, you can treat the car's thresholds with anti-gravel or gravitex. To do this, the car body is closed and only the thresholds are left. The purchased composition is applied from a spray can in several layers, and each layer must dry for at least 5 minutes. It is enough to apply 2-3 layers.
Anti-gravel or gravitex is used to cover the outer part of the threshold
More about VAZ 2106 body repair: https://bumper.guru/klassicheskie-modeli-vaz/kuzov/kuzov-vaz-2106.html
Video: filling thresholds with Movil
Description and purpose
Technologically, the threshold is a hollow box welded to the bottom of the car using gas or electric welding. Structurally, the part consists of four parts connected to each other by spot welding; the total length of the part corresponds to the length of the sidewall. The design includes:
- Overlay or outer part. A metal plate that is located on the outside of the car. Spot welded to the amplifier.
- Amplifier. The power load element is a plate of perforated stamped steel, welded to the bottom of the car.
- Connector. The element is visible from below the body and connects the inside of the sill and the amplifier.
- Inner part. A strip visible from inside the cabin that is attached to the amplifier and the base of the underbody.
Thresholds for all models of the VAZ line belong to the load-bearing elements of the body, which bear up to 25% of the force and vibration load. Factory welding covers the sill edges of the front and rear fenders, which are overlap welded to the part. When completely replacing an element, it is possible to cut out the threshold without dismantling the wings. The cutting runs near the factory welds. In addition to power load, the elements provide protective and decorative functions:
- They give the car a finished look and aesthetics.
- Protect the underbody and interior of the body from corrosion due to the penetration of salt reagents and moisture.
- They take on the mechanical impact from gravel flying during movement and impacts when moving over obstacles.
Length and other dimensions
Replacing threshold 2106 according to the work algorithm is similar to repairing a unit for all cars in the line. It is allowed to use the amplifier, linings, external and internal parts from adjacent models. The thresholds for the model range 2101-21074 are classics, they have a factory length of 1520 mm, a height of 50 mm, a metal thickness of 8 mm and belong to the “body side” catalog group, article numbers 2101-5401061-10.
Strengthening thresholds
To enhance the thresholds, you can purchase a factory amplifier. Often home craftsmen make it themselves, using a metal strip 125 mm wide and 2 mm thick. A piece of the required length is cut from it, in which holes are made every 6–7 cm, and the amplifier is ready. To obtain maximum body rigidity, some craftsmen strengthen the sills using a profile pipe.
To obtain maximum body rigidity, some craftsmen strengthen the sills using a profile pipe
To strengthen the location of the jacks, you can additionally weld a metal plate, and only then fix the jack.
The final stage of work. Finishing and painting
After completing the welding work, all that remains is to process the seams with a cleaning disk and roll the lower part of the VAZ 2110 threshold (clamp it onto the connector). You can take a few breaths, then it will be easier. From the outside, treat the car with a primer. Inside the cabin, the bottom is initially treated with mastic, then a layer of polyethylene is laid down, then back with mastic, sound insulation and carpet.
All that remains is to collect all the other parts in their places and you can hit the road again. Be prepared that the total scope of work may take at least three to four days. As you understand, having certain skills and tools will allow you to save a considerable amount of money, but it also takes a lot of time, so it’s up to you to decide whether it’s advisable to restore the VAZ 2110 thresholds yourself.
Preparing to replace the threshold
- You need to lift the car and level it. It is better that the body is supported evenly at several points to avoid body distortion.
- When completely replacing the threshold, it is better to remove the doors. This will give good access and prevent damage to the doors during welding. When removing doors, it is better to leave the hinges on the body so that their position does not change. In most cases, it is also necessary to remove the front fender. Removing the front fender may require additional disassembly. So, for example, you will have to remove the front bumper and headlight.
- If the threshold is being replaced due to its corrosion, then it is necessary to clean the area around the rusty areas with a reserve in order to determine the boundaries of the rust. This way you can understand which areas of the threshold can be left and which need to be cut out.
- To replace the thresholds, it is necessary to dismantle some interior parts, such as plastic cladding, seats, and rubber seals. Carpeting can be rolled up.
- Protect your car's paintwork, glass and interior from sparks from welding and grinders.
- Before welding, you need to disconnect and insulate the battery terminals.
| See all advertisements in the archive |
Replacement of thresholds of VAZ 2107
Replacing the thresholds of a VAZ 2107 is a job that sooner or later all owners of the “Seven” have to face. In this article we will look at how to replace thresholds with your own hands, list the materials and tools for work, and also tell you about the reasons for corrosion of VAZ 2107 thresholds.
Causes of corrosion of VAZ 2107 thresholds
- Untimely treatment with anti-corrosion agents. On classics you need to carry out anti-corrosion treatments once a season and preferably before winter.
- Damage to the threshold and poor quality repairs. In this case, through corrosion may develop after 2-3 years.
- Damage to external anti-corrosion protection by stones.
- Drainage holes in thresholds clogged with debris. The drainage holes throughout the body need to be cleaned once a year.
- Operating a car in winter on roads where reagents are used. Salts and sand settle on the thresholds of the car and after a while “break through” the anti-corrosion coating. If you operate your car on roads where reagents are used, you should wash it at least once a month and preferably with warm water.
Selection of spare parts
The threshold on the VAZ 2107 consists of three parts:
- Faceplate.
- Amplifier inside.
- Connector.
Thresholds corrode differently for everyone, but, as a rule, if through holes appear, then all three parts need to be replaced.
- Right threshold 21010-5401060-00;
- Left threshold 21010-5401061-00;
- Amplifier 21010-5401100-00;
- Connector 21010-5101068/69.
Tools and materials for work
To repair thresholds on a VAZ 2107, you will need a lot of different tools and processing materials. Below is a list of tools and materials without which it is impossible to make a high-quality replacement of thresholds.
- Semi-automatic welding machine with accessories;
- Power tools (grinder, drill and accessories);
- A set of keys and sockets (for disassembling the interior);
- Ratchet driver;
- Hammer;
- Knife for chopping metal;
- Kerner;
- Marker;
- Compressor;
- Pneumatic gun for applying anti-corrosion agents;
- Several body pliers;
- Spray gun;
- Epoxy primer;
- Degreaser;
- Putty (with fiberglass and finishing);
- Red scotch-brite;
- Solvent;
- Sealant for welds;
- External anti-corrosion agent for application with an air gun (for example, Teroson RB2000, Body 951);
- Internal anti-corrosion agent for application with an air gun (e.g. APP-F400, Dinitrol ML, TecTyl 210R).
Step-by-step replacement process
- Start by completely disassembling the interior, removing seats, upholstery, and carpets.
- For ease of operation, dismantle the doors.
- Protect your car windows from sparks when welding and using an angle grinder.
- Disconnect the battery terminals and place the vehicle on a pit or tipper.
- Take the new threshold and place it on top of the old one. Next, use a marker to mark the lines along which you will cut the old threshold. From the factory, the edges of the threshold go under the front and rear fenders and are welded with an overlap.
- After drilling, use a knife to separate the threshold from the body along the resistance welding line.
- Drill out the resistance welding points and separate the amplifier from the body.
- Assess the condition of the connector and replace it in whole or in part.
- After welding the connector, clean off any minor rust with a grinder and prime everything with epoxy primer.
- Prepare the amplifier for welding, cut and prime where necessary.
- Drill holes at the resistance welding points at the top and bottom. Next, clean the soil in the weld areas and weld the amplifier.
- After welding, clean everything and prime with epoxy primer.
- Prepare the threshold for welding, cut it to size and drill holes at the resistance welding points.
- Clean the transport primer from inside the threshold and prime the threshold with epoxy.
- Install the threshold on the body and secure it with body pliers.
- Make “pot mitts” and slowly scald the threshold around it.
In our case, in addition to the threshold, the pillar between the doors was also damaged, so two patches were welded onto it. Clean the weld seams and clear the transport soil from the threshold. - Prime the threshold with epoxy primer and let it dry thoroughly.
- “Stuff” the groove on the ground with Scotch Brite and apply sealant to the welds in the right places.
- If necessary, fill the face welds.
- Apply external corrosion protection using an air gun.
- After all work has been completed, apply an anti-corrosion compound to hidden cavities.
The process of replacing VAZ 2107 thresholds is clearly shown in this video:
Let's summarize
In order to replace thresholds, you need to have many different tools, as well as have welding and painting skills. If you do not have the tools or space for repairs, we recommend turning to professionals. It will be much cheaper and faster. The price of replacing one VAZ 2107 threshold at a service station (with treatment) is from 7 to 14 thousand rubles.